Table of Contents
Advertisement
Quick Links
Advertisement
Table of Contents

Subscribe to Our Youtube Channel
Related Manuals for AOC MW1031-3G


Summary of Contents for AOC MW1031-3G
-
Page 2: Table Of Contents
Table of Contents 1.1 Functions overview ............................1 1.2 Notes ................................1 1.3 Packaging list ..............................2 1.4 Technical specifications ..........................2 CHAPTER 2 BUTTONS AND APPEARANCE..................4 CHAPTER 3 INSTALL AND UNINSTALL SIM OR USIM CARD ............. 6 CHAPTER 4 EASYCONFIG........................7 CHAPTER 5 BASIC OPERATIONS ....................... - Page 3 6.2.2 Editing text ............................16 6.3 Notification bar ............................17 6.3.1 Opening notification bar ........................17 6.3.2 Closing notification panel ........................ 17 6.4 Recently run apps ............................17 6.5 Changing wallpaper ............................ 17 6.6 Power control .............................. 17 CHAPTER 7 APPS ..........................19 7.1 Apps interface .............................
- Page 4 CHAPTER 9 COMMON TOOLS ......................32 9.1 E-mail ................................32 9.1.1 Opening e-mail ..........................33 9.1.2 Creating and sending e-mails ......................34 9.1.3 Receiving and reading e-mail ......................35 9.1.4 Replying / Forwarding e-mail ......................35 9.1.5 Managing e-mail ..........................35 9.1.6 Email Settings ...........................
- Page 5 10.3.4 Backup & reset ..........................46 10.4 ACCOUNTS Settings ..........................46 10.5 SYSTEM Settings ............................46 10.5.1 Data & Time ............................. 46 10.5.2 Accessibility ............................ 46 10.5.3 About device ........................... 47 CHAPTER 11 USING MICRO SD (TF) CARD ..................48 CHAPTER 12 ABOUT THE BATTERY AND POWER ................
-
Page 6: Functions Overview
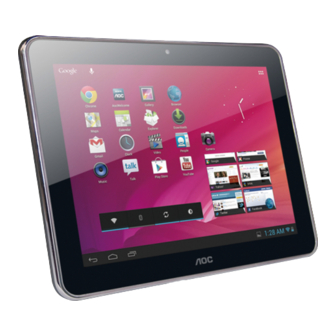
CHAPTER 1 PRODUCT OVERVIEW 1.1 Functions overview 9.7 inch wide screen True Color TFT touch screen with a high resolution of 1024*768 pixels. Surf the Internet wirelessly via Wi-Fi or 3G network to enjoy the Internet on the go. Get the location and navigation via GPS or Wi-Fi. Support all mainstream e-mail services for more convenient e-mail sending and receiving. -
Page 7: Packaging List
W a r r a n t y S t a t e m e n t Note: The actual accessories provided with the product may vary. 1.4 Technical specifications Basic specifications Model no. AOC Tablet MW1031-3G Android OS 4.x Installed OS Processor (CPU) 1.6GHz ARM Cortex A9 Duo-core & Quad-core GPU Memory 1GB,DDR3... - Page 8 Power specifications Voltage Supply voltage: 5V Charging voltage: 5V Max. current for playback is 1.5A DC. Current Max. current for charging is 1.3A DC. Built-in lithium-ion polymer rechargeable battery, 3.7V, Battery used 7000mAh AC input:100-240V 50/60Hz DC input:5V 2.5A Power adapter It takes about 7 hours for the battery to be fully charged when the provided charger is used while powered-down.
-
Page 9: Chapter 2 Buttons And Appearance
Chapter 2 Buttons and Appearance A B C D A. Build-in Microphone B. Operation indicator C. Power button D. Volume +/- buttons E. Front camera F. Touch screen G. Headset jack H. HDMI jack I. Mini USB port (connecting to PC) J. - Page 10 Note 1: During operation, sounds will be automatically output from the Audio speaker if there is audio output. Note 2: In the Instructions, “Press” means pressing a button while “Press and Hold” means continuously pressing a button for 2 ~ 3 seconds.
-
Page 11: Chapter 3 Install And Uninstall Sim Or Usim Card
Chapter 3 Install and uninstall SIM or USIM card Install 1. Shut down your tablet. 2. Insert the SIM or USIM card with the gold-colored facing up. 3. Push into card slot until it is fully inserted and locks inside the product. Uninstall 1. -
Page 12: Chapter 4 Easyconfig
Chapter 4 EasyConfig When first using your Breeze tablet, the EasyConfig application will launch and walk you through the basic setup where you will select your Language, Date/Time and Wi-Fi settings. Touch "Next" to start EasyConfig Step 1, Language, and then choose a language you want. Touch "Next"... - Page 13 Touch "Next" to go to the Wi-Fi settings interface. Touch "Menu icon ( ) -> Scan" to search for the available wireless networks in the vicinity. Touch the desired wireless network name to connect to it. You will be prompted, if a password is required. 1.
- Page 14 2. If you use dynamic IP address keep the default "DHCP" in the “IP settings” option. Note: The word "Connected" displayed under the network name indicates a successful connection. Afterwards you can surf the Internet, connect to email services, etc. If Wi-Fi has not been connected, 3G network can be used for surfing the Internet.
-
Page 15: Chapter 5 Basic Operations
Chapter 5 Basic Operations 5.1 Main interface After booting and unlocking, you can go to the main interface (as shown below). A. Quick search box Touch to begin search B. Voice Search Touch for voice search C. Apps icon Touch to go to Apps and Widgets Interface D. -
Page 16: Shutdown
directly into camera mode. 5.3 Shutdown In any mode, Press and hold the Power button for about 2 seconds. The device shutdown window will appear: a. Power off: Touch to turn off the product. b. Airplane mode: Touch to turn on or turn off Airplane mode. c. -
Page 17: Volume Adjustment
1. While the product is on, plug the smaller end of the provided USB cable to the MINI USB port on the side of it, and the larger end of it to a USB port on PC. 2. If the "Media device (MTP)" option is selected, (in Storage Settings / menu / USB computer connection), the device is connected as a media device and you can transfer any files on Windows PC, or using "Android File Transfer"... -
Page 18: Adjusting The Alarm Volume
· In the apps interface, touch “Settings -> Sound -> Volume” , touch the media volume bar to adjust the volume after the Volume window appears. 5.8.2 Adjusting the alarm volume · In the apps interface, touch “Settings -> Sound -> Volume”, touch the alarm volume bar to adjust the volume after the Volume window appears. -
Page 19: Gps
Place and slide your finger on the screen. Slide your finger up or down to scroll up or down; or if the list has a scroll bar, slide your finger up or down in the list to page down or up; when you are browsing pictures, slide your finger to the left or to the right to view the previous or next picture. -
Page 20: Chapter 6 Common Features
Chapter 6 Common Features 6.1 Landscape/Portrait display switching 1. In the “Settings” interface, touch “Accessibility ->Auto-rotate screen.” When the “√” symbol appeared, the Landscape/Portrait screen display switching is on; when the “√” symbol disappeared, the Landscape/Portrait screen display switching is off. 2. -
Page 21: Editing Text
A. Show box: Show the text typed. Touch and hold this box to display the Edit Text menu for you to cut, copy, and paste the text. B. Tab:Touch this key to switch to next input table. Touch Shift key and then touch this key to switch to previous position. -
Page 22: Notification Bar
Cut text typed Copy Copy text typed Paste Paste cut or copied text Share Share the selected text via Bluetooth, Gmail or Email. 6.3 Notification bar The notification icon appears when a message is received, PC is connected, or music is played. You can open the notification bar to check for messages and played music. - Page 23 widgets interface, find “Power control” widgets. Touch and hold the widgets icon to move it to main interface, as the picture show below: A. Wireless network on/off Touch to turn on or off the wireless network. B. Bluetooth Touch to turn on or off the Bluetooth. C.
-
Page 24: Chapter 7 Apps
Chapter 7 Apps Make sure the Wi-Fi wireless network connection is established to use the following functions. 7.1 Apps interface Touch the Apps & Widgets icon at the right corner of the main interface to go to the Apps interface, as shown below: 7.2 Browser Open the browser to enjoy a colorful experience. -
Page 25: Going To A Webpage
A. Back icon Touch to go to previous webpage. B. Next icon Touch to go to next webpage. C. Refresh icon Touch to refresh the current webpage. D. Close icon Touch to close the current tab. E. Add icon Touch to open a new tab. F. -
Page 26: Managing Bookmarks
Selecting link in webpage The selected link will be put in a blue box. · Touch it to open a webpage. · Touch and hold to open the Actions menu, Open, Open in new tab, Save link, Copy link URL and Select text. -
Page 27: Other Functions
Touch “☆” to add the current webpage to bookmark. Opening bookmark In the “Bookmark” interface, perform any of the following steps to open a bookmark: · Touch the bookmark you want to open. · Touch and hold the bookmark you want to open, and touch “Open” or “Open in new window”. Editing bookmark 1. - Page 28 Touch the screen to show the Hide menu: A. Add video bookmark B. Adjust screen brightness C. Touch: Previous video file D. Play/pause Touch and hold: Rewind E. Touch:Next video file F. Screen extension:Touch to select, Full Screen, Normal, Touch and hold: Fast forward 16:9, 4:3 Touch to display the video in floating mode.
-
Page 29: Delete Video
Note 1: It takes a longer time to start playing a larger formatted video file. Convert video files that exceed the max. resolution supported by the unit. Note 2: For some supported video sources, a few video files that are partly damaged may not be played by the unit. Convert them on the PC and play the converted files on unit. -
Page 30: Playing Audio
Touch and hold “Recently added” to play or edit the time of the “Recently added” list. In the music file list, touch and hold a song or a folder, then touch “Add to playlist” to add the song to a new playlist or other playlist. -
Page 31: Sound Effects
Stop after the end song is played. C. Play mode Repeat playing all songs in the current directory. Repeat the current song. D. LRC Touch to show or hide lyrics. When the network connection is established, touch it to check File info the link information about the currently played music file. -
Page 32: Picture Browser
7.5 Picture browser In the “Apps” interface, touch “Gallery” to go to the picture list. Tip: The system will automatically search for all pictures on Flash memory, SD card and USB device and display them as folders. 7.5.1 Browsing pictures In the directory, touch the pictures you want to browse to open the picture browsing interface. -
Page 33: Picture File Operation
A. Share icon Share the current picture through Bluetooth, Picasa, Gmail, or Drive. B. Trash can Delete the current picture. C. Menu Touch to show the menu options. Touch the menu icon to show the menu options Slideshow Automatically browse pictures. Edit Touch to edit the current picture. -
Page 34: Camera
A. Done Finish the operation. Show the number of the selected picture. Touch a picture to be B. X items selected selected or unselected C. Share Share the pictures through Picasa, Bluetooth, Gmail or Email. D. Delete Delete the selected pictures. E. - Page 35 QVGA (320 X 240) Recording Videos Mode File Size Default 640 X 480 Note: You can view and edit the photographs and recording videos on your computer in path: AOC TABLET: \Nand Flash \DCIM\Camera\ -30-...
-
Page 36: Chapter 8 Apps
Chapter 8 Apps In the main interface, click “Apps” icon to go to the “Apps” interface in which the installed apps will be shown. 8.1 Moving a program icon to another interface To create a program alias icon and move it to other interfaces, touch and hold the program icon and the screen will switch to last interface viewed. -
Page 37: Chapter 9 Common Tools
Chapter 9 Common Tools 9.1 E-mail When you use the e-mail for the first time, you need to create an e-mail account first. 1. Enter the address and password for your e-mail account and touch “Next”. 2. Select an account type. Touch “POP3” for a POP3 account. 3. -
Page 38: Opening E-Mail
4. Touch “SMTP Server” and “Port”, enter “smtp.+ account suffix” and port number, for example “smtp.163.com”.Then touch “Next”. 5. Set the account options and touch “Next” to finish settings. Note: Since the e-mail service providers may vary, configure the server settings based on the actual e-mail account. This product can support the accounts provided by the popular e-mail service providers, such as Yahoo, Sohu, etc. -
Page 39: Creating And Sending E-Mails
Tip 1: By default, this product can be used to browse the inbox after the e-mail app has synchronized with email provider. All e-mails you received will be put into the inbox. Tip 2: Touch “ ” icon to send or receive a new e-mail and synchronize your e-mails with your e-mail accounts. 9.1.2 Creating and sending e-mails 1. -
Page 40: Receiving And Reading E-Mail
Tip: When you compose your e-mail, touch the “Save draft” or back icon to save your e-mail to Draft. 9.1.3 Receiving and reading e-mail When a new e-mail is received, the notification bar will show the new e-mail icon. Perform one of the following to read your e-mail: ·... -
Page 41: Email Settings
“ ” Delete Delete an e-mail “ ” Mark as read/unread The unread e-mails in the Inbox are highlighted with white background. Menu Touch to show more options. 9.1.6 Email Settings In the e-mail interface, touch the menu icon, and touch “Settings” to go to the e-mail settings interface. Touch “Add Account”... -
Page 42: Alarm
Note 1: The recorded file can be automatically saved in flash so that you can find them in the AudioPlayer “ playlists ->My recordings” to play. Note: The naming rule of the recorded file: recording_Year+Month+Date+serial number. 9.3 Alarm In the “Apps” interface, touch “Clock” to the clock interface. Touch “Set alarm”... -
Page 43: Delete Alarm
9.3.2 Delete alarm Touch and hold the alarm you want to delete and touch “Delete alarm -> OK” to delete it. 9.4 Calculator In the apps interface, touch the “Calculator” icon to go to the calculator interface. You can perform the basic math operations by this calculator. 9.5 Explorer In the “Apps”... -
Page 44: Chapter 10 Settings
Chapter 10 Settings In apps interface, touch the “Settings” icon to go to the “Settings” interface. 10.1 WIRELESS & NETWORK Settings 10.1.1 Wi-Fi network connection Connection 1. Touch “Wi-Fi” to enter into Wi-Fi settings interface. 2. Slide the slider to right to enable Wi-Fi and scans for available wireless networks. 3. - Page 45 Note 3: Auto search for Wi-Fi is performed, i.e., no additional steps are required to connect to the Wi-Fi network. For some closed wireless networks, the username or password may be required. Note 4: The availability of Wi-Fi signals may depend on the distance, infrastructure, and objects through which a signal must pass.
-
Page 46: Bluetooth Connection
10.1.2 Bluetooth connection Turn on Bluetooth 1. Touch “Bluetooth” to enter into Bluetooth interface. 2. Slide the slider to right to enable Bluetooth and the Bluetooth zone show the name of the available Bluetooth device. 3. Tap the menu icon at the top right of screen. Rename Device Touch to change the name of your device. -
Page 47: More
Mobile data: Enable to set to use data connections on any mobile network. Set mobile data limit: Set a limit for the mobile data usage. Data usage cycle: Change the settings for the limit cycle. To use more options, select “ ”. -Data roaming: Set to use data connections when you are roaming. -
Page 48: Device Settings
UMTS network connected 10.2 DEVICE Settings 10.2.1 Sound Music, video, Set the media volume for music and video. games & Touch the volume bar to adjust the volume other media level. Volumes Set the notification volume by touching the Notifications volume bar to adjust the volume level. -
Page 49: Screenshot Setting
10.2.4 Screenshot Setting Select delay time to capture Screenshot will be delayed according to the the screen selected time. Set the location of screenshot Set a location to store the screenshots. storage Show the screenshot button Click on check-box to display the shortcuts in the status bar screenshot camera-icon on status bar. -
Page 50: Battery
It lets you transfer photos using camera Camera(PTP) software. Use Mass Storage to share files (Mac or Mass Storage Windows). 10.2.6 Battery It shows the status of battery and the elapsed time of use 10.2.7 Apps Manage and delete installed apps: For uninstall apps, clear data, clear cache, clear default and force stop. 10.3 PERSONAL Settings 10.3.1 Location services Google’s location... -
Page 51: Language & Input
10.3.3 Language & input Language Select language for device Spell checker Select to enable spellchecker. Personal dictionary Add & remove words form user dictionary Default Set the default input method. Android keyboard Touch settings icon to set Android keyboard. Google voice typing Select to enable Google voice typing. -
Page 52: About Device
Identify Gesture Can collect all text you type, except passwords. Talk Back Slide the slider to the right to enable the talk back. When talkback is on, tablet provides spoken feedback to help blind and low-vision users. Large text Select to show large text. When feature is checked on, the Landscape/Portrait Auto-rotate screen switching feature is enabled. -
Page 53: Chapter 11 Using Micro Sd (Tf) Card
Chapter 11 Using Micro SD (TF) Card The external card supported by this product is a Micro SD card, through which the capacity of storage can be expanded. To install, insert the Micro SD card into the slot with the silk screen lettering facing towards the back of tablet. Push into card slot until it is fully inserted and locks inside the product. -
Page 54: Chapter 12 About The Battery And Power
Chapter 12 About the Battery and Power This product uses a built-in 7000mAh polymer lithium battery. When the provided power adapter is connected, the battery is automatically charged. When you charge this product for the first time, it is recommended to shutdown the product and charge it continuously for more than 8 hours for optimal battery use. -
Page 55: Chapter 13 Firmware Updating / Resetting To Factory
Chapter 13 Firmware Updating / Resetting to Factory For Firmware Updating: 1. Go to for the website (www.aoc.com or www.breezetablet.com) to download the current / latest firmware for your device. 2. Follow the instructions provided for the model of AOC tablet being updated. -
Page 56: Chapter 14 Frequently Asked Questions
Chapter 14 Frequently Asked Questions · or boots-up abnormally Product cannot be turned on There are various ways to recover/reset the tablet once a problem has occurred: ① Plug the AC adapter and see if powers up; (because battery may be low on power). ②... - Page 57 If static IP addresses are needed, make to enter a valid IP address. If dynamic IP addresses are used, static IP addresses should be disabled while the network is connected. · Cannot connect to computer Make sure the tablet is turned on Make sure the tablet is not in sleep mode Make sure to use the correct USB cable ·...
-
Page 58: Chapter 15 Troubleshooting
Chapter 15 Troubleshooting When I view JEPG pictures, some of them cannot be viewed. Why? Some JPEG files may have a non-standard resolution, they may not be viewed in full screen, or zoomed in or out. If an error prompt appears, touch the back icon to exit or touch the Reset button on the side of the product to resolve the problem.
Need help?
Do you have a question about the MW1031-3G and is the answer not in the manual?
Questions and answers