Table of Contents
Advertisement
Advertisement
Table of Contents

Related Manuals for Body Champ lb 2600


Summary of Contents for Body Champ lb 2600
-
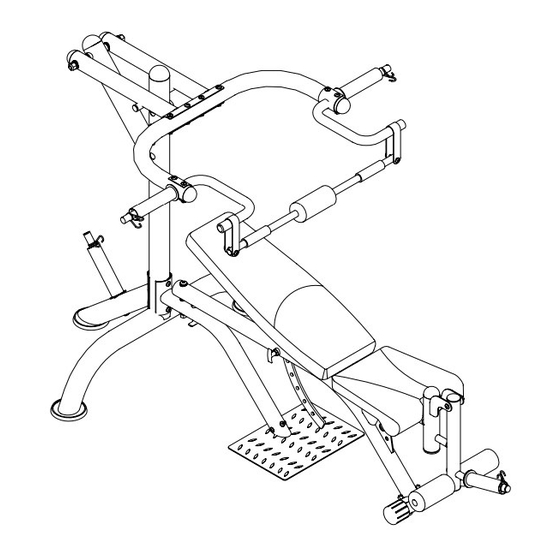
Page 2: General Information
General Information Safety Warranty Before you undertake any exercise program, Body Flex Sports warrants your product for please be sure to consult with your doctor. a period of 1 year for the frame and 90 days Frequent strenuous exercise should be on all parts if the item is used for the intended approved by your doctor and proper use purpose, properly maintained and not used... - Page 3 BEFORE ASSEMBLY Take a few minutes to familiarize yourself with the parts and hardware included with your product. Take a few moments to familiarize yourself with the specific parts hardware IMPORTANT PLEASE NOTE: MANY OF THE PARTS AND HARDWARE LISTED ON THE PARTS included with your product.
- Page 4 HARDWARE LIST IMPORTANT PLEASE NOTE: The hardware listed below is a list of ALL the hardware used on your weight bench. Some of this hardware is already pre installed on your product. Do not be alarmed if you are missing any of these parts. (#30) Button Bolt (1/2'' x 6'') [1 piece] (#34) Nylon Lock Nut (5/8"...
- Page 5 PARTS LIST Part Part Description Qty. Description Qty. Back Base Frame Nylon Lock Nut (3/8" x 11t) Back Upright Nylon Lock Nut (3/8" x 8t) Stabilizer Tube Nylon Lock Nut (1/2" x 15t) Front Tube Nylon Lock Nut (5/8" x 19t) Foot Plate Washer (3/8") Main Frame...
- Page 6 Page 6...
- Page 7 UPRIGHT ASSEMBLY STEP 1 A. Insert Back Upright (#2) into the upper bracket of the Back Base Frame (#1) and align the two pairs of holes. B. Connect the Front Tube (#4) and Stabilizer Tube (#3) to the top bracket of the Back Base Frame (#1) With the help of an assistant, secure the bottom hole of the Back Base Frame (#1), Back Upright (#2), Stabilizer Tube (#3), and Front Tube (#4) with a Curved Washer (#16) and...
- Page 8 MAIN FRAME ASSEMBLY STEP 2 A. Attach Base Tube (#7) onto the Main Frame (#6) and secure the two parts with two Carriage Bolts (#25), two Curved Washers (#16) and two Nylon Lock Nuts (#31). Tighten the nuts and bolts using a Wrench (#58) and an Allen Key (#57).
- Page 9 BACKREST/PRESS ARM ASSEM BLY STEP 3 Hardware Required for Step 3 A1. Attach two Backrest Plates (#21) to the Backrest Tube (#8) using two Washers (#35) and two Nylon Lock Nuts (#32). A2. Attach two Seat Plates (#22) onto the Main (#26) Button Bolt (3/8'' x 4-1/8'') (#24) Button Bolt (3/8'' x 3-1/4'') [1 pieces]...
- Page 10 PAD AND BAR ASSEMBLY STEP 4 A. Secure the left and right Handle Bars (#11) to the Press Arms (#9) by using four Button Bolts (#24), eight Washers (#35) and four Nylon Lock Nuts (#31). Slide on the left and right Olympic Adapters (#15) and secure them with two Quick Clips (#54).
- Page 11 FINAL CHECK • Make sure all bolts are tightened. • Check for loose parts and components • Check to see if there are any tears or bends in the welding or metal. • Be sure that all adjustment locking devices and safety devices are properly located and fully engaged prior to use! Page 11...
- Page 12 Thanks for choosing LB2600 Retailer: ���� ���� ������ ���� ����� ������� ������� ������� �� ����� ������ ����� �������� ���� ����� �������� ������ ����������������������� Version: 02-04-2010 Page 12...
Need help?
Do you have a question about the lb 2600 and is the answer not in the manual?
Questions and answers