Table of Contents
Advertisement
Advertisement
Table of Contents

Related Manuals for Nitgen Fingkey Access


Summary of Contents for Nitgen Fingkey Access
- Page 1 USER GUIDE Preliminary...
- Page 2 © Copyright 2009, NITGEN&COMPANY Co., Ltd. All rights reserved. Unauthorized reproduction of part or all of this manual’s content in any form is prohibited. Product specifications may change without prior notice to improve functionality. NITGEN&COMPANY NITGEN logo registered trademarks NITGEN.&COMPANY Other names and trademarks belong to respective companies.
-
Page 3: Table Of Contents
Table of Contents CHAPTER 1 GETTING STARTED...........4 ...... 오류! 책갈피가 정의되어 있지 않습니다. RODUCT NTRODUCTION ..................5 RODUCT OMPONENT ..................9 YSTEM ONFIGURATION ..................6 RODUCT ESCRIPTION LCD D ...................... 7 ISPLAY CHAPTER 2 ADMINISTRATOR MENU ........11 ............... 12 NTERING DMINISTRATOR ................... -
Page 4: Chapter 1 Getting Started
Chapter 1 Getting Started Product Introduction Product Components System Configuration Product Description... -
Page 5: Product Component
Product Component The FingkeyAccess includes the following components. For detailed information about installation, see the installation guide. If any of the following items is missing, contact the Customer Support Team. Terminal Installation Bracket Power Cord Adapter Bolts Software CD... -
Page 6: Product Description
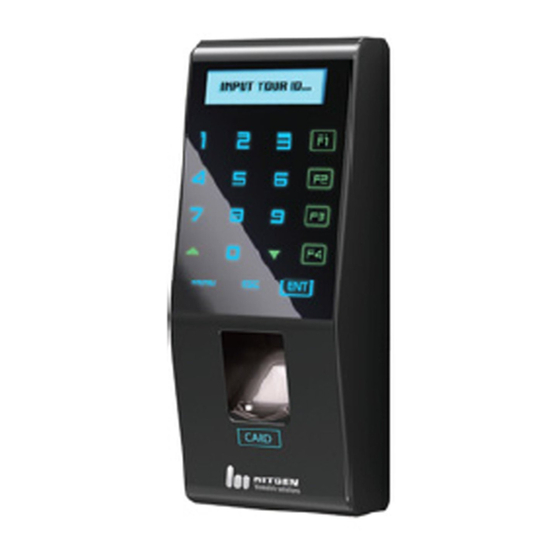
Product Description (5) Reset button (1) LCD (2) Touch Panel (3) Fingerprint Input (4) Card Input Name Description The user can get information from it Touch Panel The user can handle all inputs by touching. Fingerprint Input The user places his/her finger for authentication. Card Input The user places his/her card for authentication. -
Page 7: Lcd Display
LCD Display & Touch Pads (1) Initial message FINGKEY ACCESS FINGKEY ACCESS 09:12:34 09:12:34 (2) Network connection status (3) Time: Displays the present (4) Function Keys (5) ENTER Key (8) Menu (7) Escape (6) Cursor Key... - Page 8 Fingerprint Reading Scan fingerprints as described below for fingerprint registration and authentication to prevent authentication errors. ① Maximize the finger area scanned and press evenly (70 ~ 80% of full pressure). ② Place the “core” of the fingerprint at the center of the scanner. The core is usually opposite the whitish half-moon on the bottom of the fingernail.
-
Page 9: System Configuration
System Configuration The Access Control Terminal (FingkeyAccess ) can function either in the network or stand-alone mode. In stand-alone mode, all functions are available and the terminal does not need to be connected to the network. In network mode, multiple terminals are connected to the server through TCP/IP links and the terminals can be managed by the administrator. - Page 10 Network Mode Server PC Client PC TCP/IP Item Functions 1. Server S/W : AccessManager Professional 2. Terminal management, communication and Server PC log data collection 3. User profile and log data DB 4. Authentication 1. Client S/W: AccessManager 2. User registration and management Client PC 3.
-
Page 11: Chapter 2 Administrator Menu
Chapter 2 Administrator menu Entering Administrator Menu - 15 User Management - 19 UI & Sound Setting - 29 Network Setting - 34 Serial Connection - 39 Authentication Option Setting - 40 Terminal Information Display - 52 USB Memory Connection - 56 Terminal Reset and Firmware Update - 61... -
Page 12: Entering Administrator Menu
Entering Administrator Menu Terminal users include general users and administrators. General users are only allowed to open the door while the administrator can use the Administrator menu to control the door as well as the terminal’s functions. 1. To enter the Administrator menu, touch the “MENU”... - Page 13 The Administrator menu has seven submenus as shown below. The following describes each sub menu: Higher menu Detailed Menu Sub menu User User registration Management User info change User deletion Deletion of all users Fingerprint Sensor brightness (1~100) sensor setting Security level 1:1 mode 1:N mode...
- Page 14 System Setting Log storing RF card WIEGAND 26BIT 34BIT Function key setting Authentication mode Time setting Terminal mode Time zone Network Terminal ID TCP/IP DHCP yes or no? Terminal IP Sebnet Mask Gateway Server IP Time limit Port setting Information Number of users Firmware version Factory default...
-
Page 15: User Management
User Management The administrator can register, delete and change users with the User menu. User Registration The maximum number of users that can be registered is the 2,000 templates. (1,000 uesrs) 1.User Manager 1. Register User User Change User IDs are unique and cannot be changed. However, group, privilege, fingerprint, and authentication type can be changed in the “Modify”... - Page 16 Fingerprint Sensor Setting Settings related to fingerprint sensor options such as security level, fingerprint capture time, capture mode, LFD precision, and sensor brightness can be configured. Sensor Option If the fingerprint is too bright or dark, the brightness, contrast, and gain can be adjusted.
- Page 17 Capture Mode Set whether to distinguish fake fingerprints, to what degree of precision. “Low”, “High”, or “Not in Use” are available. 2.FP Option 3. Capture Mode Authentication Limit Time The fingerprint input waiting time is between 3 and 9 seconds, and the default is 5 seconds.
-
Page 18: Ui & Sound Setting
UI & Sound Setting Language and Buzzer The user can change the language, buzzer. 3.UI Option 1. Language 3.UI Option 2. Buzzer Function Key display mode Based on this setting, the display for Function key will be showed differently. For example, SETTING = OFF SETTING = Mode2 F3 :... -
Page 19: Network Setting
Network Setting The FingkeyAccess terminal can function either in network or stand-alone mode. Wireline networks are supported in the network mode. If the DHCP option is deactivated, the terminal IP, subnet mask, and gateway must be inputted manually. For more information, contact the service team. -
Page 20: Port Setting
Time Limit Don’t set this value too short. 5.Network 3. N/W Timeout Port Setting Enter the port number to be used for communication between the server and the terminal. The default value is “7332” and the user can choose between 2000 and 65535. When changing the port data in the terminal, change the communication setting of AccessManager Professional accordingly. -
Page 21: System Setting
System Setting Settings related to system such as log storing, RF card, Wiegand, Function key, time, terminal mode and timezone. Saving Logs The administrator can save logs that arise during user authentication. To save logs, select “Save Logs” and change “No” to “Yes.” The logs can be checked by selecting “Info”... - Page 22 Time and Attendance mode Time and attendance mode, the user must press a function key and perform the user authentication process when opening the door. The entry logs will be sent with the function key data to the server management program. Depending on the function key, user attendance records can be classified into “Coming to work”, “Leaving work”, “Going out”, and “Returning”...
-
Page 23: Terminal Information Display
Terminal Information Display The administrator can check the firmware version and number of users. 6.Infomation 1. # of User 2. F/W version Factory Default DB Format All DB are formatted. When format is completed, the system goes back to the initial screen. Factory Format Factory Format is a command to restore all information stored within a terminal into initial values including user DB, option DB, log... - Page 24 Fixed Option In the “Fixed Option” menu, the number of fingerprint scans to be inputted during fingerprint registration and the ID length can be configured. These settings cannot be changed of registered users already exist. To change these settings, the administrator must delete all users registered at the terminal.
-
Page 25: Chapter 3 General User
Chapter 3 General User Door Opening - 65 Authentication in Attendance Mode - 67 Changing User Information - 69... -
Page 26: Door Opening
Door Opening A user registered at the terminal can open the door in two ways depending on whether 1:N authentication is used. 1:1 Authentication The user enters his ID and scans his fingerprint, and the scanned fingerprint is compared 1:1 to the registered fingerprint that matches the ID. -
Page 27: Card Authentication
② Card Authentication The user is authenticated only by scanning his card without entering his ID. If 1:N authentication is not activated, the user will be asked to input his ID after he presses “Authentication” on the terminal. In 1:N authentication, the password user is authenticated in the same ways as in 1:1 authentication. -
Page 28: Authentication In Attendance Mode
Authentication in Attendance Mode In attendance mode, all users shall press the functions keys in order to be authenticated. All logs are transmitted to the server. If the users Do not press function keys, the attendance types –coming to office, leaving office, leave, and return –may not be recorded so that the user shall press the function keys in order to be authenticated. - Page 29 Using Extended Attendance Mode (Not available) F13- INPUT ID : 0324 In Extended Attendance Mode, the initial main screen will be displayed as shown on the left. 1. Select a function key, and press arrow keys to change function number. 2.
-
Page 30: Changing User Information
Changing User Information The administrator can change passwords, fingerprints, and card information of registered users using the terminal’s Administrator menu or the server program. To change user information, contact the administrator. -
Page 31: Appendix
Appendix Troubleshooting - 71 Product Specifications - 75... -
Page 32: Ppendix
Appendix Troubleshooting <If fingerprint authentication takes too long> 1. If the terminal uses 1:N authentication in network mode, server overload may occur, resulting in slow authentication and recognition. In this case, a dedicated server should be used. 2. Check if the finger and the sensor are clean. Clean the finger and the sensor. - Page 33 <If network connection cannot be established> 1. Check if the network setting is correct. 2. Check the TCP/IP setting. ① IP address of the server where AccessManager Professional is installed. ② The server and the terminal must use the same port. ④...
- Page 34 <If the door does not open after authentication> 1. Check the time period during which access is allowed. 2. Check JP1 jumper status is correct. (refer to install guide) <If users cannot be registered> In default configuration, this product operates in network mode which requires a proper network connection for user registration.
-
Page 35: Product Specifications
Product Specifications Item Description 128*32 B/W Graphic STN 200MHz 32Bit RISC Memory 16MB RAM, 8MB Nand Flash Sensor OPP06 Optical, 500DPI(LFD, Auto-On) Authentication Rate 1:1 – Less than 1 second 1:N - FAR/FRR 0.001% /0.1% Number of users 1,000 fingerprint templates (Two templates per user) Communication TCP/IP, RS-485, Wiegand... - Page 36 INFORMATION TO THE USER (15.105(a)) For Class A digital device INFORMATION TO THE USER This equipment has been tested and found to comply with the limits for a Class A digital device, pursuant to part 15 of the FCC Rules. These limits are designed to provide reasonable protection against harmful interference when the equipment is operated in a commercial environment.
Need help?
Do you have a question about the Fingkey Access and is the answer not in the manual?
Questions and answers
Can we disable F3 and F4 buttons on the Nitgen Fingkey Access 2 terminals? What is the process flow for doing it