Table of Contents
Advertisement
Advertisement
Table of Contents

Related Manuals for Home Protector 63795


Summary of Contents for Home Protector 63795
-
Page 3: Table Of Contents
Content Introduction ....................4 Welcome ....................4 General Information and Safety Instructions ......... 5 Warning ..................... 5 Caution ...................... 5 Assembly and Parts List ................. 8 Overview ..................... 10 Front view ....................10 Control panel ..................11 LCD Display ................... 13 Image/Video capacity ............... - Page 4 Delete the camera image/video ........22 Viewing images via PC ................23 Viewing images via your Security Light directly on your PC ..................23 Technical Specifications ............... 24 System Requirements and Compatibility ......24 Features and specifications ............. 24 Disposal ....................... 25 Warranty card ...................
-
Page 5: Introduction
Aldi. We want you to be completely satisfied with your purchase, so this Home Protector product is backed by a comprehensive manufacturer’s 3-year warranty and an outstanding after sales service through our dedicated Helpline. -
Page 6: General Information And Safety Instructions
General Information and Safety Instructions Read all safety information below and operating instructions before using this Security Light to avoid any damages to your device. 1. Do not drop, disassemble, open, crush, bend, deform, puncture, shred, microwave, incinerate, paint, or insert foreign objects into this device. - Page 7 natural weather conditions. You are responsible for ensuring that no personal rights of third parties are violated when using the Security Light. The Security Light has solely been designed for private use. Hazards for children and persons with limited ability to operate electronic equipment ...
- Page 8 removing covers may expose you to dangerous voltage points or other risks. Do not touch the floodlight when the power is on, it is extremely hot. Hazard of electrocution in case of wet and humid conditions The Security Light and any supplied components may not be exposed to dripping or spray water.
-
Page 9: Assembly And Parts List
Assembly and Parts List Security Light with Camera EVA foam USB cable Screws (4 pcs.) 300W halogen tube Screws bolts (4 pcs.) Hexagon key 4GB memory card ... - Page 10 ...
-
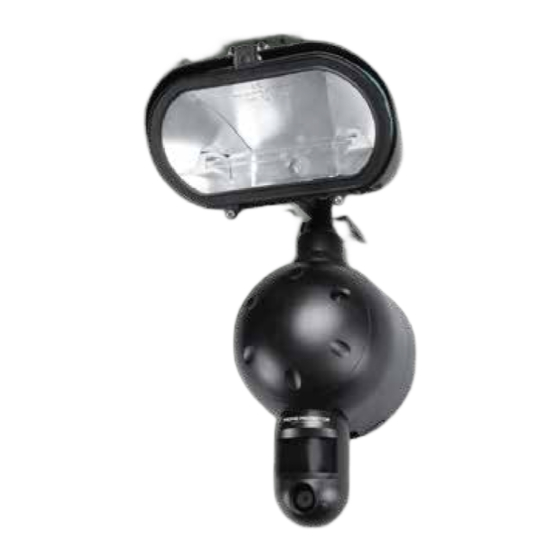
Page 11: Overview
Overview Front view Floodlight: It can be rotated and tilted to adjust the lighting area. The maximum rotation is +/-30 degree. Tilting angle is 10 degree. Flood light screw: Release to open the flood light case to replace the halogen lamp. -
Page 12: Control Panel
Flood light cover: Open to replace lamp. Halogen lamp: For lighting purposes, please use the correct voltage and wattage of halogen lamp for this product. Halogen lamp R7S. Maximum power is 300W. Front cover locker & Front cover: To open or lock the front cover. PIR: Passive infrared movement sensor. - Page 13 LCD display: Icon display showing settings and captured image/video quantity. Refer to LCD details later in this manual. Camera switch: Switch between capture mode (CAM) and Test mode (TEST). Burst switch: Use this switch to switch between still images and video. Depending on what you set the burst switch to, the Security light will capture pictures/video when motion is detected.
-
Page 14: Lcd Display
USB Jack: Use this port to connect the USB cable from the Security Light to a PC to access the captured image/video directly from the Security Light. LCD Display Still image icon. Indicates that the Security Light will capture still images. Number of images captured depends on what the Burst switch is set to. -
Page 15: Image/Video Capacity
Time setting mode. Indicates when your Security Light is in Time setting. Rubbish bin icon, Indicates the Security Light is in delete mode. Floodlight control icon. Indicates that the Security Light floodlight is auto environmental brightness detection to turn on the floodlight. -
Page 16: Mounting The Security Light
Your Security Light is equipped with 32MB built-in memory. Please note that the data stored on internal memory may be lost in the event of a power failure. We therefore recommend the use the enclosed SD card. The SD card reader slot is capable of accepting up to 16GB SD card (sold separately). -
Page 17: Connect The Security Light To Ac Power
1. Connect the Security Light to AC power Please make sure your Security Light is rated for your voltage before connection. Incorrect voltage will damage the camera. Blue wire for neutral. Yellow/ green wire for earth. Brown wire for live. IMPORTANT ... -
Page 18: Replacing The Halogen Lamp If Faulty
When connected, if the environmental brightness is not enough, the lamp will turn on for approximately 60 seconds, will blinking approximately 60 seconds to inform user to leave the capturing area, then it is ready for operation and will begin recording images once the motion sensor is triggered. -
Page 19: Testing The Pir Coverage Area
2. Testing the PIR coverage area In test mode the Security Light allows you to test the coverage area. b. After mounting and connecting your camera to AC power, the camera will turn on automatically. Slide the Camera switch to the TEST position, and the LCD display will show TEST. -
Page 20: Setting The Data And Time
4. Setting the data and time The Security Light uses the 24hr time format. Please slide the Camera switch to the CAM position. After mounting your Security Light (with SD card already inserted if required), connect the camera to the AC power. The camera will turn on automatically and will begin to count down and is ready to arm. -
Page 21: Setting The Ae Frequency To 60Hz Or 50Hz
The DATE and TIME will stamp to captured images and NOTE: first frame of video. Settings and images stored on internal memory may be NOTE: lost in the event of a power failure. Always ensure you reset your Security Light after a loss of power. 5. -
Page 22: Set The Burst Capturing And Video Capturing
is high resolution 12M or 720P (1280 x 720 @ 30 fps) video recording. is Low resolution 5M or VGA (640 x 480 @ 30 fps) video recording. 7. Set the Burst capturing and Video capturing Slide the Burst switch to 3P, the camera will take 3 photos per trigger. -
Page 23: Delete The Camera Image/Video
d. Press the UP or DN button repeatedly to adjust the video recording time from 10 to 60 seconds. Increment is 1 second. Press the SET button to confirm, and then press the UP or DN button repeatedly until it shows ESC. Press SET to exit. -
Page 24: Viewing Images Via Pc
Viewing images via PC You can connect the Security Light directly to your computer to access the images/videos on the internal memory or SD card using the USB cable provided. Alternatively, you can use a card reader or a digital camera to read the SD card. When you have connected the Security Light to your computer, it will be shown as a removable hard drive and you can use Windows Explorer to see your Security Light captured... -
Page 25: Technical Specifications
Technical Specifications 1. System Requirements and Compatibility Windows 2000/Me/XP/Vista/7/8. Pentium 1GMHz or equivalent processor 32MB SDRAM or above VGA Video Card with 32MB RAM minimum Colour 32 bit or higher An available USB port ... -
Page 26: Disposal
Floodlight tube is 300W Auto light sensor Product measurements: H300×W170×T85mm Weight: 1.2 kg Operating Environment: -10 to 40 C (14 to 104 F). 20-85% relative humidity, non-condensation Disposal The device must not be disposed of together with domestic waste. - Page 27 Great care has gone into the manufacture of this product and it should therefore provide you with years of good service when used properly. In the event of product failure within its intended use over the course of the first 3 years after date of purchase, we will remedy the problem as quickly as possible once it has been brought to our attention.
Need help?
Do you have a question about the 63795 and is the answer not in the manual?
Questions and answers