Table of Contents
Advertisement
Advertisement
Table of Contents
Troubleshooting

Subscribe to Our Youtube Channel
Related Manuals for AV TurboDock

Summary of Contents for AV TurboDock
- Page 1 OWNERS MANUAL ACCOUNT MANAGER TURBODOCK CHARGER AeroVironment EV Solutions™...
- Page 2 Specifications are subject to change without notice. Images of the TuboDock™ charger are representative; production models may vary. TurboDock™ charger may be branded under different names. No portion of these materials may be duplicated, used or disclosed without prior written permission from AeroVironment, Inc.
-
Page 3: Customer Support
The Serial Number can be found on the bottom of the charger’s plug-in module. Register your TurboDock(s) following the instructions on the included Registration Card. Recovering your TurboDock’s Admin PIN will require that you first have each charger’s serial number registered with AeroVironment, and that you contact Customer Service for support. -
Page 4: Table Of Contents
SAVE THESE INSTRUCTIONS! This manual contains important instructions for the TurboDock™ charger that shall be followed during installation, operation and maintenance of the unit. TABLE OF CONTENTS Introduction ...................1 1.1 SYMBOL USAGE ..................2 1.2 TURBODOCK COMPONENTS ..............3 1.3 TURBODOCK OVERVIEW ................. 4 1.4 PROVIDE A BACKUP DEVICE ... - Page 5 Managing Users and Chargers ............19 5.1 USERS ......................20 5.2 CHARGER NAMES AND INFORMATION ..........21 5.3 ACCESS CONTROL ................. 21 5.4 ACCOUNT MANAGMENT ..............22 Using Your turboDock Charger ............23 6.1 CHARGING AN ELECTRIC VEHICLE ............. 24 Troubleshooting ................27 7.1 TROUBLESHOOTING ................28 Appendix .....................29 SPECIFICATIONS ...
-
Page 7: Introduction
SECTION 1 INTRODUCTION... -
Page 8: Symbol Usage
1.1 SYMBOL USAGE Indicates information about safety practices which, if not DANGER followed, may result in serious injury or death........................Indicates information about safety practices which, if not WARNING followed, could result in personal injury or are necessary to prevent fire or equipment overheating. -
Page 9: Turbodock Components
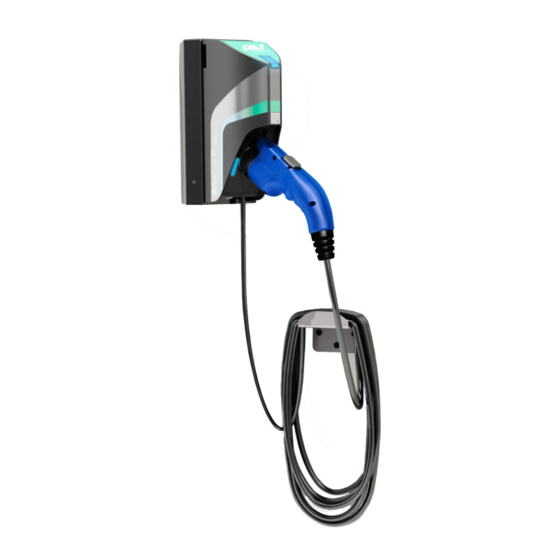
1.2 TURBODOCK COMPONENTS Charging Indicator Light [blue Status Indicator/ red Trouble Indicator] Charge Module Charge Module ID label QR Code Release button [Press to release the Coupler.] Bluetooth Indicator Charge Coupler Voltage Indicator Label Information Label... -
Page 10: Turbodock Overview
(Again, this includes the iPod Touch) 1.4 PROVIDE A BACKUP DEVICE You may wish to make a device available for TurboDock for users whose own smartphone isn’t charged, isn’t compatible, or simply was left at home. A backup device can also allow visiting drivers to use the TurboDock. For example, you could acquire an iPod Touch and place it in a lockbox near the TurboDocks, or entrust it to a security guard or parking attendant. -
Page 11: Know Your Indicator Lights
1.5 KNOW YOUR INDICATOR LIGHTS The Charging Indicator Light and Bluetooth Light on your TurboDock charger are the first thing you will notice when you are about to plug or unplug your vehicle. Before we get started, here is a simple explanation of the indicators. -
Page 13: Installing Turbodock
SECTION 2 INSTALLING TURBODOCK... -
Page 14: Placement
With Disabilities Act (ADA). TurboDock should not be installed in a commercial repair NOTE garage where excess gasoline vapors may be present. 2.2 INSTALLATION TurboDock must be installed by a licensed, qualified electrician. Detailed instructions are in the TurboDock Installation Manual. -
Page 15: Preparing For Access Control
SECTION 3 PREPARING FOR ACCESS CONTROL... -
Page 16: Install The App
When first installed, each charger has “Open Access”, not Access Control. In other words, anyone can use it to charge a vehicle without need for a PIN or the TurboDock app. If you decide to activate Access Control, follow these steps: 3.1 INSTALL THE APP Go to your smart device’s app store. -
Page 17: Choose Your Charger Names
3.3 CHOOSE YOUR CHARGER NAMES When first installed, each charger on each TurboDock will have the same de- fault name “AV TurboDock.” We recommend that you customize them to help Users later. The simplest method is to name them sequentially: “Charger 1,”... -
Page 18: Inform Your Employees/Users About The Chargers
Only the Account Manager can enter or change User PINs in the chargers. 3.5 INFORM YOUR EMPLOYEES/USERS ABOUT THE CHARGERS Let your Users know about the TurboDock Charging Station(s). You can include vital information in an e-mail: Explain which smart devices are compatible and include the website •... -
Page 19: Setting Up Turbodock For Access Control
SECTION 4 SETTING UP TURBODOCK FOR ACCESS CONTROL... -
Page 20: Accessing The Charger
“Select Available Charger” screen, in order of signal strength. The strongest signal should be from the closest charger. Since it’s the first time set up, they’ll all have the same default name: [“AV TurboDock”] Tap Select charger Select an available charger by tapping it. - Page 21 Bluetooth lights will stay green as long as your phone is connected. If you close the app or move too far from the TurboDock, the connection will be lost and the lights will turn blue again. If that happens you must reconnect by relaunching the app and following steps 1-3.
-
Page 22: Setting Up The Charger
“Charger 1, Charger 2”). Then enter your custom 4-digit Admin PIN. This will replace the default Admin PIN. • If you do not change the Admin PIN, anyone who is familiar with TurboDock can log in and make changes. •... - Page 23 You cannot charge a vehicle while logged in as an “Account Manag- er”. You will have to exit the app and log back in as a “User”. (See TurboDock Driver’s Manual for how to use TurboDock as a “User”. Remember, you can’t perform any Account Manager functions...
-
Page 24: Access Control Test
NOTE This test also turns on Access Control for the charger. 4.4 REGISTERING YOUR CHARGER Register each TurboDock charger following the instructions on the Registration Card included. Having the chargers registered is crucial if you ever need NOTE... -
Page 25: Managing Users And Chargers
SECTION 5 MANAGING USERS AND CHARGERS... -
Page 26: Users
• To change the User’s Name, overwrite it with a new one. (This has no effect on the User, who doesn’t need his User Name to connect to TurboDock.) • The existing PIN appears on this screen. To change it, just enter a new PIN. -
Page 27: Charger Names And Information
5.2 CHARGER NAMES AND INFORMATION You can change a charger’s name, or the Information content associated with it on the “Account Manager: Settings” screen. • To change the charger name, select “Charger Setup” and simply overwrite the existing charger name. •... -
Page 28: Account Managment
If a User has forgotten his PIN, you access it by connecting to the charger with your Admin PIN and going to “Manage Users”. If you lose or forget the Admin PIN, contact AV Customer Service who will be able to reset the PIN. You can find the Customer Service contact number at Turbodock.com. -
Page 29: Using Your Turbodock Charger
SECTION 6 USING YOUR TURBODOCK CHARGER... -
Page 30: Charging An Electric Vehicle
“dashboard gauge” agrees. (Refer to the vehicle owner’s manual to find the gauge on your dashboard.) Once charging begins, you may exit the TurboDock app or break the Bluetooth connection. The Bluetooth lights will turn blue, but the blue Status lights will continue to blink. -
Page 31: Manual Stop
Account Manager of the issue. If the second charger fails as well, there may be a problem with your vehicle. Each TurboDock charger is configured either as Level 1 (120V) or Level 2 (240V). Level 1 takes longer to charge than Level 2. You can read which Level the charger uses in the Information screen, and on the label under the TurboDock. -
Page 33: Troubleshooting
SECTION 7 TROUBLESHOOTING... -
Page 34: Troubleshooting
TROUBLESHOOTING Please refer to this Troubleshooting Guide for possible solutions to common errors or difficulties with charging a vehicle using your TurboDock charger. A Trouble Indicator may be triggered by several sources, including the charger, the utility service, or the vehicle- see Troubleshooting tips below. -
Page 35: Appendix
APPENDIX... -
Page 37: Specifications
SPECIFICATIONS Model Dual voltage Line input power: 120 VAC/240/208 VAC 16 Amps continuous @ 120VAC Output power: 16 Amps continuous @ 240/208VAC 20 Amp @ 120 VAC Circuit breaker rating: 20 Amp @ 240 VAC Frequency 60 Hz Power draw at idle <... -
Page 38: High Voltage Warning
WARNING charge coupler, and charger module for damage before each use. If you detect any damage, stop using the charger and contact AV Customer Support........................ALWAYS position the charger output cable so that it will not be driven over, stepped on, tripped over, or otherwise damaged or WARNING stressed. -
Page 39: State Of California Proposition 65 Warnings
Important! Changes or modifications to this product by anyone other than an authorized AV service provider will void FCC compliance. SAFETY FEATURES The charger is designed with safety as the highest priority and includes the... - Page 40 If the output cable becomes separated from the charger module or the charge coupler, DO NOT ATTEMPT TO REPAIR DANGER THE CABLE YOURSELF. Contact AV Customer Support for assistance......................... When using your charger, basic precautions should always be followed, including the following: •...
-
Page 42: Limited Warranty
Products if installed by AV. In addition, Products installed by AV are warranted that the original installation of the Products shall be free of defects in workmanship for a period of thirty-six (36) months from the date of installation. - Page 44 AeroVironment EV Solutions Customer Support 1-888-833-2148 evscs@avinc.com Corporate Headquarters AeroVironment, Inc. EV Solutions™ 181 W. Huntington Drive, Suite 202 Monrovia, CA 91016 Corporate phone: 626-357-9983 or 888-833-2148 ev@avinc.com www.evsolutions.com 20088-03 rev 01...
Need help?
Do you have a question about the TurboDock and is the answer not in the manual?
Questions and answers