Table of Contents
Advertisement
Available languages
Available languages
Advertisement
Chapters
Table of Contents

Related Manuals for ReliOn BP200W


Summary of Contents for ReliOn BP200W
- Page 1 BP3NP1-3ERL-0813-2...
- Page 2 Live Your Best For Less.
-
Page 3: Table Of Contents
Wrist Blood Pressure Monitor Instruction Manual Table of contents 1. Introduction 1.1. Features of the Wrist Blood Pressure Monitor 1.2. Inflation Mode Technology 1.3. Important information about self-measurement 2. Important information about blood pressure and its measurement 2.1. How does high/low blood pressure arise? 2.2. - Page 4 7. Error messages/troubleshooting 8. Care and maintenance 9. Warranty 10. Certifications 11. Technical specifications 12. How to contact us...
-
Page 5: Introduction
1. Introduction 1.1. Features of the Wrist Blood Pressure Monitor This blood pressure monitor (with irregular heartbeat detection) is a fully automatic, digital blood pressure measuring device for use on the wrist. This monitor enables very fast and reliable measurement of your systolic and diastolic blood pressure as well as pulse by way of the oscillometric method of measuring. -
Page 6: Important Information About Blood Pressure And Its Measurement
Electromagnetic interference: The device contains sensitive electronic components. Avoid strong electri- cal or electromagnetic fields in the direct vicinity of the device (e.g., mobile telephones, microwave ovens). These can lead to temporary impairment of the measuring accuracy. 2. Important information about blood pressure and its measurement 2.1. - Page 7 Even with normal blood pressure values, a regular self-check with your blood pressure monitor is recommended. You can detect possible changes in your values early and react appropriately. If you are undergoing medical treatment to control your blood pressure, keep a record of values along with time of day and date. Show these values to your physician.
-
Page 8: What Can Be Done If Regular High/Low Values Are Obtained
2.3. What can be done if regular high/low values are obtained? a) Consult your physician. b) Increased blood pressure values (various forms of hypertension) are associated with considerable health risks over time. Arterial blood ves- sels in your body are endangered due to constrictions caused by deposits in the vessel walls (arteriosclerosis). -
Page 9: Components Of Your Blood Pressure Monitor
• Drink only moderate amounts of alcohol. • Restrict your caffeine consumption (e.g., coffee). 4) Physical constitution • After a preliminary medical examination, do regular exercise. • Choose sports which require stamina and avoid those which require strength. • Avoid reaching the limit of your performance. •... -
Page 10: Using Your Blood Pressure Monitor For The First Time
4. Using your blood pressure monitor for the first time 4.1. Inserting the batteries After you have unpacked your device, insert the batteries. The battery compartment is located on the underside of the device. a) Remove the battery cover. b) Insert the batteries (2 x size AAA 1.5 V), following the indicated polarity. c) If the battery warning appears in the display, the batteries are discharged and must be replaced with new ones. -
Page 11: Taking A Blood Pressure Measurement
5. Taking a blood pressure measurement Please note: You should always be seated before and during the measurement. 5.1. Before the measurement: • Avoid eating, smoking as well as all forms of exertion directly before your measurement. These factors influence the measurement result. Relax by sitting in an armchair in a quiet atmosphere for about ten minutes before your measurement. -
Page 12: Fitting The Cuff
5.3. Fitting the cuff a) Remove all objects and jewelry (e.g., wrist- watch) from the wrist in use. Put the cuff over the wrist with the monitor face on the inside of the wrist. 0.5 - 1.0 cm b) The distance between the cuff and the (¼”... -
Page 13: Discontinuing A Measurement
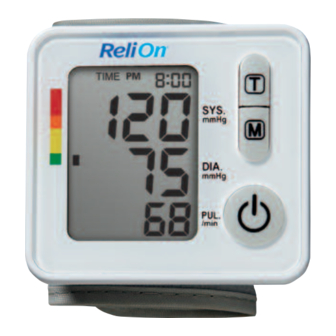
c) When the measurement has been con- cluded, air in the cuff is released. The measured systolic and diastolic blood pressure values as well as the pulse are now displayed. (Pulse=number of heart- beats each minute) Example (Fig.): Sys- tolic 118, Diastolic 73, Pulse 75. The measurement results are displayed for about one minute. -
Page 14: Hypertension Risk Indicator
Information for the doctor on frequent appearance of the irregular heartbeat symbol This instrument is an oscillometric blood pressure monitor device that also analyzes pulse frequency during measurement. The instrument is clinically tested. If pulse irregularities occur during measurement, the irregular heartbeat symbol is displayed after the measurement. -
Page 15: Memory - Storage And Recall Of The Last 90 Measurements
The traffic light bar raises according to your measurement. • If the bar is in the green zone, your measurement is "Normal" accord- ing to NIH standards • If the bars are in the yellow zone, your measurement is "Pre-Hyperten- sion"... -
Page 16: Battery Charge Indicator
6. Battery charge indicator Batteries almost discharged When the batteries are approximately 75% used, the battery symbol will flash as soon as the instrument is switched on (if at least one of the batteries still has some charge). Although the instrument will continue to measure reliably, you should obtain replacement batteries. - Page 17 If you do not intend to use the instrument for a week or more, always remove the rechargeable batteries. • Recharge these batteries using an external charger and follow manu- facturer’s instructions carefully. 7. Error messages/troubleshooting If an error occurs during a measurement, the measurement is dis- continued and a corresponding error code is displayed (Example: Error No.
- Page 18 Other possible malfunctions and solutions If problems occur when using the device, the following points should be checked and, if necessary, the corresponding measures are to be taken: Malfunction Remedy The display remains 1. Check batteries for correct polarity. blank when the instru- 2.
- Page 19 8. Care and maintenance a) Do not expose the device to either extreme tem- peratures, humidity, dust or direct sunlight. b) The cuff contains a sensitive airtight bubble. Han- dle this carefully and avoid all types of straining through twisting or buckling. c) Clean the device with a soft, dry cloth.
- Page 20 9. Warranty Your Wrist Blood Pressure Monitor is guaranteed for one year against manufacturer defects for the original purchaser only, from date of pur- chase. The warranty does not apply to damage caused by improper han- dling, accidents, professional use, not following the operating instructions or alterations made to the instrument by third parties.
- Page 21 11. Technical specifications Weight: ........138 g (with batteries) Size: ..........81 x 65 x 28 mm Storage temperature: ....-20 to +55°C (-4 to +131°F) Humidity:........15 to 90% relative humidity noncondensed Operation temperature: ....10 to 40°C (50 to 104°F) Display: ........LCD (Liquid Crystal Display) Measuring method: ....Oscillometric Pressure sensor: ......Capacitive Measuring range: .......SYS/DIA: 30 to 280 mmHg...
- Page 22 12. How to contact us Toll Free: 1-855-776-0662 Distributed by: Wal-Mart Stores, Inc. Bentonville, AR 72716...
- Page 24 Monitor de presión arterial de muñeca Manual de instrucciones Modelo # BP200W (BP3NP1-3ERL)
- Page 25 Monitor de presión arterial de muñeca Manual de Instrucción Tabla de Contenido 1. Introducción 1.1. Características del monitor de presión arterial de muñeca 1.2 Tecnología de modo de inflación 1.3. Información importante sobre la automedición. 2. Información importante sobre la tensión arterial y su medición 2.1.
- Page 26 7. Mensajes de error/solución de problemas 8. Cuidados y mantenimiento 9. Garantía 10. Referencia a estándares 11. Especificaciones técnicas 12. Contacto para la ayuda...
-
Page 27: Introducción
1. Introducción 1.1. Características del monitor de presión arterial de muñeca El monitor (con detección de latido irregular) es un aparato digital total- mente automático de medición de la tensión arterial para ser usado en la muñeca. El monitor permite medir muy rápidamente y de forma fiable la tensión arterial sistólica y diastólica, así... -
Page 28: Información Importante Sobre La Tensión Arterial Y Su Medición
• El indicador de pulsaciones no es apropiado para medir la frecuencia de los marcapasos. • En casos de irregularidad cardiaca, las mediciones realizadas con este instrumento deben ser evaluadas sólo, previa consulta con el médico. Interferencia electromagnética: El aparato contiene componentes electrónicos sensibles (microordenador). Por ello, evite los campos eléctricos o electromagnéticos fuertes en proxi- midad directa al aparato (por ejemplo, teléfonos móviles, microondas);... - Page 29 peligro su salud debido al daño progresivo que ello conlleva para los vasos sanguíneos de su cuerpo. Si el valor sistólico de la tensión arterial está entre 140 mmHg y 159 mmHg y/o el valor diastólico de la tensión arterial está entre 90 mmHg y 99 mmHg, consulte igualmente con su médico.
- Page 30 Información adicional • Si sus valores son prácticamente normales en reposo, pero excepcio- nalmente altos bajo estrés físico o psíquico, es posible que sufra de la llamada «hipertensión lábil». Consulte con su médico si tiene la sospecha de que ese puede ser su caso. •...
- Page 31 1) Hábitos alimentarios • Esfuércese por mantener un peso normal que se corresponda con su edad. Reduzca el sobrepeso. • Evite el consumo excesivo de sal común. • Evite los alimentos grasos. 2) Enfermedades anteriores • Siga fielmente cualquier instrucción médica para el tratamiento de posibles enfermedades anteriores, tales como: diabetes (diabetes mellitus), trastornos en el metabolismo de las grasas y gota 3) Hábitos...
-
Page 32: Componentes Del Monitor
3. Componentes del monitor La figura muestra el monitor que consta de: Brazalete de muñeca Botón de la hora Indicador de Botón de la hipertensión memoria Tapa de la batería Botón ON/OFF Muñequera para una circunferencia de muñeca de 5.3” - 7.7” (13.5 cm - 19.5 cm). -
Page 33: Utilización De Su Monitor De Presión Arterial Por Primera Vez
4. Utilización de su monitor de presión arterial por primera vez 4.1. Inserción de las baterías Una vez desempaquetado el aparato, inserte primero las baterías. El com- partimento de la batería está situado en la parte inferior del aparato. a) Retire la tapa b) Inserte las baterías (2 x tamaño AAA 1.5 V), teniendo en cuenta la polaridad indicada. -
Page 34: Procedimiento Para La Medición
Luego, suelte y pulse el botón otra vez. El año ahora en forma intermi- tente y se pueden escribir los nuevos valores como se describe ante- riormente. 5. Procedimiento para la medición Nota: Siempre debe estar sentado antes y durante la medición. 5.1. -
Page 35: Ajuste De La Muñequera
• Si se repiten las mediciones, la sangre se acumulará en el brazo correspondiente, lo que puede dar lugar a resultados erróneos. Por ello, para efectuar la medición de la tensión arterial de forma correcta no la repita hasta pasados 1 minuto, o hasta después de haber mante- nido el brazo en alto para permitir que la sangre acumulada fluya. -
Page 36: Procedimiento De Medición
5.4. Procedimiento de medición Después de que el brazalete de forma apropiada, pueda comenzar la medición. a) Pulse el botón de encendido/apagado botón para comenzar. Después de presionar el botón ON/OFF se escucha una serie de pitidos cor- tos y la bomba comienza a inflar el manguito. En la pantalla, el aumento de la presión del balón aparece en permanencia. -
Page 37: Detector De Latido Irregular
5.6. Detector de latido irregular El símbolo indica que se ha detectado un pulso irre- gular durante la medición. En este caso, el resultado puede variar su presión básica. Repita la medición, esto no es motivo de inquietud. Sin embargo, si el símbolo apa- rece con regularidad (ej., Varias veces a la semana duran- te mediciones diarias), le aconsejamos consulte con su médico. - Page 38 5.7. Indicador de luz de trafico Las barras en el lado izquierdo de la pantalla muestran el alcance de la presión arterial. Dependiendo de la altura de la barra, la lectura está den- tro de los parámetros normales; (verde), al borde; (amarillo) on en peligro; (naranja, rojo).
- Page 39 5.8. Memoria – almacenamiento de las últimas mediciones Con la unidad en posición OFF, presione y mantenga presionado el botón "M". La pantalla mostrará "A" seguido por un promedio de todas las lectu- ras almacenadas. El símbolo "M" se muestra en la esquina inferior izquierda.
- Page 40 6. Indicador de batería Baterías casi completamente descargadas. Cuando las baterías estan aproximadamente 75% de descar- ga, se podrá observar el siguiente símbolo centelleando en la pantalla al momento de encender la unidad. A pesar de que el instrumento continuará tomando las mediciones correctamente, usted ya debería reemplazar las baterías.
- Page 41 • Por favor utilice únicamente el tipo “NiMH” • Si aparece el símbolo de la batería descargada ( ), las mismas deben ser removidas y recargadas. No deben permanecer dentro del dispositivo porque se pueden dañar (se descargarán completamente como resultado del poco uso de las mismas aún estando el dispositivo apagado.
- Page 42 7. Mensajes de error/solución de problemas Si ocurre un error durante la medición, la misma será descon- tinuada y el código de error ser observará en la pantalla (ej., error no. 2). Error no. Remedio ERR 1 El tubo pudo haberse aflojado, no se detectó Pulso.*Asegúrese de que las conexiones de la bocamanga estén en posición correcta.
- Page 43 Otros posibles funcionamientos defectuosos y su solución Si aparecen problemas al usar el aparato, deben comprobarse los siguientes puntos y, si es necesario, deben tomarse las medidas correspondientes: Mal funcionamiento Solución 1. Revise la polaridad de las baterías La pantalla permanece en blanco 2.
- Page 44 8. Cuidados y mantenimiento a) No exponga el instrumento a temperaturas extremas, humedad, polvo o a la acción directa del sol. b) Limpie el aparato con un paño suave y seco. No use gasolina, diluyentes o disolventes similares. Las manchas en la muñequera pueden ser elimi- nadas cuidadosamente con un paño húmedo y un poquito de jabón.
- Page 45 Más información La presión arterial está sujeto a fluctuaciones, incluso en personas sanas. Mediciones comparables requieren siempre las mismas condicio- nes (condiciones de calma). Si las variaciones son mayores que 15 mmHg, y / o escucha tonos irregulares pulsos, consulte a su médico.
- Page 46 9. Garantía Su monitor de presión arterial de muñeca tiene garantía de por un año contra defectos de fabricación válidos para el comprador únicamente, a partir de la fecha de adquisición. La garantía no cubre daños causados por mal uso, accidentes, uso profesional, el no seguimiento de las instruc- ciones de uso o alteraciones hechas al dispositivo por terceras personas.
- Page 47 11.Especificaciones técnicas Peso: ......138 g (con baterías) Tamaño: ..... . .81 x 65 x 28 mm Temperatura de almacenamiento: .
- Page 48 Lea atentamente las instrucciones antes de usar este dispositivo. Tipo BF parte aplicada. No lo use en niños menores de 12 años o menos. 12.Contacto para la ayuda Llama sin cargo: 1-855-776-0662 Distribuido por: Wal-Mart Stores, Inc. Bentonville, AR 72716...
Need help?
Do you have a question about the BP200W and is the answer not in the manual?
Questions and answers
My BP100 is malfunctioning. When I turn it on, it goes up to 55/ 56, and stop,with no error message. Whats wrong with the unit?