Table of Contents
Advertisement
Quick Links
Advertisement
Table of Contents

Related Manuals for Precision Drone Pacesetter 2015

Summary of Contents for Precision Drone Pacesetter 2015
- Page 1 User's Manual Pacesetter Model 2015 Serial Number: Version 1.12...
-
Page 2: Table Of Contents
Table of Contents (1) Warnings..................2 (2) What's in the case?.................4 (3) Detailed Components..............5 (4) Getting Everything Charged............10 (5) GPS Recalibration................11 (6) Setting Up a Route................14 (7) Pre-Flight..................17 (8) Flight....................18 (9) Post-Flight..................21 (10) Stitching In Agisoft.................22 (11) NDVI Creation using Global Mapper..........29 (12)Motor Rotation Diagram..............47 (13)LED Guide..................48 (14) Technical Specifications..............49... -
Page 3: Warnings
WARNINGS Obey all federal, state, and local regulations Do not fly in rain or other harsh conditions Do not fly in wind more than 25mph Do not fly faster than 10 m/s (22.5mph) Operating in temperatures below 50° Fahrenheit (10° Celsius) will result in decreased flight times ... - Page 4 *Failure to exercise caution while using this product and comply with the warnings above could result in product malfunction, electrical issues, excessive heat, fire, and ultimately injury, property damage, or death. Never allow use of this product by anyone without providing them with these instructions.
-
Page 5: What's In The Case
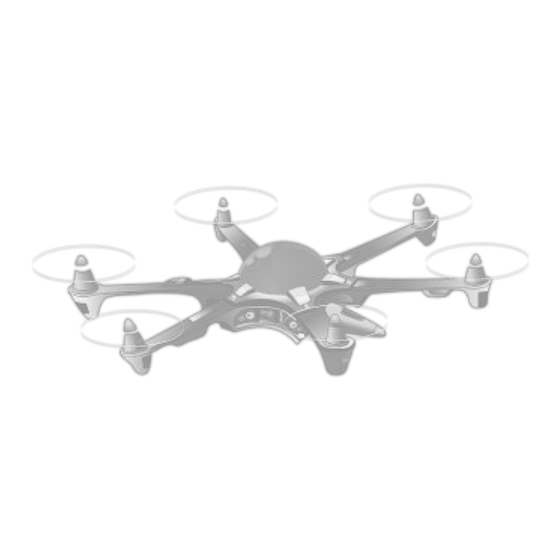
What's in the case? List of Case Components 1x Precision Drone Pacesetter 6x 7600mAh 2S LiPo Battery 1x Command Center Laptop 1x Command Center Charger 1x Live Feed Monitor 1x Live Feed Monitor Charger 1x Precision Vision Camera (NIR) 1x Precision Vision Camera (RGB) - Page 6 Components DX8 Controller: Page 5...
- Page 7 Battery Charger: Page 6...
- Page 8 Live Feed Monitor: Page 7...
- Page 9 Notes on Live Feed Monitor : All units are in metric as shown in picture above You do not need to plug the live feed cable on the drone into a camera in order to see the telemetry on the live feed screen Flight Modes: GPS- GPS and Gyroscope correction •...
- Page 10 Precision Vision Camera: Page 9...
- Page 11 Battery Voltage Checker Notes on the Battery Checker • To check the charge of a single battery, plug the balancing lead into the battery checker, using the three pins closest to the top as shown above. Make sure the red wire is towards the bottom. •...
-
Page 12: Getting Everything Charged
Getting Everything Charged DX8 Controller: Turn the controller off. Plug one end of the charging cable into the charging port (see p. 5), and the other end into a power outlet. The controller indicator LED will glow blue indicating it is charging and turn off when fully charged. Precision Vision Camera: Turn the camera off. -
Page 13: Gps Recalibration
GPS Recalibration • If your drone “toilet bowls” when hovering, or “fish tails” when flying straight • Once every 2 or 3 weeks depending on performance • When moving from one region to another 1. Make sure your DX8, live feed screen, and one (1) set of batteries are all charged. 2. - Page 14 11. Take drone up to roughly 20 feet. Take it through typical movements (forward, backward, left, right). If it "toilet bowls", or moves in a constant circular pattern land the drone and repeat steps 6-10. If it locks onto a position and does not wander, land the drone and continue.
- Page 15 Page 14...
-
Page 16: Setting Up A Route
Setting up a route Laptop w/ Ground Station open 1) Watch the “Setting Your Scout Route” video on the Youtube channel. 2) Locate the field you wish to fly within Ground Station. ◦ Tip: There is a search box in the upper left-hand corner of Ground Station that you can use to locate your field easily. - Page 17 5) Click “Click to draw a region in which you want to scan”, a box will appear on the map. The yellow pin is where the route will start and the red pin is where it will end. You can rotate the box by right clicking the center red pin or by clicking on the green arrows in the photogrammetry box.
- Page 18 Page 17...
-
Page 19: Pre-Flight
Pre-Flight Checklist Drone Controller Live Feed Monitor Batteries 1) Check the drone for any signs of damage or loose cables/straps 2) Make sure all components are fully charged. 3) Check that the propeller direction of rotation is correct. (See page 47) 4) Check that the propellers are tight and won't slip. -
Page 20: Flight
Flight Manual: IMPORTANT: If the drone has difficulty standing still while in hover, it will need a GPS recalibration, refer to pages 11-12 for the instructions 1) Follow all of the steps under the Pre-Flight section first 2) Refer to the FAA guidelines for safe and proper drone operation •... - Page 21 Position 2: The Home Lock mode will lock the homepoint in so that the drone • will always move relative to the homepoint. Moving backwards will always be towards the homepoint, forwards would be away from it, etc. Autopilot: IMPORTANT: The drone will move straight to point 0 at the start of its route. Make sure there are no obstructions in between it and point 0, if needed, ascend the drone to a safe height first, then start the route from that altitude.
- Page 22 • If at any time you need to take control of the drone, for example to avoid an imminent collision, flip the Flight Mode switch down to position 1 then back up to position 0. In the event that your Pacesetter hits failsafe in the middle of route, the route can be continued once the drone returns home and the batteries have been replaced.
-
Page 23: Post-Flight
Post-Flight Cameras Laptop 1) Remove the batteries from the drone. 2) Remove the cameras from the drone. 3) Using provided micro-USB cables, connect the cameras to the laptop using the MULTI port on the camera (see page 9), and hit the Record button to turn them on. -
Page 24: Stitching In Agisoft
Stitching in Agisoft Importing Photos: 1) Open Agisoft by double-clicking the icon on either the desktop or taskbar 2) On the workspace pane, click the “Add Chunk” button. 3) Right-click the chunk you just created and click “Add Photos” 4) Navigate to the Precision Vision folder located on the desktop and select all of the photos from the route you would like to stitch. - Page 25 2) Starting from the first camera (In the “Ground Control” pane to the left of the screen, see page 21), you select each one up until the drone was at altitude and beginning the route. Right-click and disable those cameras. Do the same thing for the end of the route.
- Page 26 2) Right-click the chunk again, highlight “Process”, and click “Optimize Alignment”. Keep “Fit k4” unselected. Page 25...
- Page 27 3) Right-click the chunk again, highlight “Process”, and click “Build Dense Cloud”. Set Quality to “Lowest” for faster results, and set Depth Filtering to “Aggressive” for a proper orthophoto. Page 26...
- Page 28 4) Right-click the chunk again, highlight “Process”, and click “Build Mesh”. Select “Height Field” for the Surface Type, “Sparse Cloud” for the Source Data, and set the Polygon Count to “High”. Keep Interpolation enabled. Page 27...
- Page 29 5) Right-click the chunk again, highlight “Process”, and click “Build Texture” 6) Once that process is complete you should see a stitched map in the 3D viewer. Tips: -If you can't see any dots when you add photos to a chunk, make sure that chunk is selected (it will be bold, if not double click to select it).
- Page 30 Exporting: 1) Make sure the chunk you are intending to export is highlighted under the “Workspace” pane 2) Go to “File”, highlight “Export Orthophoto”, and click “Export JPEG/TIFF/PNG” 3) Make sure “Geographic” is selected at the top, and “Write World File” is selected at the bottom.
- Page 31 Using Global Mapper Setting it up 1) Open up Global Mapper by double clicking the icon on the desktop or clicking the taskbar icon. 2) Open your RGB/IR maps you created earlier with Agisoft by clicking on the “Open Your Own Data Files” button. Page 30...
- Page 32 3) Now open the necessary satellite imagery by going to File and selecting “Download Online Imagery/Topo/Terrain Maps...” 4) You want to select “NAIP Color Imagery for US (1m resolution)”, and click “Connect”. If NAIP is not available, use the “World Imagery” map instead. Page 31...
- Page 33 5) If the Overlay Control Center isn't already up, click the button to open it called “Open Control Center” located at the top (see page 28). In it, you should see 3 layers (in no particular order) Rectifying The point of the rectification process is to match up the maps created by Agisoft with an actual satellite-made map provided by the professional mapping sources.
- Page 34 4) Now the Image Rectifier window will open, displaying the RGB map under “Zoomed View” and the NAIP satellite map under “Reference Images”. An Entire Image view is also displayed. 5) From here you add individual points to both the Reference image (NAIP map) and your map.
- Page 35 6) Once you are satisfied with the number of points shared between the maps, click OK and the RGB map is now rectified to the NAIP map. It is recommended that there be 5 or more rectification points. 7) Open your Overlay Control Center again, and de-select the RGB map, and re- select the IR map.
- Page 36 10) A Select Layers box will open, select the RGB/IR layers and click OK. Page 35...
- Page 37 11) The window “Set up Apply Formula Operation” will open and here you can name what you want your NDVI image to be called in the “Layer Description” textbox. 12) Select “Add Predefined Formula”, and in the drop down menu beside it, select “NDVI”...
- Page 38 16) Click the “Band 1” tab at the top, and make sure the RGB layer is checked, and the IR layer is not. Page 37...
- Page 39 17) Click the “Band 4” tab at the top, and make sure the IR layer is checked, and the RGB layer is not. Click OK. 18) The NDVI image has been created. At this point you have several options on what to do with it, including area calculations, exporting as a KMZ file to be opened with Google Earth, and exporting as a GeoTIFF for use in farm management software.
- Page 40 Digitizer The digitizer is a very powerful tool in Global Mapper that allows you to accurately calculate area, as well as set custom export bounds. To select it, simply click the Digitizer Tool Button at the top of the window (see page 30). By default it will be in "Edit"...
- Page 41 Exporting 1) In the Control Center, make sure any unwanted layers are de-selected. 1a) If an area feature was created using the digitizer, this can be selected for use as the export bounds. Select the area feature desired before going onto step 2.
- Page 42 3) A “Select Export Format” window will pop up, make sure GeoTIFF is selected Page 41...
- Page 43 4) A window “GeoTIFF Export Options” will open, make sure you enable the World File by checking the box next to “Generate TFW (World) File” Page 42...
- Page 44 5) Click the Export Bounds tab, and click the “Draw a box...” button. You can draw a box around the NDVI image to omit unnecessary parts of it you want. 5a) If an area feature was selected in step 1, select “Crop to Selected Area Feature(s)”...
- Page 45 3) From the dropdown, select KML/KMZ (Any Data as Images) 4) Select PNG as your image format 5) Under the Export Bounds tab, select "Crop to Selected Area Feature(s)" 6) Hit "OK" and name the file. It is suggested you name it after the field name. Page 44...
- Page 46 Editing the Shader Depending on the shader selected when creating the NDVI image (see page 36), you may have to edit it to give you a better idea of how your crop is doing. 1) To change the shader on the NDVI, highlight it in the Control Center, and hit “Options”...
- Page 47 5) When creating a new shader, use the “New Height/Slope Entry” box in the middle of the popup. Enter the desired value, hit “Add”, select the color, and it will be added to the list. To edit an existing value, simply highlight it in the “Elevation/Slop Colors”...
- Page 48 Blade/Motor Rotation Page 47...
- Page 49 Page 48...
-
Page 50: Technical Specifications
Technical Specifications Battery Charger DC11.0~180. Volt Operating Voltage Range AC to DC adaptor (DC11.0~18.0V/5A) Max. charge power 80W Circuit Power Max. discharge power 10W Charge current range: 0.1~6.0A Discharge current range: 0.1~2.0A Current drain for balancing Li-po: 300mAh/cell NiCd/NiMH battery cell count: 1~15cell Li-ion/Polymer cell count: 1~6 series... -
Page 51: Flight And Service Log
Flight and Service Log Serial Number:... - Page 52 Date: Action: Flight/Service (Circle one) Duration: Name of Pilot/Technician: Starting Voltage: Ending Voltage: Lowest Satellite Count: Highest Satellite Count: Total Flight Time: Weather Conditions: If flown within 5 miles of an airport: Airport: Date and Time of Notification: Notes : Signature: Page 51...
- Page 53 Date: Action: Flight/Service (Circle one) Duration: Name of Pilot/Technician: Starting Voltage: Ending Voltage: Lowest Satellite Count: Highest Satellite Count: Total Flight Time: Weather Conditions: If flown within 5 miles of an airport: Airport: Date and Time of Notification: Notes : Signature: Page 52...
- Page 54 Date: Action: Flight/Service (Circle one) Duration: Name of Pilot/Technician: Starting Voltage: Ending Voltage: Lowest Satellite Count: Highest Satellite Count: Total Flight Time: Weather Conditions: If flown within 5 miles of an airport: Airport: Date and Time of Notification: Notes : Signature: Page 53...
- Page 55 Date: Action: Flight/Service (Circle one) Duration: Name of Pilot/Technician: Starting Voltage: Ending Voltage: Lowest Satellite Count: Highest Satellite Count: Total Flight Time: Weather Conditions: If flown within 5 miles of an airport: Airport: Date and Time of Notification: Notes : Signature: Page 54...
- Page 56 Date: Action: Flight/Service (Circle one) Duration: Name of Pilot/Technician: Starting Voltage: Ending Voltage: Lowest Satellite Count: Highest Satellite Count: Total Flight Time: Weather Conditions: If flown within 5 miles of an airport: Airport: Date and Time of Notification: Notes : Signature: Page 55...
- Page 57 Date: Action: Flight/Service (Circle one) Duration: Name of Pilot/Technician: Starting Voltage: Ending Voltage: Lowest Satellite Count: Highest Satellite Count: Total Flight Time: Weather Conditions: If flown within 5 miles of an airport: Airport: Date and Time of Notification: Notes : Signature: Page 56...
- Page 58 Date: Action: Flight/Service (Circle one) Duration: Name of Pilot/Technician: Starting Voltage: Ending Voltage: Lowest Satellite Count: Highest Satellite Count: Total Flight Time: Weather Conditions: If flown within 5 miles of an airport: Airport: Date and Time of Notification: Notes : Signature: Page 57...
- Page 59 Date: Action: Flight/Service (Circle one) Duration: Name of Pilot/Technician: Starting Voltage: Ending Voltage: Lowest Satellite Count: Highest Satellite Count: Total Flight Time: Weather Conditions: If flown within 5 miles of an airport: Airport: Date and Time of Notification: Notes : Signature: Page 58...
- Page 60 Date: Action: Flight/Service (Circle one) Duration: Name of Pilot/Technician: Starting Voltage: Ending Voltage: Lowest Satellite Count: Highest Satellite Count: Total Flight Time: Weather Conditions: If flown within 5 miles of an airport: Airport: Date and Time of Notification: Notes : Signature: Page 59...
Need help?
Do you have a question about the Pacesetter 2015 and is the answer not in the manual?
Questions and answers