Advertisement
Quick Links
Advertisement

Related Manuals for Portronics Electropen

Summary of Contents for Portronics Electropen
-
Page 2: Digital Pen
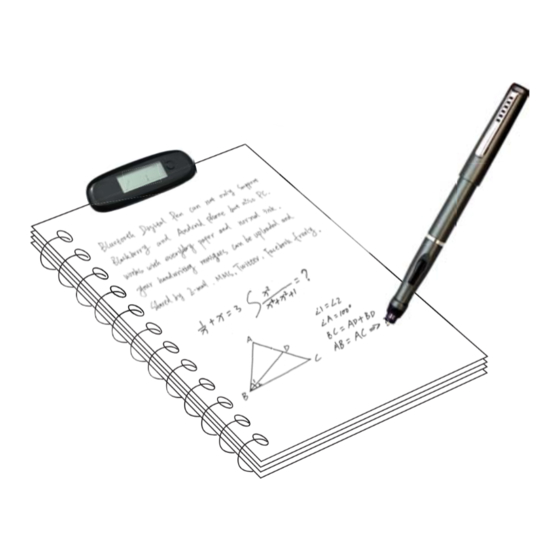
DIGITAL PEN QUICK START GUIDE For detail instructions on how to use the Digital Pen, see the User Manual stored in the CD. This manual may not reflect your actual device’s operation. All information is subject to change without prior notification. Please follow your actual device’s operational procedures. Package Content Base unit Ink refill... - Page 3 To replace the ink refill, 1.Detach the cap from the digital pen. 2.Clamp the ink refill with the refill extractor. Hold the pen firmly, and apply pressure with the extractor against it. 3.Pull the used refill out. Step4 Turn On the Base Unit Press and hold the Power button on the base unit.
-
Page 4: Buttons & Ports
Note: Make sure the pen point is 1.5cm away from the unit. Otherwise, the unit sensor may not work. Buttons & Ports USB port –connect to computer through the USB cable Paper Clipper – clip the unit to paper LCD display Power button –Press and hold for about 5 seconds to turn on the unit. - Page 5 Create Note in Mobile Mode To take handwritten note when you are away from computer, (1) Press and hold the ON/OFF button to power on the unit. (2) Hold the base unit and gently press the paper clipper. (3) Slide the base unit into the paper’ s upper edge and make sure the base unit is in the center.
- Page 6 In Mouse mode, your Digital Pen behaves as a mouse, having the following functionality: To move your mouse cursor you can hover with the pen. To start Hovering you can press the side button or tip the pen on the paper.
- Page 7 The Note Manager contains buttons that give you access to the most commonly used menu commands. The following table contains a list of each button in the toolbox together with a description of its function. Button Description UPLOAD –When in Connected Mode, you can upload all your notes from the mobile unit to your PC using the Digital Pen application Note To Text - Convert handwritten note to texts.
-
Page 8: Getting Started
Using the Digital Pen in Windows Vista/7 Windows Vista and 7 provides rich inking features & utilities which enable users to take handwritten notes, convert handwriting to text, annotate documents, add electronic signatures and send handwritten emails. With integrated Pen-Tablet support, digital ink technologies and handwriting recognition technologies your Digital Pen turns into a Tablet PC compatible device that’s practical, comfortable, intuitive and easy to use while you are on the go and it also works well when you are at your desk. - Page 9 Inking Excel 2007 Drawing in Outlook 2007 Using the Digital Pen in MAC Installing the Note Manager for Mac software Simply insert the Note Manager CD and follow the wizard's instructions. Setting Preferences with the NoteTaker Preference Tool Before you can start transferring your text from the Digital Pen, you first need to decide where on your Mac’...
- Page 10 Digital Pen operation with Mac (1) Use the Digital Pen to capture and save your notes while you are away from your Mac, in meetings or lectures. (2) Connect the Digital Pen to your Mac to upload the saved notes. The notes are saved in TIFF format in the directory that you have specified.
- Page 11 Using the Vision Objects MyScript® Notes MyScript® Notes is a well known character recognition engine. It can covert the notes in your Digital Pen to texts. You can purchase the software from its vendor if you want. (1) Installing MyScript® Notes. Follow the installation instructions in the software manual. (2) Operating MyScript®...
- Page 12 (4) Your Note will be exported to MyScript® Notes application. MyScript® Notes will be opened with your Note in the “ Conversion”area. Using the Photo Sketcher Photo Sketcher gives you the ability to sketch on top of any jpeg picture file. You can add annotations on top of any picture.
Need help?
Do you have a question about the Electropen and is the answer not in the manual?
Questions and answers