
Related Manuals for SurePrint SP91

Summary of Contents for SurePrint SP91
- Page 1 USER MANUAL USER MANUAL USER USER MANUAL MANUAL SP91 SP91 SP91 SP91 THERMAL PRINTER THERMAL PRINTER THERMAL THERMAL PRINTER PRINTER The contents of this document are subject to change without notice...
- Page 2 CAUTIONS � It’s grade A product,maybe it cause wireless jammer in the environment. In such circumstances, need the user to do related steps. COPYRIGHT � Copied date: 2013 � Version:1.5...
-
Page 3: Table Of Contents
目 目 目 目 录 录 录 录 GENERAL DESCRIPTION.....................1 1.1 Basic Specifications....................1 1.2 Printable Area......................1 1.3 Internal Buffer......................2 1.4 Printing Position and Tear off Position..............2 CONFIGURATION AND INSTALLATION..............4 2.1 Interface Specifications.................... 4 2.1.1 RS232 Serial Interface...................4 2.1.2 IEEE 1284 Bidirectional Parallel Interface............ - Page 4 DLE ENQ n......................27 ESC S0........................28 ESC DC4....................... 28 ESC ! n........................28 ESC $ nL nH......................29 ESC % n........................ 29 ESC & y c1 c2 [x1 d1...d(y × x1)]...[xk d1...d(y ×xk)]..........30 ESC * m nL nH d1... dk..................32 ESC 2........................34 ESC 3 n........................34 ESC ? n........................34...
- Page 5 GS ( k pL pH cn fn n1 n2(cn=49 ,fn=69)...............58 GS ( k pL pH cn fn m d1..dk(cn=49 ,fn=80).............58 GS ( k pL pH cn fn m (cn=49 ,fn=81)..............59 GS ( k pL pH cn fn m (cn=49 ,fn=82)..............59 5.5 Chinese Character Control Command..............59 FS ! n........................60 FS &........................
-
Page 6: General Description
SP91 User Manual 1 1 1 1 GENERAL GENERAL DESCRIPTION DESCRIPTION GENERAL GENERAL DESCRIPTION DESCRIPTION Basic Basic Specifications Specifications 1.1 Basic Basic Specifications Specifications Specifications Specifications Parameter Parameter Specifications Specifications Parameter Parameter Printing Method Line Thermal Printer Printing Speed 150mm/S(Max) -
Page 7: Internal Buffer
SP91 User Manual Internal Internal Buffer Buffer 1.3 Internal Internal Buffer Buffer Receive Date Buffer Memory Macro Defined Buffer Memory NV Bit Image Buffer Memory 192KB 1.4 Printing Printing Printing Printing Position Position Position Position and and Tear Tear Tear... - Page 8 SP91 User Manual NOTE: 1.The values shown in the figures are typical values, the values may vary slightly as a result of the paper slack or variations in the paper. 2.If the printer don’t work for a long time but installing the paper, the paper may be go to bad and fall on print head;...
-
Page 9: Interface Specifications
SP91 User Manual 2 2 2 2 CONFIGURATION CONFIGURATION INSTALLATION INSTALLATION CONFIGURATION CONFIGURATION AND AND INSTALLATION INSTALLATION Interface Interface Specifications Specifications 2.1 Interface Interface Specifications Specifications 2.1.1 2.1.1 RS232 RS232 Serial Serial Interface Interface 2.1.1 2.1.1 RS232 RS232 Serial Serial Interface... - Page 10 SP91 User Manual When DTR/DSR control is selected,The signal indicates whether the printer is busy. SPACE indicates that the printer get ready to receive data,but MARK indicates that the printer is busy. Changing the Memory Switch setting to be used as a signal for printer busy.
- Page 11 SP91 User Manual reset signal for the printer. Outpu Same as RTS signal This signal indicates whether the host computer can receive data. SPACE indicates that the host computer can receive data, and MARK indicats the host computer can’t receive the data.
- Page 12 SP91 User Manual Data Terminal Ready Data Terminal Ready GND Ground GND Ground Data Set Ready Data Set Ready Request To Send Request To Send Clear To Send Clear To Send Ring Indicator Ring Indicator DIP Switch 1-3 is ON 1) When the printer occure error, open the cover, when out of paper or feed paper, the printer only stop working but not busy status.
- Page 13 SP91 User Manual 4) During paper feeding using the paper fedd button. 5) When the printer stops printing due to a paper-end(in cases when empty paper supply is detected by either the paper roll end detector or the paper roll near-end detector with a printing halt due to paper shortage enabled by ESC c 4).
- Page 14 SP91 User Manual Host nInit nInit Printer nFault nDataAvail/Data0, 4 Printer DK_STATUS Printer Host nSelectIn 1284-Active *NC: Not Connected ND: Not Defined NOTES: 1. A prefix “n” to signal names refer to low level active signals. 2. To the host provided with none of the signal lines listed above, both-way communication fails.
- Page 15 SP91 User Manual Output Low Voltage 2.0 V power is OFF +5 V Signal Sender Characteristics Specifications Characteristics Symbol Conditions Output High Voltage =0.32 mA Output Low Voltage *2.4 V 5.5 V While the power is Output High Current Output Low Current 0.32 mA...
-
Page 16: Ethernet Interface
After modifying the related information, then “Reset”; 3. If printing by Windows driver, install SP91 driver. After installing driver, find installed SP91 driver in “printer and fax”. Choose attribute, then “Port”-“Add port”-choose “Standard TCP/IP Port”, operate according its prompt. -
Page 17: Usb Interface
Notes: Notes: Notes: Notes: When use USB port,if turn the printer power off for a long time, printer driver (SP91) will be went off automatically, this moment driver can not print normally, right click to cancel offline print; 2.1.4.3 2.1.4.3 2.1.4.3... -
Page 18: Drawer Connector
SP91 User Manual Drawer Drawer Connector Connector 2.3 Drawer Drawer Connector Connector SP91 used RJ-11 6 connector,as follows: Pin Definition as the following table: Pin NO. Signal Ground Direction Frame GND Drawer kick-out drive signal 1 Output Drawer open/close signal... -
Page 19: Functions
SP91 User Manual 3 3 3 3 FUNCTIONS FUNCTIONS FUNCTIONS FUNCTIONS List List List of of of of Commands Commands Commands 3.1 List Commands Command Type Standard Command Name Executive Mode Horizontal tab ¡ ¡ Print and line feed ¡... - Page 20 SP91 User Manual GS H H H H Select print position of HRI ¡ ¡ characters GS I I I I Transmit printer ID ¡ ¡ (¡ ) GS L L L L Set left margin ¡ GS T T T T Set print position as printing origin ¡...
-
Page 21: Panel Button
SP91 key panel picture self-test: NOTE:ESC c 5, enable/diable the button fuction. Push button to prohibit, it isn’t valid. 3.3 DIP DIP Switch Switch Switch Switch ; SP91 has two DIP Switchs and printed agreed number, each function refer to the below sections... -
Page 22: Dip Switch 1
SP91 User Manual Can change from DIP setting utility Switch Switch Switch 1 1 1 1 DIP Switch 3.3.1 3.3.1 3.3.1 3.3.1 DIP Switch 1 Switch Switch Switch Switch Fuction Default Fuction Fuction Fuction Default Default Default Chinese character Chinese character mode... -
Page 23: Dip Switch 2
SP91 User Manual Baud Rate Selection Transmission Speed(Baud rate Switch NO. BPS) 115200 38400 19200 9600 NOTE:BPS – bits per second bit/second DIP Switch Switch Switch Switch 2 2 2 2 3.3.2 3.3.2 3.3.2 3.3.2 DIP Switch 2 Switch Switch... -
Page 24: 3.6 Self-Test
SP91 User Manual LED bliks to indicate the macro execution ready state. ( see macro definition commands) 2) Alarm LED:Blue Flashing:Paper out, Cover open, The temperature of print head is extremely high, Autocutter error, another mechanism error. Off:Printer is ready to go. -
Page 25: 3.9 Error Processing
SP91 User Manual 2、Turn the power off, and press feed paper key 3、Turn the power on, about 1~3 seconds and release FEED paper key, will print self-test print. 3 3 3 3 . 9 9 9 9 Error Error Error... -
Page 26: Buffer-Full Printing
SP91 User Manual The sensor which detect whether paper is present or not. When the sensor detects a paper-end, the printer stops printing. 2)Roll paper near-end sensor The sensor which detect a near-end of a paper roll. When the paper roll diameter becomes sufficiently small, the detects a near-end of the paper roll and the PAPER OUT LED lights. -
Page 27: Case Specifications
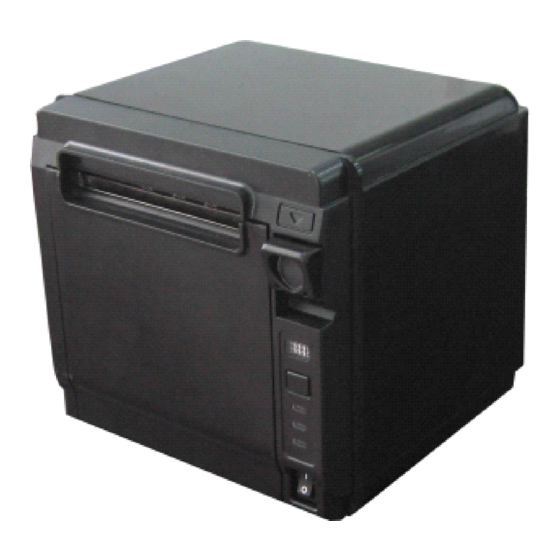
External Appearance Appearance Data line Paper Paper Cash Power Interface Key board Power Cover Interface Interface Figure 1 1 1 1 : SP91 Figure 2 2 2 2 : SP91 Figure Figure SP91 SP91 Plan Plan Figure Figure SP91 SP91 Back... -
Page 28: Commands
SP91 User Manual 5 5 5 5 COMMANDS COMMANDS COMMANDS COMMANDS 5.1 Command Notation [Name] The name of the command [Format] The code sequence [ ] k indicates the contents in brackets [ ] should be repeated k time. [Range]... -
Page 29: Detailed Explanation Of Commands
SP91 User Manual Length unit. 1 inch=25.4mm. (9) MSB Most Significant Bit (10) LSB Least Significant Bit (11)Baseline The standard position of the character data what stocked in the print buffer area. The following indicates the general characters position under the standard mode and page... -
Page 30: Dle Eot N
SP91 User Manual ESC 2 2 2 2 , ESC [Reference] ESC 3 3 3 3 [Name] Print and carriage return [Format] ASCII Decimal [Description] Allow feed paper automatically, the function of this command is the same as LF command. - Page 31 SP91 User Manual If want to send ESC ESC 3 3 3 3 n n n n to the printer, before sending the n, DTR (for host is EOT 3 3 3 3 . The DSR)will be changed to MARK,so before receiving the n, interrupt DLE DLE EOT EOT 3 3 3 3 <10>H will deal with as the code of ESC...
- Page 32 SP91 User Manual Unrecoverable error occurred. No automatically recoverable error. Automatically recoverable error occurred. Not used. Select off. Bit 2:While the cover is opening, the printer showed it as the mechanical error. Bit 6:If the temperature of print head is extremely high, bit 6 will be turn on, until temperature of the print head effectively comes down or open the cover during printing.
- Page 33 SP91 User Manual ESC ! ! ! ! , ESC ESC 3 3 3 3 etc). Completely initialize the printer by this command and ESC ESC @. @. This command only effects for the error which can be recovered, except for print head temperature error.
- Page 34 SP91 User Manual × Character type B (9 17)。 Set double width print Cancel double width print Undefined Undefined Cancel double height mode Set double height mode Cancel double width mode Set double width mode Undefined Undefined Undefined [Particularize] ·...
- Page 35 SP91 User Manual [Particularize] · When select cancel user-defined character set, automatically select inner character set. · n only valid at least significant bit. [Default] n = 0 [Reference] ESC & & & & , ESC ESC ? ? ? ? ESC &...
- Page 36 SP91 User Manual · When set character type B (9 ´ 17).
- Page 37 SP91 User Manual ESC * * * * m m m m nL d1... d1... nL nH nH d1... d1... dk [Name] Select bit-image mode [Format] ASCII m nL nH d1...dk m nL nH d1...dk Decimal m nL nH d1...dk...
- Page 38 SP91 User Manual (but the printing can not over the max printable area): ① The printable width extend to the right and meet the data content. ② If the step ① can not apply the enough width to the data, so the left will be decreased to apply the relative data.
- Page 39 SP91 User Manual ESC 2 2 2 2 [Name] Select default line spacing [Format] ASCII Decimal [Description] Set the line spacing to 3.75mm (30 ´ 0.125mm). [Note] Line spacing set independently in stable mode and page mode. [Reference] ESC 3 3 3 3...
- Page 40 SP91 User Manual · Macro definition won’t be cleared. ESC a a a a n n n n [Name] Select alignment mode [Format] ASCII Decimal [Range] 0 £ n £ 2, 48 £ n £ [Description] Put one line date alignment as the point position...
- Page 41 SP91 User Manual · As sort ascending to transmit [n] k and put one NUL 0 at last . When [n] k is less than or equal to the fore data, sets position which be finished, and the continued data dealt as normal data.
- Page 42 SP91 User Manual Decimal ≤ ≤ [Range] ≤ ≤ [Description] On basis of present position, set print starting position by horizontal and vertical motor unit. × · This command set the print position from present position to [(nL + nH 256) ×...
- Page 43 SP91 User Manual [Format] ASCII Decimal ≤ ≤ [Range] [Description] Selects the paper sensor to stop printing when paper end detected: Off/On Decimal Fuction Undefinded. Roll paper near end sensor disabled. Roll paper near end sensor enabled. Undefined. [Notes] ·...
- Page 44 SP91 User Manual measure (n line spacing) overs 1016mm{40inch}, so the printer only feed paper 1016mm{40 inch}. ESC 2 2 2 2 , ESC ESC 3 3 3 3 [Reference] ESC t t t t n n n n [Name]...
-
Page 45: Fs Q N [Xl Xh Yl Yh D1...Dk]1...[Xl Xh Yl Yh D1...Dk]N
SP91 User Manual [Particularize] · NV bit image defined bit image in NVM. Define by FS q, print by FS P. · When the appointed NV bit image absent, this command is invalid. · In stable mode, this command effects only when there are no data in buffer area. - Page 46 SP91 User Manual n [xL xH yL yH d1...dk]1...[xL xH yL yH d1...dk]n Decimal n [xL xH yL yH d1...dk]1...[xL xH yL yH d1...dk]n ≤ ≤ [Range] ≤ ≤ ≤ ≤ ≤ × ≤ 3 (when 1 (xL+ + 256) 1023 ≤...
- Page 47 SP91 User Manual one NV bit image n=1, the printer only processes the data group [xl xH yL yH dl...dK] once. The printer uses ([data:(xL+xH×256) × (yL+yH×256) × 8]+[header:4]) bytes of the NV memory. · The definded area of this printer is 192K bytes (max). This command can define several bit images, but can’t define the bit image which the total capacity [bit image...
- Page 48 SP91 User Manual FS p p p p n n n n m m m m [Name] Print NV bit image [Format] ASCII Decimal ≤ ≤ [Range] ≤ ≤ ≤ ≤ 3 , 48 [Description] Prints NV bit image n using m.
- Page 49 SP91 User Manual dpi: per 25.4 mm{1inch} print dot · n is the quantity of NV bit image( defined by ES q). · m specify bit image mode [Particularize] · NV bit image defined bit image in NVM. Define by FS q, print by FS P.
- Page 50 SP91 User Manual Decimal Width 1(Standard) 2(Double width) Set character width [Notes] · This command affects to all characters (English characters and Chinese) except for HRI character. · If n is out of the definition scale, this command will be ignored.
- Page 51 SP91 User Manual [Reference] GS / / / / GS / / / / m m m m [Name] Prints down-load bit image [Format] ASCII Decimal ≤ ≤ ≤ ≤ [Range] 3, 48 [Description] Prints down-load bit image by mode which defines by m.
- Page 52 SP91 User Manual Each data in stable mode (m=0, 48) and double height mode (m=2,50), the printer prints one dot; Each data under the double width mode (m=1, 48) and four double mode (m=3, 51), the printer prints two dots.
- Page 53 3, 49 [Description] Transmit printer ID. · n indicates the type of printer ID. Printer ID type 1, 49 Printer type ID Model: SP91, Hex: 21H 2, 50 Type ID Below table 3, 51 Firmware version ID [Type ID] Off/o...
- Page 54 SP91 User Manual [Format] ASCII Decimal ≤ ≤ [Range] ≤ ≤ [Description] Set left margin by nL and nH. × × · Set left margin [(nL + nH 256) 0.125 mm]. The left side blank The width of printable width [注意]...
- Page 55 SP91 User Manual GS W W W W nL nL nH [Name] Set pirnt area width [Format] ASCII Decimal ≤ ≤ [Range] ≤ ≤ [Description] Set print area width by nL and nH. · Set print area width as [(nL + nH× 256) × 0.125mm].
- Page 56 SP91 User Manual (82.5 mm paper width type ) 640 dot nL = 128, nH = 2 (79.5 mm paper width type ) 576 dot nL = 64, nH = 2 (60 mm paper width type ) 448 dot nL = 192, nH = 1...
- Page 57 SP91 User Manual [Reference] GS H H H H , GS GS k k k k GS h h h h n n n n [Name] Set bar code height [Format] ASCII Decimal ≤ ≤ [Range] [Description] Set bar code height...
- Page 58 SP91 User Manual ≤ ≤ ≤ ≤ 255 (n is even) ≤ ≤ ≤ ≤ 57, 65 68, 36, 43, ≤ ≤ CODABAR 45, 46, 47, 58 ≤ ≤ ≤ ≤ CODE93 ≤ ≤ ≤ ≤ CODE128 Standard ≤ ≤...
- Page 59 SP91 User Manual · Refer to the section 3.9 in page mode. When using thermal label: · If the bar code height can not meet the present label, the over parts will be printed on the next label. When using CODE93 (m = 72) ·...
- Page 60 SP91 User Manual Special Transmission Data Character ASCII Decimal SHIFT 7B,53 123,83 CODE A 7B,41 123,65 CODE B 7B,42 123,66 CODE C 7B,43 123,67 FNC1 7B,31 123,49 FNC2 7B,32 123,50 FNC3 7B,33 123,51 FNC4 7B,34 123,52 “{” 7B,7B 123,123 [For example] Print "No.
- Page 61 SP91 User Manual byte after the host have received the date (DSR signal is SPACE). If the host haven’t ready to receive data (DSR signal is MARK), the printer wait until the host have ready If set XON/XOFF control, the printer only transmits one byte, and can not specify the DSR signal status.
- Page 62 SP91 User Manual [Notes] · In standard mode, this command affects only when there are no data in print buffer area. · For grating bit image print, this command doesn’t affect by print mode (character size, bold,overlap,upside down print,underline,invert blank print etc.).
- Page 63 SP91 User Manual CODE39, ITF, CODABAR [Default] n = 3 GS k k k k [Reference] GS ( ( ( ( k k k k PL PL PH PH cn cn fn fn fn fn n1 n1 n2(cn=49 n2(cn=49 n2(cn=49...
- Page 64 SP91 User Manual Grade M Can error correction 15% data Grade Q Can error correction 25% data Grade H Can error correction 30% data GS ( ( ( ( k k k k pL cn fn fn fn fn m m m m d1..dk(cn=49 d1..dk(cn=49...
- Page 65 SP91 User Manual Xiyue Lotus Hill. Far-ranging see stars. Su hand hibiscus. Step tread too pure virtual. Colourful drag wide belt. Fimbrist ##1D 28 6B 03 00 31 51 30## 5.5 Chinese Chinese Chinese Chinese Character Character Character Character Control...
- Page 66 SP91 User Manual FS & & & & [Name] Set Chinese character mode [Format] ASCII & Decimal [Description] Select Chinese character mode. [Particularize] · This command only affects when selecting GB18030 code system. · GB18030 only supports double bytes 1、2、3、4、5 area.
- Page 67 SP91 User Manual · Characters enlarges along the horizontal direction, characters enlarges to the right side on basis of the left side. · Select double width and double height mode, turn quadruple-size mode on/off by FS ! or GS !. The last received command set is effective.
- Page 68 SP91 User Manual steps:: 1.Turn the power off, and pull the power cable and communication out. 2.Open the roll paper cover. 3.Clean cotton with a little alcohol, paint to surface dirt slightly, do not use sandpaper, blade or force materials to clean print head slice! Or, the thermal print head slice will be damaged, and can not be recovered.
- Page 69 SP91 User Manual E.2 Code Code Code Code table table table table Printable Printable character character character in in in in code code code set A A A A Printable Printable character code set Characte Characte Transmit Data Character Transmit Data...
- Page 70 SP91 User Manual Printable Printable character character character in in in in code code code set B B B B Printable Printable character code set Charac Characte Characte Transmit Data Transmit Data Transmit Data Decimal Decimal Decimal " & 7B,7B 123,123 —...
- Page 71 SP91 User Manual Printable character character in in in in code code set C C C C Printable Printable Printable character character code code set Charac Charact Transmit Data Character Transmit Data Transmit Data Decimal Decimal Decimal FNC1 7B,31 123,49...
- Page 72 SP91 User Manual...
Need help?
Do you have a question about the SP91 and is the answer not in the manual?
Questions and answers