Table of Contents
Advertisement
Available languages
Available languages
10" / 24" / 48"
DIGITAL LASER LEVEL
MODEL HLLT10 / HLLT24 / HLLT48
ATTACH YOUR RECEIPT HERE
Serial Number _____________________ Purchase Date ______________________
Questions, problems, missing parts? Before returning to your retailer, call our
customer service department at 1-877-888-1880, 8:30 a.m. – 8:00 p.m. EST
(Monday – Friday) & 10:00 a.m. – 6:00 p.m. EST (Saturday and Sunday).
Advertisement
Chapters
Table of Contents

Subscribe to Our Youtube Channel
Related Manuals for Hammerhead HLLT10

Summary of Contents for Hammerhead HLLT10
- Page 1 10" / 24" / 48" DIGITAL LASER LEVEL MODEL HLLT10 / HLLT24 / HLLT48 ATTACH YOUR RECEIPT HERE Serial Number _____________________ Purchase Date ______________________ Questions, problems, missing parts? Before returning to your retailer, call our customer service department at 1-877-888-1880, 8:30 a.m. – 8:00 p.m. EST...
-
Page 2: Table Of Contents
Warranty ............. . 14 TECHNICAL SPECIFICATIONS COMPONENT SPECIFICATIONS Model HLLT10 / HLLT24 / HLLT48 Power supply (2 x 1.5V AAA alkaline battery) λ=650nm, Class II laser, maximum laser output<1mW Laser Angle measuring range 0°... -
Page 3: Safety Instructions
SAFETY INSTRUCTIONS Safety Instructions for Digital Laser Level WARNING CAUTION CAUTION LASER RADIATION. Do not stare into PRECAUCIÓN PRECAUCIÓN beam. ClassII laser product. Turn the laser beam on only when using this tool. • Do not remove or deface any product labels. - Page 4 SAFETY INSTRUCTIONS FCC Statement 1. This device complies with Part 15 of the FCC Rules. Operation is subject to the following two conditions: 1) This device may not cause harmful interference. 2) This device must accept any interference received, including interference that may cause undesired operation.
-
Page 5: Unpacking
UNPACKING When unpacking the box, do not discard any packing materials until all of the contents are accounted for: a. Open the carton to locate the following: • Digital laser level • 2 X AAA alkaline batteries • Soft bag •... -
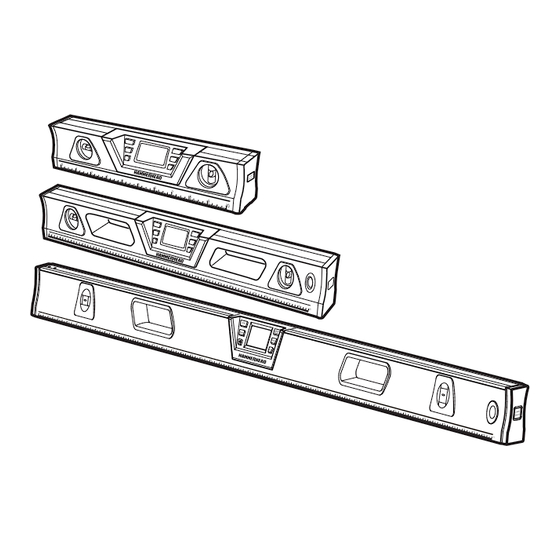
Page 6: Description
Integrated ruler Laser ON/OFF button Endcaps Laser light aperture Magnetic base 1/4" threaded mounting hole (HLLT10 / HLLT24 only) Working base Battery compartment Soft-grip handles (HLLT24 / HLLT48 only) Hanging hole (HLLT24 / HLLT48 only) 10" / 24" / 48" DIGITAL LASER LEVEL... - Page 7 DESCRIPTION 1. KEYBOARD FUNCTION Power button Relative angle measurement button Beeper activation button Memory button Memory recall button UNIT Unit conversion button 2. LCD DISPLAY SCREEN ICONS Up/Down indicator Battery power indicator Indicates that beeper function is activated M1-M9 Indicates that the memory function is being used. Level can recall the last nine saved measurements Indicates that the digital laser level is working in relative angle mode Indicates that the digital laser level is incorrectly positioned or incorrect...
-
Page 8: Operation
OPERATION 1. BATTERY INSTALLATION This multi-function digital laser level uses two “AAA” alkaline batteries to power both the LCD module display and the laser dot. a. Open the battery cover, located in the middle of the back of the level. b. - Page 9 OPERATION NOTE: • If not used for 5 minutes the digital laser level automatically turns off. • The LCD display is large and easy to read. When the digital laser level is turned upside down, the LCD screen senses this and changes to read correctly in the inverted position. 3.
- Page 10 OPERATION NOTE: • Calibration must be performed on a flat and smooth surface with the gradient no more than 5º. If it exceeds 5º, the beeper will sound for 3 seconds, and “Err” will show on the LCD display to indicate that the calibration failed, and calibration will stop automatically. •...
- Page 11 OPERATION 5. RELATIVE ANGLE MEASUREMENT Use the relative angle measurement to measure the angle difference between two working surfaces. a. Lay the digital laser level on the first working surface. b. Turn on the digital laser level. The LCD screen indicates the absolute angle between true level and the working surface.
- Page 12 OPERATION 8. LASER DOT ALIGNMENT This digital laser level contains a laser diode located inside the left endcap. WARNING: When turning on the self-leveling cross laser, always be aware of protecting your eyes and the eyes of those around you. a.
-
Page 13: Maintenance
MAINTENANCE All maintenance should only be carried out by an authorized service organization. This digital laser level has been designed to be a low-maintenance tool. However, in order to maintain its performance, follow these steps. a. HANDLE the tool with care. Treat it as a precision optical device, such as a camera or binoculars. -
Page 14: Troubleshooting
HAMMERHEAD support at 1-877-888-1880 to speak with a customer service agent. This warranty does not cover: (1) Part failure due to normal wear or tool abuse (2) Any parts have been altered or modified by anyone other than authorized HAMMERHEAD personnel. -
Page 15: Model
NIVEL LÁSER DIGITAL DE 10" / 24" / 48" MODELO HLLT10 / HLLT24 / HLLT48 ADJUNTE SU RECIBO AQUÍ Número de serie ___________________ Fecha de compra ____________________ ¿Preguntas, problemas, piezas faltantes? Antes de volver a la tienda, llame a nuestro departamento de Servicio al Cliente al 1-877-888-1880, de 8:30 a.m. a 8:00 p.m. -
Page 16: Especificaciones Técnicas
Garantía ............. . 28 ESPECIFICACIONES TÉCNICAS COMPONENTE ESPECIFICACIONES Modelo HLLT10 / HLLT24 / HLLT48 Suministro de electricidad (2 baterías alcalinas AAA de 1,5 V) λ = 650 nm, láser clase II, salida máxima del láser < 1 mW Láser Rango de medida angular 0°... -
Page 17: Instrucciones De Seguridad
INSTRUCCIONES DE SEGURIDAD Instrucciones de seguridad para el nivel láser digital ADVERTENCIA RADIACIÓN LÁSER. No mire CAUTION CAUTION directamente al rayo. Producto PRECAUCIÓN PRECAUCIÓN láser clase II. Encienda el rayo láser solo cuando utilice la herramienta. • No retire ni desfigure las etiquetas del producto. - Page 18 INSTRUCCIONES DE SEGURIDAD PELIGRO SIGA CON CUIDADO LAS SIGUIENTES INSTRUCCIONES PARA REDUCIR EL RIESGO DE INCENDIO O DESCARGAS ELÉCTRICAS Declaración de la FCC 1. Este dispositivo cumple con la Sección 15 de las Normas de la Comisión Federal de Comunicaciones de los EE. UU. (FCC, por sus siglas en inglés). El funcionamiento está...
-
Page 19: Desembalaje
DESEMBALAJE Cuando desembale la caja, no deseche el material de embalaje hasta que verifique que esté todo el contenido: a. Abra la caja para ubicar lo siguiente: • Nivel láser digital • 2 baterías alcalinas AAA • Bolsa suave • Manual del usuario b. -
Page 20: Descripción
Botón de ENCENDIDO/APAGADO del láser Tapas Orificio de luz del láser Base magnética Orificio roscado para montaje de 1/4" (solo HLLT10 / HLLT24) Base de trabajo Compartimento para las baterías Asas suaves (solo HLLT24 / HLLT48) Orificio para colgar (solo HLLT24 / HLLT48) - Page 21 DESCRIPCIÓN 1. FUNCIÓN DEL TECLADO Botón de encendido Botón de medición del ángulo relativo Botón de activación de sonido Botón de memoria Botón de recuperación de memoria UNIT Botón de conversión de unidades 2. ICONOS DE LA PANTALLA LCD Indicador arriba/abajo Indicador de carga de la batería Indica que la función de sonido está...
- Page 22 OPERACIÓN 1. INSTALACIÓN DE LAS BATERÍAS Este nivel láser digital de múltiples funciones usa dos baterías alcalinas AAA para alimentar la pantalla LCD del módulo y el láser. a. Abra la tapa del compartimento, que se encuentra en la parte central posterior del nivel.
- Page 23 OPERACIÓN c. Para apagar el nivel láser digital, mantenga presionado el botón de encendido durante 2 segundos. NOTA: • Si no usa el nivel láser digital durante 5 minutos, se apagará de forma automática. • La pantalla LCD es grande y fácil de leer. Cuando invierte el nivel láser digital, la pantalla LCD lo percibe y cambia para leer correctamente la posición invertida.
- Page 24 OPERACIÓN NOTA: • La calibración debe realizarse sobre una superficie plana y lisa con el gradiente a no más de 5°. Si supera los 5°, sonará durante 3 segundos y aparecerá “Err”en la pantalla LCD para indicar un error en la calibración, que se detendrá de forma automática. •...
- Page 25 OPERACIÓN 5. MEDICIÓN DEL ÁNGULO RELATIVO Use la medición del ángulo relativo para medir la diferencia del ángulo entre las dos superficies de trabajo. a. Coloque el nivel láser digital en la primera superficie de trabajo. b. Encienda el nivel láser digital. La pantalla LCD indica el ángulo absoluto entre el nivel verdadero y la superficie de trabajo.
-
Page 26: Operación
OPERACIÓN 8. ALINEACIÓN DEL PUNTO LÁSER Este nivel láser digital contiene un diodo láser ubicado en el interior de la tapa izquierda. ADVERTENCIA: Cuando encienda el láser autonivelante, siempre proteja la vista propia y la de los demás. a. Para activar el láser, presione el botón de ENCENDIDO/APAGADO ubicado en la tapa derecha del nivel láser digital. -
Page 27: Solución De Problemas
SOLUCIÓN DE PROBLEMAS PROBLEMA CAUSA SOLUCIÓN Las baterías están Reemplace por baterías descargadas. nuevas. La herramienta no enciende. Las baterías están colocadas Vuelva a colocar las con la polaridad incorrecta. baterías. El botón de ENCENDIDO/ Asegúrese de que el El punto láser no se APAGADO no está... -
Page 28: Garantía
Ayuda al cliente de HAMMERHEAD al 1-877-888-1880 para hablar con un agente de Servicio al Cliente. Esta garantía no cubre: (1) Falla de las piezas debido al desgaste normal o al maltrato de la herramienta (2) Cualquier pieza alterada o modificada por alguien ajeno al personal autorizado de HAMMERHEAD.
Need help?
Do you have a question about the HLLT10 and is the answer not in the manual?
Questions and answers