Advertisement
Table of Contents
- 1 Table of Contents
- 2 I: Safety Precautions
- 3 II: Parts Description
- 4 III: Pre-Operation Inspection
- 5 Battery Connection
- 6 Starting the Engine
- 7 Stopping the Engine
- 8 Exhaust Control System
- 9 VII: Maintenance
- 10 Transport and Storage
- 11 IX: Troubleshooting
- 12 Specifications
- 13 Electrical Diagrams
- Download this manual
Advertisement
Table of Contents

Subscribe to Our Youtube Channel
Related Manuals for DR R225


Summary of Contents for DR R225
- Page 1 ® R225, R300 and R390 ENGINES SAFETY & OPERATING INSTRUCTIONS DR Power Equipment Toll-free phone: 1-800-DR-OWNER (376-9637) Fax: 1-802-877-1213 Original Language Website: www.DRpower.com Read and understand this manual and all instructions before operating the DR R225, R300 and R390 ENGINES.
-
Page 2: Table Of Contents
Additional Information and Potential Changes DR Power Equipment reserves the right to discontinue, change, and improve its products at any time without notice or obligation to the purchaser. The descriptions and specifications contained in this manual were in effect at printing. -
Page 3: I: Safety Precautions
Do not transport or store the engine until it has cooled down entirely. 13. Safe warning label: Please carefully read warning labels before operating. DR Power Equipment is not responsible if a person is hurt, or equipment becomes damaged due to disregarding warning labels. -
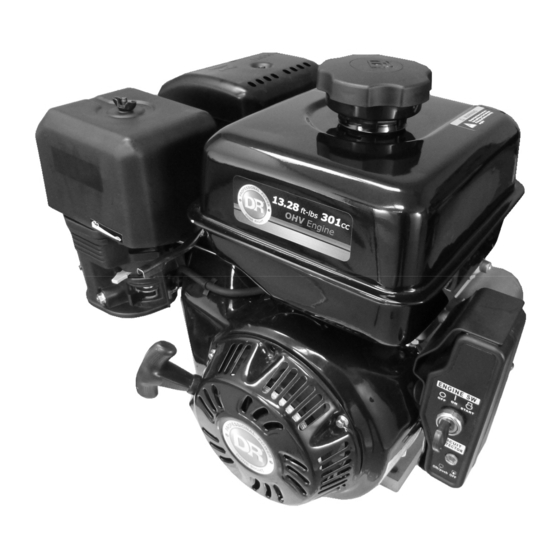
Page 4: Ii: Parts Description
II: Parts Description Throttle Lever Engine Switch Choke Lever Fuel Shutoff Starter Handle Oil Dipstick Recoil Starter Oil Drain Plug Fuel Tank Cap Cleaner Fuel Tank Spark Plug Muffler Oil Plug ® R225, R300 and R390 Engines... -
Page 5: Iii: Pre-Operation Inspection
3. If the oil level is too low, add the recommended engine oil up to the oil filling neck. Environment Temperature 4. Reinstall the dipstick. R225 Oil Capacity = .5 qt/16 oz (0.5L) R300 and R390 Oil Capacity = 1.16 qt/37 oz (1.1L) Oil Dipstick... - Page 6 Maximum Fuel Filler Fuel Level R225 Fuel Tank Capacity = .9 gal/3.6 qt (3.4L) R300 and R390 Fuel Tank Capacity = 1.72 gal/6.9 qt (6.5L) Fuel may damage paint and plastic. Be careful not to spill fuel when refueling. Any damage due to fuel spilling is not covered under warranty.
-
Page 7: Battery Connection
4. BATTERY CONNECTION Use a 12V battery with your DR Engine. Connect the battery’s positive (+) lead to the start relay terminal and connect it’s negative (-) lead to the engine mounting Bolt, base screw or other grounding point with the engine (See the following picture). -
Page 8: Starting The Engine
3. Move throttle lever to the left a little. Throttle Lever High Speed Low Speed 4. Starting the engine – Manual Start Manual Engine Switch Turn the engine switch to the “ON” (START) position. ® R225, R300 and R390 Engines... - Page 9 b. Pull the recoil starter grip lightly until resistance is felt, then pull briskly. Recoil Starter Grip Don’t allow the recoil starter grip to snap back against the engine. Return it gently to prevent damage to the starter 5. Starting the engine – Electric Start Turn the engine switch to the “START”...
- Page 10 To run the engine, move the throttle lever to proper position to run at the required speed. Throttle Lever High Speed Low Speed ® R225, R300 and R390 Engines...
-
Page 11: Stopping The Engine
V. Stopping the Engine In an emergency, rotate the engine switch to the “OFF” position. In normal non emergency conditions, please do as follows: 1. Push the throttle lever to the right to the low speed position. Throttle Lever High Speed Low Speed 2. - Page 12 See the table below to determine when an altitude kit is required. Operating this engine without the proper altitude kit installed may increase the engine’s emissions and decrease fuel economy and performance. Kits may be obtained from DR Power Equipment, and should be installed by a qualified individual. Fuel...
-
Page 13: Exhaust Control System
Unstable idling speed. Exhausting of black smoke or consuming too much fuel. Poor ignition, sparks or backfire. Premature ignition. If you are experiencing any of above problems, contact DR Power Equipment for help. CONTACT US AT www.DRpower.com... -
Page 14: Vii: Maintenance
Never run your engine in a poorly ventilated room or other enclosed area, be sure to keep good ventilation in working area. The exhaust from the engine may contain poisonous gases, inhalation can cause shock, unconsciousness and even death. ® R225, R300 and R390 Engines... - Page 15 2. MAINTENANCE METHOD Oil Dipstick 1) Replacement of engine oil (see “Oil Level Check” in Chapter IV to check oil level) Drain Plug The oil will drain more rapidly and completely when the engine is warm. Washer (1) Remove the oil filler cap and drain plug to drain engine oil thoroughly. (2) Reinstall the drain plug and screw in securely.
- Page 16 If reinstalling the used spark plug, turn it 1/8-1/4 turns after compressing the gasket. Don’t touch the muffler when the engine is running to avoid burns. The spark plug must be tightened securely or it may become very hot and damage the engine. ® R225, R300 and R390 Engines...
-
Page 17: Transport And Storage
VIII. Transport and Storage Transport with the fuel shutoff turned to the “OFF” position. Transport or store the engine when it is cool to avoid getting burns or causing fire. Do not excessively tilt the engine because fuel will spill. Spilled fuel or fuel vapor may ignite to cause fire. Fuel is extremely flammable and explosive under certain conditions. -
Page 18: Ix: Troubleshooting
Tighten cylinder head bolts in proper order to proper torque. Air leakage in the valves Check valve clearance and tightness. Repair if necessary. If engine will still not start, contact DR Power Equipment. ® R225, R300 and R390 Engines... - Page 19 When testing the spark plug, never hold the high- voltage wire of the spark plug with a wet hand. Make sure there is no spilled fuel outside the engine and that the spark plug isn’t dipped with fuel. ...
- Page 20 Cylinder or piston or piston ring is worn and is creating Replace the worn parts heat between cylinder and crankcase Improper adjustment of engine governor causing high Readjust engine governor speed. Crankshaft main bearing burnt out Replace main bearing ® R225, R300 and R390 Engines...
- Page 21 6. ABNORMAL NOISES WHEN ENGINE IS RUNNING TROUBLE CAUSE REMEDY Piston, piston ring or cylinder is worn Replace the worn part Connection rod or piston pin and piston pin hole are worn Replace the worn part Crankshaft main neck is worn Replace bearing Piston ring is broken Replace piston ring...
-
Page 22: Specifications
BP6ES(NGK)/F6RTC(NHSP)/F6TC/ F6TC BP6ES (NGK) / F6RTC F7RTC/F7TC (NHSP) Spark Plug Clearance .028"-.032" (0.7- 0.8mm) .028"-.032" (0.7- 0.8mm) .028"-.032" (0.7- 0.8mm) Lubrication System Forced Splash Forced Splash Forced Splash PTO Shaft Rotation Counterclockwise Counterclockwise Counterclockwise ® R225, R300 and R390 Engines... -
Page 23: Electrical Diagrams
XI. Electrical Diagrams 1. Electric Start Engine with Oil Protection System Bl BLACK BROWN YELLOW W WHITE GREEN START Starting Motor Battery Starting Relay Changing Coil Bl/W Rectifier Protector Engine Switch Ignition Coil Bl/R Circuit Breaker Spark Plug Oil Sensor Oil Protector Controlling Box CONTACT US AT www.DRpower.com... - Page 24 2. Manual Start Engine with Oil Protection System Bl BLACK YELLOW G GREEN Ignition Coil Engine Switch Spark Plug Oil Sensor Oil Protector ® R225, R300 and R390 Engines...
- Page 25 R225, R300 and R390 ENGINES are fit for ordinary purposes for which a product of this type is used. DR Power Equipment however, limits the implied warranties of merchantability and fitness in duration to a period of two (2) years in consumer use, one (1) year for commercial use.
- Page 26 RATO will not be liable to warrant failures of warranted parts caused by the use of a non-exempted add-on or modified part. ® R225, R300 and R390 Engines...
- Page 27 (11) RATO issuing the warranty shall provide any documents that describe that manufacturer's warranty procedures or policies within five working days of request by the Air Resources Board. (d) Emission Warranty Parts List for exhaust (for all displacements). (1) Fuel Metering System (i) Carburetor and internal parts (and/or pressure regulator or fuel injection system).
- Page 28 7 5 M E I G S R O A D , P . O . B O X 2 5 , V E R G E N N E S , V E R M O N T 0 5 4 9 1 ©2014 Country Home Products, Inc.
Need help?
Do you have a question about the R225 and is the answer not in the manual?
Questions and answers