Table of Contents
Advertisement
Advertisement
Table of Contents

Related Manuals for dji ronin-m


Summary of Contents for dji ronin-m
- Page 1 RONIN-M User Manual V1.2 2015.7...
-
Page 2: Disclaimers And Warnings
2. DJI reserves the right of final interpretation of this disclaimer. Do not modify or adjust the Ronin-M. The Ronin-M has been calibrated before it leaves the factory. No adjusting or amending to the Ronin-M is allowed. Make sure to use the original battery, otherwise performance may be hindered, and internal malfunctions and damage to the gimbal may be caused. -
Page 3: Battery Disposal
DJI Intelligent Batteries inside vehicles on hot days. 9. Do not allow DJI Intelligent Batteries to come into contact with any kind of liquid. Do not leave DJI Intelligent Batteries out in the rain or near sources of moisture. -
Page 4: Using The Manual
Download the DJI Ronin-M Assistant App Download and install the DJI Assistant app. Search for "DJI Assistant" on the App Store and then follow the instructions for iOS installation. Search "DJI Ronin" on the Google Play and then follow the instructions for Android installation. -
Page 5: Table Of Contents
Download and Install Basic Settings Advanced Settings DJI PC / MAC Assistant Tuning Install DJI PC / MAC Assistant Settings Remote Control Connecting the Remote Control to the Ronin-M Remote Control Power LED Indicator Status Remote Control Battery Level Indicator Status Remote Control Features Adding a Third-Party Transmitter/Receiver Operation Modes Underslung Mode... -
Page 6: Introduction
Introduction Developed for filmmaking professionals, the DJI Ronin-M marks a generational leap forward in camera stabilization technology. The technology built into the DJI Ronin-M allows a broad spectrum of cameras, of varying sizes and weights, to be stabilized during filming. Based on the successful design of the DJI Ronin Handheld Gimbal, the DJI Ronin-M is lighter, smaller, and more convenient to use. A brushless gimbal stabilization system is not simply three brushless motors moving on three axes. The motors work with position feedback and the IMU (Inertial Measurement Unit) to communicate with DJI’s... - Page 7 Power source for the gimbal. Supplies power for other external devices. Cable Pack ×1 ANSI cable JIS or CE cable (varies by region) Micro-USB Cable×1 For firmware upgrades. Camera Mounting Plate ×1 For mounting your camera onto the gimbal. Accessories Package Camera Screw A (1/4'')×2 Camera Screw B (3/8' ' ) ×2 Camera Screw C (1/4'')×2 Camera Screw D (3/8' ' ) ×2 Lens Support Screw ×1 Lens Support ×1 Allen Wrench ×2 (3 mm & 3/16”) © 2015 DJI. All Rights Reserved.
-
Page 8: Ronin-M Diagram
Before you start using your Ronin-M, be sure to charge the battery. The DJI Intelligent Battery was specially designed for the Ronin-M. It has a capacity of 3400mAh, a voltage of 14.8V, and a variety of power management functions. Only charge the DJI Intelligent Battery with DJI approved chargers. When the DJI Intelligent Battery is fully charged, the Ronin-M has a maximum run-time of six hours. - Page 9 3. The battery level indicator lights display the current charge level as the DJI Intelligent Battery charges. 4. The DJI Intelligent Battery is fully charged when the battery level indicator lights turn off and the indicator light on the charger turns green. Disconnect the battery from the charger when charging is complete.
-
Page 10: Tuning Stand
Checking the battery level: When the DJI Intelligent Battery is turned off, pressing the battery power button once will display the current battery level. Powering on: When the DJI Intelligent Battery is turned off, press and hold the power button for 1 second to turn on the DJI Intelligent Battery. -
Page 11: Assembling The Handle Bar
DJI Intelligent Battery Installation 1. Loosen the screws on either side of the DJI Intelligent Battery. Slide the DJI Intelligent Battery directly into the gimbal and then slide it down. Be sure the battery’s thumb screws go fit into their locating slots, so that the DJI Intelligent Battery makes full contact with the gimbal’s electrical leads. 2. Tighten the screws on the DJI Intelligent Battery to lock it in place. © 2015 DJI. All Rights Reserved. -
Page 12: Mounting The Camera
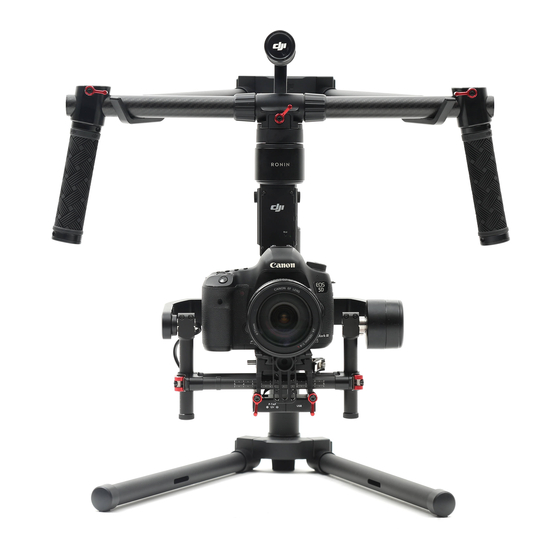
Mounting the Camera The Ronin-M uses an adjustable camera mounting plate that allows you to easily balance, install, and remove the camera. The Ronin-M has been tested with the following types of cameras. Other cameras similar in size and weight may also be compatible. - Page 13 Certain cameras have a very tight lens securing system, and some cameras such as the Canon 5D MK II and MK III have very loose lens securing systems. The Ronin-M balances the camera as one solid unit. If the mounted camera has a loose lens securing system, the lens support must be used.
-
Page 14: Configuring The Handle Bar
Ronin-M will be subjected to extreme movements or accelerations (running, horseback riding, biking, car mounts, helicopters, etc.). Proper balance will also offer a longer battery runtime. There are three axes that need to be accurately balanced prior to turning on the Ronin-M and setting up the software. -
Page 15: Step 1: Balancing The Vertical Tilt
Balancing the camera on the tilt axis is also necessary. When the proper fore and aft tilt balance is achieved, the camera will stay level when you remove your hand (while holding the roll axis in position). © 2015 DJI. All Rights Reserved. -
Page 16: Step 4: Balancing The Pan Axis
Ronin-M is front heavy or rear heavy. 2. While the Ronin-M is resting on the tuning stand, try rotating the Ronin-M along the pan axis by lifting one side of the handle bar. If the camera does not swing, the pan axis is properly balanced. -
Page 17: Dji Ronin-M Assistant App Tuning
After enabling Bluetooth on your mobile device, return to the DJI Assistant App to connect to the Ronin-M. The Ronin-M will not appear in the mobile device’s Bluetooth device list. It can only be connected via the DJI Assistant App. -
Page 18: Advanced Settings
When Briefcase Mode is switched on, the Ronin-M will be able to seamlessly transform into this operation mode. With Briefcase Mode turned off, the Ronin-M will allow the camera to roll when the Ronin-M is tilted past the standard roll axis parameters. - Page 19 Ronin-M User Manual 1. Motor Adjustment The Auto Tune Stability button allows for automatic adjustment of each motor’s stiffness (as relayed from the sensors and interpreted by the Ronin-M) to accomplish an optimized setting. Besides the stiffness, there are other electronic settings being tuned. It is highly recommended that the Auto Tune Stability button be tapped whenever a new camera configuration is mounted or the lens or accessories are changed. This will offer the optimal stability and settings. Each axis has its own stiffness and trim adjustment. The motor stiffness adjustment allows the user to fine tune the amount of power that is applied by the motors as they react and balance the weight on each axis.
- Page 20 Controller Priority: If both input devices simultaneously send control signals to the gimbal, the input from the selected controller will take priority and will control the device at that given time. Pan/Tilt Remote Speed Adjustment: Click to choose combined or independent settings. Speed Toggle Presets: These presets will allow you to change the SmoothTrack speed remotely. If the remote control is turned on, the Speed Toggle Presets for SmoothTrack will take precedence over the © 2015 DJI. All Rights Reserved.
- Page 21 Roll Axis Roll Control Power Angle Internal Receiver Silent Mode Calibrate Center Calibrate System Restore Default Settings Voltage 14.50V 。 35.40 Temperature 0:01:59 Accounts ***@***.com Time Gimbal Control Viewer More Gimbal Control Viewer More © 2015 DJI. All Rights Reserved.
-
Page 22: More Menu
Ronin-M is tilted past the standard roll axis parameters. Motor Kill When the Motor Kill switch is activated, the Ronin-M is still powered on, but the motors will be powered off. This will allow an adjustment to the gimbal or camera without having to turn it off completely. -
Page 23: Dji Pc / Mac Assistant Tuning
There is no need to repeat settings adjustment in both Assistants. The DJI Assistant App and the DJI PC/MAC Assistant program cannot be connected at the same time. If running the DJI Assistant App on your mobile device, be sure to disconnect the micro USB cable before using the DJI PC/MAC Assistant on a PC/MAC. - Page 24 Choose Open from the shortcut menu, then click Open in the dialog box to launch the program. 5. After the first successful launch, double click the Gimbal icon, as usual, to launch the program using Finder or Launchpad. The DMG installer supports Mac OS X 10.9 or above. Ronin-M Assistant on Mac OS X and Windows are the same. Assistant pages shown in this manual are from the Windows version. © 2015 DJI. All Rights Reserved.
-
Page 25: Settings
Reset Password: If you forgot your Bluetooth connection password, click here to reset your password. Calibrate Center: If the Ronin-M’s pan axis is off center, you can recalibrate the true center of the Ronin-M using this switch. Using a remote control, position the pan axis at dead center, then click the Calibrate Center button. Click “Center” again in the pop-up to confirm. - Page 26 Power is indicated for each axis. The current angle of each axis is also indicated. Calibrate System: Calibrate System is only used if you notice any kind of drift in any of the axes. To calibrate the system, place the Ronin-M on the tuning stand and make sure it is completely steady. Ensure a 90 degrees movement of the camera with the lens pointing straight down is possible without any interference from video monitor wires during the movement. Then tap the Calibrate System button ...
- Page 27 3. Channels This is a channel indicator to provide feedback during remote operator configuration. Pan, tilt, and roll can be re-assigned to either of the remote control sticks. The controlled axis can also be reversed. 4. Battery This page provides all of the essential information regarding the Ronin-M’s battery. © 2015 DJI. All Rights Reserved.
- Page 28 Ensure that the Ronin-M is powered on during the upgrade. Do not power off the Ronin-M until the upgrade is complete. Do not disconnect the USB cable during the upgrade. Info You can check which version of the DJI Assistant App you are using in the Info tab. The S/N is a 32-digit authorization code that is used to activate certain functions. The authorization code for your unit is entered after it is manufactured. You may be asked to enter a new S/N after upgrading. Fill in the S/N and then click the Write button. If you enter an invalid S/N more than 30 times, the Ronin-M will be locked and you will need to contact customer support.
-
Page 29: Remote Control
3. Slide the power switch to the right to power on the remote control. If the LED of gimbal turns solid green light, the remote control and the Ronin-M have been successfully bound. The binding process only needs to be done once, unless the bind button is pressed or if the Ronin-M needs to be bound to another remote control. -
Page 30: Remote Control Power Led Indicator Status
The battery level indicator displays the current battery level. The following is a description of the indicators. : The LED is in a solid state on : The LED is blinking : The LED is off LED1 LED2 LED3 LED4 Current Battery Level 75%~100% 50%~75% 25%~50% 12.5%~25% 0%~12.5% <0% © 2015 DJI. All Rights Reserved. -
Page 31: Remote Control Features
Horizontal movements on Vertical movements on the right the right stick control the pan stick control the tilt axis. axis. These stick settings can be customized in the DJI Assistant App or DJI PC/MAC Assistant. © 2015 DJI. All Rights Reserved. -
Page 32: Adding A Third-Party Transmitter/Receiver
There are three operation modes for the Ronin-M: Underslung Mode, Upright Mode and Briefcase Mode. Underslung Mode Underslung Mode is the standard, default mode. The Ronin-M can be used in this mode without any adjustments. Upright Mode Flip the gimbal forward 180 degrees and it will automatically change to Upright Mode. Alternatively, you can change the gimbal into upright mode before turning it on. -
Page 33: Briefcase Mode
Ronin-M on again. The Ronin-M is a precise machine and is not waterproof. Keep it away from sand and dust when in use. After use, it is recommended that you wipe the Ronin-M down with a soft dry cloth. Never spray any cleaning liquids onto the Ronin-M. -
Page 34: Troubleshooting
Ronin-M will deactivate the motors and will not reactivate them until the unit has been restarted. Forgot the Bluetooth Connect the Ronin-M to the DJI PC/MAC Assistant and click the password "Reset Password" button to reset the password. Video footage appears to The SmoothTrack speed setting is too high or the SmoothTrack ... -
Page 35: Specifications
Tilt axis: 105° Up, 190° Down Roll axis: ± 110° Pan axis control: 360 ° Controlled Rotation Range Tilt axis control: Up 105 to Down 190 ° ° Roll axis control: ± 25 ° © 2015 DJI. All Rights Reserved. -
Page 36: 2015 Dji. All Rights Reserved
The content is subject to change. Download the latest version from http://www.dji.com/product/ronin-m If you have any questions about this document, please contact DJI by sending a message to DocSupport@dji.com. © 2015 DJI. All Rights Reserved.
Need help?
Do you have a question about the ronin-m and is the answer not in the manual?
Questions and answers