Table of Contents
Advertisement
THE FCC REGULATION WARNING (for USA)
NOTE: This equipment has been tested and found to comply with the
limits for a Class B digital device, pursuant to Part 15 of the FCC Rules.
These limits are designed to provide reasonable protection against
harmful interference in a residential installation. This equipment
generates, uses, and can radiate radio frequency energy and, if not
installed and used in accordance with the instructions, may cause
harmful interference to radio communications. However, there is no
guarantee that interference will not occur in a particular installation. If
this equipment does cause harmful interference to radio or television
reception, which can be determined by turning the equipment off and
on, the user is encouraged to try to correct the interference by one or
more of the following measures:
• Reorient or relocate the receiving antenna.
• Increase the separation between the equipment and receiver.
• Connect the equipment into an outlet on a circuit different from
that to which the receiver is connected.
• Consult the dealer or an experienced radio/TV technician for help.
If items such as cables are included with this equipment, you must
use those included items.
Unauthorized changes or modification to this system can void the
user's authority to operate this equipment.
SQ-1 Owner's manual
Thank you for purchasing the Korg SQ-1 Step Sequencer. To help
you get the most out of your new instrument, please read this
manual carefully.
Precautions
SQ-1
Step Seqencer
Location
Using the unit in the following locations can result in a
malfunction.
• In direct sunlight
• Locations of extreme temperature or humidity
• Excessively dusty or dirty locations
IMPORTANT NOTICE TO CONSUMERS
• Locations of excessive vibration
This product has been manufactured according to strict specifications
• Close to magnetic fields
and voltage requirements that are applicable in the country in which
it is intended that this product should be used. If you have purchased
Power supply
this product via the internet, through mail order, and/or via a telephone
Be sure to turn the power switch to OFF when the unit is not in
sale, you must verify that this product is intended to be used in the
use. Remove the battery in order to prevent it from leaking when
country in which you reside.
WARNING: Use of this product in any country other than that for
the unit is not in use for extended periods.
which it is intended could be dangerous and could invalidate the
Interference with other electrical devices
manufacturer's or distributor's warranty. Please also retain your receipt
as proof of purchase otherwise your product may be disqualified from
Radios and televisions placed nearby may experience reception
the manufacturer's or distributor's warranty. Company names, product
interference. Operate this unit at a suitable distance from radios
names, and names of formats etc. are the trademarks or registered
and televisions.
trademarks of their respective owners.
Handling
To avoid breakage, do not apply excessive force to the switches
* All product names and company names are the trademarks or
or controls.
registered trademarks of their respective owners.
Care
* Specifications and appearance are subject to change without
notice for improvement.
If the exterior becomes dirty, wipe it with a clean, dry cloth. Do
not use liquid cleaners such as benzene or thinner, or cleaning
compounds or flammable polishes.
Installing batteries
Keep this manual
Install the batteries as follows.
After reading this manual, please keep it for later reference.
1. Use a Philips screwdriver to remove the two screws indicated
Keeping foreign matter out of your equipment
in the illustration below.
Never set any container with liquid in it near this equipment. If liquid
gets into the equipment, it could cause a breakdown, fire, or electrical
shock. Be careful not to let metal objects get into the equipment.
Notice regarding disposal (EU only)
If this symbol is shown on the product, manual, battery, or
package, you must dispose of it in the correct manner to avoid
harm to human health or damage to the environment. Contact
your local administrative body for details on the correct disposal
2. Remove the battery compartment cover.
method. If the battery contains heavy metals in excess of the
3. Install the batteries, making sure that they are oriented in the
regulated amount, a chemical symbol is displayed below the
correct position.
symbol on the battery or battery package.
4. Use the screws to reattach the battery compartment cover.
Note concernant les dispositions (Seulement EU)
The FUNCTION button blinks when the batteries are nearly
Si ce symbole apparait sur le produit, le manuel, les piles ou
empty. When this happens, install new batteries as soon as
les packs de piles, cela signifie que vous devez le recycler d'une
possible.
manière correcte afin de prévenir les dommages pour la santé
humaine et les dommages potentiels pour l'environnement.
Turn off the SQ-1 before replacing the batteries.
Contactez votre administration locale pour de plus amples
renseignements concernant la bonne méthode de recyclage. Si
Depleted batteries should be immediately removed from the
la pile contient des métaux lourds au-delà du seuil réglementé, un
SQ-1. Leaving depleted batteries in the battery compartment
symbole chimique est affiché en dessous du symbole de la poubelle
may cause malfunctions (the batteries may leak). In addition,
barrée d'une croix sur la pile ou le pack de piles.
remove the batteries if you do not expect to use the SQ-1 for
an extended period of time.
REMARQUE IMPORTANTE POUR LES CLIENTS
Do not mix partially used batteries with new ones, and do
Ce produit a été fabriqué suivant des spécifications sévères et des
not mix batteries of differing types.
besoins en tension applicables dans le pays où ce produit doit être
utilisé. Si vous avez acheté ce produit via l'internet, par vente par
correspondance ou/et vente par téléphone, vous devez vérifier que ce
produit est bien utilisable dans le pays où vous résidez.
ATTENTION: L'utilisation de ce produit dans un pays autre que celui
SQ-1 Manuel d'utilisation
pour lequel il a été conçu peut être dangereuse et annulera la garantie
du fabricant ou du distributeur.
Nous vous remercions d'avoir choisi le séquenceur SQ-1 Step
Conservez bien votre récépissé qui est la preuve de votre achat, faute
Sequencer de Korg. Pour profiter au mieux de votre nouvel
de quoi votre produit ne risque de ne plus être couvert par la garantie
du fabricant ou du distributeur.
instrument, veuillez lire attentivement ce manuel et suivre ses
consignes.
* Tous les noms de produits et de sociétés sont des marques commerciales
ou déposées de leur détenteur respectif.
Précautions
* Les caractéristiques et l'aspect du produit sont susceptibles d'être
modifiés sans avis préalable en vue d'une amélioration.
Emplacement
Mise en place de piles
L'utilisation de cet instrument dans les endroits suivants peut en
entraîner le mauvais fonctionnement.
Installez les piles de la façon décrite.
• En plein soleil
1. Retirez les deux vis indiquées sur l'illustration ci-dessous avec
• Endroits très chauds ou très humides
un tournevis cruciforme.
• Endroits sales ou fort poussiéreux
• Endroits soumis à de fortes vibrations
• A proximité de champs magnétiques
Alimentation
Lorsque vous n'utilisez pas l'appareil, n'oubliez pas de le mettre
hors tension. Retirez les piles pour éviter toute fuite lorsque
l'appareil ne sera pas utilisé pendant de longues périodes de
temps.
2. Retirez le couvercle du compartiment des piles.
Interférences avec d'autres appareils électriques
3. Mettez les piles en place, en veillant à les orienter en respectant
Les postes de radio et de télévision situés à proximité peuvent
les indications de polarité.
par conséquent souffrir d'interférences à la réception. Veuillez
dès lors faire fonctionner cet appareil à une distance raisonnable
4. Remettez le couvercle du compartiment des piles en place
avec les vis déposées.
de postes de radio et de télévision.
Le bouton FUNCTION se met à clignoter quand les piles sont
Maniement
presque plates. Dans ce cas, retirez les piles et remplacez-les
Pour éviter de les endommager, manipulez les commandes et les
par des neuves sans tarder.
boutons de cet instrument avec soin.
Mettez le SQ-1 hors tension avant de remplacer les piles.
Entretien
Extrayez toujours immédiatement les piles usées du SQ-1.
Lorsque l'instrument se salit, nettoyez-le avec un chiffon propre
Ne laissez jamais des piles plates dans le compartiment car
et sec. Ne vous servez pas d'agents de nettoyage liquides tels
elles pourraient fuir et endommager l'instrument. En outre,
que du benzène ou du diluant, voire des produits inflammables.
retirez les piles du SQ-1 si vous ne comptez pas l'utiliser
pendant une période prolongée.
Conservez ce manuel
Après avoir lu ce manuel, veuillez le conserver soigneusement
Ne mélangez jamais des piles neuves avec des piles usagées,
pour toute référence ultérieure.
et n'utilisez des piles que du même type.
Evitez toute intrusion d'objets ou de liquide
Ne placez jamais de récipient contenant du liquide près de
l'instrument. Si le liquide se renverse ou coule, il risque de
provoquer des dommages, un court-circuit ou une électrocution.
Veillez à ne pas laisser tomber des objets métalliques dans le
boîtier (trombones, par ex.).
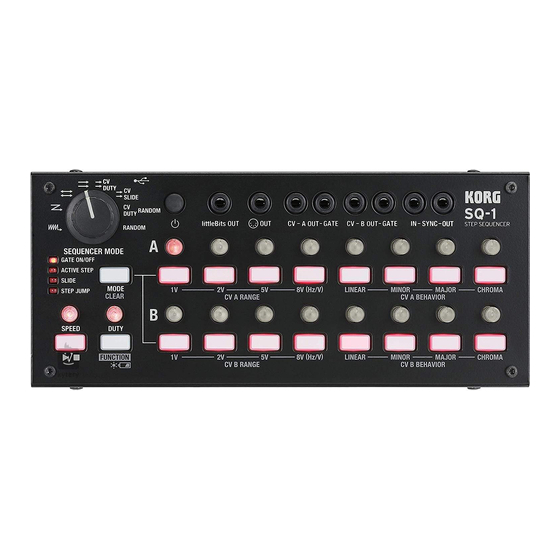
The SQ-1's controls, connectors, and functions
SEQUENCER MODE Selector
Specifies the sequencer mode
: Channel A and channel B run alternately in units of one step; signals are output from the CV-A OUT-GATE and CV-B
OUT-GATE jacks. Use channel A and channel B to control pitch or other parameters.
: The steps run in the order of channel A → channel B; signals are output from the CV-A OUT-GATE and CV-B OUT-GATE
jacks. Use channel A and channel B to control pitch or other parameters.
: Channel A and channel B run in parallel, and reverse direction at the last step. Use channel A and channel B to control
pitch or other parameters. Channel A signals are output from the CV-A OUT-GATE jacks, and channel B signals are output
from the CV-B OUT-GATE jacks.
: Channel A and channel B run in parallel. Use channel A and channel B to control pitch or other parameters. Channel A
signals are output from the CV-A OUT-GATE jacks, and channel B signals are output from the CV-B OUT-GATE jacks.
: Only channel A runs; signals are output from the CV-A OUT-GATE and CV-B OUT-GATE jacks. Use channel A to
control pitch or other parameters. Use channel B to control the duty cycle of the gate signal.
: Only channel A runs; signals are output from the CV-A
OUT-GATE and CV-B OUT-GATE jacks. Use channel A to control
pitch or other parameters. Channel B controls how smoothly the
values for each step of channel A are connected.
: The steps of channel A run randomly; signals are
output from the CV-A OUT-GATE and CV-B OUT-GATE jacks.
Use channel A to control pitch or other parameters. Use channel
B to control the duty cycle of the gate signal.
: The steps of channel A and channel B run randomly;
signals are output from the CV-A OUT-GATE and CV-B OUT-
GATE jacks. Use channel A and channel B to control pitch or
other parameters.
SPEED knob
Controls the speed at which the sequencer runs
DUTY knob
Adjusts the duty cycle of the gate signal. Higher values make the
notes sound longer.
Step knobs
If the sequencer mode is
or
, the setting of this knob is ignored,
These specify the value for each step of channel A and channel B.
and the duty cycle is controlled by channel B.
Step buttons
/ button
These edit the parameter that's specified by the MODE button.
Starts/stops the sequencer
MODE/CLEAR button
FUNCTION button
This button lets you edit the parameters of channel A and
By holding down this button and pressing the STEP buttons of each channel, you
channel B. The editable parameter changes each time you
can edit the CV output parameters of each channel. The button is lit up while you
press a button. Use the step buttons of each channel to edit
are editing these settings.
the setting.
CV A RANGE, CV B RANGE
The settings are reset if you hold down the FUNCTION button
These parameters specify the voltage of the channel A or channel B CV output
and press the MODE button (GATE ON/OFF: all steps on,
jacks. Set this to either 1V, 2V, 5V, or 8V [Hz/V] as appropriate for the device
ACTIVE STEP: all steps on, SLIDE: all steps off).
that's connected.
GATE ON/OFF
Note: The voltage setting affects the range of pitches that are sounded. For the
This function specifies whether each step's gate output is on
appropriate voltage setting, refer to the manual of the connected device.
or off. Steps that are off (button unlit) do not output a signal
CV A BEHAVIOR, CV B BEHAVIOR
from the CV/GATE jacks during playback.
These parameters specify how the setting of each step's knob will affect the output
when using channel A or channel B to control the pitch.
LINEAR: The setting of each step's knob is output without any adjustment.
Main Specifications
MINOR: The setting of each step's knob is adjusted to a minor scale for output.
● Connectors: littleBits OUT jack (mini monaural phone jack),
MAJOR: The setting of each step's knob is adjusted to a major scale for output.
level 1V, 2V, 5V, 8V [Hz/V], GATE OUT: output level 10V ), IN - SYNC - OUT jacks (mini monaural phone jack, SYNC IN: maximum input level 20V, SYNC OUT: output level 5V) ● Power supply: AA batteries
CHROMA: The setting of each step's knob is adjusted to a chromatic scale for
× 2 (alkaline batteries recommended), or USB bus power ● Battery life: approximately 5 hours (when using alkaline batteries) ● Dimensions (width × depth × height): 193 × 84 × 63 mm/7.60" × 3.31" × 2.48"
output.
● Weight: 641 g/1.41 lbs. (not including batteries) ● Included items: two AA alkaline batteries, mini-plug to DIN adapter cable, owner's manual ● Options: patch cable MS-CABLE-18
SQ-1 Bedienungsanleitung
WICHTIGER HINWEIS FÜR KUNDEN
Dieses Produkt wurde unter strenger Beachtung von Spezifikationen
Vielen Dank, dass Sie sich für den Kauf eines SQ-1 Step Sequenzers
und Spannungsanforderungen hergestellt, die im Bestimmungsland
von Korg entschieden haben. Um das Beste aus Ihrem neuen
gelten. Wenn Sie dieses Produkt über das Internet, per Postversand
und/oder mit telefonischer Bestellung gekauft haben, müssen Sie
Instrument herauszuholen, sollten Sie diese Bedienungsanleitung
bestätigen, dass dieses Produkt für Ihr Wohngebiet ausgelegt ist.
sorgfältig durchlesen.
WARNUNG: Verwendung dieses Produkts in einem anderen Land
als dem, für das es bestimmt ist, verwendet wird, kann gefährlich
Vorsichtsmaßnahmen
sein und die Garantie des Herstellers oder Importeurs hinfällig
lassen werden. Bitte bewahren Sie diese Quittung als Kaufbeleg auf,
da andernfalls das Produkt von der Garantie des Herstellers oder
Aufstellungsort
Importeurs ausgeschlossen werden kann.
Vermeiden Sie das Aufstellen des Geräts an Orten, an denen.
* Alle Produkt- und Firmennamen sind Warenzeichen oder eingetragene
• es direkter Sonneneinstrahlung ausgesetzt ist;
Warenzeichen der betreffenden Eigentümer.
• hohe Feuchtigkeit oder Extremtemperaturen auftreten können;
* Änderungen der technischen Daten und des Designs ohne vorherige
Ankündigung vorbehalten.
• Staub oder Schmutz in großen Mengen vorhanden sind;
• das Gerät Erschütterungen ausgesetzt sein kann.
Batterien einlegen
• in der Nähe eines Magnetfeldes.
Legen Sie die Batterien wie folgt ein.
Stromversorgung
1. Lösen Sie mit einem Kreuzschlitz-Schraubendreher die beiden
Stellen Sie den Netzschalter auf OFF, wenn das Gerät nicht
Schrauben wie in der Abbildung unten gezeigt.
benutzt wird. Wenn Sie das Gerät über einen längeren Zeitraum
nicht benutzen, nehmen Sie die Batterien heraus, damit sie nicht
auslaufen.
Störeinflüsse auf andere Elektrogeräte
Dieser kann bei in der Nähe aufgestellten Rund-funkempfängern
oder Fernsehgeräten Empfangsstörungen hervorrufen. Betreiben
Sie solche Geräte nur in einem geeigneten Abstand von diesem
Erzeugnis.
2. Entfernen Sie den Batteriefachdeckel.
3. Legen Sie die Batterien ein und achten Sie dabei auf die
Bedienung
richtige Polung.
Vermeiden Sie bei der Bedienung von Schaltern und Reglern
4. Bringen Sie den Batteriefachdeckel wieder an und schrauben
unangemessenen Kraftaufwand.
Sie ihn mit den beiden Schrauben fest.
Reinigung
Wenn die Batterien erschöpft sind, blinkt die FUNCTION-
Taste. Legen Sie in diesem Fall umgehend neue Batterien ein.
Bei auftretender Verschmutzung können Sie das Gehäuse mit
einem trockenen, sauberen Tuch abwischen. Verwenden Sie
Schalten Sie den SQ-1 aus, bevor Sie die Batterien ersetzen.
keinerlei Flüssigreiniger wie beispielsweise Reinigungsbenzin,
Verdünnungs- oder Spülmittel. Verwenden Sie niemals brennbare
Entfernen Sie entladene Batterien umgehend aus dem SQ-1.
Reiniger.
Die Batterien könnten sonst auslaufen und Beschädigungen
oder Fehlfunktionen verursachen. Entfernen Sie zudem
Bedienungsanleitung
die Batterien, wenn Sie den SQ-1 über längere Zeit nicht
Bewahren Sie diese Bedienungsanleitung gut auf, falls Sie sie
verwenden möchten.
später noch einmal benötigen.
Mischen Sie keine gebrauchten mit neuen Batterien und
Flüssigkeiten und Fremdkörper
verwenden Sie stets Batterien desselben Typs.
Stellen Sie niemals Behältnisse mit Flüssigkeiten in der Nähe
des Geräts auf. Wenn Flüssigkeit in das Gerät gelangt, können
Beschädigung des Geräts, Feuer oder ein elek-trischer Schlag
die Folge sein. Beachten Sie, daß keinerlei Fremdkörper in das
Gerät gelangen.
Hinweis zur Entsorgung (Nur EU)
Wenn Sie das Symbol mit der „durchgekreuzten Mülltonne"
auf Ihrem Produkt, der dazugehörigen Bedienungsanleitung,
der Batterie oder der Verpackung sehen, müssen Sie das
Produkt in der vorgeschriebenen Art und Weise entsorgen um
Schäden an der menschlichen Gesundheit und der Umwelt zu
vermeiden. Batterien oder Akkus, die Schadstoffe enthalten,
sind auch mit dem Symbol einer durchgekreuzten Mülltonne
gekennzeichnet. In der Nähe zum Mülltonnensymbol befindet sich
die chemische Bezeichnung des Schadstoffes.
CV jacks output signals that control pitch or other parameters , and the GATE
(power) button
jacks output gate signals that control the length of the notes.
This button turns the power on. To turn the power off, press and hold the
button for approximately one second.
IN - SYNC - OUT jacks
Auto power-off function
Connect these jacks to an analog synthesizer such as the volca series or the
The SQ-1 has an auto power-off function. When approximately four hours
monotribe, so that the two units will operate in synchronization. The SYNC
have elapsed without the SQ-1 running, the power will turn off automatically.
OUT jack outputs a 5V pulse that's 15 ms long at the beginning of each step.
You can disable the auto power-off function (see "Global parameter settings")
If you connect the SYNC OUT jack of a volca series unit or the monotribe to
the SYNC IN jack of the SQ-1, the step clock of the SQ-1 is ignored, and steps
littleBits OUT jack
advance according to the pulses that are input. Use this if you want steps to
Connect this jack to a littleBits unit that you want to control.
synchronize to the pulses that are output from a monotribe or other analog
sequencer, or from an audio output of your DAW.
OUT (MIDI OUT) jack
(USB) jack
Use the included adapter cable and a MIDI cable to connect this jack to an
external MIDI unit that you want to control.
Connect this to your computer if you want to control a software synthesizer
from the SQ-1. The USB connection is also used to update the SQ-1's operating
CV - A OUT - GATE, CV - B OUT - GATE jacks
system software. If this is connected, the SQ-1 will be powered by USB bus
Connect these jacks to an external analog unit that you want to control. The
power.
Global parameter settings
If you turn on the power while pressing the / button, you can set the
following global parameters. When you've finished editing the settings,
press the
button. The settings will be saved and the SQ-1 will restart.
Auto power-off function
To enable the auto power-off function, make the / button light up.
With the original factory settings, this feature is enabled.
To disable the auto power-off function, make the / button unlit.
MIDI channel setting
The channel A and channel B step buttons correspond to MIDI channels
1‒16. Press the button of the corresponding channel to make it light up.
GATE output polarity of channel A and channel B
When the MODE button lit is lit up + (positive polarity) is selected. When
the MODE button is unlit (negative polarity) - polarity is selected. With
the factory settings enabled, + (positive polarity) is selected. Set this as
appropriate for the device that's connected.
SYNC IN and SYNC OUT polarity
When the MODE button is lit + polarity (rise) is selected. When the
MODE button is unlit - polarity (fall) is selected. With the factory settings
enabled, + (rise) is selected. Set this as appropriate for the device that's
connected.
ACTIVE STEP
This feature specifies whether each step of the sequence is on
Sequence step resolution
or off. Steps that are off (button unlit) are disabled, and are
Use the SEQUENCER MODE selector to specify the resolution of the
excluded from the sequence.
steps.
SLIDE
: quarter notes,
: eighth notes,
This feature allows you to specify how the value changes
About the MIDI implementation chart
between steps. If this is on (button lit up), the pitch or value
You can connect the SQ-1's MIDI OUT connector to an external MIDI
changes smoothly from one step to the next. If the sequencer
mode is
, the settings of each step of channel B will
device and control it. The MIDI messages that the SQ-1 can transmit
are listed in the MIDI implementation chart. You can download the
be used.
SQ-1's MIDI implementation chart from the Korg website (http://www.
STEP JUMP
korg.com/).
If the sequencer is running, pressing a step button will cause
the sequencer jump immediately to that step. If the sequencer
is stopped, pressing a step button (the button lit up) makes the
sequencer start running from that step.
OUT (MIDI OUT) jack (mini stereo phone jack), CV - A OUT -GATE, CV - B OUT - GATE jacks (mini monaural phone jacks, CV OUT: output
* Todos los nombres de productos y compañías son marcas
Manual del usuario del SQ-1
comerciales o marcas registradas de sus respectivos propietarios.
* Las especificaciones y el aspecto están sujetas a cambios sin
Gracias por comprar el secuenciador por pasos Korg SQ-1. Para
previo aviso por mejora.
ayudarle a sacar el máximo partido de su nuevo instrumento, lea
detenidamente este manual.
Colocación de las pilas
Precauciones
Coloque las pilas como se indica a continuación.
1. Utilice un destornillador Philips para retirar los dos tornillos
Ubicación
indicados en la ilustración siguiente.
El uso de la unidad en las siguientes ubicaciones puede dar como
resultado un mal funcionamiento:
• Expuesto a la luz directa del sol
• Zonas de extremada temperatura o humedad
• Zonas con exceso de suciedad o polvo
• Zonas con excesiva vibración
• Cercano a campos magnéticos
2. Retire la tapa del compartimento de las pilas.
Fuente de alimentación
3. Coloque las pilas y asegúrese de que están orientadas en la
posición correcta.
Apague la unidad cuando no la use la batería. Retire las baterías
4. Utilice los tornillos para volver a colocar la tapa del
si no va a usar la unidad durante un tiempo largo.
compartimento de las pilas.
Interferencias con otros aparatos
El botón FUNCTION parpadea cuando las pilas están casi
Las radios y televisores situados cerca pueden experimentar
agotadas. Si ocurre esto, coloque pilas nuevas lo antes posible.
interferencias en la recepción. Opere este dispositivo a una
Desactive el SQ-1 antes de sustituir las pilas.
distancia prudencial de radios y televisores.
Las pilas agotadas deben extraerse inmediatamente del SQ-1.
Manejo
Si no retira las pilas agotadas de su compartimento puede
Para evitar una rotura, no aplique excesiva fuerza a los
provocar un fallo de funcionamiento (las pilas pueden tener
conmutadores o controles.
pérdidas). Retire también las pilas si no tiene previsto utilizar
el SQ-1 durante un periodo de tiempo prolongado.
Cuidado
Si exterior se ensucia, límpiese con un trapo seco. No use líquidos
No combine pilas parcialmente utilizadas con otras nuevas
limpiadores como disolvente, ni compuestos inflamables.
y tampoco combine pilas de distintos tipos.
Guarde este manual
Después de leer este manual, guárdelo para futuras consultas.
Mantenga los elementos externos alejados del equipo
Nunca coloque ningún recipiente con líquido cerca de este
equipo, podría causar un cortocircuito, fuero o descarga eléctrica.
Cuide de que no caiga ningún objeto metálico dentro del equipo.
na distancia prudencial de radios y televisores.
Nota respecto a residuos y deshechos (solo UE)
Si aparece el símbolo del cubo de basura tachado sobre
un producto, su manual de usuario, la batería, o el
embalaje de cualquiera de éstos, significa que cuando tire
dichos artículos a la basura, ha de hacerlo en acuerdo con
la normativa vigente de la Unión Europea para prevenir
daños a la salud pública y al medioambiente. Le rogamos
que se ponga en contacto con su oficina o ministerio de
medioambiente para más detalles. Si la batería contiene metales
pesados por encima del límite permitido, habrá un símbolo de
un material químico, debajo del símbolo del cubo de basura
tachado.
NOTA IMPORTANTE PARA EL CONSUMIDOR
Este producto ha sido fabricado de acuerdo a estrictas
especificaciones y requerimientos de voltaje aplicables en el
país para el cual está destinado. Si ha comprado este producto
por internet, a través de correo, y/o venta telefónica, debe usted
verificar que el uso de este producto está destinado al país en
el cual reside.
AVISO: El uso de este producto en un país distinto al cual
está destinado podría resultar peligroso y podría invalidar
la garantía del fabricante o distribuidor. Por favor guarde
su recibo como prueba de compra ya que de otro modo el
producto puede verse privado de la garantía del fabricante
o distribuidor.
: sixteenth notes
Advertisement
Table of Contents

Related Manuals for Korg SQ-1


Summary of Contents for Korg SQ-1
- Page 1 SYNC IN jack of the SQ-1, the step clock of the SQ-1 is ignored, and steps remove the batteries if you do not expect to use the SQ-1 for reception, which can be determined by turning the equipment off and jacks.
- Page 2 : Kanal A und Kanal B laufen parallel und in Umkehrrichtung beim letzten Step. Mit Kanal A und Kanal B können Sie paramètres globaux”). la prise SYNC IN du SQ-1, l'horloge de pas interne du SQ-1 est ignorée et les pas suivent Zum Anschluss eines littleBits-Geräts, das Sie hierüber steuern möchten.
Need help?
Do you have a question about the SQ-1 and is the answer not in the manual?
Questions and answers