
Related Manuals for wbox 0E-41TP1UN

Summary of Contents for wbox 0E-41TP1UN
- Page 1 FOR TECHNICAL SUPPORT: 1-888-668-8808 0E-41TP1UN 0E-82TP1UN 0E-162TP15UN T E C H N O L O G I E S...
-
Page 2: Table Of Contents
Contents Contents ..................................... 2 Warranty ....................................3 Regulatory Information ................................8 Preventive and Cautionary Tips ..............................9 Trademarks and Registered Trademarks ........................... 9 Appearance Description ................................10 Getting Started ..................................14 Live View ....................................15 Record ...................................... 20 Playback ....................................21 Backup ...................................... -
Page 3: Warranty
The content in this manual is subject to change without notice. Updates will be added to future versions of this manual. DISCLAIMER STATEMENT “Underwriters Laboratories Inc. (“UL”) has not tested the performance or reliability of the security or signaling aspects of this product. - Page 4 DVR's, NVR's 60 Months IP Cameras 60 Months Magnetic Locks 60 Months Racks 60 months TV Mounts 60 months PIR’s 84 months Analog Cables Limited Lifetime B Connectors Limited Lifetime Bus Terminals Limited Lifetime Extension Cords Limited Lifetime HDMI Cables Limited Lifetime Jacks, Cords...
- Page 5 4. Returns Subject to the terms and conditions listed below, during the applicable warranty period, ADI will replace Product or provide a credit at purchase at its sole option free of charge any defective products returned prepaid. Any obligations of ADI to replace Limited Lifetime warranty products pursuant to this warranty which result from defect are limited to the availability of replacement product.
- Page 6 quels, conformément à ses modalités de vente. b. Les garanties particulières applicables aux catégories de produits sont les suivantes : Catégories de produits Période de la garantie Téléviseurs 12 mois Accessoires de communication d’intrusion sans fil 12 mois Barres de son 12 mois UPS (systèmes d’alimentation sans coupure) 24 mois...
- Page 7 ou ses mandataires au sujet de l’utilisation, de l’application ou du caractère approprié des produits ne doivent pas être interprétées comme des garanties ou conditions expresses, sauf si ADI confirme par écrit qu’il s’agit de garanties ou de conditions expresses. ADI ne garantit pas qu’il n’y aura aucune atteinte à l’intégrité des produits qu’elle vend ou que les produits qu’elle vend ne seront pas contournés, qu’ils préviendront les blessures ou les pertes matérielles en cas de cambriolage, de vol, d’incendie ou autrement ou qu’ils constitueront dans tous les cas une protection ou un avertissement approprié.
-
Page 8: Regulatory Information
5. Lois applicables Les lois de l’État de New York s’appliquent à la présente garantie limitée. 6. Modalités diverses Si une modalité de la présente garantie limitée est interdite par ces lois, elle sera nulle, mais le reste de la présente garantie limitée demeurera pleinement en vigueur. -
Page 9: Preventive And Cautionary Tips
Preventive and Cautionary Tips Before connecting and operating your device, please be advised of the following tips: • Ensure unit is installed in a well-ventilated, dust-free environment. • Unit is designed for indoor use only. • Keep all liquids away from the device. •... -
Page 10: Appearance Description
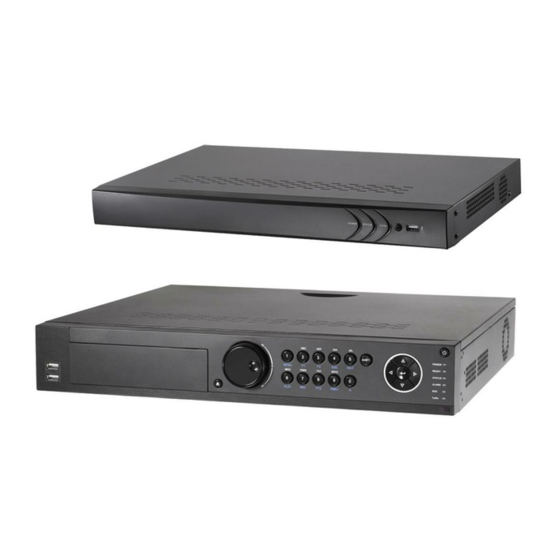
USB Interface such as USB mouse and USB Hard Disk Drive (HDD). Item Description Power Supply 48V DC power supply for 0E-41TP1UN and AC 100~240V for 0E-82TP1UN/0E-162TP15UN. Audio In RCA connector for audio input. HDMI Interface HDMI video output connector. - Page 11 Name Function Description POWER Turns green when NVR is powered up. READY The LED is green when the device is running normally. The light is green when the IR remote control is enabled; The light is red when the function of the composite STATUS Status keys (SHIFT) are used;...
- Page 12 Name Function Description Access the main menu interface. Enter numeral “2”; Enter letters “ABC”; The F1 button when used in a list field will select all 2/ABC/F1 items in the list. In PTZ Control mode, it will turn on/off PTZ light and when the image is zoomed in, the key is used to zoom out.
- Page 13 Name Function Description Universal Serial Bus (USB) ports for additional devices USB Interfaces such as USB mouse and USB Hard Disk Drive (HDD). Item Description LAN Interface Network interface. AUDIO OUT RCA connector for audio output. LINE IN RCA connector for audio input. HDMI HDMI video output connector.
-
Page 14: Getting Started
Getting Started The default user name is admin and password is wbox123. This product has default user name and password credentials for first time access. You must change these default credentials to protect against unauthorized access to the product. Starting Up and Shutting Down the NVR Proper startup and shutdown procedures are crucial to expanding the life of the NVR. -
Page 15: Live View
The menu structure is shown as below: Menu Playback Maintenance Shutdown Export Manual Record Camera Configuration Normal Normal Record General Schedule Camera General System Info Logout Event Event Alarm Advanced Parameters Network Shutdown Information Advanced Image Alarm Reboot Import/Export Smart Holiday RS-232 Upgrade... - Page 16 In the live view mode, there are icons at the right top of the screen for each channel, showing the status of the record and alarm in the channel, so that you can know whether the channel is recorded, or whether there are alarms occur as soon as possible.
- Page 17 The settings available in this menu include: • Video Output Interface: Designates the output to configure the settings for. Outputs include HDMI/VGA and CVBS (depends on the model). • Live View Mode: Designates the display mode to be used for Live View. •...
-
Page 18: Adding And Connecting The Ip Cameras
User Logout After logging out, the monitor turns to the live view mode and if you want to do some operation, you need to enter user name and password to log in again. Steps: Enter the Shutdown menu. Menu>Shutdown Click Logout. Note: After you have logged out the system, menu operation on the screen is invalid. - Page 19 3. The online cameras with same network segment will be displayed in the camera list. Click the button to add the camera. Icon Explanation Icon Explanation Edit basic parameters of the Add the detected IP camera. camera The camera is disconnected; you can click the icon to get The camera is connected.
-
Page 20: Record
Icon Explanation Icon Explanation Edit basic parameters of the Add the detected IP camera. camera The camera is disconnected; The camera is connected; you you can click the icon to get can click the icon to get the the exception information of live view of the camera. -
Page 21: Playback
4. Choose the day in a week to configure scheduled recording. 5. Click Edit to edit record schedule. 1) Configure All Day or Customize Record: • If you want to configure the all-day recording, please check the All Day checkbox. •... - Page 22 Choose a channel in live view mode using the mouse and click the button in the quick setting toolbar. Note: In the instant playback mode, only record files recorded during the last five minutes on this channel will be played back. Playback by channel Enter the Playback interface.
-
Page 23: Backup
Click the channel(s) to execute simultaneous playback of multiple channels. Button Operation Button Operation Button Operation Start/Stop Mute/Audio on Save clip(s) clipping Add default Add customized Tag management Pause/ Digital Zoom Smart Search Play Reverse Stop 30s backward 30s forward Slow forward Fast forward Previous day... - Page 24 Enter Export interface, choose backup device and click the Export button to start exporting. Check backup result. Choose the record file in Export interface and click button to check it. The record files can be backup to various devices, such as USB devices (USB flash drives, USB HDDs, USB writer) and SATA writer.
- Page 25 Export. Click Export All button to export all the recording files. Or you can select recording files you want to back up, and click Export button to enter Export interface. Note: If the inserted USB device is not recognized: • Click the Refresh button. •...
-
Page 26: Accessing Via Web Browser
Accessing via Web Browser Logging In You can get access to the device via web browser. Open web browser, input the IP address of the device and then press Enter. The login interface appears. Input the user name and password, and click the Login button. NOTES: You may use one of the following listed web browsers: Internet Explorer 6.0, Internet Explorer 7.0, Internet Explorer 8.0, Internet Explorer 9.0, Internet Explorer 10.0, Apple Safari, Mozilla Firefox, and Google Chrome. - Page 27 When you log in for the first time, the system will remind you to install the Plug-in control. After the installation, you can configure and manage the device remotely.
-
Page 28: Specifications
Specifications Model 0E-41TP1UN 0E-82TP1UN 0E-162TP15UN IP video input 4-ch 8-ch 16-ch Video/Audio input Two-way audio input 1-ch, RCA (2.0 Vp-p, 1kΩ) Incoming bandwidth 25Mbps 50Mbps 100Mbps Network Outgoing bandwidth 80Mbps Remote connection Recording resolution 6MP/5MP/3MP/1080P/UXGA/720P/VGA/4CIF/DCIF/2CIF/CIF/QCIF Main stream: 50 fps (P) / 60 fps (N) - Page 29 FOR TECHNICAL SUPPORT: 1-888-668-8808...
Need help?
Do you have a question about the 0E-41TP1UN and is the answer not in the manual?
Questions and answers