Table of Contents
Advertisement
Advertisement
Table of Contents
Troubleshooting

Related Manuals for TANDBERG RDX QuikStation

Summary of Contents for TANDBERG RDX QuikStation
- Page 2 Copyright 2011 by Tandberg Data. All rights reserved. This item and the information OPYRIGHT contained herein are the property of Tandberg Data. No part of this document may be reproduced, transmitted, transcribed, stored in a retrieval system, or translated into any...
- Page 3 The RDX QuikStation by Tandberg Data Corporation is warranted to be free from RODUCT defects in materials, parts, and workmanship and will conform to the current product ARRANTY specification upon delivery. For the specific details of your warranty, refer to your sales AUTION contract or see the Tandberg Data web site (www.tandbergdata.com).
- Page 4 OTES 1019786 RODUCT ANUAL...
-
Page 5: Table Of Contents
Product Overview ......1 RDX QuikStation Features ....... . . 2 Configuration Flexibility . - Page 6 Configuring the RDX QuikStation ......21 Logical Device Type ....... . . 21 System Settings .
- Page 7 Troubleshooting ......103 RDX QuikStation Dock Error Codes ......103 Basic Troubleshooting Information .
- Page 8 Specifications ....... . 105 Physical Specifications ........106 Power Specifications .
-
Page 9: About This Manual
BOUT ANUAL BOUT ANUAL This manual describes how to install and operate the RDX QuikStation and is intended for use by anyone deploying the RDX QuikStation into their network environment. Familiarity with system and network configuration is highly recommended. The following chapters are included in this manual: Overview ... - Page 10 For additional information about the RDX QuikStation, refer to the following publications, which are available at www.tandbergdata.com. RDX QuikStation Quick Start Guide, part number 1019372 Field Instruction: Installing the RDX QuikStation in a Rack, part number 1019782 RDX QuikStation Knowledge Base articles available online at ...
-
Page 11: Product Overview
Depending on the size of the RDX cartridges that are in use, the RDX QuikStation can offer up to 8-terabytes of online capacity. This chapter provides an overview of the RDX QuikStation’s features and components. -
Page 12: Rdx Quikstation Features
EATURES This section provides an overview of the RDX QuikStation’s features. ONFIGURATION LEXIBILITY You can configure the RDX QuikStation as one of the following device types: Eight Tandberg Data RDX drives with eight removable iSCSI disk targets. Eight LTO-3 tape drive iSCSI targets. -
Page 13: High Performance And Capacity
51). OMPACT ESIGN The RDX QuikStation uses only two units (2U) of rack space, minimizing the impact on data center space requirements. 1. The data transfer rate is up to 200 MB/second when port configuration is configured for adaptive load... -
Page 14: Rdx Quikstation Components
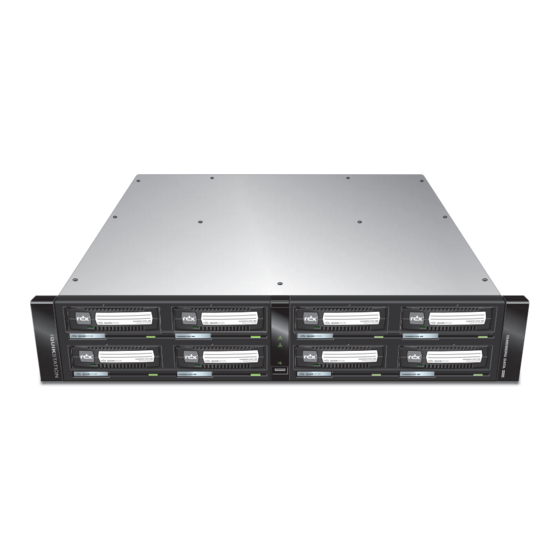
1—P HAPTER RODUCT VERVIEW RDX Q TATION OMPONENTS This section describes the RDX QuikStation’s front panel and back panel components. Figure 1-1 RDX QuikStation front panel components RDX LCD panel (eight each) — see... - Page 15 Figure 1-2 RDX QuikStation back panel components Power connector Power button Note: When the unit is turned on, pressing the power button performs a soft shutdown (recommended). Pressing and holding the power button for 10 seconds performs a hard shutdown.
-
Page 16: Rdx Dock Lcd Panels
1—P HAPTER RODUCT VERVIEW RDX D LCD P ANELS The eight RDX dock LCDs display information based on the conditions that are described in the following table Condition What is displayed in LCD Dock Panels Upon initial startup of The firmware level, system name, IP status (DHCP or the unit and before a static), and a valid IP address (if DHCP is enabled) logical device type has... -
Page 17: Rdx Cartridge-Eject Button/Power Led
NDICATOR ANEL The following table describes LED indicator functionality on the front panel. Color Status Indicator RDX QuikStation is not connected to a network cable. (no color) Blinking Network connection has good-to-excellent connectivity. Green Blinking Network connection has limited or no connectivity. - Page 18 1—P HAPTER RODUCT VERVIEW 1019786 RODUCT ANUAL...
-
Page 19: Installation And Setup
Connecting to the Remote Management Console ... . . page 20 Configuring the RDX QuikStation ......page 21 2011... -
Page 20: Preparing For Installation
2—I HAPTER NSTALLATION AND ETUP REPARING FOR NSTALLATION For all host computers that will be backed up by the RDX QuikStation, verify that the host computer OS has iSCSI initiator software installed. Windows Linux Macintosh iSCSI initiators are iSCSI initiators are... -
Page 21: Verifying Accessory Kit Contents
Two appliance end-cap covers to place over rackmount bolts USB flash drive Rackmount rail kit, which includes: Two inner rack rails to attach to the RDX QuikStation Two outer rack rails to attach to the rack Hardware pack for inner rails Hardware pack for outer rails ... -
Page 22: Installing The Rdx Quikstation In A Rack
RDX Q NSTALLING THE TATION IN A The RDX QuikStation is designed for installation in a standard (EIA-310) 4-post, 19-inch rack and uses 2 units (2U) of rack space. The rackmount kit includes the following items: Table 2-2 Rackmount kit contents... -
Page 23: Assembling The Outer Rails
Figure 2-1 RDX QuikStation outer rack rail assembly To assemble the outer rails: Measure the inside distance from the front mounting holes to the back mounting holes on one side of your rack. -
Page 24: Installing The Outer Rails Into The Rack
2—I HAPTER NSTALLATION AND ETUP NSTALLING THE UTER AILS INTO THE The front and back of the rails attach to the rack with a bar nut, two washers, and two #10 pan-head screws, as shown in the figure below. #10 pan-head screws washers rail extension bracket... -
Page 25: Attaching The Inner Rails
AILS inner rail locking tab Figure 2-3 Attaching the inner rails to the RDX QuikStation On each side of the appliance, align the inner rail holes with the first three holes on the RDX QuikStation. Use three #6 pan-head screws to attach the inner rail to the appliance, as shown in the above figure. -
Page 26: Installing The Rdx Quikstation Into The Rack
You may have to depress the locking tabs when inserting. Push the RDX QuikStation completely into the rack. Use the locking screws located on each side of the RDX QuikStation to secure it into the rack. Push and turn the locking screws clockwise to lock. -
Page 27: Connecting Network And Power Cables
ABLES power button ethernet ports power connector Figure 2-5 Connecting ethernet and power cables to the RDX QuikStation Connect one or two RDX QuikStation ethernet network ports to ethernet network ports on a switch, hub, or router. Note: Two network ports are recommended for failover protection. -
Page 28: Configuring Network Information
ONFIGURING ETWORK NFORMATION Note: If you are able to obtain a valid IP address from your RDX QuikStation LCD panels upon startup, skip this section and go to Connecting to the Remote Management Console on page To manually configure your RDX QuikStation network information:... - Page 29 Save the file to the root directory of the USB flash drive as “network.conf.” If the flash drive that was included with your RDX QuikStation is unavailable, you can save the file to any USB flash drive with a VFAT file system.
-
Page 30: Connecting To The Remote Management Console
Note: Your web browser must have JavaScript enabled. To connect to the RDX QuikStation Remote Management Console: From a network host, type the RDX QuikStation IP address in a web browser: http://<RDX QuikStation IP address> Note: If your network runs DHCP , you can obtain the IP address from the RDX QuikStation’s LCD panels. -
Page 31: Configuring The Rdx Quikstation
TATION OGICAL EVICE You can configure your RDX QuikStation in a variety of ways. Logical device configurations are available for disk, tape, disk automation and tape automation. For even greater flexibility, you can choose a hybrid configuration of virtual tape library and disk. -
Page 32: System Settings
2—I HAPTER NSTALLATION AND ETUP YSTEM ETTINGS Refer to the table below to configure the following RDX QuikStation system settings. For more information, see Chapter 4 on page Table 2-3 Recommended system settings Setting Purpose Where to find Date/Time Set the date and time to your time... -
Page 33: Iscsi Configuration
ONFIGURATION The data that you want to back up and restore is transferred from your host computers to the RDX QuikStation via the iSCSI (Internet Small Computer System Interface) protocol. In iSCSI terminology, a host computer is referred to as an “initiator” and the storage device it connects to as the iSCSI “target.”... -
Page 34: Iscsi Configuration Overview
SCSI C ONFIGURATION VERVIEW Before you can begin to back up and restore data with the RDX QuikStation, the host computers (initiators) must establish an iSCSI connection to the RDX QuikStation’s storage targets. To establish an iSCSI connection, you need to have iSCSI initiator software installed on the host. -
Page 35: Connecting To Iscsi Targets Without Authentication
ONNECTING TO I ARGETS ITHOUT UTHENTICATION This section describes how to connect Windows, Linux, and Macintosh hosts to RDX QuikStation iSCSI targets without authentication. If you plan on using one-way CHAP authentication, follow the instructions in “Setting iSCSI Security” on page ... - Page 36 HAPTER ONFIGURATION In the Discover Target Portal dialog window, type the IP address for the RDX QuikStation. Click [OK]. Click the Targets tab. Depending on how you configured the logical device type for the QuikStation, you will see two to eight iSCSI targets. The screenshot below depicts a TandbergData StorageLibrary T24 configuration.
- Page 37 Select the “Add this connection to the list of Favorite Targets” checkbox. Click [OK]. The RDX QuikStation’s iSCSI target should display as “connected” in the Discovered Targets dialog window, as shown below. Before you shutdown or restart the RDX QuikStation for any...
-
Page 38: Connecting Iscsi Targets For Linux
$ sudo apt-get install open-iscsi Discover iSCSI Targets. To discover the RDX QuikStation iSCSI targets, enter the following command, replacing the variable RDX QuikStation IP address with the actual IP address for your RDX QuikStation: # iscsiadm -m discovery -t sendtargets -p RDX QuikStation... - Page 39 To delete a target, enter the following command, replacing target IQN name with the iSCSI qualified name (IQN) of the target: # iscsiadm -m node -T target IQN name -o delete Before you shutdown or restart the RDX QuikStation for any Important reason, Tandberg Data recommends that you disconnect all iSCSI initiators.
-
Page 40: Connecting Iscsi Targets For Macintosh
[Discover{ b y{ D NS/IP]. The following dialog window opens. In the Address field, type the IP address for the RDX QuikStation. If you are using a port number other than the default, type the number in the Port field. Otherwise leave the default 3260 port number. Click [Finish]. - Page 41 Highlight all the discovered targets and click [Add]. The targets are displayed in the left pane with a red icon, signifying that they are not yet connected. 2011 RDX Q CTOBER TATION...
- Page 42 Select the Network Node and click [Login]. The iSCSI targets will display with a green icon when they are connected to the RDX QuikStation, as shown below. Before you shutdown or restart the RDX QuikStation for any Important reason, Tandberg Data recommends that you disconnect all iSCSI initiators.
-
Page 43: Setting Iscsi Security
SCSI S ETTING I ECURITY The RDX QuikStation allows you to set iSCSI security in one of the following ways Security Type Description CHAP CHAP is a protocol that is used to authenticate iSCSI Authentication connections and is based upon the initiator and target sharing a secret (a security key that is similar to a password). -
Page 44: Setting Iscsi Security In The Remote Management Console
ECURITY IN THE EMOTE ANAGEMENT ONSOLE To set iSCSI security: Sign in to the RDX QuikStation Remote Management Console (see page 20). Click the Logical Device tab, then select the iSCSI target from the tree view in the left pane. - Page 45 Enabling CHAP Authentication To add CHAP users (hosts) to an iSCSI target: From the Security tab dialog window, make sure the CHAP Authentication option is shown in the pulldown window. Click [+{ A dd]. The Add iSCSI User dialog box opens. In the User Name field, enter the host initiator name.
- Page 46 3— SCSI C HAPTER ONFIGURATION Enabling Host Authentication To add hosts that will be allowed to connect to an iSCSI target: From the Security tab dialog window, select Host Authentication from the pulldown window. Click [+{ A dd]. The Add iSCSI Host dialog box opens. Type the IP address for the network host.
-
Page 47: Connecting Iscsi Targets With Chap For Windows
Click [Discover{{Portal...]. (Your version of iSCSI initiator may use [Add] depending on your Windows OS.) The Discover Target Portal dialog window opens. In the Discover Target Portal dialog window, type the IP address for the RDX QuikStation. Click [OK]. Click the Targets tab. 2011 RDX Q... - Page 48 3— SCSI C HAPTER ONFIGURATION Depending on how you configured the logical device type for the QuikStation, you will see two to eight iSCSI targets. The screenshot below depicts a TandbergData StorageLibrary T24 configuration. The three iSCSi targets connect the library and two LTO-3 tape drives to the host. For each iSCSI target, complete the following steps: Select an iSCSI qualified name (IQN).
- Page 49 The Advanced Settings dialog window opens. Select the “Enable CHAP log on” checkbox. Type the target secret. This secret must match the CHAP secret that was set in the RDX QuikStation Remote Management Console for this particular iSCSI target. Note:...
-
Page 50: Connecting Iscsi Targets With Chap For Linux
3— SCSI C HAPTER ONFIGURATION Before you shutdown or restart the RDX QuikStation for any Important reason, Tandberg Data recommends that you disconnect all iSCSI initiators. SCSI T CHAP ONNECTING I ARGETS WITH INUX The following instructions describe how to connect iSCSI targets with CHAP authentication using Linux Open-iSCSI Initiator. - Page 51 # /etc/init.d/iscsi start Discover iSCSI Targets. To discover the RDX QuikStation iSCSI targets, enter the following command, replacing the variable RDX QuikStation IP address with the actual IP address for your RDX QuikStation: # iscsiadm -m discovery -t sendtargets -p RDX QuikStation...
-
Page 52: Connecting Iscsi Targets With Chap For Macintosh
[Discover{ b y{ D NS/IP]. The following dialog window opens. In the Address field, type the IP address for the RDX QuikStation. If you are using a port number other than the default, type the number in the Port field. Otherwise leave the default 3260 port number. Click [Finish]. - Page 53 Highlight all the discovered targets and click [Add]. The targets are displayed in the left pane with a red icon, signifying that they are not yet connected. 2011 RDX Q CTOBER TATION...
- Page 54 Click [Security]. The Configure Security dialog window opens. Type the target secret. This secret must match the CHAP secret that was set in the RDX QuikStation Remote Management Console for this particular iSCSI target. Note: The target user name (the host’s IQN name), must match the user name that is specified in the iSCSI Management settings of the Remote Management Console.
- Page 55 Select the Network Node and click [Login]. The iSCSI targets will display with a green icon when they are connected to the RDX QuikStation, as shown below. Before you shutdown or restart the RDX QuikStation for any Important reason, Tandberg Data recommends that you disconnect all iSCSI initiators.
- Page 56 3— SCSI C HAPTER ONFIGURATION 1019786 RODUCT ANUAL...
-
Page 57: System Configuration
Setting email notifications ....... . . page 53 Setting RDX QuikStation options ......page 54 ... -
Page 58: System Settings Overview
(see page 53). User Management Allows an administrator to add, remove, and edit users that are allowed access to the RDX QuikStation Remote Management Console (see page 60). Convert Device Type Allows you to change the logical device type for the RDX QuikStation. -
Page 59: Setting Date And Time
ATE AND Note: You must have administrator privileges to set the date and time. To set the date the time and time for your RDX QuikStation: From the Remote Management Console main menu, select System Settings > Date/Time. The Date/Time Settings dialog window opens. -
Page 60: Configuring Network Information
System Settings > Network. The Network Settings dialog window opens. Modify the host name if desired. The default RDX QuikStation host name uses “QS” and the last four digits of the unit’s serial number. Add or modify the search domain (DNS lookup domain). This field is optional. -
Page 61: Configuring Advanced Network Settings
Select an ethernet port configuration. By default, the port setting is set for Active Backup, or Failover. In most cases, this default setting will suffice for your network environment. See Configuring Advanced Network Settings in the section below for more information. Click [Change]. - Page 62 YSTEM ONFIGURATION Port Configuration Options The RDX QuikStation has two Gigabit Ethernet ports to provide failover protection and high availability network connectivity. In network environments, it is a common practice to configure two or more external ports as a single, logical, bonded port using an industry standard feature called Link Aggregation, also known as port bonding or port trunking.
-
Page 63: Setting Email Notifications
Type one or two valid email addresses in the email recipient fields. The RDX QuikStation will send any system error messages, such as a fan failure or an RDX dock failure, to the addresses that you specify. The RDX QuikStation will also send any password recovery requests to these addresses. -
Page 64: Customizing Email Subject And "From" Address
Allows you to change the log level from Normal to Detail or Extend. Tandberg Data recommends you only change the log level if you are instructed to do so by Tandberg Data Technical Support. Note: If you change the log level, the system will default to “normal”... - Page 65 From the Remote Management Console main menu, select System Settings > Options. The Options dialog window opens with the System tab selected. 2011 RDX Q CTOBER TATION...
-
Page 66: Setting Removable Disk Options
4—S HAPTER YSTEM ONFIGURATION ETTING EMOVABLE PTIONS Note: The removable disk option only applies to disk configurations. You can enable the “Unsafe Eject” mode for RDX cartridges that have an established host connection. By default, when an RDX dock is configured as a logical disk drive that is connected to a host computer, you cannot manually eject the cartridge using the RDX dock eject button or from using the eject function in the Remote Management Console. -
Page 67: Setting The Auto-Insert Option
ETTING THE NSERT PTION The auto-insert option controls how the RDX QuikStation handles tape library import/export slot functionality. The following table describes RDX QuikStation behavior when this option is turned off and when it’s turned on. Table 4-4 Auto-insert (I/E port behavior) option settings... - Page 68 4—S HAPTER YSTEM ONFIGURATION To change the auto-insert option: Click the Automation tab from the Options dialog window. Select your desired setting. Click [OK]. Note: The default is the “On” setting. See Table 4-4. Figure 4-1 A logical view of a tape library with the auto-insert option turned OFF. Note that only the IE Port displays as populated until you import the other cartridges one at a time with your backup software.
- Page 69 Figure 4-2 A physical view of a tape library with the auto-insert option turned OFF. Note that four cartridges are displayed in their physical slots, where in Figure 4-1, only one cartridge is displayed in the IE port. Figure 4-3 A logical view of a tape library with the auto-insert option turned ON. Note that cartridges automatically mount to logical slots that correspond with their physical dock locations.
-
Page 70: Managing User Groups
4-3). ANAGING ROUPS Note: You must have administrator privileges to manage user groups. The RDX QuikStation allows you to set up three types of groups: administrator, manager, and user. This section contains the following topics: Group permissions overview (page ... -
Page 71: Group Permissions Overview
ROUP ERMISSIONS VERVIEW The following table describes the functionality each group can access in the Remote Management Console. Table 4-5 RDX QuikStation Group Permissions User Manager Administrator Users have permission to do the Managers have permission to do Administrators have access to all... -
Page 72: Removing Users From A Group
To remove users from a group: From the User Management dialog window (go to System Settings > User), select the user that you want to remove. Click [-{ R emove]. Type your RDX QuikStation administrator password. Click [OK]. Click [Yes] to confirm. 1019786... -
Page 73: Editing User Information
Type a new password. Type the password again to verify. Click [OK]. Notes: For users assigned to administrator and manager groups, you must first enter your RDX QuikStation administrator password before editing the password. Passwords are case sensitive and must be 6 to 30 characters long. -
Page 74: Recovering The Built-In Administrator Password
63). ESETTING THE ASSWORD VIA MAIL From the RDX QuikStation Sign-in dialog window, click the [?] in the upper-right corner. Select the Administrator radio button. Click [Continue]. The Administrator Password Reset dialog window opens. Select [Request{ K ey]. 1019786... - Page 75 The RDX QuikStation sends an email message to the address that was specified in the Remote Management Console (see page 53). The request key will remain valid for one hour. Click [OK] and leave the Administrator Password Reset dialog window open.
-
Page 76: Resetting The Password Via Usb
RDX QuikStation. To create the password.reset file and reset the password via USB: Insert the USB flash drive that was included in your RDX QuikStation accessory kit box into your computer. If you cannot find the flash drive, you can use any USB flash drive that is formatted with a VFAT file system. - Page 77 The USB symbol on the center-front panel flashes and the LCD dock panels display “RstPasswd.” Remove the USB flash drive from the RDX QuikStation when the USB symbol stops blinking and the LCD dock panels flash “Done.” Connect to the RDX QuikStation Remote Management Console (see page 20).
- Page 78 4—S HAPTER YSTEM ONFIGURATION Click [Reset{ P assword] from the “Reset Administrator Password via USB” section of the dialog window. Type a new password. Type the password again to verify. Click [Reset]. Click [OK]. Note: Passwords are case sensitive and must be 6 to 30 characters long. Passwords can contain any combination of letters, numbers, and the following special characters: -,!@#$%^&*_.
-
Page 79: Logical Device Management
OGICAL EVICE ANAGEMENT This chapter describes the Remote Management Console’s Logical Device interface. The chapter includes the following sections: Logical device type overview ......page 70 Choosing a logical device type . -
Page 80: Logical Device Type Overview
5—L HAPTER OGICAL EVICE ANAGEMENT OGICAL EVICE VERVIEW The following table compares the logical device types that the RDX QuikStation can emulate. Table 5-1 Comparison of logical device types Allowed Available Logical Device active iSCSI Number of Reported Available virtual tape iSCSI security Type connections... -
Page 81: Choosing A Logical Device Type
HOOSING A OGICAL EVICE There are many choices to look at when deciding which logical device type is best for your data storage needs. Some questions to consider are: Does your back-up application support removable disk or does it support tape only? ... -
Page 82: Iscsi Device Overview
5—L HAPTER OGICAL EVICE ANAGEMENT SCSI D EVICE VERVIEW You can view general information about a logical device’s iSCSI targets from the iSCSI Devices view in the Remote Management Console. To navigate to the iSCSI Devices view: From the Logical Device interface, select iSCSI Devices from the tree view in ... -
Page 83: Customizing The Iscsi Devices View
SCSI D USTOMIZING THE I EVICES You can sort the columns in ascending or descending order and select which columns are visible. To customize the iSCSI Devices view: Select the arrow, which appears when you move your mouse over the product or serial number column head. -
Page 84: Managing Disk And Tape Drive Configurations
ANAGING ISK AND RIVE ONFIGURATIONS If you have your RDX QuikStation configured as either eight RDX drives or as eight virtual LTO-3 tape drives, you can do the following tasks from the Logical Device interface: View logical device properties (page ... -
Page 85: Viewing Active Iscsi Connections For Rdx Or Tape Drives
SCSI C IEWING CTIVE I ONNECTIONS FOR RIVES From the Logical Device interface, select an RDX or tape drive target from the tree view in the left pane. Note:2.The Connection tab only displays when you have selected an iSCSI device target from the left pane. Click the Connection tab. -
Page 86: Managing Tape Library And Autoloader Configurations
ANAGING IBRARY AND UTOLOADER ONFIGURATIONS If you have your RDX QuikStation configured as a virtual tape library or as a tape or disk autoloader, you can do the following tasks from the Logical Device interface: View logical properties (see page ... - Page 87 Table 5-4 Logical properties for virtual tape libraries and autoloaders Property Name Description Target ID/LUN The iSCSI target/logical unit number that identifies the library/autoloader and drives. Status Displays the operating status for the device. The status displays either “good”, “offline”, or an error state. For I/E port and tape slots Element Address The element address associated with the virtual location of the tape...
-
Page 88: Moving A Media Cartridge
OVING A EDIA ARTRIDGE With RDX QuikStation virtual library and tape autoloader configurations, you can logically move media to an open slot, to the IE port, or to the tape drives. Note: If you move media to the IE port, the cartridge will be ejected from the dock, and the media will be logically removed from the library. - Page 89 The Move Media dialog window opens. Select the Source slot and the Destination slot from the pull-down menus. The Source pull-down menu only displays the slots that contain an inserted cartridge, and the Destination pull-down menu only displays empty slots. Click [Move].
-
Page 90: Setting The Unique Inquiry Option
NQUIRY PTION The Unique Inquiry option is available from the Advanced Options dialog. You can set the RDX QuikStation to report the tape library/autoloader’s unique inquiry string, or an RDX QuikStation inquiry string Table 5-5 Inquiry String settings Inquiry String setting... - Page 91 OTES 2011 RDX Q CTOBER TATION...
- Page 92 5—L HAPTER OGICAL EVICE ANAGEMENT 1019786 RODUCT ANUAL...
-
Page 93: Physical Device Management
HYSICAL EVICE ANAGEMENT This chapter describes the Remote Management Console’s Physical Device interface. The physical device view is useful for determining the physical location of your RDX cartridges, since logical tape library views can differ. You can also use the physical device view to force-eject RDX cartridges, erase cartridges, and clone data from one RDX cartridge to another. -
Page 94: Viewing Physical Device Properties
IEWING HYSICAL EVICE ROPERTIES The following physical device properties are displayed when you select the RDX QuikStation’s host name in the left pane of the Physical Device interface. Table 6-1 RDX QuikStation physical device properties Property Name Description System status The operating system status for the RDX QuikStation. - Page 95 Table 6-1 RDX QuikStation physical device properties (continued) Property Name Description DOM version The Disk On Module (DOM) version that is currently in use. ADM version The Admiral board (ADM) firmware version that is currently in use. The Admiral board enables communication to the center-front LED panel, dock LCD panels, fans, and system sensors.
-
Page 96: Ejecting Rdx Cartridges
You can erase data and reformat an RDX cartridge as a single NTFS partition from the Remote Management Console. If you configure your RDX QuikStation as a virtual tape library, the RDX cartridges are automatically formatted to use with the library. This format partitions 8 MB as an NTFS file system. -
Page 97: Cloning Data
Therefore, cloning will be rejected if the destination cartridge is smaller than the source cartridge. To clone data: Insert both the source RDX cartridge and the destination RDX cartridge into an available dock on the RDX QuikStation. From the Physical Device interface, click [Clone]. 2011 RDX Q... - Page 98 The source and destination cartridges will be offline during the cloning process. Click [Start]. The RDX QuikStation begins the cloning process. You can monitor the progress of the cloning job in the bottom-right corner of the Physical Device interface. 1019786...
- Page 99 cloning job status bar 2011 RDX Q CTOBER TATION...
- Page 100 6—P HAPTER HYSICAL EVICE ANAGEMENT OTES 1019786 RODUCT ANUAL...
-
Page 101: System Maintenance
Generating system logs........page 96 Restarting and shutting down the RDX QuikStation ..page 97 ... -
Page 102: System Maintenance Overview
QuikStation. A soft shutdown is the preferred way of turning off the power to the unit. If you need to do a hard shutdown, press and hold the power button on the back of the RDX QuikStation for 10 seconds. Important: Before you shutdown the system for any reason, make sure there are no active host connections to the iSCSI targets. -
Page 103: Performing An Lcd Diagnostic Test
ERFORMING AN IAGNOSTIC An LCD diagnostic test verifies that the LCD/LED pixels and backlighting are working correctly. You must be standing in front of the RDX QuikStation to verify the test sequence. To run an LCD diagnostic test: From the Remote Management Console main menu, select System Maintenance >... -
Page 104: Lcd Diagnostic Test Sequence
7—S HAPTER YSTEM AINTENANCE LCD D IAGNOSTIC EQUENCE The test begins with dock 1 then moves sequentially through each dock, ending with dock 8. Dock 4 Dock 3 Dock 2 Dock 1 Dock 8 Dock 7 Dock 5 Dock 6 Center Panel The LCD diagnostic test sequence is as follows:... -
Page 105: Performing A Dock Diagnostic Test
ERFORMING A IAGNOSTIC You do not have to be physically in front of the RDX QuikStation to conduct a dock diagnostic test. However, you do need an RDX cartridge in the dock to verify that the dock is working properly. -
Page 106: Generating System Logs
Note: You can also generate a log dump by inserting a USB flash drive (fomatted with a VFAT file system) into the RDX QuikStation. The RDX QuikStation automatically generates a log dump when a USB flash drive is detected. Make sure that the flash drive does not include any RDX QuikStation... -
Page 107: Restarting And Shutting Down The Rdx Quikstation
Before you restart or shutdown the system for any reason, make Important sure there are no active hosts that are currently communicating with the iSCSI targets. To restart the RDX QuikStation: From the Remote Management Console main menu, select System Maintenance > System Restart. Click [Yes] to confirm. -
Page 108: Exporting System Configuration Files
YSTEM ONFIGURATION ILES As a best practice, Tandberg Data recommends that you export your system configuration files as a backup in case you ever need to replace your current unit. The system exports all configuration settings, including network information, email notification settings, time zone setting, user names and passwords, logical device type settings, and iSCSI security settings. -
Page 109: Manually Updating Firmware
Console. ANUALLY PDATING IRMWARE When you sign in as an administrator user, the RDX QuikStation detects the firmware version (see page 54). If your system is not running the most current version, the RDX QuikStation prompts you to update the firmware. - Page 110 The Update Firmware dialog window opens. Select the “Update QuikStation firmware manually” radio button. Click the “Tandberg Data Support Web Site” link to access the most current firmware file. After you download the file from the web site, make sure you extract the zipped file before uploading it to the RDX QuikStation.
-
Page 111: Using Ausb Flash Drive For System Tasks
YSTEM ASKS The RDX QuikStation ships with a USB flash drive that you can use to perform many system tasks. If the RDX QuikStation flash drive is unavailable, you can use any USB flash drive that is formatted with a VFAT file system. - Page 112 7—S HAPTER YSTEM AINTENANCE OTES 1019786 RODUCT ANUAL...
-
Page 113: A Troubleshooting
ROUBLESHOOTING This appendix provides information on error codes and some basic troubleshooting questions and solutions. For more detailed troubleshooting help, visit the Support section of the Tandberg Data web site (www.tandbergdata.com), or contact Tandberg technical support. RDX Q TATION RROR... -
Page 114: Basic Troubleshooting Information
ASIC ROUBLESHOOTING NFORMATION The following table describes some basic troubleshooting information. If you have a problem that is not addressed in the table below, contact Tandberg Data technical support. Table A-2 Basic troubleshooting information Problem Potential Solution(s) Check to see if another host is already connected to the target ... - Page 115 PECIFICATIONS This appendix provides the following information about the RDX QuikStation: Physical specifications ....... . .page 106 ...
-
Page 116: Specifications
B—S PPENDIX HAPTER PECIFICATIONS HYSICAL PECIFICATIONS 8900-RDX Part Number 508mm x 438mmx 89mm/ Dimensions (D x W x H) 20” x 17.25” x 3.5” 10.16 kilograms/22.4 pounds Weight 2U Rackmount Form Factor Cartridge dependent (online): 8 x 1TB RDX cartridges Capacity Unlimited offline capacity Up to 200 MB... -
Page 117: Safety And Regulatory Agency Compliance
OMPLIANCE Tandberg Data products are designed, tested, and classified for their intended electromagnetic environment. The RDX QuikStation is a Class A device and complies with the safety and regulatory agency standards listed below when installed in accordance with this manual. -
Page 118: United States: Fcc Declaration Of Conformity
TATES ECLARATION OF ONFORMITY We declare under our sole responsibility that: Product Name: RDX QuikStation, regulatory model RMN-A-05-10 To which this declaration relates, is in conformity with the following standard(s) or other normative documents: ANSI C63.4-1992 Methods of Measurement Federal Communications Commission 47 CFR Part 15, Subpart B, Class AB:2008 This equipment has been tested and found to comply with the limits for a Class AB digital device, pursuant to Part 15 of the FCC Rules. -
Page 119: Australia And New Zealand
USTRALIA AND EALAND This device has been tested and found to comply with the limits for a Class A digital device, pursuant to the Australian/New Zealand standard AS/NZS 3548:1995: “Information Technological Equipment” set out by the Australian Communications Agency. (WEEE) ASTE OF LECTRONIC AND LECTRICAL... - Page 120 B—S PPENDIX HAPTER PECIFICATIONS OTES 1019786 RODUCT ANUAL...
-
Page 121: C Safety Guidelines
AFETY UIDELINES This appendix provides safety guidelines for the RDX QuikStation: General safety precautions....... . -
Page 122: General Safety Precautions
AFETY RECAUTIONS Keep the area around the RDX QuikStation clean and free of clutter. Remove any jewelry or metal objects from your body, which are excellent metal conductors that can create short circuits and harm you if they come in contact with printed circuit boards or areas where power is present. -
Page 123: Electrical Safety Precautions
LECTRICAL AFETY RECAUTIONS Be aware of the locations of the on/off switch on the chassis as well as the room's emergency power-off switch, disconnection switch or electrical outlet(s). The on/off switch does not disconnect power to the chassis. If an electrical accident occurs, quickly remove power to the system by removing the plug(s) from the outlet(s). -
Page 124: Operating Precautions
C—S PPENDIX HAPTER AFETY UIDELINES PERATING RECAUTIONS Risk of Explosion when battery is replaced by an incorrect type. Caution When installing the serverboard (CMOS) battery, there is a danger of explosion if the onboard battery is installed upside down, which will reverse its polarities (see figure). -
Page 125: Index
NDEX accessory kit contents CHAP enabling in the Remote Management active-backup/failover network mode Console adaptive load balancing network mode Microsoft iSCSI initiator administrator group Open-iSCSI for Linux adding to secret/password requirements editing Xtend SAN initiator for Mac permissions cloning data removing users from configuration files administrator password, recovering... - Page 126 NDEX eject button/power LED indicators import/export tape options ejecting RDX cartridges importing system configuration files electrical safety precautions installation configuring a static IP address via electrostatic discharge (ESD) precautions network.conf file email notification connecting network and power cables customizing iSCSI initiator software prerequisite environmental specifications preparing for erasing RDX cartridges...
- Page 127 CHAP enabling unsafe eject erasing/formatting logically moving RDX dock network performing a diagnostic test configuring RDX QuikStation properties port bonding options RDX QuikStation network.conf file, configuring accessory kit contents configuring network information connecting to the Remote Management...
- Page 128 Console physical specifications specifying hosts in the Remote Management power button location Console power ratings service, contacting Tandberg Data RDX dock diagnostic test shutting down the RDX QuikStation recommended system settings specifications restarting agency compliance safety guidelines physical shutting down...
- Page 129 NDEX Tandberg Data LTO StorageLoader unique inquiry option auto-insert option unsafe eject option import/export tape option updating firmware logically moving a tape cartridge USB flash drive physical device properties configuring network information unique inquiry option generating system logs viewing active iSCSI connections...
- Page 130 NDEX Notes 1019786 RODUCT ANUAL...
Need help?
Do you have a question about the RDX QuikStation and is the answer not in the manual?
Questions and answers