
Related Manuals for Strong XENON SUPER TROUPER


Summary of Contents for Strong XENON SUPER TROUPER
- Page 1 XENON SUPER TROUPER Follow Spotlight Type 83050, 83070 Rev. 11/99 STRONG INTERNATIONAL a division of Ballantyne of Omaha, Inc. 4350 McKinley Street Omaha, Nebraska 68112 USA Tel 402/453-4444 • Fax 402/453-7238...
- Page 3 PREFACE THE STRONG XENON SUPER TROUPER is a direct current follow spotlight system complete with a xenon lamphouse, power supply, optical system, base and yoke assembly, and six-color boomerang. ONLY THE SPECIAL XENON POWER SUPPLIES manufactured by Strong International can be used with the xenon spotlight. For installation and operation of the power supply, see the manual furnished separately.
- Page 4 LAMPHOUSE - POWER SUPPLY Interconnection Diagram LAMPHOUSE (Connections Pre-wired) MS CONNECTOR Wire No, Grnd Remote - Auto Lamphouse Sustained 5 Amp. Cable Assembly Dry Contact Conduit (by Installer) XENON SYSTEM MUST BE GROUNDED POWER All wiring must conform to local SUPPLY codes;...
- Page 5 INSTALLATION AND SETTING UP SPOTLIGHT THE XENON SUPER TROUPER is shipped in sections which must be assembled. The Folding Base Stand Assembly 65826 (if supplied; see Figure 6A) is shipped collapsed, and re- quires only folding down and pinning the base legs. The following paragraph applies only to the rigid base assembly 83793 (see Figure 6).
- Page 6 SAFETY PROCEDURES THE XENON BULB is highly pressurized. When ignited, the normal operating temperature of the bulb increases the pressure to a level at which the bulb may explode if not handled in strict accordance to the manufacturer’s operating instructions. The bulb is stable at room temperature, but may still explode if dropped or otherwise mishandled.
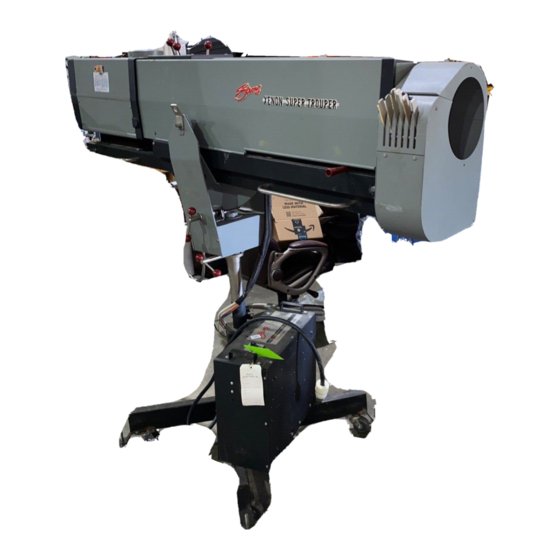
- Page 7 1. Fade-Out Mechanism Control Lever 2. Masking Shutter (Chopper) Control Lever 3. Iris Control Lever 4. Spot Size Control Handle 5. Color Boomerang 6. Spot Focus Knob 7. Leveling Foot 8. Horizontal Swing Control Lever 9. Vertical Tilt Control Lever 10.
- Page 8 EXHAUST SYSTEM INSTALLATION IF THE SPOTLIGHT is installed in a closed booth, it is recommended to vent the lamphouse exhaust to outside atmosphere to remove the heat from the booth. THE EXHAUST STACK of the lamphouse is designed to fit a six-inch diameter duct. The exhaust system must be designed and installed is a way to eliminate any possibility of a down draft or of rain dripping into the lamphouse.
- Page 9 1. Cap, Exhaust Stack 2. Top Cover, Lamphouse 3. Access Panel, Igniter 4. Cover, Bulb Adjust 5. Current Control (early models) 6. Elapsed Time Meter 7. Ammeter 8. MODE Switch (AUTO-MAN.) 9. LAMP Switch (ON-OFF) XST/007...
- Page 10 XST/008...
- Page 11 BULB INSTALLATION CAUTION: OBSERVE ALL SAFETY PROCEDURES. Put on the protective face mask. Wear clean cotton gloves to prevent marking the quartz envelope of the bulb with fingerprints. REMOVE THE TOP COVER of the lamphouse by removing the four Holt head (tamperproof) screws with the special screwdriver provided.
- Page 12 AN ALTERNATE METHOD of installing the 2000 watt bulb is to dismount the shock mount ring from the front bulb support assembly by removing the socket head screw. Slide the ring over the cathode (-) end cap of the bulb, and install the bulb by inserting the anode (+) end cap through the reflector center hole and seating the anode pin into the rear support collet.
- Page 13 XST/011...
- Page 14 XST/012...
- Page 15 OPERATION REMOVE THE PLASTIC COVER from the xenon bulb. Do not ignite the lamp with the cover on the bulb. A GLASS HEAT FILTER is supplied to reduce the temperature at the optical system and color gels. Insert the heat filter in the bracket provided on the inside of the lamphouse at the front opening.
- Page 16 THE THUMB SCREWS to the left and right of the focusing control lock the horizon- tal and vertical position of the bulb. BULB ADJUSTMENT CONTROLS Thumb Screw Focus Control Focus Lockscrew TWO METHODS, detailed following, are recommended to align the bulb in order to project the best light to the stage.
- Page 17 Once the “hot spot” is centered in the projected spot, lock the adjustment control in position with the two thumb screws and rotate the focus control to obtain a spot with an even distribution of light. Turn the spot focus control knob at the front of the lens mechanism to sharpen the edge of the spot. THIS ADJUSTMENT should not be disturbed until the xenon bulb is replaced.
- Page 18 HANDLING THE SPOTLIGHT GENERALLY THE BEST POSITION for the operator to stand is near the center of the spotlight, on the right hand side, although the angle of tilt and the size of the porthole may alter the position for the most convenient operation. EACH OPERATOR will, after a few minutes of operation, generally develop his own system and position for operating the unit.
- Page 19 OPERATION OF OPTICAL SYSTEM THE IRIS CONTROL is the front lever which projects through the top of the optical system housing. When this lever is to the left (as viewed from the rear of the unit), the largest aperture is provided. Smaller apertures are obtained as the lever is moved to the right. THE SPOT SIZE CONTROL HANDLE is located on the right hand side of the opti- cal system just above the base rail.
- Page 20 The ultraviolet filter may be purchased as an accessory (Order No. 51829) and is easily mounted to the front of the boomerang. Additional filter holders (51928 & 51376) can be supplied by your Strong International Dealer. TO OPERATE INDIVIDUAL COLOR FILTERS, lower the desired filter selector lever.
- Page 21 MAINTENANCE THE XENON SUPER TROUPER SPOTLIGHT requires very little maintenance to keep it in good working order. THE REFLECTOR should be cleaned periodically with a clean, soft, lint free cloth to remove any dust from the reflective surface. Do not use abrasive cleaners.
- Page 22 LAMPHOUSE SCHEMATIC XST/020...
- Page 23 SCHEMATIC DIAGRAM Parts List Ref. Desig. Part No. Description 65938A Igniter (See Figure 3) 65932 Blower, 115 V.AC, 50/60 Hz. C1,2 76132 Capacitor, .005 µf, 600 WVDC 76133 Capacitor, .01 µf, 400 WVDC C4A,B 80177 Capacitor, 1.0-1.0 µf, 600 WVDC 81947 Capacitor, .01 µf, 500 WVDC Xenon Bulb...
- Page 24 XST/022...
- Page 25 IGNITER PRINTED CIRCUIT BOARD Assembly No. 65992B 65938 Ref. Desig. Part No. Description C201 65204 Capacitor, 3 µf, 400 V. C202 65222 Capacitor, .68 µf, 100 V. C203 79127 Capacitor, .01 µf, 1000 V. C204 65960 RF Bypass Capacitor Assembly D201 65223 Silicon Diode, 1N2071...
- Page 26 TROUBLESHOOTING FLOW CHART Xenon Super Trouper XST/024...
- Page 27 TROUBLE CHART NORMAL OPERATION WHEN THE SWITCH in the main AC supply line to the xenon power supply is in the ON position, and the 30 A. circuit breaker on the switching power supply is ON, the POWER light on the xenon power supply will glow.
- Page 28 IF THE HIGH VOLTAGE ARC is not audible or the flash of the bulb visible, the problem is in the igniter assembly. EXCHANGE of components (i.e. igniters, printed circuit boards) between similar Strong Xenon Super Troupers to aid in diagnosis of a problem is encouraged. This will not lead to equipment damage, and will not void equipment warranty.
- Page 29 XENON SUPER TROUPER TROUBLESHOOTING Bulb fails to ignite. 1. MODE switch S3 set to “AUTO.” Place in “MAN.” position when not employing automated or remote lamphouse operation. 2. AC power not on to lamphouse. Turn switching power supply 30 A. circuit breaker ON. If 115 V.AC not read at 2 &...
- Page 30 Bulb goes out during operation. 1. Xenon power supply overheated; thermal switch open. Check power supply blower(s), air inlets and outlets unobstructed. See power supply manual. 2. Xenon bulb depressurizing. Check for envelope discoloration; replace if defective. 3. Lamphouse blower B1 not moving adequate air. Clean and lubricate blower. 4.
- Page 31 Extremely long duration between ignition pulses (continued). 2. Defective spark gap. A “Ping” sound is normal; excessive “Hissing” is abnormal. Replace if defective. 3. Low AC voltage to lamphouse. Check for 115 V.AC at 2 & 4; if below 95 volts, check stepdown or isolation transformer in xenon power supply.
- Page 32 XST/030...
- Page 33 PARTS LIST Figure 1 Item Part No. Description 65866 Cap, Exhaust Stack 01303 Screw, #6 Self-Tapping 81282 CAUTION Plate 01639-2 Pop Rivet, Aluminum 65864 Igniter Access Panel 01736-1 Screw, 10-32 x 1/2" Holt Head (Tamperproof) 01715 Flatwasher, #10 65865 Lamphouse Base Pan 65969 Base Adapter, Black Enamel (not shown) 00687...
- Page 34 XST/032...
- Page 35 PARTS LIST Figure 2 Item Part No. Description 85109 Air Flow Switch (S4) 01565 Screw, 4-40 x 3/4" Round Head 41-70011 Lockwasher, #4 81143 Cable Connector, 90° 65935 Lamphouse/Power Supply Interconnect Cable Assembly 88318 MS Connector to Power Supply 62153 Cable Clamp (for 88318) 65932 Blower Assembly (B1) w/ Switch Bracket...
- Page 36 PARTS LIST, Figure 2 (continued) Item Part No. Description 65148 Contact & Clamp (as shown; 1, 1.6 kW) 65410 Contact & Clamp (2 kW) 41-51556 Clamping Screw, 8-32 x 1/2" Socket Head 00687 Screw, 1/4-20 x 1/2" Hex Head 00876 Split Lockwasher, 1/4"...
- Page 37 DC open circuit voltage. The Strong switching power supply should develop 150-180 V.DC open circuit, whereas an older high reactance type (i.e. Type 61001) provides around 120 V.DC. The R208 potentiometer on the PC board is factory set to fire the neon glow lamp at 80-85 V.DC.
- Page 38 XST/036...
- Page 39 PARTS LIST Figure 3A Item Part No. Description 65992B Igniter Printed Circuit Board Assembly 65384 PCB Stand-Off Bracket 41-51028 Screw, 6-32 x 1/4" Pan Head 65390 Capacitor Mounting Bracket 01761 Nylon Screw, 1/4-20 x 1/2" Hex Head 01754 Nylon Hexnut, 1/4-20 65394 Ceramic Insulator 41-51539...
- Page 40 XST/038...
- Page 41 PARTS LIST Figure 4 Item Part No. Description 65142 Ammeter (M2), 0-150 A. 81276 MODE Switch (S3), “Auto - Man” 81275 LAMP Switch (S2), “On - Off” 65116 Casting, Bulb Adjust Control 65132 Thumb Screw 15010 Compression Spring 65150 Fender Washer 65112 Rear Lamphouse Casting 65959...
- Page 42 XST/040...
- Page 43 PARTS LIST Figure 5 Item Part No. Description 80168 Cover Interlock Switch (S1) 01741 Lockwasher, 7/16" 65185 Switch Mounting Bracket 00254 Screw, 8-32 x 1/4" Fillister Head 00891A Lockwasher, #8 65876 Current Control Ass’y. (early models) 79131 Ground Terminal 65960 Anode Support Collet (1, 1.6 kW) 65844 Anode Support Collet (2 kW)
- Page 44 FIGURE 6 XST/042...
- Page 45 PARTS LIST Figure 6 Item Part No. Description 49943 Lifting Strap 00854 Washer, 3/8" S.A.E. 49120 Tilt Axis Bolt 01319 Nut, 3/8-16 NyLock 02411 Washer, .640" I.D. x 1¼” O.D. 49126 Clamp Plate 49125 Compression Spring, Clamp 49124 Bushing 49223 Clamping Shaft 49130 Handle...
- Page 46 FIGURE 6A XST/044...
- Page 47 PARTS LIST Figure 6A Item Part No. Description 49120 Tilt Axis Bolt 49943 Lifting Strap 01319 Hexnut, 3/8-16 NyLock 83743 Yoke, Welded Assembly 49955 Saddle & Quadrant, Welded Assembly 83341 Cable Clamp 65431 Inner Retaining Collar 65824 Inner Tube Welded Assembly 83357 Cover Panel 83381...
- Page 48 XST/046...
- Page 49 PARTS LIST Figure 7 Item Part No. Description 83309 Lens Retainer Spinning (pre-1981 units) 83864 Lens Ring, Welded Assembly * 83107 Lens Retaining Ring * 83306 Rubber Gasket, Large Lens * 83302 Large Lens * 83775 Large Lens & Ring Assembly (All above parts marked *) 01305 Screw, 6-32 x 1/4"...
- Page 50 PARTS LIST, Figure 7 (continued) Item Part No. Description 83144 Support Tube, Projection Lens 83160 Rear Lens Carriage Casting 44239 Projection Lens 83155 Lens Retaining Ring 47210 Pulley, Large Lens Carriage 83774 Large Lens Support Frame (pre-1981 units) NOT SHOWN 83795 Base Rail, Lamphouse &...
- Page 51 XST/049...
- Page 52 PARTS LIST Figure 8 Item Part No. Description 10048A Knob 51451 Shaft, Iris Handle 00179 Screw, 6-32 x 1/4" Fillister Head 00892 Lockwasher, #6 51978 Friction Spring, Iris (as shown; see Item 8 below) 51229 Friction Pad (as shown) 00184 Screw, 6-32 x 5/8"...
- Page 53 PARTS LIST, Figure 8 (continued) Item Part No. Description 83143 Fade-Out Control Bracket 51450 Shaft Handle, Fade-Out Control 01406 Hex Nut, 5/16-18, Flexlock 00853 Washer, 1/4" S.A.E. 51156 Friction Plate (Replace with 00843A Friction Washer) 51498 Chopper Pull Rod (Short) 51452 Control Shaft, Choppers 10048A...
- Page 54 FIGURE 8A Part No. Description 01306 Screw, 6-32 x 5/16" 21-70029 Spring Washer 24369 Bell Crank 24372 Adapter Ring 24374 Iris 51451 25034 Iris Clamp 25035 Link with Pins 41-51252 Screw, 8-32 x 5/8" 41-50325 Screw, 6-32 x 3/8" 41-51530 Shoulder Bolt 24369 51451...
- Page 55 51850 BOOMERANG ASSEMBLY XST/053...
- Page 56 BOOMERANG PARTS LIST Part No. Description 51850 Boomerang Assembly 00180 Screw, 6-32 x 5/16" Fillister Head 00255 Screw, 8-32 x 5/16" Fillister Head 00793 Nut, 6-32, Steel 00829 Washer, #8 Brass, 3/8" O.D. 00831 Washer, #10 Brass, 7/16" O.D. 00837 Washer, 5/16"...
Need help?
Do you have a question about the XENON SUPER TROUPER and is the answer not in the manual?
Questions and answers