Advertisement
Advertisement

Related Manuals for BodyPerfect JINTREPID

Summary of Contents for BodyPerfect JINTREPID
-
Page 2: Table Of Contents
INDEX 1. OVERVIEW DRAWING................2 2. IMPORTANT SAFETY INSTRUCTION ............3 3. GROUNDING INSTRUCTION..............4 4. PRE-ASSEMBLY CHECK LIST ..............5 5. ASSEMBLY STEPS ..................6 6. CAUTION ....................8 7. MAINTENANCE ..................9 8. COMPUTER OPERATION INSTRUCTIONS..........10 - 1 -... -
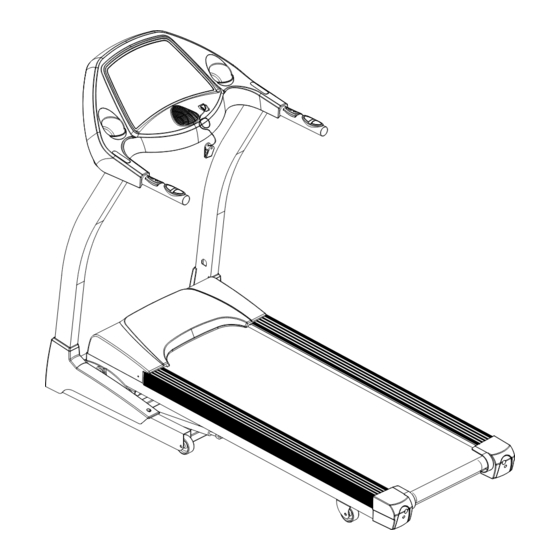
Page 3: Overview Drawing
1. OVERVIEW DRAWING 電子錶 Computer 安全插銷/夾子 Safety Key/Clip 電源開關 Power Switch 過載保護開關 Circuit Breaker Power 電源線 Cord 機台主架 Frame Base 底座 - 2 -... -
Page 4: Important Safety Instruction
2. IMPORTANT SAFETY INSTRUCTION When using this product, basic precautions should always be followed, including the following: Please read the instruction carefully before starting to use this product. Danger – To reduce the risk of electric shock: Always unplug this product from the electrical outlet immediately after using and before cleaning. -
Page 5: Grounding Instruction
3. GROUNDING INSTRUCTIONS The products must be grounded first. If malfunction or breakdown occurs, proper grounding will reduce the risk of electric shock. The product is equipped with a grounding plug. The plug must be plugged into an appropriate outlet that is properly installed and grounded in accordance with local ordinances. -
Page 6: Pre-Assembly Check List
4. PRE-ASSEMBLY CHECK LIST ITEM Description ITEM Description Computer Console Hex Screw M8xP1.25x15 Frame Washer Ø8xØ16x1.5t Left Upright Hex Screw M8xP1.25x60 Right Upright Philips Screw M5xP0.8x18 Cover SILICON Decoration Cover (Left) Hex Wrench 5mm(80mmx80mm) Decoration Cover (Right) Hex Wrench 6mm(80mmx80mm) Towel Safety Key/Clip - 5 -... -
Page 7: Assembly Steps
5. ASSEMBLY STEPS Two persons are required to finish the assembly steps. (Caution!! Please follow the assemly procedure below to aviod injury . ) 1. Attach the control wire-lower section from the frame (B) to the guide thread from the right Upright (D), then pull the control wire into the Upright , clip it with protecting ring and fasten it inside of the Upright. - Page 8 4. After the above steps are finished, cap the Handrail Cover (E) onto the Handrail. Then cap the left and right Decoration Cover (F, G) to the frame and tighten with Philips Screw (d) according to the right drawing. - 7 -...
-
Page 9: Caution
6. CAUTION Note 1: The Cylinder is made of high pressure, so be extra careful not to make an impact on it with other object that may cause deformation. Note 2: The cylinder may be damaged and not be smooth in use when it is hit. The damage may also result in the fall of the treadmill when folding. -
Page 10: Maintenance
7. MAINTENANCE If the belt tends to move off the center, stop the treadmill. Take the Hex Wrench 6mm and adjust the Hex Screw in the Rear End Cap. For example, if the running belt is moving towards the left side, tighten the left Hex Screw about 1/4 turn(clockwise);... -
Page 11: Computer Operation Instructions
7. COMPUTER OPERATION INSTRUCTIONS I. General Operation Turn on the treadmill. Put the safety key in the recess of the console. □ The beeper will sound and the window will display , which present the treadmill has been entered the START/READY state, under this state, user can hold the grip pulse sensor to detect heart rate value directly. - Page 12 ** Range of speed : 1.0~16 km/hr , Step is 0.1 km/hr Range of inclination : 0~15 Level , Step is 1 Level You can also enter other functions by pressing under the Start / Ready state. Press to start fan at once. Press this key again to stop fan. Except the buttons on the Computer, the switches on the Handrails can also be used to adjust the speed and angle, the left ones are used to adjust the inclination, the right ones are used to adjust the speed.
- Page 13 9.3. After the level is selected, the TIME window flashes, at this time you can press “ " to change the time, after the desired time is set, press and then TIME window will stop flashing. Time preset value : 25(min) Range of time :...
- Page 14 Refer to the below chart for the preset parameters of PROGRAM: - 13 -...
- Page 15 - 14 -...
- Page 16 10. HRC function:(This function must be attached with heart beat to finish) 10.1. The program aims to exercise heartbeat. When operating, the heartbeat value is equal to the pre-set value, the angle and speed will keep steady to maintain the heartbeat value in certain range to achieve the exercising effect.
- Page 17 ** The chart below will show the relationship between different age and heart rate of this product of HRC function: Pre-set Pre-set Pre-set Pre-set - 16 -...
Need help?
Do you have a question about the JINTREPID and is the answer not in the manual?
Questions and answers