Table of Contents
Advertisement
CONTENTS
Unpacking Instructions ........... 2
Package Contents .................. 2
Product Registration ............... 2
Features & Benefits ................. 3
Clock Setup ........................... 4
Set the Time & Date ............... 5
Questions?
(877) 221-1252 or visit www.AcuRite.com.
SAVE THIS MANUAL FOR FUTURE REFERENCE.
Care & Maintenance .............. 6
Specifications ......................... 6
FCC Information .................... 6
Customer Support .................. 7
Warranty............................... 7
Contact Customer Support at
Instruction Manual
Digital Clock
model 75127
Advertisement
Table of Contents

Related Manuals for AcuRite 75127


Summary of Contents for AcuRite 75127
-
Page 1: Table Of Contents
FCC Information ....6 Features & Benefits ....3 Customer Support ....7 Clock Setup ......4 Warranty....... 7 Set the Time & Date ....5 Questions? Contact Customer Support at (877) 221-1252 or visit www.AcuRite.com. SAVE THIS MANUAL FOR FUTURE REFERENCE. -
Page 2: Unpacking Instructions
Congratulations on your new AcuRite product. To ensure the best possible product performance, please read this manual in its entirety and retain it for future reference. Unpacking Instructions Remove the protective film that is applied to the LED screen prior to using this product. -
Page 3: Features & Benefits
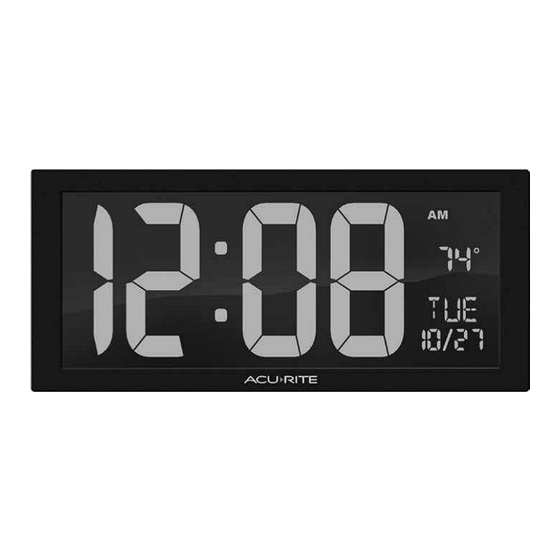
Features & Benefits 1. Clock 9. Power Adapter 2. AM/PM Indicator 10. Built-In Cord Storage Secures excess cord. 3. Indoor Temperature 11. Battery Compartment 4. Day of The Week Button 5. Date For setup preferences. 6. Integrated Hang Holes 13. SET Button For easy wall mounting. -
Page 4: Clock Setup
SETUP Install or Replace Plug in Power Adapter Backup Batteries Plug the power adapter into a 1. Remove the battery compartment power outlet. cover. 2. Insert 2 x AA alkaline batteries into the battery compartment, as shown. Follow the polarity (+/-) diagram in the battery compartment. -
Page 5: Set The Time & Date
Set the Time & Date Press and hold the “SET” button, located on the back of the clock, to enter SET MODE. Once in SET MODE the preference you are currently setting will blink on the clock. To adjust the currently selected (flashing) item, press and release the “ ” or “... -
Page 6: Care & Maintenance
Care & Maintenance Clock Care Clean with a soft, damp cloth. Do not use caustic cleaners or abrasives. Keep away from dust, dirt and moisture. Clean ventilation ports regularly with a gentle puff of air. Specifications 32ºF to 122ºF; 0ºC to 50ºC TEMPERATURE RANGE 9-ft. -
Page 7: Customer Support
Customer Support AcuRite customer support is committed to providing you with best-in- class service. For assistance, please have the model number of this product available and contact us in any of the following ways: (877) 221-1252 info@chaney-inst.com AcuRite 24/7 support at www. - Page 8 Plan your day with confidence ™ www.AcuRite.com ©Chaney Instrument Co. All rights reserved. AcuRite is a registered trademark of the Chaney Instrument Co., Lake Geneva, WI 53147. All other trademarks and copyrights are the property of their respective owners. AcuRite uses patented...
Need help?
Do you have a question about the 75127 and is the answer not in the manual?
Questions and answers