Table of Contents
Advertisement
Quick Links
instruction Manual
orion
®
atlas
10 EQ
™
#9874
Equatorial Reflector Telescope
customer support (800)‑676‑1343
E‑mail: support@telescope.com
corporate offices (831)‑763‑7000
89 Hangar Way, Watsonville, ca 95076
oriontelescopes.com
Providing Exceptional Consumer Optical Products Since 1975
IN 214 Rev. B 05/09
Advertisement
Table of Contents

Related Manuals for Orion ATLAS 10 EQ


Summary of Contents for Orion ATLAS 10 EQ
- Page 1 Manual orion ® atlas 10 EQ ™ #9874 Equatorial Reflector Telescope customer support (800)‑676‑1343 E‑mail: support@telescope.com corporate offices (831)‑763‑7000 89 Hangar Way, Watsonville, ca 95076 oriontelescopes.com Providing Exceptional Consumer Optical Products Since 1975 IN 214 Rev. B 05/09...
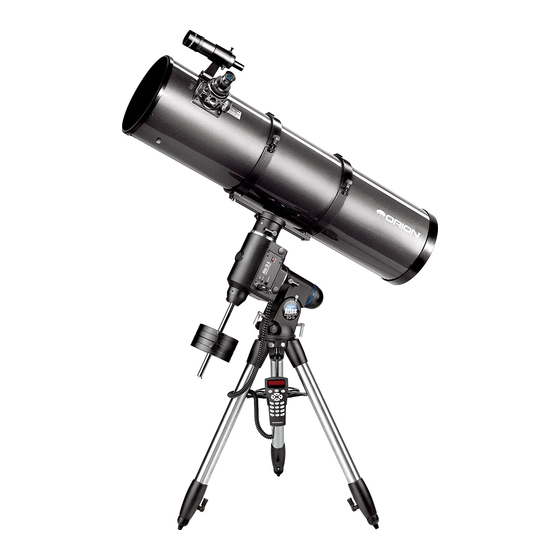
- Page 2 Declination lock lever Counterweight shaft lock lever Counterweight shaft Counterweights Mirror cell Counterweight lock knobs Latitude scale “Toe Saver” Latitude adjustment L‑bolts Center support shaft (not‑shown) Hand controller Tripod leg Tripod support tray Leg lock lever Figure 1a. The Atlas 10 EQ.
-
Page 3: Table Of Contents
Orion telescope. Your new Atlas 10 EQ is designed for high‑resolution viewing of astronomical objects. With its precision optics, and its superb Atlas mount, you’ll be able to locate and enjoy thousands of fascinating celestial denizens, including planets, Moon, and a variety of galaxies, nebulas and star clusters. - Page 4 Nylon alignment Finder Finder scope thumbscrew (2) scope bracket Azimuth adjustment knobs Post Eyepiece Focusing lock ring Tensioner Figure 2. Orient the equatorial head so that the post on the tripod lines up with the azimuth adjustment knobs on the equatorial mount. Figure 3a.
-
Page 5: Inserting The Eyepiece
10 EQ Mount Weight Dec. lock lever. The telescope should now be able to rotate The Atlas 10 EQ mount is very heavy. Alone it weighs 54 lbs. freely about the declination axis. With the optical tube and counterweights it weighs over 120 6. -
Page 6: Using Your Telescope
The view through a standard finder scope and reflector toward the desired object. Then sight along the tube to pre‑ telescope is rotated 180°. This is true for the Atlas 10 EQ and its cisely aim the telescope. Turn the focus knob until the object finder scope as well. -
Page 7: Setting Up And Using The Equatorial Mount
L‑bolts Figure 7. The Atlas EQ Mount. The Atlas 10 EQ has a focal length of 1200mm, which when into the holder. Re‑tighten the thumbscrew, and refocus for your used with the supplied 25mm eyepiece yields a magnification new magnification. - Page 8 Eyepiece Alignment Focus Objective Little Dipper focus ring setscrew (3) lock ring lens (in Ursa Minor) N.C.P. Big Dipper (in Ursa Major) Polaris Cassiopeia Figure 8. To find Polaris in the night sky, look north and find the Big Dipper. Extend an imaginary line from the two “Pointer Stars” in the bowl of the Big Dipper.
- Page 9 Power switch Rate switch Indicator light Reverse switches Dec. R.A. pushbuttons pushbuttons Figure 10. The optical tube must be at a 90° angle to the R.A. axis in order to view through the polar axis finder. Figure 11. The Atlas EQ Mount hand controller. quick and easy.
- Page 10 On the side of the hand controller, there are two reversal So, the coordinates for the Orion Nebula listed in a star atlas switches, one for the R.A. axis, and one for the Dec. axis. When will look like this: these switches are flipped to the “REV”...
- Page 11 Figure 13a‑d. These illustrations show the telescope pointed in the four cardinal directions. (a) north, (b) south, (c) east, (d) west. Note that the tripod and mount have not been moved; only the telescope has been moved on the its R.A. and Dec. axes. Dec.
-
Page 12: Collimating
Mirror center Mark Your Atlas 10 EQ comes with a collimation cap. This is a sim‑ ple cap that fits on the focuser drawtube like a dust cap, but has a hole in the center and a silver bottom. - Page 13 Figure 15. To center the secondary mirror under the focuser, hold the secondary mirror holder in place with your fingers while adjusting the center screw with a Phillips screwdriver. Do not touch Figure 17. the mirror’s surface! The three thumb screws that lock the primary mirror in place must first be loosened before any adjustments can be made.
-
Page 14: Astronomical Observing
All tend to scatter light, which reduces an object’s brightness. For many users, the Atlas 10 EQ telescope will be a major One good way to tell if conditions are good is by how many leap into the world of amateur astronomy. This section is stars you can see with your naked eye. - Page 15 Youc an attach a small fan to the Atlas 10 EQ to make cooling the tube faster. On the bottom of the mirror cell there are four The best rule of thumb with eyepiece selection is to start with holes (M4x.7 thread) where a fan can be mounted.
- Page 16 Venus, Mars, Jupiter, and Saturn are the brightest objects in the sky after the Sun and the Moon. Your Atlas 10 EQ is capable of showing you these planets in some detail. Other planets may be visible but will likely appear starlike.
-
Page 17: Astrophotography
35mm SLR camera attached. Start by choosing bright objects to view. The brightness of ed camera adapter to the Atlas 10 EQ’s focuser. To do this, an object is measured by its visual magnitude; the brighter remove the 1.25" and 2" eyepiece adapters from the focuser an object, the lower its magnitude. -
Page 18: Piggyback Photography
Remove the tube rings from the equatorial mount and swap Your Atlas 10 EQ requires very little mechanical maintenance. their position if necessary. Now, connect the camera to the The optical tube is steel and has a smooth painted finish that piggyback adapter. -
Page 19: Specifications
11. specifications The large primary mirror and the elliptical secondary mirror of your telescope are front‑surface aluminized and over‑coated with hard silicon dioxide, which prevents the aluminum from Primary mirror diameter: 254mm oxidizing. These coatings normally last through many years of Primary mirror coating: Aluminized, SiO overcoat use before requiring re‑coating (which is easily done). - Page 20 Warranty This Orion Atlas 10 EQ is warranted against defects in materials or workmanship for a period of one year from the date of purchase. This warranty is for the benefit of the original retail purchaser only. During this warranty period Orion Telescopes &...
Need help?
Do you have a question about the ATLAS 10 EQ and is the answer not in the manual?
Questions and answers