Table of Contents
Advertisement
Advertisement
Table of Contents

Related Manuals for Orion ASTROVIEW 6 EQ


Summary of Contents for Orion ASTROVIEW 6 EQ
- Page 1 Manual orion ® astroView 6 EQ ™ #9827 Equatorial Reflecting Telescope customer support (800)‑676‑1343 E‑mail: support@telescope.com corporate offices (831)‑763‑7000 89 Hangar Way, Watsonville, ca 95076 Providing Exceptional Consumer Optical Products Since 1975 IN 160 Rev. B 02/09...
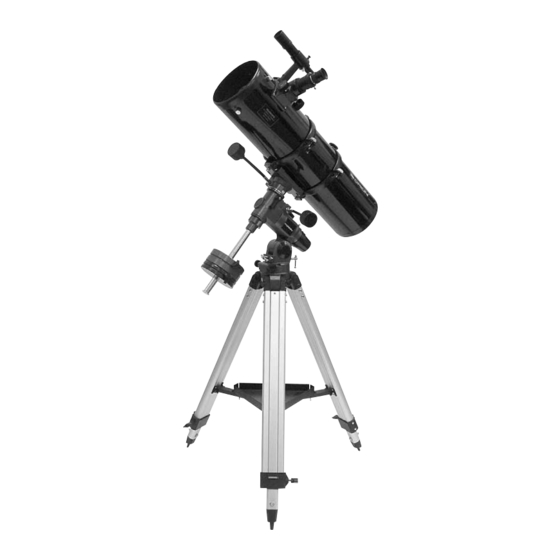
- Page 2 Small counterweight Right ascension slow- motion control “Toe Saver” Right ascension lock lever Counterweight lock knobs Polar axis finder (covered) Latitude scale Tripod leg Latitude adjustment T-bolts Accessory tray bracket Accessory tray Leg lock knob Figure 1. The AstroView 6 EQ...
-
Page 3: Table Of Contents
Welcome to the exciting world of amateur astronomy! Your new AstroView 6 EQ Reflector is designed for high-resolution viewing of astronomical objects. With its precision optics and equatorial mount, you’ll be able to locate and enjoy hundreds of fascinating celestial denizens, including the planets, Moon, and a variety of deep-sky galaxies, nebulas, and star clusters. - Page 4 5. Next, tighten the wingnuts at the top of the tripod legs, so to locate the O-ring and reseat it. This is done by rotating the the legs are securely fastened to the equatorial mount. Use entire housing counterclockwise. Once the polar axis finder the larger wrench and your fingers to do this.
-
Page 5: Inserting The Eyepiece
Figure 3a Figure 3b Figure 3c Figure 3d Figure 3a, b, c, d: down. (c) With the Dec. lock lever released, loosen the tube ting Proper operation of the equatorial mount requires clamps a few turns and slide the telescope forward or back in the that the telescope tube be balanced on both the R.A. -
Page 6: Aligning The Finder Scope
Eyepiece Focal Length (mm) The AstroView 6 EQ’s finder scope uses a spring-loaded The AstroView 6 EQ has a focal length of 750mm, which bracket that makes alignment of the finderscope very easy. As when used with the supplied 25mm eyepiece yields: you turn either of the thumbscrews, the spring in the bracket’s... -
Page 7: Latitude Scale
Right Ascension lock lever Declination setting circle Declination lock lever Front opening in R.A. axis Latitude scale Right Ascension Latitude adjustment setting circle lock T-bolts thumb screw Azimuth fine Right Ascension setting circle adjustment knobs Polar axis finder scope Figure 5: The equatorial mount of the AstroView 6 the focuser. - Page 8 Polar axis Finder scope the date circle, and is labeled “E20” to “W20”. The time merid- A feature of the AstroView 6 EQ is the polar axis finder scope ian indicator mark is an engraved line on the exterior of the housed inside the R.A.
- Page 9 4. Loosen the R.A. lock lever and rotate the mount about standard time meridian, you are west of the standard time the R.A. axis until the March 1 indicating mark (the long line meridian by the calculated amount. For example, if you are between the “2”...
- Page 10 Do so by calibrating the setting cir- the Dec. setting circle are negative. cle for the centered object before moving on to the next one. So, the coordinates for the Orion Nebula listed in a star atlas will look like this: confused about Pointing the telescope? Beginners occasionally experience some confusion about how R.A.
-
Page 11: Collimation (Aligning The Mirrors)
Mirror center Mark What if you need to aim the telescope directly north, but at an Your AstroView 6 EQ comes with a collimation cap. This is a object that is nearer to the horizon than Polaris? You can’t do simple cap that fits on the focuser drawtube like a dust cap, it with the counterweight down as pictured in Figure 1. - Page 12 drawtube Reflection of primary mirror clip Figure 10. Collimating the optics. (a) When the mirrors are properly aligned, the view down the focuser drawtube should look like this (b) With the collimation cap in place, if the optics are out of alignment, the view might look something like this. (c) Here, the secondary mirror is centered under the focuser, but it needs to be adjusted (tilted) so that the entire primary mirror is visible.
-
Page 13: Astronomical Observing
Figure 13: Figure 14: The three small thumbscrews that lock the primary mirror The tilt of the primary mirror is adjusted by turning one in place must first be loosened before any adjustments can be made. or more of the three larger thumbscrews. A flat head screwdriver may be used to loosen these screws. - Page 14 By using eyepieces of varying focal lengths, it is possible to to see bands on Jupiter, the rings of Saturn, craters on the attain many magnifications with the AstroView 6 EQ. The tele- moon, the waxing and waning of Venus, and possibly hun-...
- Page 15 Under dark skies, you can observe a number of brighter deep- While the full moon may look like a tempting target, it is actu- sky objects with your AstroView 6 EQ, including gaseous ally the worst time for viewing! The light of a full moon is too nebulas, open and globular star clusters, and the brighter gal- bright and lacks any decent surface definition.
-
Page 16: Astrophotography
You can change your nighttime scope into a daytime Sun viewer by installing an optional full-aperture solar-filter over the front opening of a AstroView 6 EQ. The primary attraction is sunspots, which change in shape, appearance, and loca- tion daily. Sun spots are directly related to magnetic activity in the sun and follow an 11 year cycle. -
Page 17: Care And Maintenance
Now, connect the camera to the Your AstroView 6 EQ requires very little mechanical mainte- piggyback adapter. There should be a 1/4"-20 mounting hole nance. The optical tube is steel and has a smooth painted fin- in the bottom of the camera’s body. -
Page 18: Specifications
(aluminized face up) in the water and let it soak for a one‑Year limited Warranty This Orion AstroView 6 EQ is warranted against defects in materials or workmanship for a period of one year from the date of purchase. This warranty is for the benefit of the original retail purchaser only.
Need help?
Do you have a question about the ASTROVIEW 6 EQ and is the answer not in the manual?
Questions and answers