Advertisement
Quick Links
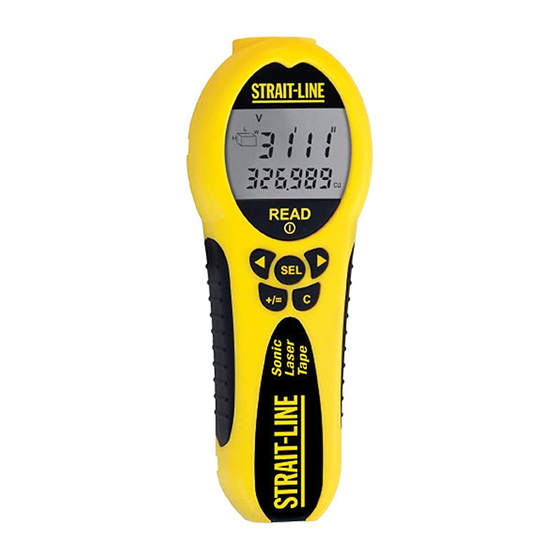
Sonic Laser Tape 50
Installing battery
Installing battery
Installing battery
Installing battery
Installing battery
English
Open battery door (see diagram for location) and insert a new 9V alkaline
Thank you for purchasing this STRAIT-LINE® SONIC
Thank you for purchasing this STRAIT-LINE® SONIC
Thank you for purchasing this STRAIT-LINE® SONIC
Thank you for purchasing this STRAIT-LINE® SONIC
Thank you for purchasing this STRAIT-LINE® SONIC
battery (not included). Reinstall battery door.
LASER TAPE.
LASER TAPE.
LASER TAPE.
LASER TAPE.
LASER TAPE.
If you have any questions about this product or its use,
If you have any questions about this product or its use,
If you have any questions about this product or its use,
If you have any questions about this product or its use,
If you have any questions about this product or its use,
Turn SLT50 On
Turn SLT50 On
Turn SLT50 On
Turn SLT50 On
Turn SLT50 On
please call our toll-free customer service center at 1-800-
please call our toll-free customer service center at 1-800-
please call our toll-free customer service center at 1-800-
please call our toll-free customer service center at 1-800-
please call our toll-free customer service center at 1-800-
Press the READ button once. Unit will power up with the display showing
464-7946.
464-7946.
464-7946.
464-7946.
464-7946.
the same information as the previous shutdown.
To learn more about how STRAIT-LINE® Products can
To learn more about how STRAIT-LINE® Products can
To learn more about how STRAIT-LINE® Products can
To learn more about how STRAIT-LINE® Products can
To learn more about how STRAIT-LINE® Products can
*NOTE: Unit will automatically shut down 30 seconds after last
*NOTE: Unit will automatically shut down 30 seconds after last
*NOTE: Unit will automatically shut down 30 seconds after last
*NOTE: Unit will automatically shut down 30 seconds after last
*NOTE: Unit will automatically shut down 30 seconds after last
help you with all your home-improvement or decorating
help you with all your home-improvement or decorating
help you with all your home-improvement or decorating
help you with all your home-improvement or decorating
help you with all your home-improvement or decorating
input
input
input
input
input
projects visit our website at
projects visit our website at
projects visit our website at
projects visit our website at www.strait-line.com
projects visit our website at
www.strait-line.com
www.strait-line.com
www.strait-line.com
www.strait-line.com. . . . .
To Select Mode
To Select Mode
To Select Mode
To Select Mode
To Select Mode
This tool emits a laser beam, which, projects a visible spot on the target
• The SLT50 has six modes: Length, Area,
surface when the tool is used indoors.
Volume, Units, Memory Store, and Memory
This is a Class IIIA (U.S. version) or IIIR (Europe version) laser tool and is
Retrieve. Icons at the top left of the display
manufactured to comply with international safety rule IEC 285.
indicate these modes.
1. Press the SEL button. The menu options
Technical Specifications
Technical Specifications
Technical Specifications
Technical Specifications
Technical Specifications
will pop up with the mode you are currently
Recommended use
Indoor
in flashing. Choices are "Length", "Area", "Volume", "Units", "Memory
± 0.5% or ± 1 digit
Accuracy
Store", and "Memory Retrieve".
Resolution:
2. Press the scroll buttons ( or ) until the desired mode is flashing.
In
1"
3. Press the SEL button to accept selection.
Ft-in
1"
Yards
0.01
**NOTE: At any time pressing the C button 3 times will return the
**NOTE: At any time pressing the C button 3 times will return the
**NOTE: At any time pressing the C button 3 times will return the
**NOTE: At any time pressing the C button 3 times will return the
**NOTE: At any time pressing the C button 3 times will return the
CM
1
unit to Length mode.
unit to Length mode.
unit to Length mode.
unit to Length mode.
unit to Length mode.
M
0.01
± 5˚
Aperture Angle
To Select Units
To Select Units
To Select Units
To Select Units
To Select Units
Power Supply
9V block battery (not included)
• The SLT50 can be set to display the
Battery Life
10,000 readings
measurements in five units indicated by icons
Dimensions
6.5"/165mm x 2.44"/62mm x 1.41"/36mm
on the right of the display: Inches, Feet, Yards,
Weight
3.8oz / 108g (without battery)
Centimeters, and Meters.
Measurement Range:
1. Press the SEL button.
Length
1'10" to 50'0" (0.55m to 15.20m)
Area
3.44'sq to 2500'sq (0.30m sq to 231.04m sq)
2. Press the scroll buttons ( or ) until the Units icon (U) is flashing.
Volume
6.20'cu to 125000'cu (0.17m cu to 3511.81m cu)
3. Press the SEL button. The unit icons on the right of the screen will all
Calculation Range:
appear with the current unit setting flashing.
Inches
22" to 999999"
4. Press the scroll buttons ( or ) until the desired units are flashing.
Feet
1'10" to 9999'11"
Yards
0.60yds to 999999yds
5. Press the SEL button to set the units. The previous measurement
Centimeters
55cm to 999999cm
that was displayed on the screen will be converted to the new units
Meters
0.55m to 9999.99m
of measure.
Operating Environment
Operating Environment
Operating Environment
Operating Environment
Operating Environment
To Measure Length
To Measure Length
To Measure Length
To Measure Length
To Measure Length
Temperature
32˚F to 104˚F (0˚C to 40˚C)
• Refer to the "To Select Mode" section to
Still air and hard target surface for accurate measurement.
change to LENGTH mode. Once LENGTH
mode is selected, the length (L) icon will be
NOTE: The SLT50 always measures from the base of the tool
NOTE: The SLT50 always measures from the base of the tool
NOTE: The SLT50 always measures from the base of the tool
NOTE: The SLT50 always measures from the base of the tool
NOTE: The SLT50 always measures from the base of the tool
on the screen flashing.
1. With the base of the SLT50 held firmly
SAFETY INSTRUCTIONS
SAFETY INSTRUCTIONS
SAFETY INSTRUCTIONS
SAFETY INSTRUCTIONS
SAFETY INSTRUCTIONS
against the first wall or hard surface, point
Important
Important
Important
Important
Important
the SLT50 at opposite surface. The unit must be perpendicular to the
Please read all instructions prior to operating Sonic Laser Tape Measure.
surface you are measuring to.
Caution
Caution
Caution
Caution
Caution
2. Press the READ button. You will hear a short clicking sound. The
Use of controls or performance of procedures other than those specified
SLT50 will display the length on the screen. The reading includes the
herein may result in hazardous radiation exposure.
length of the tool.
Warnings
Warnings
Warnings
Warnings
Warnings
To obtain another reading, press the READ button again. To store the
Use of controls or performance of procedures other than those specified
reading in memory, refer to the section labeled "Measurement Storage". To
herein may result in hazardous radiation exposure. The power of the emission
add measurements refer to the section labeled "To Add Measurements".
of the laser beam is less than 1mW in Class II (Europe) and less than 5mW
in Class IIIA (U.S.) and Class IIIR (Europe), so the following warnings must
To Measure Area
To Measure Area
To Measure Area
To Measure Area
To Measure Area
be followed to avoid injury:
• Refer to the "To Select Mode" section to
• DO NOT stare directly at the laser beam.
change to AREA mode. Once AREA mode is
selected the length/width (LW) icon will be
• DO NOT project the laser beam directly into the eyes of others / animals.
on the screen with the L flashing.
• DO NOT set up the tool at eye level or operate the tool on or near a
• When the SLT50 units are set to inches (IN),
reflective surface, as the laser beam could be projected into your eyes
the SLT50 will automatically change to FT-IN
or the eyes of others.
mode and the resultant area will be displayed in square feet. This is
indicated by a FT on the right side of the screen (see Diagram).
DANGER
DANGER
DANGER
DANGER
DANGER
This caution
Class IIIA Laser Product
• When the SLT50 units are set to centimeter
notice is
Laser radiation emitted from tool
(CM), the SLT50 will automatically change to
reminded
Max. Power Output < 5mw
Meter mode and the resultant area will be
with a sticker
Wavelength: 630-670 nm
displayed in square meters. This is indicated
located on
Do Not Stare Into Beam
Do Not Stare Into Beam
Do Not Stare Into Beam
Do Not Stare Into Beam
Do Not Stare Into Beam
by a M on the right side of the screen (see
the back of the
AVOID DIRECT EYE EXPOSURE
AVOID DIRECT EYE EXPOSURE
AVOID DIRECT EYE EXPOSURE
AVOID DIRECT EYE EXPOSURE
AVOID DIRECT EYE EXPOSURE
Diagram).
SLT50.
THIS TOOL EMITS A LASER RADIATION
THIS TOOL EMITS A LASER RADIATION
THIS TOOL EMITS A LASER RADIATION
THIS TOOL EMITS A LASER RADIATION
THIS TOOL EMITS A LASER RADIATION
1. With the base of the SLT50 held firmly against the first wall or hard
surface, press the READ button to obtain the first dimension. The
first measurement will be displayed on the top line of the display.
HOW TO USE
HOW TO USE
HOW TO USE
HOW TO USE
HOW TO USE
The W will now be flashing.
2. With the base of the SLT50 held firmly against the second wall or
hard surface, press the READ button to obtain the second
measurement. Now the second measurement will be displayed on
the top line of the display and the area calculation will appear on the
bottom line. The LW icon will not be flashing.
LCD Screen
To review the 2 measurements, pressing the read button repeatedly will
scroll thru L and W. To obtain another area measurement, press the C
Left Scroll Key
button to start the Area procedure over. To store the reading in memory,
Select Key
refer to the section labeled "Measurement Storage". To add measurements
refer to the section labeled "To Add Measurements".
Right Scroll Key
Clear Key
To Measure Volume
To Measure Volume
To Measure Volume
To Measure Volume
To Measure Volume
Addition Key
• Refer to the "To Select Mode" section to
change to VOLUME mode. Once VOLUME
mode is selected, the length/width/height
(LWH) icon will be on the screen with the L
Battery Door
flashing.
• When the SLT50 units are set to inches (IN), the SLT50 will automatically
change to FT-IN mode and the resultant area will be displayed in cubic
Belt Clip
feet. This is indicated by a FT on the right side of the screen.
• When the SLT50 units are set to centimeter (CM), the SLT50 will
automatically change to Meter mode and the resultant area will be
displayed in cubic meters. This is indicated by a M on the right side of
the screen.
Laser Pointer
Ultrasonic Sensor
1. With the base of the SLT50 held firmly
V
against the first wall or hard surface, press
the READ button to obtain the first
dimension. The first measurement will be
displayed on the top line of the display.
The W will now be flashing.
2. With the base of the SLT50 held firmly
V
against the second wall or hard surface,
press the READ button to obtain the
second measurement. The measurement
will be displayed on the top line of the
display; nothing will be displayed on the
S
R
bottom line. The H will now be flashing.
L
L
A V U M
M
3. With the base of the SLT50 held firmly
V
against the third hard surface, press the
READ button to obtain the third
measurement.
Now
the
third
measurement will be displayed on the top
line of the display and the volume
calculation will appear on the bottom line. The LWH icon will not be
flashing.
To review the 3 measurements, pressing the read button repeatedly will
scroll thru H, L, and W. To obtain another volume measurement, press the
C button to start the procedure over. To store the reading in memory, refer
to the section labeled "Measurement Storage". To add measurements refer
to the section labeled "To Add Measurements".
U
Measurement Storage
Measurement Storage
Measurement Storage
Measurement Storage
Measurement Storage
• The value on the display will be stored in one of five memory locations.
• For Length measurements, the top line of the display is transferred to
memory unless two or more lengths have been added. In this case, the
total from the bottom line of the display will be put into memory.
• For Area and Volume measurements, the bottom line of the display is
transferred to memory.
• The type of measurement is stored (sq for area or cu for volume) in
memory.
• The measurement will be stored in the current unit mode, but will be
recalculated if the unit mode is changed. For example if a measurement
of 16ft is stored and the units are changed to m, the memory location
will be changed to 4.9m.
1. To store a measurement in one of the five
S
S
L A V U M
M
M
memory locations, press the SEL button
L
while the value is displayed on the screen.
The current mode will flash on the top of
the screen.
2. Press
the
scroll
buttons
(
or
)
is flashing.
3. Press the SEL button.
4. Select which memory location to store the value by pressing the
scroll buttons ( or ) until the desired location is flashing.
5. Press the SEL button to chose the location. The screen will return to
the previous display.
*NOTE: Memory locations cannot be cleared. When a memory
*NOTE: Memory locations cannot be cleared. When a memory
*NOTE: Memory locations cannot be cleared. When a memory
*NOTE: Memory locations cannot be cleared. When a memory
*NOTE: Memory locations cannot be cleared. When a memory
location is selected, the current value will be replaced with the
location is selected, the current value will be replaced with the
location is selected, the current value will be replaced with the
location is selected, the current value will be replaced with the
location is selected, the current value will be replaced with the
new one.
new one.
new one.
new one.
new one.
Memory Retrieval
Memory Retrieval
Memory Retrieval
Memory Retrieval
Memory Retrieval
A
• The values stored in one of the five memory
S
S
L A V U M
M
M
locations will be displayed on the screen.
• The value will be restored to the bottom line
of the display.
1. Press the SEL button. The current mode
will flash at the top of the screen.
M
2. Press the scroll buttons ( or ) until M
R
A
is flashing.
3. Press the SEL button.
4. Select which memory location to restore
by pressing the scroll buttons ( or ) until the desired location is
flashing. The measurement stored in each location is shown on the
screen as the locations are scrolled. The measurement will be on the
bottom line of the display.
5. Press the SEL button to return to measure mode.
To add Measurements
To add Measurements
To add Measurements
To add Measurements
To add Measurements
• Measurements currently displayed on the screen can be added without
entering them in memory.
• This is useful when measuring the square footage of a house. The area
of each room can be added to the total one at a time.
• Different units of measure cannot be added. For example an Area cannot
be added to a Volume.
1. Put the SLT50 in the desired mode and take the first measurement.
For example Area mode and measure the first room.
2. When the first measurement is displayed (on the top line for Length
measurements and bottom line for Area and Volume measurements),
V
press the +/= button. A + sign is displayed on the left of the screen.
The unit is ready to make the next measurement.
3. For Length mode, press the READ button once. For Area or Volume,
follow the appropriate procedure to obtain the next measurement.
While obtaining an Area or Volume during the addition process,
pressing the C key once will start that measurement over from the
beginning, but the addition will still be in progress.
4. When the measurement is obtained, press the +/= key to add the
measurement to the total. The new total is displayed on the bottom
line.
5. Press the +/= key to add another measurement.
To Add Measurements in Memory
To Add Measurements in Memory
To Add Measurements in Memory
To Add Measurements in Memory
To Add Measurements in Memory
• The units have to be of the same type (Length,
L
Area, or Volume).
1. Calculate first measurement: Length,
Area, or Volume.
2. With the first measurement displayed on
the screen, press the +/= button. A + will be displayed on the left
side of the display.
3. Press SEL button. The current mode will
L
flash at the top of the screen.
4. Press the scroll buttons ( or ) until M
R
is flashing.
5. Press the SEL button. The memory location
icons are displayed with the first one flashing.
6. Press the scroll buttons ( or ) until the desired memory location is
flashing. Only memory locations that have the same type of
measurement (Length, Area, or Volume) can be used. As the locations
are scrolled, the screen will display the stored measurement. The
type of measurement is indicated on the screen by the units next
to the measurement.
7. Press SEL to choose the measurement. The measurements will be
totaled and the result displayed on the bottom line of the display.
Important Notes
Important Notes
Important Notes
Important Notes
Important Notes
Inaccurate measurement may result from the following:
• When the battery runs low (please replace the battery when the "Low
Battery" icon
is displayed on the screen)
• When the measured distance is out of the specified range.
• When another ultrasonic source is nearby.
• When the unit is not perpendicular to the target.
An error message "err" will be displayed under the following conditions:
• The target surface does not provide good reflection for the ultrasonic
pulse (i.e. soft and irregular surface such as thick carpet, curtain, or
irregular wall paper).
• The distance measured is out of the specified range (less than 1'10" or
greater than 50').
• The unit is not perpendicular to the target.
R
1
2 3 4 5
Care and Handling
Care and Handling
Care and Handling
Care and Handling
Care and Handling
• The SLT50 is a precision instrument, which must be handled with care.
• Avoid shock, vibrations and extreme heat.
until
M
S
• Avoid dust and water. If needed, use a soft cloth and glass cleaner to
clean the screen.
• Keep the laser tool dry and clean.
• Check battery regularly to avoid deterioration.
• Remove battery if the laser tool is to be stored for an extended period of
time.
Warranty
Warranty
Warranty
Warranty
Warranty
Each STRAIT-LINE® tool is warranted to be free from defects in material
and workmanship for a period of five years from the date of purchase.
During the warranty period, should the tool fail to operate under normal
R
conditions and be deemed defective by the manufacturer, the manufacturer
1
2 3 4 5
reserves the right to repair or replace the product.
This warranty does not apply to any damage resulting from, but not limited
to, the following: abuse, negligence, accident, water, being dropped from
more than 3 feet, any uses for which the tool is not designed, and/or if
repairs have been made or attempted by others. Disassembling the laser
R
tool will also void the warranty.
1
2 3 4 5
Return all parts of the broken tool to Strait-Line™
Huntersville, NC 28078-1801 USA, for a free repair or replacement if warranty
applies.
BEFORE RETURNING THIS PRODUCT, PLEASE CALL 1-800-464-7946.
In Australia or New Zealand, return all parts of the broken tool to Newell
Rubbermaid Pty, LTD. 44-48 Rocco Drive, Scoresby Victoria 3179, Australia,
for a free repair or replacement if warranty applies.
Cinta láser sónica 50
Spanish
Instalación de la batería
Instalación de la batería
Instalación de la batería
Instalación de la batería
Instalación de la batería
Abra la tapa de la batería (vea el diagrama que muestra su localización) e
Gracias por comprar este Nivel Láser STRAIT-LINE®.
Gracias por comprar este Nivel Láser STRAIT-LINE®.
Gracias por comprar este Nivel Láser STRAIT-LINE®.
Gracias por comprar este Nivel Láser STRAIT-LINE®.
Gracias por comprar este Nivel Láser STRAIT-LINE®.
inserte una batería alcalina nueva de 9 V (no incluida). Instale de nuevo la
Si tiene alguna pregunta acerca de este producto o su
Si tiene alguna pregunta acerca de este producto o su
Si tiene alguna pregunta acerca de este producto o su
Si tiene alguna pregunta acerca de este producto o su
Si tiene alguna pregunta acerca de este producto o su
tapa de la batería.
uso, comuníquese con nuestra central de servicio al
uso, comuníquese con nuestra central de servicio al
uso, comuníquese con nuestra central de servicio al
uso, comuníquese con nuestra central de servicio al
uso, comuníquese con nuestra central de servicio al
Encienda la cinta métrica SLT50
Encienda la cinta métrica SLT50
Encienda la cinta métrica SLT50
Encienda la cinta métrica SLT50
Encienda la cinta métrica SLT50
cliente al número gratuito 1-800-464-7946.
cliente al número gratuito 1-800-464-7946.
cliente al número gratuito 1-800-464-7946.
cliente al número gratuito 1-800-464-7946.
cliente al número gratuito 1-800-464-7946.
Apriete una vez el botón READ (Leer). La unidad se encenderá mostrando
en la pantalla la misma información que tenía cuando se apagó la última
Para conocer en mas detalle como los productos STRAIT-
Para conocer en mas detalle como los productos STRAIT-
Para conocer en mas detalle como los productos STRAIT-
Para conocer en mas detalle como los productos STRAIT-
Para conocer en mas detalle como los productos STRAIT-
vez.
LINE® prueden ayudarle con sus proyectos de decoracion
LINE® prueden ayudarle con sus proyectos de decoracion
LINE® prueden ayudarle con sus proyectos de decoracion
LINE® prueden ayudarle con sus proyectos de decoracion
LINE® prueden ayudarle con sus proyectos de decoracion
*NOTA: La unidad se apagará automáticamente después de 30
*NOTA: La unidad se apagará automáticamente después de 30
*NOTA: La unidad se apagará automáticamente después de 30
*NOTA: La unidad se apagará automáticamente después de 30
*NOTA: La unidad se apagará automáticamente después de 30
y remodelacion eu el hogar visite nuestro bágina Web
y remodelacion eu el hogar visite nuestro bágina Web
y remodelacion eu el hogar visite nuestro bágina Web
y remodelacion eu el hogar visite nuestro bágina Web
y remodelacion eu el hogar visite nuestro bágina Web
segundos de la última entrada
segundos de la última entrada
segundos de la última entrada
segundos de la última entrada
segundos de la última entrada
www.strait-line.com.
www.strait-line.com.
www.strait-line.com.
www.strait-line.com.
www.strait-line.com.
Para seleccionar el modo
Para seleccionar el modo
Para seleccionar el modo
Para seleccionar el modo
Para seleccionar el modo
Esta herramienta emite un rayo láser, el cual proyecta un punto visible
• La cinta métrica SLT50 tiene seis modos:
sobre la superficie del objetivo cuando se usa bajo techo.
Length (Longitud), Area (Área), Volume
Esta es una herramienta láser Clase IIIA (versión EE.UU.) o Clase IIIR (versión
(Volumen), Units (Unidades), Memory Store
Europa) y su fabricación cumple con la regla de seguridad internacional IEC
(Almacenamiento de memoria) y Memory
285.
Retrieve (Recuperación de memoria); los
iconos de la parte superior izquierda de la
Especificaciones técnicas
Especificaciones técnicas
Especificaciones técnicas
Especificaciones técnicas
Especificaciones técnicas
pantalla indican estos modos.
Se recomienda su uso
Bajo techo
1. Apriete el botón SEL. Las opciones del menú aparecerán y el modo
± 0,5% ó ± 1 dígito
Precisión
actual brillará de forma intermitente. Las opciones son "Length", "Area",
Resolución:
"Volume", "Units", "Memory Store" y "Memory Retrieve".
Pulgadas
1"
2. Apriete los botones de desplazamiento ( or ) hasta que el modo
Pies-pulgadas
1"
deseado esté brillando intermitentemente.
Yardas
0,01
3. Apriete el botón SEL para aceptar la opción seleccionada.
Centímetros
1
**NOTA: Apretando 3 veces el botón C en cualquier momento se
**NOTA: Apretando 3 veces el botón C en cualquier momento se
**NOTA: Apretando 3 veces el botón C en cualquier momento se
**NOTA: Apretando 3 veces el botón C en cualquier momento se
**NOTA: Apretando 3 veces el botón C en cualquier momento se
Metros
0,01
± 5˚
regresará al modo Longitud.
regresará al modo Longitud.
regresará al modo Longitud.
regresará al modo Longitud.
regresará al modo Longitud.
Ángulo de apertura
Suministro de energía
Batería de 9V (no incluida)
Para seleccionar las unidades
Para seleccionar las unidades
Para seleccionar las unidades
Para seleccionar las unidades
Para seleccionar las unidades
Duración de la batería
10.000 lecturas
• Se puede graduar la cinta métrica SLT50 para
Dimensiones
165 mm x 62 mm x 36 mm
mostrar las mediciones en cinco unidades
Peso 120 g
indicadas por los iconos a la derecha de la
Rango de medición:
pantalla: pulgadas, pies, yardas, centímetros
Longitud
0,55 m a 15,20 m
y metros.
Área
0,30 m
2
a 231,04 m
2
1. Apriete el botón SEL.
Volumen
0,17 m
3
a 3511,81 m
3
Rango de cómputo:
2. Apriete los botones de desplazamiento ( or ) hasta que el icono
Pulgadas
22" a 999999"
de la unidades (U) esté brillando intermitentemente.
Pies
1'10" a 9999'11"
3. Apriete el botón SEL. Los iconos de las unidades a la derecha de la
Yardas
0.60 yds a 999999 yds
pantalla aparecerán todos brillando intermitentemente con la
Centímetros
55 cm a 999999 cm
graduación actual de las unidades.
Metros
0,55 m a 9999,99 m
4. Apriete los botones de desplazamiento ( or ) hasta que el modo
deseado esté brillando intermitentemente.
Ambiente de operación
Ambiente de operación
Ambiente de operación
Ambiente de operación
Ambiente de operación
5. Apriete el botón SEL para establecer las unidades. La medición anterior
Temperatura
0˚C a 40˚C
que fue desplegada en la pantalla será convertida a las nuevas
Para una medición exacta, se requiere que el aire esté en calma y que la
unidades de medición.
superficie del objetivo sea dura.
Para medir la Longitud
Para medir la Longitud
Para medir la Longitud
Para medir la Longitud
Para medir la Longitud
NOTA: La cinta láser sónica - SLT50 siempre mide desde la base de
NOTA: La cinta láser sónica - SLT50 siempre mide desde la base de
NOTA: La cinta láser sónica - SLT50 siempre mide desde la base de
NOTA: La cinta láser sónica - SLT50 siempre mide desde la base de
NOTA: La cinta láser sónica - SLT50 siempre mide desde la base de
• Para cambiar al modo LENGTH (Longitud),
la herramienta
la herramienta
la herramienta
la herramienta
la herramienta
consulte la sección "Para seleccionar el modo".
INSTRUCCIONES DE SEGURIDAD
INSTRUCCIONES DE SEGURIDAD
INSTRUCCIONES DE SEGURIDAD
INSTRUCCIONES DE SEGURIDAD
INSTRUCCIONES DE SEGURIDAD
Una vez se haya seleccionado el modo
LENGTH, el icono de longitud (L) aparecerá
Importante
Importante
Importante
Importante
Importante
en la pantalla con la L brillando
Lea todas las instrucciones antes de operar la Cinta métrica láser sónica.
intermitentemente.
Precaución
Precaución
Precaución
Precaución
Precaución
1. Con la base de la cinta métrica SLT50 sostenida firmemente contra la
El uso de controles o la ejecución de procedimientos diferentes a los
primera pared o superficie dura, apúntela hacia la superficie opuesta.
especificados aquí pueden producir como resultado la exposición a
La unidad debe estar perpendicular a la superficie sobre la cual usted
radiaciones peligrosas.
está midiendo.
Advertencias
Advertencias
Advertencias
Advertencias
Advertencias
2. Apriete el botón READ. Usted escuchará un breve sonido de chasqueo.
El uso de controles o la ejecución de procedimientos diferentes a los
La cinta métrica SLT50 mostrará la longitud en la pantalla. La lectura
especificados aquí pueden producir como resultado la exposición a
incluye la longitud de la herramienta.
radiaciones peligrosas. La potencia de las emisiones del rayo láser es menor
Para obtener otra lectura, apriete de nuevo el botón READ. Para almacenar
de 1mW en la Clase II (Europa) y menor de 5mW en la Clase IIIA (EE.UU.)
la lectura en la memoria, consulte la sección denominada "Almacenamiento
y Clase IIIR (Europa), de tal forma que se deben respetar las siguientes
de mediciones". Para sumar mediciones, consulte la sección denominada
advertencias para evitar lesiones:
"Sumar mediciones".
• NO mire directamente al rayo láser.
Para medir el Área
Para medir el Área
Para medir el Área
Para medir el Área
Para medir el Área
• NO proyecte el rayo láser directamente a los ojos de otras personas o de
• Para cambiar al modo AREA (Área), consulte
animales.
a sección "Para seleccionar el modo". Una vez
• NO monte la herramienta al nivel de los ojos ni la opere sobre o cerca de
se haya seleccionado el modo AREA, el icono
superficies reflectivas ya que el rayo láser podría proyectarse hacia sus
de longitud/ancho (LW) aparecerá en la
ojos o hacia los ojos de otras personas.
pantalla con la L brillando intermitentemente.
• Cuando las unidades de la cinta métrica SLT50
PELIGRO
PELIGRO
PELIGRO
PELIGRO
PELIGRO
estén ajustadas a pulgadas (IN), la SLT50 cambiará automáticamente al
Producto de láser clase IIIA
Este aviso de
modo FT-IN y el área resultante se mostrará en pies cuadrados. Esto se
Esta herramienta emite radiación de láser
precaución aparece
Salida máxima de energía < 5 mw
indica por medio de las letras FT al lado derecho de la pantalla (vea
en la etiqueta
Longitud de onda: 630 a 670 nm
diagrama).
ubicada en un lado
No mire directamente a la luz
No mire directamente a la luz
No mire directamente a la luz
No mire directamente a la luz
No mire directamente a la luz
• Cuando las unidades de la cinta métrica SLT50
de la unidad.
EVITE EL CONTACTO DIRECTO CON LOS
EVITE EL CONTACTO DIRECTO CON LOS
EVITE EL CONTACTO DIRECTO CON LOS
EVITE EL CONTACTO DIRECTO CON LOS
EVITE EL CONTACTO DIRECTO CON LOS
estén ajustadas a centímetros (CM), la SLT50
OJOS. ESTA HERRAMIENTA EMITE
OJOS. ESTA HERRAMIENTA EMITE
OJOS. ESTA HERRAMIENTA EMITE
OJOS. ESTA HERRAMIENTA EMITE
OJOS. ESTA HERRAMIENTA EMITE
cambiará automáticamente al modo Meter
RADIACIÓN DE LÁSER
RADIACIÓN DE LÁSER
RADIACIÓN DE LÁSER
RADIACIÓN DE LÁSER
RADIACIÓN DE LÁSER
(Metro) y el área resultante se mostrará en
CÓMO USAR
CÓMO USAR
CÓMO USAR
CÓMO USAR
CÓMO USAR
metros cuadrados. Esto se indica por medio
de la letra M al lado derecho de la pantalla
(vea diagrama).
1. Con la base de la cinta métrica SLT50 sostenida firmemente contra la
primera pared o superficie dura, apriete el botón READ para obtener
la primera dimensión. La primera medición se mostrará en la línea
Pantalla LCD
superior de la pantalla. La W estará ahora brillando intermitentemente.
Tecla de
2. Con la base de la cinta métrica SLT50 sostenida firmemente contra la
desplazamiento
a la izquierda
segunda pared o superficie dura, apriete el botón READ para obtener
Tecla de selección
la segunda medición. Ahora se mostrará la segunda dimensión en la
Tecla de desplazamiento
línea superior de la pantalla y el cálculo del área aparecerá en la línea
a la derecha
inferior. El icono LW estará ahora brillando intermitentemente.
Tecla de borrado
Presionando el botón de lectura repetidamente se desplazará a través de L
Tecla para sumar
y W para revisar las dos mediciones. Para obtener otra medición del Área,
apriete el botón C para volver a iniciar el procedimiento de medición de
Tapa de
la batería
área. Para almacenar la lectura en la memoria, consulte la sección
denominada "Almacenamiento de mediciones". Para sumar mediciones,
Clip De la Correa
consulte la sección denominada "Sumar mediciones".
Para medir el Volumen
Para medir el Volumen
Para medir el Volumen
Para medir el Volumen
Para medir el Volumen
• Para cambiar al modo VOLUME, consulte la
sección "Para seleccionar el modo". Una vez
Puntero láser
que se haya seleccionado el modo VOLUME,
el icono de longitud/ancho/altura (LWH)
Sensor ultrasónico
aparecerá en la pantalla con la L brillando
intermitentemente.
S
R
L
L
A V U M
M
U
L
A
A
V
Advertisement

Related Manuals for Strait-line Sonic Laser Tape 50

Summary of Contents for Strait-line Sonic Laser Tape 50
- Page 1 1mW in Class II (Europe) and less than 5mW Each STRAIT-LINE® tool is warranted to be free from defects in material Advertencias Advertencias...
- Page 2 YEUX AU FAISCEAU CET INSTRUMENT YEUX AU FAISCEAU CET INSTRUMENT YEUX AU FAISCEAU CET INSTRUMENT Chaque outil STRAIT-LINE® est garanti contre les défauts de matériaux ou la superficie résultante sera affichée en mètres 1. Appuyer sur le bouton SEL. Le mode actuel ÉMET DES RADIATIONS LASER.
Need help?
Do you have a question about the Sonic Laser Tape 50 and is the answer not in the manual?
Questions and answers
How do I change to metric measurements (instead of feet and inches)? Thanks
To change the measurement units to metric on the Strait-line Sonic Laser Tape 50:
1. Press the SEL button.
2. Use the scroll buttons (▲ or ▼) until the Units icon (U) is flashing.
3. Press the SEL button again. The unit icons on the right of the screen will appear, with the current unit setting flashing.
4. Use the scroll buttons (▲ or ▼) to select the desired metric unit (centimeters or meters).
5. Press the SEL button to confirm the selection. The previous measurement on the screen will be converted to the new unit.
This answer is automatically generated
How do I recalibrate my strait-line? At what should be 2' it's measuring 2'1". At 16' it's measuring 16'2"