Sign In
Upload
Manuals
Brands
Quantum Manuals
Storage
SuperLoader 3A Series
Quantum SuperLoader 3A Series Manuals
Manuals and User Guides for Quantum SuperLoader 3A Series. We have
6
Quantum SuperLoader 3A Series manuals available for free PDF download: User Manual, Quick Start Manual, Warranty, Supplement Sheet
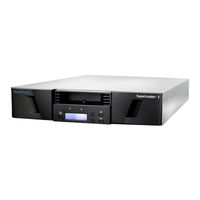
Quantum SuperLoader 3A Series User Manual (306 pages)
Quantum SuperLoader 3: User Guide
Brand:
Quantum
| Category:
Storage
| Size: 6.03 MB
Table of Contents
Table of Contents
3
Preface
19
Figure 1 LCD Front Panel Screen
22
Figure 2 On-Board Remote Management Screen
23
Contact Information
24
Chapter 1 Introduction
27
Introduction General Description
27
Front View
29
Mailslot
29
Figure 3 Superloader Front View
29
Lcd
30
Function Keys
30
Figure 4 Function Keys
30
Status Leds
31
Power Switch
31
Magazines
31
Table 1 LCD Panel Function Keys
31
Figure 5 Magazine (Left and Right Sides)
32
Rear View
33
Figure 6 Magazine Blank
33
Figure 7 Superloader DLT Rear View
33
AC Power
34
Cooling Fans
34
Ethernet Connection
34
Figure 8 Superloader LTO Rear View
34
SCSI Connection
35
Internal View
35
Figure 9 Internal View of the Superloader
36
Bar Code Reader
37
Drive Carrier Assembly (DCA)
37
Picker
37
Supported Software
38
Chapter 2 Installation and Configuration
39
Installation and Configuration Preparation
39
SCSI Bus Requirements
40
Accessories
40
Installation Location Requirements
41
Table 2 Location Criteria
41
Rack Mounting the Superloader
42
Table 3 UL Criteria
42
Figure 10 Clearance Requirements for Rack Mounting
44
General Preparation for Rack Mount Installation
45
Stationary Rack Mount Installation
45
Figure 11 Required Parts for Installation
46
Figure 12 Installing Two Clip Nuts
47
Figure 13 Attaching Superloader Brackets
48
Figure 14 Attaching Support Brackets
49
Figure 15 Sliding Superloader into Rack
50
Figure 16 Front Alignment
51
Figure 17 Connecting Support Brackets
51
Making the SCSI Connection
52
Figure 18 Making the SCSI Connection
53
Powering on the Superloader
54
Figure 19 Sample Idle Screen Display
55
Configuration
56
Figure 20 LCD Front Panel
56
Figure 21 Submenu for Configuration
57
Setting SCSI ID
58
Figure 22 Main Menu (LCD)
59
Figure 23 Configuration Menu (LCD)
59
Setting Ethernet
60
IP Address
60
Figure 24 Main Menu (LCD)
60
Figure 25 Main Menu (LCD)
61
Figure 26 Static IP Selection
62
Subnet Mask
63
Figure 27 Main Menu (LCD)
63
Figure 28 Set Subnet Mask
63
IP Gateway
64
Figure 29 Main Menu (LCD)
64
Figure 30 IP Gateway
64
Setting the SNMP Server
65
Figure 31 Main Menu (LCD)
65
Setting the Time Server
66
Figure 32 Set IP Server
66
Figure 33 Main Menu (LCD)
67
Figure 34 Setting a Time Server
67
Setting the Time
68
Figure 35 Main Menu (LCD)
69
Figure 36 Setting a Time Zone (Hours)
69
Figure 37 Setting a Time Zone (Minutes)
70
Figure 38 Main Menu (LCD)
70
Figure 39 Setting the Date and Time
71
Setting the Change Mode
72
Figure 40 Main Menu (LCD)
72
Sequential Mode Operations
73
Figure 41 Main Menu (LCD)
74
Figure 42 Main Menu (LCD)
74
Setting Security
75
Security Option
75
Figure 43 Main Menu (LCD)
75
Setting Magazines
76
Figure 44 Main Menu (LCD)
76
V20 Firmware and the Superloader LTO
77
V45 Firmware and the Superloader DLT (Excludes DLT1)
77
V45 Firmware and the Superloader DLT1
77
Passwords
78
Figure 45 Main Menu (LCD)
78
Figure 46 Password Screen
79
Getting Lost Passwords
79
Chapter 3 Tape Cartridge Use
81
Tape Cartridges Defined
82
Figure 47 Dlttape IV and Super Dlttape I Cartridges
83
Figure 48 SDLT II Cartridge
84
Figure 49 Ultrium Format Tape Cartridge
84
Tape Maintenance
85
The Write-Protect Switch
85
Figure 50 Write-Protect Switch (SDLT Shown)
85
Tape Drive Cleaning
86
Table 4 Write-Protect Switch Positions
86
Insert the Cleaning Tape
87
Figure 51 Magazine Map
88
Storing the Cleaning Tape (DLT/SDLT Only) in a Magazine
89
Eject the Cleaning Tape
90
Tape Drive Cleaning Methods
91
Manual Cleaning (DLT/SDLT Only)
91
Auto Clean
92
Software
93
Figure 52 Media Compatibility Chart
94
Chapter 4 Superloader Operation
95
Front Panel Components
96
Function Keys
96
Leds
96
Table 5 LED Display
96
Lcd
97
Front Panel Menus
97
Figure 53 Superloader DLT Menu Tree Structure
98
Figure 54 Superloader LTO Menu Tree Structure
99
Commands Menu
100
Status Menu
100
Configuration Menu
101
Diagnostics Menu
101
Front Panel Functionality
101
Enter Passwords
101
Figure 55 Log in Sample
102
Logout
103
Set Change Mode Settings
103
Using Data Cartridges
103
Insert a Single Cartridge
104
Figure 56 Loading a Cartridge (SDLT Tape Shown)
105
Move a Single Cartridge
106
Eject a Single Cartridge
106
Use of Magazines and Magazine Blanks
108
Eject a Magazine
108
Install a Magazine
109
Figure 57 Installing a Magazine
109
Manually Operate the Magazine
110
Figure 58 Installing a Magazine (Continued)
110
Figure 59 View of Magazines
111
Figure 60 Cartridge Orientation (SDLT Shown)
112
Figure 61 Upper Slot of Magazine (SDLT Shown)
113
Figure 62 Top of Magazine
114
Figure 63 Identifying a Magazine Slot (SDLT Shown)
115
View Status Information
116
View Superloader Status
116
Figure 64 LCD Messages
117
Table 6 Superloader Status
117
View Firmware Version
118
View Element Status
118
Figure 65 Firmware Version Display
118
Table 7 Firmware Version Description
118
Figure 66 Element Status
119
Figure 67 Magazine Slot Map
119
Figure 68 Element Status
119
View Tape Drive Status
120
Figure 69 Tape Drive Status (DLT/SDLT Shown)
120
View Tape Drive Version
121
Figure 70 Tape Drive Version
121
Table 8 Tape Drive Status
121
View Ethernet Information
122
Figure 71 View Ethernet Information
122
Table 9 Tape Drive Version
122
View Flex I/O Information
123
Figure 72 View Flex I/O Information (Scrolled Down)
123
Table 10 Ethernet Information Messages
123
Table 11 Flex I/O Information
123
Run Inventory
124
Set Data Compression
124
Updating the System
125
Figure 73 Accessing the Backup Copy of Firmware (Superloader DLT Shown)
127
On-Board Remote Management
128
Open On-Board Remote Management
128
Status Information
129
Default Username and Password
129
Figure 74 On-Board Remote Management Home Page
129
Time Display
130
Feedback
130
Figure 75 Feedback in On-Board Remote Management Screen
130
Commands Page
131
Figure 76 Commands Page
131
Inventory
132
Moving Tapes
132
Set to Home
132
Sequential Operations
133
Configurations Page
134
Figure 77 Screen for Configurations Page
134
Figure 78 Systems Operations Page
135
Scsi ID
135
System Operations Options
135
Figure 79 Screen for Configurations
136
Figure 80 Setting the Mode
137
Set the Mode
137
Figure 81 Viewing the Compression Setting
138
View the Compression Setting
138
Set the Cleaning Mode
139
Set the Magazines
139
Set the System Time
140
Figure 82 Setting the System Time
142
Figure 83 Setting Network Options
143
Set Networking Options
143
Set Security Options
144
Figure 84 Setting Security Options
145
Figure 85 Setting Authorized Client List
147
Figure 86 Disabling Sets
148
Figure 87 Setting Client Overlap Control
149
Diagnostics Page
150
Run Diagnostic Tests
150
Figure 88 Diagnostics Page
150
Figure 89 View Test Status
151
Identify Superloader
152
Figure 90 Viewing Error or History Logs
152
Perform a System Reset
153
System Updates Page
153
Perform System Updates
153
Figure 91 System Updates
153
Chapter 5 Troubleshooting
155
Before Contacting Quantum Support
155
Table 12 Suggested Actions for Performance Problems
156
Contacting Quantum Technical Support
160
Returning Units for Repair
161
Return Authorization Process
161
Policies and Procedures
162
Repair Process
164
How to Return the Superloader for Service
165
Figure 92 Removing the Superloader from the Rack
166
Figure 93 Loosening the Support Brackets
166
Figure 94 Connecting Support Brackets
167
To Pack the Superloader
168
Figure 95 Removing the Brackets
168
Figure 96 Shipping Materials
169
Check for Errors
170
Figure 97 Error Flowchart
171
Superloader Error Logs
172
Screen Display of Hard Error Logs
172
Table 13 Screen Display of Hard Error Logs
172
Hard Error Log Display
179
Figure 98 Hard Error Log as Displayed Via FTP and On-Board Remote Management
179
Figure 99 Hard Error Log as Displayed on Front Panel and SCSI Formats
180
Hard Error Log Fields
181
Error Code Field Description
181
Table 14 Hard Error Log Fields
181
Figure 100 Error Code Block Descriptor for Hard and Soft Event Logs
182
Table 15 Error Code Field Descriptions
182
Error Code Listing
184
Table 16 Error Code Listing
184
Tape Drive Error Logs
191
Error Log Display
191
Error Log Information
192
Figure 101 Example Tape Drive Error Log
192
Figure 102 Example DLT1 Tape Drive Error Log
192
SCSI Check Condition Error Logs
193
Table 17 Tape Drive Field Descriptions
193
Figure 103 SCSI Check Condition Error Log
194
Table 18 SCSI Check Condition Error Log Field Descriptions
194
Table 19 Sense Key Field Definitions
195
Table 20 ASC/ASCQ Field Description
197
Bugcheck Error Logs
199
Figure 104 Bugcheck Error Log
199
Event Error Logs
200
Table 21 Bugcheck Log Field Descriptions
200
Figure 105 Event Error Log
201
Table 22 Event Error Log Field Descriptions
201
A400: Read Error
202
Figure 106 Read Error Block Descriptor
202
Table 23 Read Error Field Descriptions
203
Cause
204
Suggested Actions
204
A401: Write Error
205
Figure 107 Write Error Block Descriptor
205
Table 24 Write Error Field Descriptor
206
Cause
207
Suggested Actions
207
A402: Drive Error
208
Figure 108 Drive Error Block Descriptor
208
Table 25 Drive Error Log Field Descriptions
209
Cause
211
Figure 109 32-Bit Register
211
Suggested Actions
212
A403: Loader Log
212
Figure 110 Loader Error Field Descriptions
212
Cause
213
Suggested Actions
213
Table 26 Loader Error Field Descriptions
213
A404/A405: Calibration
214
Figure 111 Calibration Block Descriptor
214
Table 27 Calibration Field Descriptions
214
Cause
216
Suggested Actions
217
A407: Directory Read
217
Figure 112 Directory Read Block Descriptor
218
Table 28 Directory Read Field Descriptions
219
Cause
222
Suggested Actions
222
A408: Directory Write
223
Figure 113 Directory Write Block Descriptor
223
Table 29 Directory Write Field Descriptions
224
A500: SDLT Hard Read Error
227
Figure 114 Hard Read Error/Hard Write Error Block Descriptor
227
Cause
228
Table 30 Hard Read Error/Hard Write Error Field Descriptions
228
Suggested Actions
229
A501: SDLT Hard Write Error
229
Figure 115 Hard Read Error/Hard Write Error Block Descriptor
229
Table 31 Hard Read Error/Hard Write Error Field Descriptions
230
Cause
231
Suggested Actions
231
A502: SDLT Loader Communication Error
231
Figure 116 Loader Communication Error Block Description
231
Table 32 Loader Communication Error Field Description
231
Cause
232
Suggested Actions
232
A503: SDLT Drive-Servo Error
232
Figure 117 Drive Servo Error Block Descriptor
232
Table 33 Drive Servo Error Field Descriptions
233
Cause
237
A507/A508: Directory Read Failure/Directory Write Failure
238
Figure 118 Directory Read Failure/Write Failure Block Descriptor
238
Table 34 Directory Read Failure/Write Failure Field Descriptions
239
Cause
244
Suggested Actions
245
Chapter 6 Diagnostics
247
Post
247
POST Descriptions
248
Perform a POST
248
Table 35 POST Descriptions
248
Interpret the POST Results
249
Diagnostic Tests
249
Set the Security
249
Stop a Diagnostic Test
250
Front Panel Diagnostic Tests
251
On-Board Remote Management Diagnostic Tests
252
Diagnostics Using On-Board Remote Management
253
Appendix A Basic Information Logs
255
Log Descriptions
255
Superloader Logs
256
Table 36 Log Retrieval Methods
256
Common Information
257
Figure 119 Log Display
257
Log Display
257
Log Fields
257
Error Codes
258
Figure 120 Error Code Block Descriptor for Hard and Soft Event Logs
258
Table 37 Basic Information (Superloader) Log Fields
258
Table 38 Error Code Field Descriptions
259
Shadow Event Log
262
Soft Logs
262
Update Logs
262
Boot Logs
263
Figure 121 Shadow Event Log
263
ID Logs
263
OEM Logs
263
Tape Drive Logs
264
Common Information
264
Log Display
264
Log Fields
264
Figure 122 Example Tape Drive Log
264
POST Failure Logs
265
Table 39 Tape Drive Field Descriptions
265
DLT Drive Diagnostic Results Logs
266
Figure 123 POST Failures Event Log
266
Table 40 POST Failures Event Log Field Description
266
DLT Firmware Changes
267
Figure 124 DLT Drive Diagnostics Event Log
267
Table 41 DLT Drive Diagnostics Field Descriptions
267
Appendix B Specifications
269
Superloader Physical Specifications
270
Superloader Performance Specifications
270
Superloader Power Specifications
272
Superloader Environmental Specifications
273
Superloader Vibration Specifications
274
Superloader Shock Specifications
274
Superloader Product Safety/Compliance
275
Superloader Acoustic and Noise Limits
275
SCSI Specifications
276
SCSI Cable and Terminator Requirements
276
SCSI Cable Length
276
Ethernet
276
Appendix C Time Zones
277
Table 42 Times and Time Zones
278
Fcc Statement
281
Appendix D Regulatory Statements Taiwan Statement
282
Japan Notice
283
Canadian Notice (Avis Canadien)
283
European Union Notice
283
Product Safety Electrostatic Discharge
284
Grounding Methods
285
Laser Safety
285
Taiwan Battery Recycling Label
285
Glossary
287
Index
299
Advertisement
Quantum SuperLoader 3A Series User Manual (121 pages)
Autoloader
Brand:
Quantum
| Category:
Storage
| Size: 1.65 MB
Table of Contents
Table of Contents
3
Chapter 1 Introduction
15
Superloader 3A Series
15
Media Inventory
16
Ethernet Interfaces
16
Table 1 Storage Capacity and Transfer Rates
16
Figure 1 Back Panel Overview
17
Chapter 2 Operating the Autoloader
18
Using the Front Panel
19
Figure 2 Front Panel
19
Table 2 Front Panel Leds
20
Entering Passwords
21
Logging out
21
Configuring the Autoloader
21
Figure 3 System Menu Tree
22
Setting the IP Address
23
Using the Remote Management Ethernet Port
23
Setting the Subnet Mask
24
Setting the IP Gateway
25
Setting the SNMP Server
25
Setting the Time
26
Setting the Time Server
26
Setting Security
28
Setting the Change Mode
28
Setting Passwords
29
Getting Lost Passwords
30
Using Cartridges
30
Inserting a Single Cartridge
32
Moving a Single Cartridge
33
Ejecting a Single Cartridge
34
Using Magazines and Magazine Blanks
36
Figure 4 Left and Right Sides of a Magazine
36
Ejecting a Magazine
37
Using the Magazine Load/Unload Command
37
Installing a Magazine
38
Manually Operating the Magazine
38
Viewing Status Information
40
Autoloader Status
40
Table 3 Autoloader Status
40
Firmware Version
41
Element Status
41
Table 4 Firmware Version Fields
41
Tape Drive Status
42
Table 5 Drive Status Fields
42
Tape Drive Version
43
FTP Server Version
43
Ethernet Information
43
Table 6 Drive Version Fields
43
Table 7 Ethernet Information Fields
43
Running an Inventory
44
Using Data Compression
44
Chapter 3 On-Board Remote Management
45
Accessing On-Board Remote Management
46
Opening On-Board Remote Management
47
Viewing Status Information
47
Default Username and Password
48
Time Display
48
Feedback on Pages
48
Configurations Page
49
System Operations Options
49
Setting Network Options
53
Setting Security Options
54
Updates Page
57
FTP Server Updates
58
Diagnostics Page
59
Running Diagnostic Tests
59
Viewing Error or History Logs
59
Diagnostics
60
Sales Demo
60
Identification
60
Performing a System Reset
61
Commands Page
61
Moving Tapes
61
Inventory
62
Set to Home
62
Chapter 4 Customer Replaceable Units (Crus)
63
Replacing a Magazine or Magazine Blank
63
Removing a Magazine
64
Removing a Blank
64
Installing a Magazine
64
Installing a Blank
65
Changing the Orientation
65
Figure 5 Magazine and Blank
66
Figure 6 Removing the Screws from the Handle
67
Chapter 5 Troubleshooting
68
Before Contacting Customer Support
68
Table 8 Probable Cause and Possible Solutions
69
Autoloader Troubleshooting
72
Autoloader Logs
72
Table 9 Log Retrieval Methods
73
Retrieving the Hard Log
74
Hard Log Example
75
Time Stamp
75
Error
76
Table 10 Error Code Listing and Suggested Actions
77
Power-On Self Test (POST)
85
Table 11 POST Descriptions
85
Interpreting the POST Results
86
Performing a POST
86
Diagnostic Tests from the Front Panel
87
Setting the Security
87
Stopping a Diagnostic Test
88
Front Panel Diagnostic Tests
88
On-Board Remote Management Diagnostic Tests
90
Diagnostics Using On-Board Remote Management
90
Returning the Autoloader for Service
91
Preparing the Autoloader for Shipment
91
Removing the Autoloader from a Rack
91
Packing the Autoloader
92
Appendix A Specifications
93
Superloader 3A Series Autoloader
94
Physical Specifications
94
Performance Specifications
94
Environmental Specifications
95
Power Specifications
96
Vibration Specifications
96
Shock Specifications
96
A-Series SDLT 600A Tape Drive
97
Drive Specifications
97
Media Capacity
97
Media Specifications
97
A-Series LTO-3A Tape Drive
99
Drive Specifications
99
Media Capacity
99
Media Specifications
100
Appendix B Regulatory Statements
101
FCC Statement
101
Taiwan Statement
102
Japan Notice
102
Canadian Notice (Avis Canadien)
102
European Union Notice
103
Product Safety Electrostatic Discharge
104
Grounding Methods
104
Environmental Compliance
105
Disposal of Electrical and Electronic Equipment
105
Glossary
106
Index
118
Quantum SuperLoader 3A Series Quick Start Manual (14 pages)
Quantum Audio SuperLoader 3A Series Quick Start Guide
Brand:
Quantum
| Category:
Storage
| Size: 1.2 MB
Table of Contents
Table of Contents
1
Quick Start Guide
1
Choosing a Location
1
Preparing for the Installation
2
Providing Necessary Tools
2
Taking ESD Precautions
3
Preparing for Rack Mounting
3
Unpacking the Autoloader
4
Checking Accessories
5
Rack Mounting the Autoloader
6
Autoloader Panel Overviews
12
Connecting Ethernet and Power Cables
13
Contents
13
After the Installation
14
Advertisement
Quantum SuperLoader 3A Series Warranty (6 pages)
Quantum DX100: Supplementary Guide
Brand:
Quantum
| Category:
Storage
| Size: 0.12 MB
Quantum SuperLoader 3A Series Quick Start Manual (4 pages)
Bar Code Reader Upgrade
Brand:
Quantum
| Category:
Storage
| Size: 2.09 MB
Quantum SuperLoader 3A Series Supplement Sheet (1 page)
Quantum SuperLoader 3A: Supplementary Guide
Brand:
Quantum
| Category:
Storage
| Size: 0.11 MB
Advertisement
Related Products
Quantum Superloader 3
Quantum DAT 320 CD320UE
Quantum DAT 320 CD320UH
Quantum 3214
Quantum 3316
Quantum 3414
Quantum 3U
Quantum Harvest 3000-60 TSW
Quantum Q-LOGIC 3e
Quantum 340TIH-134
Quantum Categories
Storage
Wheelchair
Network Hardware
Server
Wireless Access Point
More Quantum Manuals
Login
Sign In
OR
Sign in with Facebook
Sign in with Google
Upload manual
Upload from disk
Upload from URL