Sign In
Upload
Manuals
Brands
HP Manuals
Laptop
Pavilion dv7-4300
HP Pavilion dv7-4300 Manuals
Manuals and User Guides for HP Pavilion dv7-4300. We have
3
HP Pavilion dv7-4300 manuals available for free PDF download: Maintenance And Service Manual, User Manual, Supplementary Manual
HP Pavilion dv7-4300 User Manual (121 pages)
Notebook PC
Brand:
HP
| Category:
Laptop
| Size: 4.85 MB
Table of Contents
Table of Contents
5
1 Features
11
Identifying Hardware
11
Components
12
Top Components
12
Touchpad
12
Touchpad Buttons
13
Lights
14
Buttons and Fingerprint Reader (Select Models Only)
15
Keys
16
Front Components
16
Right-Side Components
17
Left-Side Components
17
Bottom Components
18
Display Components
19
Wireless Antennas (Select Models Only)
20
Additional Hardware Components
20
Labels
22
2 Wireless, Local Area Network, and Modem
23
Using Wireless Devices
23
Identifying Wireless and Network Status Icons
23
Using the Wireless Controls
24
Using the Wireless Key
24
Using HP Wireless Assistant
25
Using Operating System Controls
25
Using a WLAN
25
Setting up a WLAN
26
Protecting Your WLAN
26
Connecting to a WLAN
27
Roaming to Another Network
28
Using Bluetooth Wireless Devices (Select Models Only)
29
Bluetooth and Internet Connection Sharing (ICS)
29
Connecting to a Local Area Network
30
3 Pointing Devices and Keyboard
31
Using Pointing Devices
31
Setting Pointing Device Preferences
31
Using the Touchpad
31
Scrolling
32
Turning the Touchpad on and off
32
Using Touchpad Gestures
32
Pinching
33
Rotating
33
Connecting an External Mouse
34
Using the Action Keys
35
Using the Hotkeys
36
Using the Keypads
37
Using an Integrated Numeric Keypad
37
Using an Optional External Numeric Keypad
37
Cleaning the Touchpad and Keyboard
38
4 Multimedia
39
Multimedia Features
39
Identifying Your Multimedia Components
40
Adjusting the Volume
41
Using the Media Activity Keys
41
Multimedia Software
43
Using HP Mediasmart Software
43
Using Other Preinstalled Multimedia Software
43
Installing Multimedia Software from a Disc
43
Audio
44
Connecting External Audio Devices
44
Checking Your Audio Functions
44
Video
45
Connecting an External Monitor or Projector
45
Connecting an HDMI Device
45
Configuring Audio for HDMI (Select Models Only)
46
Webcam
47
5 Power Management
48
Setting Power Options
48
Using Power-Saving States
48
Initiating and Exiting Sleep
48
Initiating and Exiting Hibernation
49
Using the Battery Meter
49
Using Power Plans
49
Customizing Power Plans
50
Selecting a Different Power Plan
50
Viewing the Current Power Plan
50
Setting Password Protection on Wakeup
50
Using External AC Power
51
Connecting the AC Adapter
51
Using Battery Power
53
Finding Battery Information in Help and Support
53
Using Battery Check
53
Displaying the Remaining Battery Charge
54
Inserting or Removing the Battery
54
Charging a Battery
55
Maximizing Battery Discharge Time
55
Managing Low Battery Levels
56
Identifying Low Battery Levels
56
Resolving a Low Battery Level
56
Resolving a Low Battery Level When a Charged Battery Is Available
56
Resolving a Low Battery Level When External Power Is Available
56
Resolving a Low Battery Level When no Power Source Is Available
56
Resolving a Low Battery Level When the Computer Cannot Exit Hibernation
56
Calibrating a Battery
57
Conserving Battery Power
58
Storing a Battery
59
Disposing of a Used Battery
59
Replacing the Battery
59
Switching between Graphics Modes (Select Models Only)
60
Shutting down the Computer
61
6 Drives
62
Handling Drives
62
Optical Drive
63
Identifying the Installed Optical Drive
63
Using Optical Discs
63
Selecting the Right Disc (Cds, Dvds, and Bds)
64
Blu-Ray Discs (BD)
64
CD-R Discs
64
CD-RW Discs
64
DVD±R Discs
64
DVD±RW Discs
64
Lightscribe DVD+R Discs
64
Playing a CD, DVD, or BD
65
Configuring Autoplay
66
Changing DVD Region Settings
66
Observing the Copyright Warning
66
Copying a CD or DVD
67
Creating (Burning) a CD or DVD
67
Removing a CD, DVD, or BD
68
Using External Drives
70
Improving Hard Drive Performance
71
Using Disk Defragmenter
71
Using Disk Cleanup
71
Replacing a Drive in the Primary Hard Drive Bay
72
Replacing a Drive in the Secondary Hard Drive Bay
75
7 External Devices
78
Using a USB Device
78
Connecting a USB Device
78
Removing a USB Device
78
Using an Esata Device
79
Connecting an Esata Device
79
Removing an Esata Device
79
8 External Media Cards
81
Using Digital Media Slot Cards
81
Inserting a Digital Card
81
Removing a Digital Card
82
9 Memory Modules
83
10 Security
87
Protecting the Computer
87
Using Passwords
88
Setting Passwords in Windows
88
Setting Passwords in Setup Utility
89
Administrator Password
89
Managing an Administrator Password
89
Entering a Power-On Password
90
Entering an Administrator Password
90
Managing a Power-On Password
90
Power-On Password
90
Using Antivirus Software
91
Using Firewall Software
91
Installing Critical Security Updates
92
Installing an Optional Security Cable
92
Using the Fingerprint Reader (Select Models Only)
93
Locating the Fingerprint Reader
93
Registering Fingerprints
93
Using Your Registered Fingerprint to Log on to Windows
94
11 Troubleshooting
95
Cannot Connect to a WLAN
95
Cannot Connect to a Preferred Network
96
Network Icon Is Not Displayed
96
Current Network Security Codes Are Unavailable
96
WLAN Connection Is very Weak
97
Cannot Connect to the Wireless Router
97
The Optical Disc Tray Does Not Open for Removal of a CD, a DVD, or a BD
98
The Computer Does Not Detect the CD, DVD, or BD Drive
98
A CD, DVD, or BD Does Not Play
99
A CD, DVD, or BD Does Not Play Automatically
100
A DVD or BD Movie Stops, Skips, or Plays Erratically
100
A DVD or BD Movie Is Not Visible on an External Display
100
The Process of Burning a CD or DVD Does Not Begin, or It Stops before Completion
101
A DVD or BD Playing in Windows Media Player Produces no Sound or Display
101
A Device Driver Must be Reinstalled
101
Obtaining the Latest HP Device Drivers
102
Obtaining the Latest Windows Device Drivers
102
Appendix A Setup Utility (BIOS)
103
Starting Setup Utility
103
Using Setup Utility
104
Changing the Language of Setup Utility
104
Navigating and Selecting in Setup Utility
104
Displaying System Information
104
Restoring Default Settings in Setup Utility
105
Exiting Setup Utility
105
Setup Utility Menus
106
Main Menu
106
Security Menu
106
System Configuration Menu
106
Diagnostics Menu
107
Appendix B Software Updates
108
Updating the BIOS
109
Determining the BIOS Version
109
Downloading a BIOS Update
109
Updating Programs and Drivers
110
Appendix C Backup and Recovery
111
Creating Recovery Discs
112
Backing up Your Information
113
Using Windows Backup and Restore
113
Using System Restore Points
114
Create a System Restore Point
114
Restore to a Previous Date and Time
114
When to Create Restore Points
114
Performing a Recovery
115
Recovering from the Recovery Discs
115
Recovering from the Dedicated Recovery Partition (Select Models Only)
115
Index
117
Advertisement
HP Pavilion dv7-4300 Maintenance And Service Manual (150 pages)
Entertainment PC
Brand:
HP
| Category:
Laptop
| Size: 4.36 MB
Table of Contents
Table of Contents
7
Revision History
3
1 Product Description
11
2 Components
18
Top Components
18
Touchpad
18
Touchpad Buttons
19
Lights
20
Buttons and Fingerprint Reader (Select Models Only)
21
Keys
22
Front Components
23
Right-Side Components
23
Left-Side Components
24
Bottom Components
25
Display Components
26
Wireless Antennas (Select Models Only)
27
Additional Hardware Components
28
3 Illustrated Parts Catalog
29
Service Tag
30
Computer Major Components
31
Display Assembly Components
38
Flush Glass Display Assembly Spare Parts
38
Standard Display Assembly Spare Parts
39
Mass Storage Devices
41
Miscellaneous Parts
43
Sequential Part Number Listing
44
4 Removal and Replacement Procedures
54
Preliminary Replacement Requirements
54
Plastic Parts
54
Service Considerations
54
Tools Required
54
Cables and Connectors
55
Drive Handling
55
Electrostatic Discharge Damage
56
Grounding Guidelines
56
Packaging and Transporting Guidelines
57
Workstation Guidelines
57
Equipment Guidelines
58
Component Replacement Procedures
59
Service Tag
59
Computer Feet
60
Battery
61
Primary Hard Drive Cover
62
Hard Drive
63
Secondary Hard Drive
65
WLAN Module
68
RTC Battery
71
Memory Module
72
Optical Drive
73
Keyboard
75
Top Cover
77
Power Button Board
81
Display Assembly
83
System Board
93
Table of Contents
94
USB Board
96
Bluetooth Module
97
Disconnect All External Devices Connected to the Computer
97
Disconnect the Power from the Computer by First Unplugging the Power Cord from the AC Outlet and then Unplugging the AC Adapter from the Computer
97
Remove the Battery
97
Remove the Following Components
97
Speaker Assembly
99
Optical Drive Connector
100
Subwoofer
101
Display Assembly
103
Hard Drive (See Hard Drive
103
Keyboard
103
Optical Drive
103
Power Connector Cable
103
Secondary Hard Drive on Page
103
Top Cover
103
Fan/Heat Sink Assembly
104
Processor
108
Remove the Primary Hard Drive Cover (See Primary Hard Drive Cover
97
Shut down the Computer. if You Are Unsure Whether the Computer Is off or in Hibernation, Turn the Computer On, and then Shut It down through the Operating System
97
5 Setup Utility (BIOS)
111
Starting Setup Utility
111
Using Setup Utility
112
Changing the Language of Setup Utility
112
Navigating and Selecting in Setup Utility
112
Displaying System Information
113
Restoring Default Settings in Setup Utility
113
Exiting Setup Utility
114
Setup Utility Menus
114
Main Menu
114
Security Menu
114
Diagnostics Menu
115
System Configuration Menu
115
6 Specifications
116
Computer Specifications
116
Inch, HD+ Flush Glass Antiglare Display Specifications
117
Inch, HD+ Brightview Display Specifications
118
Hard Drive Specifications
119
Blu-Ray ROM with Lightscribe DVD±R/RW Supermulti DL Drive
120
DVD±RW and CD-RW Supermulti Double-Layer Combo Drive with Lightscribe Specifications
121
System DMA Specifications
122
System Interrupt Specifications (Discrete)
122
System Interrupt Specifications (Switchable Graphics)
123
System Interrupt Specifications (UMA)
124
System I/O Address Specifications
125
System Memory Map Specifications
127
7 Backup and Recovery
128
Creating Recovery Discs
129
Backing up Your Information
130
Create a System Restore Point
131
Using System Restore Points
131
Using Windows Backup and Restore
131
When to Create Restore Points
131
Restore to a Previous Date and Time
132
Performing a Recovery
132
Recovering from the Recovery Discs
132
Recovering from the Dedicated Recovery Partition (Select Models Only)
133
8 Connector Pin Assignments
134
Audio-In (Microphone)
134
Audio-Out (Headphone)
134
External Monitor
135
Hdmi
136
Network)
137
Universal Serial Bus
137
9 Power Cord Set Requirements
138
Requirements for All Countries or Regions
138
Requirements for Specific Countries or Regions
139
10 Recycling
140
Battery
140
Display
140
Index
146
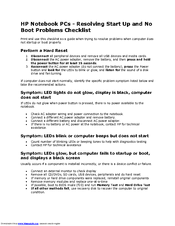
HP Pavilion dv7-4300 Supplementary Manual (2 pages)
Resolving Start Up and No Boot Problems Checklist
Brand:
HP
| Category:
Laptop
| Size: 0.09 MB
Advertisement
Advertisement
Related Products
HP Pavilion DV7-4180
HP Pavilion DV7-4087
HP Pavilion DV7-4169
HP Pavilion DV7-4182
HP Pavilion DV7-4260
HP Pavilion DV7-4269
HP Pavilion DV7-4060
HP Pavilion dv7-4000 - Entertainment Notebook PC
HP Pavilion DV7-4277
HP Pavilion DV7-4289
HP Categories
Desktop
Laptop
Server
Monitor
Switch
More HP Manuals
Login
Sign In
OR
Sign in with Facebook
Sign in with Google
Upload manual
Upload from disk
Upload from URL