Table of Contents
Advertisement
Quick Links
Advertisement
Table of Contents

Related Manuals for Shindaiwa AHS254


Summary of Contents for Shindaiwa AHS254
- Page 1 SHINDAIWA OWNER’S/OPERATOR'S MANUAL AHS254 ARTICULATED HEDGE TRIMMER WARNING! Always wear eye and ear protection when operating this machine! To minimize the risk of injury to yourself and others, read this manual and familiarize yourself with its contents. X7502872104 01/15...
-
Page 2: Table Of Contents
These procedures are guidelines for safe operation under most conditions, and are not intended to replace any safety rules and/or laws that may be in force in your area. If you have questions regarding your Shindaiwa hand- held power equipment, or if you do not understand something in this manual, contact Shindaiwa at the address printed on the back of this Manual. -
Page 3: Safety And Operation Labels
You must protection. Shindaiwa T h i s p r o d u c t c o n d u c t s observe all special safety recommends wearing a face electricity. - Page 4 ■ securely to prevent fuel spillage or Always use genuine Shindaiwa ■ damage to the machine. Keep the articulated hedge trimmer parts and accessories when as clean as possible. Keep it free repairing or maintaining this of loose vegetation, mud, etc.
- Page 5 Handle Ignition (STOP) switch Throttle interlock IMPORTANT! Caution, Danger, Warning, and Operation Information Labels: Make sure all information labels are undamaged and readable. Immediately replace damaged or missing information labels. New labels are available from your local authorized Shindaiwa dealer.
-
Page 6: Product Description
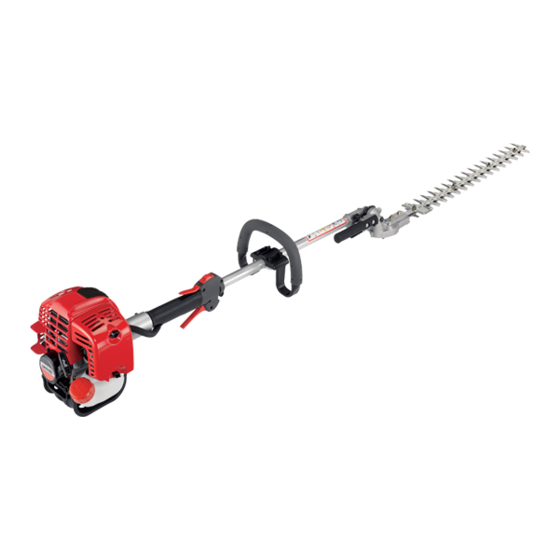
Powerhead Assembly Using the illustration as a Thottle Handle for Right Hand guide, familiarize yourself Latch Release Hedge Trimmer with the Shindaiwa AHS254 Cutter Assembly articulated hedge trimmer and its various components. Understanding your machine Gearcase Latch Lock Cutter Bar and... -
Page 7: Specifications
1674 x 224 x 341 mm (65.9 x 8.82 x 13.43 in.) Fuel Tank Capacity 590 ml (20.1 oz.) Fuel/oil ratio 50:1 Shindaiwa Red Armor® ISO-L-EGD (ISO/CD 13738) and J.A.S.O. M345- FD, two-stroke, air-cooled engine oil Carburetor Diaphragm type Ignition... -
Page 8: Assembly
Carefully inspect all components for operation. damage. Blade Guard Removal/Install NOTE: For normal cutting, Shindaiwa strongly recommends the WARNING! blade guard be installed. In extreme conditions, such as Hedge Trimmer blades are very sharp. Touching commercial cutting, or when cutting thick and/or dense them may lead to severe personal injury. - Page 9 Assembly (continued) Handle Socket-head Cap screws Handle This unit comes with the handle installed. It can be readjusted for operator comfort in the following manner. 1. Loosen the four hex screws. 2. Rotate/slide handle assembly to Throttle Assembly best position for operator comfort, Outer Tube usually 25 cm (10 in.) ahead of the throttle assembly.
- Page 10 Assembly (continued) Travel limiter and adjustment range 225° NOTE: 135° Various This articulated hedge trimmer is positions Travel Limiter possible equipped with a travel limiter that prevents the cutter assembly from rotating outside of the 90°- 225° range. 90° The cutter assembly can be adjusted to 10 different positions ranging from 90°...
-
Page 11: Mixing Fuel
IMPORTANT! Shindaiwa Red Armor engine oil may be mixed at 50:1 ratio for application in all Shindaiwa engines sold in the past, regardless of ratio specified in those manuals. IMPORTANT! Stored fuel ages. Do not mix more fuel than you expect to use in thirty (30) days, ninety (90) days when a fuel stabilizer is added. -
Page 12: Filling The Fuel Tank
Mixing Instructions 1. Fill an approved fuel container with half of the required amount of gasoline. 2. Add the proper amount of engine oil to gasoline. 3. Close container and shake to mix oil with gasoline. 4. Add remaining gasoline, close fuel container, and remix. IMPORTANT! Spilled fuel is a leading cause of hydrocarbon emissions. -
Page 13: Starting The Engine
Starting the Engine IMPORTANT! Engine ignition is controlled by a two position switch mounted on the throttle housing labeled, “I” for ON or START and “O” for OFF or STOP. WARNING! The attachment will operate immediately when the engine starts, and could result in possible serious injury. Keep movable parts of the attachment away from objects that could become entangled or thrown, and surfaces that could cause loss of control. -
Page 14: Stopping The Engine
Starting the Engine (continued) 5. While holding the outer tube firmly with left hand. Use your other hand to Hold slowly pull the recoil starter handle until resistance is felt, then pull quickly to the unit firmly... start the engine. CAUTION! Do not pull the recoil starter to the end of the rope travel. -
Page 15: Checking Unit Condition
Shindaiwa hedge trimmer. Do not make and re-check. modifications to this unit without written approval from Shindaiwa. ALWAYS stop the engine immediately... - Page 16 Operation (continued) Working Position ■ Hold the shaft grip above the powerhead with your right hand, and the loop handle with your left hand. Hold the Support Handle with your ■ Your left arm should be extended to Left Hand the most comfortable position.
-
Page 17: General Maintenance
Air Filter The H4 engine that powers your Shindaiwa model is a hybrid 4-stroke engine. As a hybrid, the engine is lubricated by oil mixed with the gasoline and air from the carburetor that moves through and around the internal parts of the engine in a similar way that a 2-stroke engine is lubricated. - Page 18 Maintenance (continued) WARNING! Always wear gloves when working around the cutter assembly. ■ Lubricate the blades before use and after refueling. Check the cutters for damage or incorrect adjustment. ■ Clean any debris or dirt from the cutting attachment. ■ Check for loose or missing screws or components.
- Page 19 Fuel filter element the fuel filter element. If it shows Fuel filter maintenance signs of contamination, replace with a genuine Shindaiwa replacement NOTE: fuel filter element. Federal EPA regulations require all model year 2012 and later gasoline powered engines produced for sale in the United States to be equipped with a special low permeation fuel supply hose between the carburetor and fuel tank.
- Page 20 ■ Combustion chamber should be decarbonized, and the valve clearance should be adjusted. It is highly recommended that this is done by a Shindaiwa-trained service technician. Valve Adjustment 1. Remove cylinder cover, rocker arm cover, and spark plug. Rotate the crankshaft while observing the piston through the spark plug opening.
- Page 21 Maintenance (continued) Cutter blade adjustment 3. Working from the gearcase end, WARNING! lock each bolt in place by firmly Lock nut tightening its lock nut while The cutter blades are very Guide Bar preventing the shoulder bolt from sharp! Always wear gloves when turning.
-
Page 22: Adjusting Engine Idle
This engine has been factory adjusted to maintain satisfactory starting, emission, and durability performance up to 1,100 feet above sea level (ASL) (96.0 kPa). To maintain proper engine operation and emission compliance above 1,100 feet ASL the carburetor may need to be adjusted by an authorized Shindaiwa service dealer. IMPORTANT! -
Page 23: Troubleshooting Guide
Adjust valves. Valve clearance too loose. ENGINE DOES NOT START What To Check Possible Cause Remedy Consult with an authorized Shindaiwa servicing dealer. Faulty recoil starter. Does the engine crank? Fluid in the crankcase. Internal damage. Tighten and re-test. - Page 24 89 or higher mixed with an air cooled engine oil that meets or exceeds ISO-L-EGD and/or JASO FD classi ed oils at 50:1 gasoline/oil ratio. Piston seizure. Consult with an authorized Shindaiwa servicing dealer. Faulty carburetor and/or diaphragm. Overheating condition. Consult with an authorized Shindaiwa servicing dealer.
- Page 25 Adjust idle. Check Speci cations page for correct Idle set too high. Engine will not idle idle speed. down. Consult with an authorized Shindaiwa servicing Engine has an air leak. dealer. Adjust idle. Check Speci cations page for correct idle Engine idle too high.
-
Page 26: Warranty Statements
The owner shall demonstrate reasonable care and use, and follow preventative maintenance, storage, fuel and oil usage as prescribed in the operator’s manual. Should a product difficulty occur, you must, at your expense, deliver or ship your Shindaiwa unit to an authorized Shindaiwa servicing dealer for warranty repairs (within the applicable warranty period), and arrange for pick-up or return of your unit after the repairs have been made. - Page 27 89 octane or higher. Gasohol which contains a maximum 10% ethanol (grain alcohol) or 15% MTBE (methyl/tertiary/butyl/ether) is also approved. The prescribed mixing ratio of gasoline to oil is listed on the Shindaiwa oil label and covered in your operator’s manual.
- Page 28 NOTES...
-
Page 29: Product Registration
Thank you for choosing Shindaiwa Power Equipment Please go to http://www.shindaiwa-usa.com to register your new product on-line. It's FAST and EASY! NOTE: your information will never be sold or misused by ECHO, Inc. Registering your purchase enables us to contact you in the unlikely event of a service update or product recall, and verifies your ownership for warranty consideration. - Page 30 NOTES...
- Page 31 NOTES...
-
Page 32: Servicing Information
Genuine Shindaiwa Parts and Assemblies for your Shindaiwa products are available only from an Authorized Shindaiwa Dealer. When you do need to buy parts always have the Model Number, Type and Serial Number of the unit with you. You can find these numbers on the engine. For future reference, write them in the space provided below.