Table of Contents
Advertisement
CR-N765
Network CD Receiver
Instruction Manual
Thank you for purchasing an Onkyo CD receiver.
Please read this manual thoroughly before making any
connections and plugging it in.
Following the instructions in this manual will enable you to
obtain optimum performance and listening enjoyment from
your new CD receiver.
Please retain this manual for future reference.
Names and functions of parts ..... 8
Getting started........................... 12
Playing CDs .............................. 15
Listening to Internet radio.......... 18
storage device........................... 20
Listening to an iPod/iPhone ...... 22
Listening to AM/FM radio .......... 23
Using a home network .............. 26
Various settings......................... 29
Troubleshooting ........................ 34
E
n
Advertisement
Table of Contents

Related Manuals for Onkyo CR-N765


Summary of Contents for Onkyo CR-N765
-
Page 1: Table Of Contents
20 Listening to an iPod/iPhone ..22 Listening to AM/FM radio ..23 Thank you for purchasing an Onkyo CD receiver. Please read this manual thoroughly before making any Using a home network ....26 connections and plugging it in. -
Page 2: Important Safety Instructions
WARNING: WARNING AVIS RISK OF ELECTRIC SHOCK RISQUE DE CHOC ELECTRIQUE TO REDUCE THE RISK OF FIRE OR ELECTRIC DO NOT OPEN NE PAS OUVRIR SHOCK, DO NOT EXPOSE THIS APPARATUS TO RAIN OR MOISTURE. The lightning flash with arrowhead symbol, within an equilateral triangle, is intended to alert the user to the CAUTION: presence of uninsulated “dangerous voltage”... -
Page 3: Precautions
If water or any other liquid gets inside this unit, have it checked by your Onkyo dealer. - Page 4 Company has been advised of the possibility of such damages, nor shall Company be liable for any third party claims against users of this device or any third party.
-
Page 5: Features
0 Aluminium Volume Knob Circuitry) 0 RI-Dock Compatible Remote Control (iPod/iPhone Control Capable) CD player Onkyo Remote (smartphone app) 0 Plays CDs, MP3/WMA discs, CD-Rs and CD-RWs 0 25 Track Programming 0 2 Repeat Mode (Track/Full) 0 3 Play Modes (Normal/Random/Memory) - Page 6 Contents Important safety instructions Using a home network Playing music stored on DLNA-compatible devices Precautions 0 Setting up Windows Media Player 0 Playing music files by operating the unit Features 0 Using the Play To feature Music streaming from a shared folder (Home Media) Supplied accessories 0 Setting up Windows Handling the unit...
-
Page 7: Supplied Accessories
Supplied accessories Handling the unit Precautions for use ∫ Remote control (RC-850S) ∫ Batteries for remote control (AAA/R03) Do not install this unit in a location that could become hot. ∫ Power cord This includes places that are exposed to direct sunlight or ∫... -
Page 8: Names And Functions Of Parts
Names and functions of parts Front Display TONE button: Used to adjust the tone. VOLUME control: Used to adjust the volume. Tray open/close (<) button Í ON/STANDBY button: Press this button to turn the RETURN button: When a menu is displayed, press to unit on or put it in standby mode. -
Page 9: Display
Names and functions of parts Display Auto Standby (ASb) indicator: This indicator SLEEP indicator: This indicator appears when the appears when the Auto Standby function is on. sleep timer is set. -
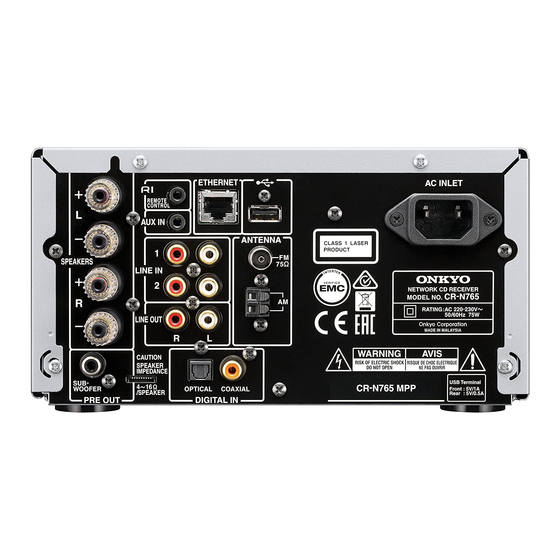
Page 10: Rear
USB terminal: Use to connect a USB storage device LINE IN terminals: These analog audio inputs are for to the unit. connecting Onkyo RI Dock and cassette deck, etc. AC INLET terminal: The supplied power cord is REMOTE CONTROL terminal: An Onkyo RI Dock connected. -
Page 11: Remote Control
Names and functions of parts Remote control Í button: Press this button to turn the unit on or put it in standby mode. DISPLAY button: Change the information shown. DIMMER button: Use this button to switch the display’s brightness between normal, moderately dark and dark. -
Page 12: Getting Started
Getting started 1. Connecting speakers failure. Also do not connect two or more cables to one speaker terminal or one speaker to several terminals. Refer to the illustration below to connect the unit and the right and left speakers with the speaker cables. Connect the speaker to be placed on the right hand side to the SPEAKERS terminal (R), and connect the speaker to be placed on the left hand side to the SPEAKERS terminal... -
Page 13: 3. Network Connection
0 Push plugs in all the way to make good connections. Loose connections can cause noise or malfunctions. REMOTE CONTROL (connecting an Onkyo RI Dock) Required: an RI cable You can control an RI Dock with the remote control of the unit by connecting the cable. -
Page 14: 5. Connecting The Power Cord
Getting started 5. Connecting the power cord Do not use a power cord other than the one supplied with this unit. Before connecting the power cord, connect all of your speakers and components. Always connect the power cord to an AC outlet only after connecting it to the AC INLET terminal of the unit. -
Page 15: Playing Cds
Playing CDs ∫ Search backward/forward: During playback, press the search (6/5) buttons to search backward/ Basic operations forward. Release the button when you find the desired part. Playback resumes from that point. ∫ Information shown on the display: Press the DISPLAY button repeatedly during playback to change This unit can play the following types of discs and files. -
Page 16: Selecting Tracks
Playing CDs All folder mode In this mode, only the folders containing music files Selecting tracks appear when you select a file. For example, in the figure below, folders appear in the order of 1 to 4. Selecting tracks on music CDs (Direct Play) [Root] During playback or when stopped, you can use the remote control number buttons to select a track by... -
Page 17: Memory Playback
Playing CDs Memory playback Random playback This unit can store up to 25 tracks in the memory. With random playback, all of the tracks on the disc are played in random order. 1. When stopped, press the MEMORY button. 1. When stopped, press the RANDOM button. appears on the display. -
Page 18: Listening To Internet Radio
Listening to Internet radio Some Internet radio services are registered to the unit by 3. Press the direction ( ) buttons to select a default. You can display the desired service, menu or folder or menu item from the “TuneIn” top list, and radio station on the display and play the radio with simple press the ENTER button. -
Page 19: Registering A Station In The "My Favorites
Listening to Internet radio 0 This unit supports Internet radio stations that use the 6. Click the “My Favorites” tab and input the name and PLS, M3U and podcast (RSS) formats. Even if an URL of the Internet radio station. Internet radio station uses one of these formats, 7. -
Page 20: Playing Tracks Stored On A Usb Storage Device
Playing tracks stored on a USB storage device 3. Press the ENTER button. The name of the track or folder appears. Basic operations 4. Use the direction ( ) buttons to select a track or a folder and press the playback (1) button. Playback starts. -
Page 21: Random Playback
Playing tracks stored on a USB storage device Random playback Plays back audio files in the folder repeatedly in random order. 1. Press the RANDOM button. appears on the display. ∫ Ending random playback: Press the RANDOM button again. 0 Random playback is cancelled if you put the unit into standby mode, disconnect the USB storage device or start repeat playback. -
Page 22: Listening To An Ipod/Iphone
Listening to an iPod/iPhone You can connect an iPod/iPhone to the USB port on the ∫ Menu items in Extended mode: When Extended front panel and play music files on it. mode is selected, the following menu items appear on the 0 For information on supported iPod/iPhone, see display. -
Page 23: Listening To Am/Fm Radio
Listening to AM/FM radio Tuning into stations manually Tuning into a radio station If you tune into an FM radio station manually, it will be received in monaural sound. 1. Press the TUNER button repeatedly to select either “AM” or “FM” on the display. Tuning into stations automatically 2. -
Page 24: Presetting An Am/Fm Radio Station
Listening to AM/FM radio Selecting preset stations Presetting an AM/FM radio 1. Press the TUNER button repeatedly to select either station “AM” or “FM” on the display. 2. Press 2 PRESET/PRESET 1 buttons to select preset number. It allows you to register up to 40 of your favorite AM/FM radio stations. -
Page 25: Receiving Rds
Listening to AM/FM radio Receiving RDS Press the DISPLAY button repeatedly to display the following RDS information. Frequency and preset number Preset name Program Service Name Radio Text (if available) 0 If the selected preset has no name, it will be skipped and the next Program Service Name will be displayed. -
Page 26: Using A Home Network
Using a home network Playing music files by operating the unit Playing music stored on DLNA- You can play music files stored on a server by operating compatible devices the unit. 1. Turn on the server. 2. Press the NET button. Digital Living Network Alliance (DLNA) can be referred to as a technology standard or the industry group to develop the technology standard to interconnect and use AV... -
Page 27: Using The Play To Feature
Using a home network Music streaming from a shared About basic operations You can also perform operations such as stopping or folder (Home Media) selecting a track with the stop (∫), pause (;), skip (:/9), and search (6/5) buttons. About repeat/random playback You can perform these operations with the REPEAT button and the RANDOM button. -
Page 28: Playing Back
Using a home network Playing back You can play music files in a shared folder stored on each device by operating the unit. 1. Press the NET button. 2. Use the direction ( ) buttons to select “Home Media” on the display and press the ENTER button. -
Page 29: Various Settings
Various settings Setting the sound quality The following characters can be used. 1. Press the TONE/BAL button repeatedly to select the setting you want to adjust. 0 Shift*: Changes the characters shown. (a 2. Press the direction ( ) buttons to adjust the 0 Space: Inputs a blank space that is one character setting. -
Page 30: Menu Settings
ENTER button. ∫ Sel Change (Selector Change) 0 To return to the previous display, press the When connecting an Onkyo RI Dock to the unit, you must RETURN button. switch the input display to “DOCK” in order for the 0 If a submenu appears, press the direction ( devices to work properly with each other. -
Page 31: Firmware Update
Enable: Such numbers will not be shown. own risk. Onkyo will not be liable and you will have no 0 When an MP3/WMA disc is made on a PC, the remedy for damages for any claim of any kind ordinary file playback order is not determined. - Page 32 Various settings ∫ Updating the firmware via network 0 This unit may fail in network connection if your network environment does not allow multiple device You can update the firmware by connecting the unit to a connections. Consult your Internet service provider network.
- Page 33 Various settings “Now Initializing...” appears on the display, followed by the name of the USB flash drive. 0 Loading the USB flash drive takes about 20 to 30 seconds. 7. Press the MENU button to display the menu and use the direction ( ) buttons to select “Update”...
-
Page 34: Troubleshooting
Troubleshooting 0 If a fluorescent light is near the unit, turn the light off. 0 The unit is located behind the glass doors of a audio Before starting the procedure Problems may be solved by simply turning the power rack or cabinet. on/off or disconnecting/connecting the power cord, which is easier than working on the connection, setting and operating procedure. - Page 35 Troubleshooting ∫ Audio files 0 Check that the format of the USB storage device is FAT16 or FAT32. Playback is not possible. 0 USB flash drives with an internal USB hub are not 0 Check the file format. For information about playable supported.
- Page 36 0 If the PC is using antivirus or security software, the unit might not be able to connect to it. Onkyo is not responsible for damages (such as CD rental fees) due to unsuccessful recordings caused by the unit’s malfunction. Before you record important data, make sure that the material will be recorded correctly.
-
Page 37: Specifications
DSD and the Direct Stream Digital logo are trademarks of Audio output/impedance (analog): 2.0 V (rms)/320 h Sony Corporation. ∫ General VLSC, Music Optimizer, DIDRC and WRAT are trademarks of Onkyo Corporation. Power supply: AC 220 - 230 V, 50/60 Hz Power consumption: 75 W No-sound power consumption: 35 W “All other trademarks are the property of their respective owners.”... -
Page 38: Compatible Devices/Media/File Formats
Compatible devices/media/file formats Maintenance 0 If the side of the disc that has the data encoded on it (unlabeled Compatible devices/media side) becomes dirty with fingerprints or dust, use a soft cloth to wipe the surface from the center directly toward the edge. 0 Never use record cleaners, antistatic treatments, thinners or similar chemicals to clean discs. -
Page 39: File Format
Compatible devices/media/file formats 0 When using an audio player powered by a battery, check that its When WAV, FLAC and Apple Lossless files are consecutively remaining capacity is sufficient. played back and they have the same format, sampling frequency, 0 This unit does not support USB flash drives with security functions. channels and quantization bit rate 0 The Play To feature does not support the following: Gapless playback... - Page 40 Tel: 86-21-52131366 Fax: 86-21-52130396 http://www.cn.onkyo.com/ Asia, Oceania, Middle East, Africa Please contact an Onkyo distributor referring to Onkyo SUPPORT site. http://www.intl.onkyo.com/support/ The above-mentioned information is subject to change without prior notice. Visit the Onkyo web site for the latest update.