
Related Manuals for Kenwood KDC-BT39DAB


Summary of Contents for Kenwood KDC-BT39DAB
- Page 1 KDC-BT39DAB CD-RECEIVER INSTRUCTION MANUAL © 2014 JVC KENWOOD Corporation B5A-0147-00 (MN)
-
Page 2: Table Of Contents
CONTENTS BEFORE USE BEFORE USE Warning Do not operate any function that takes your attention away from safe driving. BASICS Caution GETTING STARTED Volume setting: DIGITAL RADIO (DAB) • Adjust the volume so that you can hear sounds outside the car to prevent accidents. •... -
Page 3: Basics
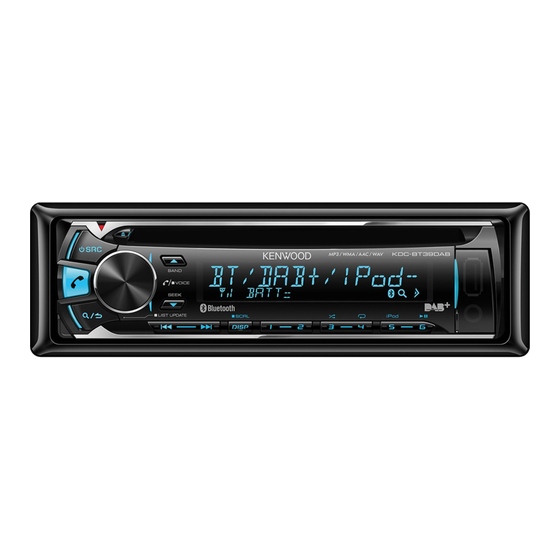
BASICS Faceplate Remote control (RC-406) (not supplied) This unit can be remotely controlled with an optionally Volume knob purchased remote control. (turn/press) Loading slot Display window Remote sensor (Do not expose to bright sunlight.) Pull out the insulation sheet when using for the first time. -
Page 4: Getting Started
GETTING STARTED Set the initial settings Press to enter STANDBY. Press the volume knob to enter [FUNCTION]. Turn the volume knob to make a selection (see the following table), then press the knob. Repeat step until the desired item is selected or activated. Press and hold to exit. -
Page 5: Digital Radio (Dab)
YES: Starts upgrading the firmware. ; F/W UP xxxxx/ NO: Cancels (upgrading is not activated). F/W UP Vxxx For details on how to update the firmware, see: www.kenwood.com/cs/ce/ CLOCK CLOCK DISPLAY ON: The clock time is shown on the Search for an ensemble display even when the unit is turned off. ;... - Page 6 DIGITAL RADIO (DAB) • To change the searching method for S / T: Press Other settings repeatedly. Press the volume knob to enter [FUNCTION]. : Press S / T: Select an ensemble, service or AUTO1 Turn the volume knob to make a selection (see the following table), component.
-
Page 7: Analog Radio
ANALOG RADIO DIGITAL RADIO (DAB) LIST UPDATE AUTO: Automatically update the DAB Service List when the power is turned on. ; MANUAL: Updates the DAB Service List by pressing and holding PTY WATCH Automatically switch from any source to Digital Radio ensembles broadcasting a selected type of program. NEWS, AFFAIRS, INFO, SPORT, EDUCATE, DRAMA, CULTURE, SCIENCE, VARIED, POP M (music), ROCK M (music), EASY M (music), LIGHT M (music), CLASSICS, OTHER M (music), WEATHER, FINANCE,... - Page 8 ANALOG RADIO • [MONO SET]/ [NEWS SET]/ [REGIONAL/ [AF SET]/ [PTY SEARCH] is Other settings selectable only when the band is FM1/ FM2/ FM3. Press the volume knob to enter [FUNCTION]. • Available Program Type: Turn the volume knob to make a selection (see the following table), then SPEECH : NEWS, AFFAIRS, INFO (information), SPORT, EDUCATE, press the knob.
-
Page 9: Cd / Usb / Ipod / Android
CD / USB / iPod / ANDROID Start playback The source changes automatically and playback starts. M Eject disc Label side On the faceplate On the remote control Playback / pause Press Press USB input terminal Reverse / Fast-forward * Press and hold S / T. - Page 10 CD / USB / iPod / ANDROID When connecting an Android device, “Press [VIEW] to install KENWOOD MUSIC PLAY APP” is Direct Music Search (using RC-406) shown. Follow the instructions to install the application. You can also install the latest version Press DIRECT.
-
Page 11: Bluetooth
– Bluetooth function of the connected devcie is turned on. Adjust the microphone – [AUTO PAIRING] is set to [ON]. ( 15) angle – KENWOOD MUSIC PLAY application is installed on the Android device. Secure using cord clamps (not supplied) if necessary. ENGLISH... - Page 12 BLUETOOTH® BLUETOOTH — Mobile phone Improve the voice quality While talking on the phone... Press the volume knob to enter [FUNCTION]. Turn the volume knob to make a selection (see the following table), then press the knob. Repeat step until the desired item is selected or activated.
- Page 13 BLUETOOTH® Make the settings for receiving a call Press to enter Bluetooth mode. Turn the volume knob to make a selection (see the following table), then press the knob. Repeat step until the desired item is Make a call selected or activated. Press and hold to exit.
- Page 14 BLUETOOTH® Delete a contact NUMBER DIAL 1 Turn the volume knob to select a number (0 to 9) or character ( , #, +). Press to enter Bluetooth mode. 2 Press S / T to move the entry position. Turn the volume knob to select [CALL HISTORY], then press the knob. Repeat steps until you finish entering the phone Turn the volume knob to select a contact.
- Page 15 BLUETOOTH® Other settings Bluetooth test mode Press the volume knob to enter [FUNCTION]. You can check the connectivity of the supported Turn the volume knob to make a selection (see the following table), then press the knob. profile between the Bluetooth device and the Repeat step until the desired item is selected/activated or follow the instructions stated unit.
-
Page 16: Aux
BLUETOOTH® BLUETOOTH — Audio Preparation: Select [ON] for [BUILT-IN AUX]. ( 5) Start listening Connect a portable audio player (commercially available). Auxiliary input jack Portable audio player Audio player via Bluetooth Press repeatedly to select BT AUDIO (or press SRC on RC-406). Operate the Bluetooth audio player to start playback. -
Page 17: Audio Settings
AUDIO SETTINGS While listening to any source... PRESET EQ DRIVE EQ/ TOP40/ POWERFUL/ ROCK/ POPS/ Press the volume knob to enter [FUNCTION]. EASY/ JAZZ/ NATURAL/ USER: Selects a preset Turn the volume knob to select [AUDIO CONTROL], then press the knob. equalizer suitable to the music genre. -
Page 18: Display Settings
DISPLAY SETTINGS AUDIO SETTINGS Press the volume knob to enter [FUNCTION]. SOUND RECNSTR ON: Creates realistic sound by compensating the high-frequency Turn the volume knob to select [DISPLAY], then press the knob. (Sound reconstruction) components and restoring the rise-time of the waveform that are Turn the volume knob to make a selection (see the following table), lost in audio data compression. ;... -
Page 19: More Information
• This unit supports the PC application KENWOOD Music Editor Light and Android™ application KENWOOD Music Control. • When you play audio files with song data added using the KENWOOD Music Editor Light or KENWOOD Music Control, you can search for audio files by Genres, Artists, Albums, Playlists, and Songs. -
Page 20: Troubleshooting
TROUBLESHOOTING Symptom Remedy Symptom Remedy • Adjust the volume to the optimum level. Sound cannot be heard. “READING” keeps Do not use too many hierarchical levels or folders. • Check the cords and connections. flashing. Elapsed playing time is This is caused by how the tracks are recorded. “MISWIRING CHECK WIRING Turn the power off, then check to be sure the not correct. - Page 21 Symptom Remedy Symptom Remedy • Make sure KENWOOD MUSIC PLAY APP is installed on the • Use voice calling method in a more quiet environment. Cannot playback at Voice calling method is • Reduce the distance from the microphone when you [BROWSE MODE].
-
Page 22: Installation / Connection
INSTALLATION / CONNECTION Warning Installing the unit (in-dash mounting) • The unit can only be used with a 12 V DC power supply, negative ground. • Disconnect the battery’s negative terminal before wiring and mounting. • Do not connect Battery wire (yellow) and Ignition wire (red) to the Do the required wiring. -
Page 23: Wiring Connection
To front speaker (right) (Steering remote control control adapter wire) Green To rear speaker (left) Green/Black (C) Mounting sleeve To connect the Kenwood Brown Purple navigation system, refer your (Mute control wire) navigations manual To rear speaker (right) Purple/Black Ignition switch... - Page 24 INSTALLATION / CONNECTION Installing the DAB antenna (supplied) Determine the antenna installation position • The direction of the film antenna (F) changes depending on whether the film antenna (F) is installed on the Caution right side or left side. • The film antenna (F) is exclusively for use inside the vehicle. •...
- Page 25 INSTALLATION / CONNECTION Caution Clean the windscreen with the supplied Installation overview cleaner (I). When installing the antenna cable inside the front The antenna should be installed on the passenger side pillar with the air bag installed for safety. • The front pillar cover is secured with a special clip which may need to be replaced when it is removed.
- Page 26 INSTALLATION / CONNECTION Rub the film antenna gently onto the Set the postion of the protrusion of the Remove the film covering the earth sheet amplifier unit (G) with the K on the film windscreen in the direction of the arrow and paste the earth sheet on the metal shown to allow it to stick firmly.
-
Page 27: Specifications
SPECIFICATIONS DAB Frequency Range L Band 1 452.960 MHz — 1 490.624 MHz Laser Diode GaAIAs Band III 174.928 MHz — 239.200 MHz Digital Filter (D/A) 8 times over sampling Sensitivity –100 dBm Spindle Speed 500 rpm — 200 rpm (CLV) Signal-to-Noise Ratio 80 dB Wow & Flutter Below measurable limit Antenna Connector Type Frequency Response (±1 dB) 20 Hz —... - Page 28 ≤ 600 Ω • The Bluetooth® word mark and logos are registered trademarks owned by Bluetooth SIG, Inc. and any use of such marks by JVC KENWOOD Corporation is under license. Other trademarks and trade names are those of their respective owners.