
Related Manuals for Sunbeam GCSBCL-317


Summary of Contents for Sunbeam GCSBCL-317
- Page 1 Steam Iron Instruction Manual Fer à vapeur Notice d’emploi www.sunbeam.ca P.N. 175503...
-
Page 2: Important Safeguards
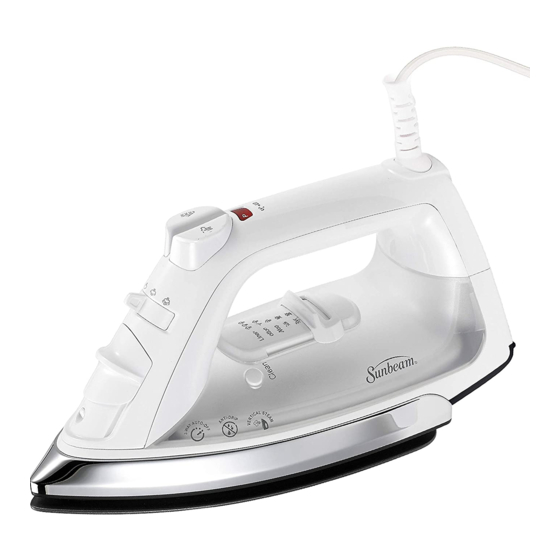
• D o not operate iron with a damaged cord or if the iron has been dropped or damaged. To avoid the risk of electric shock, do not disassemble the iron. Take it to an authorized service center for examination and/or repair. Incorrect reassembly can cause a risk of electric shock when iron is used. • C lose supervision is necessary for any appliance being used by or near children. Do not leave iron unattended while plugged in, turned on or on an ironing board. • B urns can occur from contact with hot metal parts, hot water or steam. Use caution when you turn a steam iron upside down – there may be hot water in the reservoir. • I f the iron is not operating normally, disconnect from the power supply and have the iron serviced by an authorized service center or call Customer Service at 1 800-667-8623. • Y our SUNBEAM iron is designed to rest on the heel rest. Do not leave the iron unattended. ® Do not set the iron on an unprotected surface, even if it is on the heel rest. • T his is a high wattage appliance. To avoid a circuit overload, do not operate another high wattage appliance on the same circuit. • I f an extension cord is absolutely necessary, a 15-ampere cord should be used. Cords rated for less amperage may overheat. Care should be taken to arrange the extension cord so that it cannot be pulled or tripped over. roducts... - Page 3 eatureS 1. SPRAY MIST™ Nozzle 2. Water Fill Hole 3. Steam Lever 4. SHOT OF STEAM and SPRAY MIST™ Buttons ® 5. Reset Button and Power Light 6. Handle Fabric Select Setting 8. S elf Clean Button 9. S ee-Through Water Reservoir/ Maximum Fill Line 10. Soleplate 11. Storage Strip Indicator (select models only) ® 12. Cord Wrap (underneath) 13. Power Cord NOTE: The model shown in the manual is for reference only. Your model may differ slightly. (use tap water) IllIng ater eServoIr 1. T urn Steam Lever to (Dry) and Fabric Select Setting to Off. Unplug.
-
Page 4: M Aintaining Y Our I Ron
(continued) pecIal eatureS ® ertIcal hot of team eature allows iron to function vertically as a garment steamer. TIP: When using vertical steam, hang clothing on a hanger for best results. Hanging curtains and drapes may also be steamed. TO USE: 1. H old iron vertically near, but not touching the fabric you want to steam. Pull the fabric tight. 2. P ress Shot of Steam button in 3-second intervals as you move iron over wrinkles. ® WARNING: To prevent burns, keep hands away from the area being steamed. WARNING: DO NOT steam garments while wearing them; this may result in injuries. Imed eature IF YOU LEAVE IRON ON: Timed auto-off will automatically turn unit off after 30 minutes. 3-way auto-off (15 min in heeled position) IMPORTANT: Once timed auto-off activates, power light blinks to indicate it is in auto-off mode. TO RESET: Press reset button. if available, otherwise unplug and plug it back in. WARNING: Auto-Off is a safety feature and is not a recommended means for turning iron off. (select models only) torage trIp... - Page 5 (continued) aIntaInIng 4. Plug in iron, set Fabric Select Setting to Linen and heat for 2 minutes. 5. Unplug iron. Holding iron over a sink in a horizontal position, press Self-Clean Button and hold. Water will begin dripping from the steam vents. Slowly rock iron side to side and front to back for 30 seconds. Dip nose of the iron slightly below the rear to circulate water. Release Self-Clean Button after one minute. 6. O pen fill cap and empty remaining water. Carefully dry soleplate with a towel. 7. P lug in iron and set Fabric selection to Linen and Heat for 2 minutes to dry out completely. Set Fabric Select Setting to Off, unplug the iron, and allow to cool. CLEANING SOLEPLATE: Clean soleplate after every 30 uses, or more frequently if starch is used or build-up starts to accumulate. Before cleaning, ensure iron is unplugged and cool. WARNING: Do not immerse in liquids or use abrasive cleansers or scouring pads to clean the soleplate. This will damage the finish. Type of Debris/Build-Up Cleaning Recommendation Light Dirt Use a cotton cloth or terrycloth towel to wipe the soleplate with warm soapy water. Hard Water Deposits Use a cotton cloth or terrycloth towel to wipe the soleplate with a 50/50 vinegar/water mixture. Heavy Starch or Residue Use Hot Iron Cleaner or Mr.Clean Magic Eraser cleaning pad. Refer to the ® ® Build-up manufacturer’s directions included with these products for specific cleaner usage instructions. Mr. Clean Magic Eraser are registered trademarks owned by the ®...
-
Page 6: Troubleshooting
(continued) ronIng IRONING PANTS • Begin with the waistband and inseam area, then pockets and cuffs. • Pull waistband on pointy end of the board, as if you’re “dressing” the ironing board. Iron upper-front part of the pants, including the waistband. • Place pants parallel to ironing board lengthwise so both legs are facing the same direction. Iron each leg by moving the iron back and forth along the pant leg. • Take cuff of the leg and bring it over towards the waistband to iron the inner part of the leg. Repeat these 2 steps for the second leg. Trouble Shooting PROBLEM CAUSE/SOLUTION Power indicator is blinking • The light blinks to indicate that the iron auto-off function has been activated. • Press it to restart. • To stop blinking and reset, move the iron back and forth and allow to re-heat for 2 minutes. Iron is not heating • Ensure the iron is on and power light is illuminated. • Verify unit is plugged in. • Adjust Fabric Select Setting to the correct setting for your garments. Iron will not steam • Ensure water tank level is at least ¼ full. • Ensure steam lever is switched on. • Press Shot of Steam button several times to prime. -
Page 7: How To Obtain Warranty Service
1.800.458.8407 and a convenient service center address will be provided to you. In Canada If you have any question regarding this warranty or would like to obtain warranty service, please call 1.800.667.8623 and a convenient service center address will be provided to you. In the U.S.A., this warranty is offered by Sunbeam Products, Inc. doing business as Jarden Consumer Solutions located in Boca Raton, Florida 33431. In Canada, this warranty is offered by Sunbeam Corporation (Canada) Limited doing business as Jarden Consumer Solutions, located at 20 B Hereford Street, Brampton, Ontario L6Y 0M1. If you have any other problem or claim in connection with this product, please write our Consumer Service Department. PLEASE DO NOT RETURN THIS PRODUCT TO ANY OF THESE ADDRESSES OR TO THE PLACE OF PURCHASE. PLEASE DO NOT RETURN THIS PRODUCT TO ANY OF THESE ADDRESSES OR TO THE PLACE OF PURCHASE. STOP For product questions visit us online at www.sunbeam.ca or call 1.800.667.8623. - Page 8 ©2014 Sunbeam Products, Inc., doing business as Jarden Consumer Solutions. All rights reserved. In the U.S., distributed by Sunbeam Products, Inc., doing business as Jarden Consumer Solutions, Boca Raton, FL 33431. In Canada, imported and distributed by Sunbeam Corporation (Canada), Limited, doing business as Jarden Consumer Solutions, Brampton, ON L6Y 0M1.