
Related Manuals for Electrolux EIFLS20QS Series


Summary of Contents for Electrolux EIFLS20QS Series
- Page 1 EIFLS20QS EN FRONT LOAD WASHER USE & CARE GUIDE FR LAVEUSE Á CHARGEMENT FRONTAL GUIDE D’UTILISATION ET D’ENTRETIEN ES LAVADORA DE CARGA FRONTAL GUÍA DE USO Y CUIDADO = COLOR CODE / CODE COULEUR / CÓDIGO DE COLOR...
-
Page 2: Table Of Contents
IMPORTANT SAFETY INSTRUCTIONS Product Record WARNING Please read all instructions before using this washer. Record Your Model and Serial Numbers The model and serial numbers of your washer are found on the serial plate located inside the door opening. Record and Recognize safety symbols, words and labels retain these numbers. -
Page 3: Important Safety Instructions
IMPORTANT SAFETY INSTRUCTIONS WARNING To reduce the risk of fire, electrical shock, or injury to persons when using this washer, comply with the basic warnings listed below. Failure to comply with these warnings could result in serious personal injuries. You can be killed or seriously injured if you don’t follow these Important Safety Instructions: PREVENT FIRE PROTECT CHILDREN •... - Page 4 IMPORTANT SAFETY INSTRUCTIONS PREVENT INJURY PREVENT INJURY AND DAMAGE TO THE APPLIANCE • To prevent shock hazard and assure stability during opera- To prevent serious personal injury and damage to the washer: tion, the washer must be installed and electrically grounded •...
-
Page 5: Features
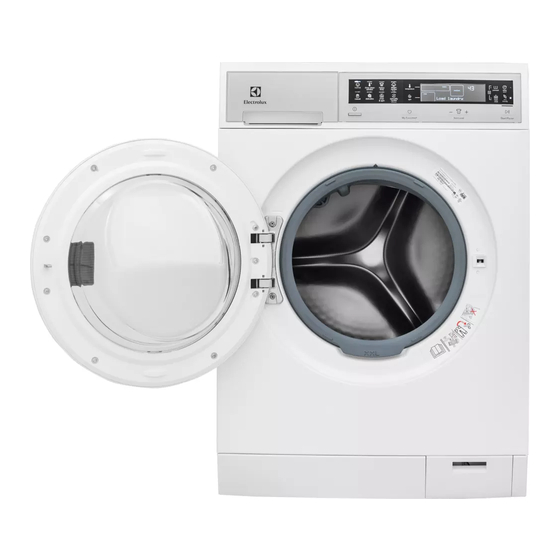
Inner glass with small article redistribution ramp Stainless Steel Wash Drum Cascading Pump Filter Wash Vanes Cleanout Adjustable Leveling Legs As an ENERGY STAR® Partner, Electrolux Major Appliances has determined that this product meets the ENERGY STAR® guide- lines for energy efficiency. - Page 6 Operating Instructions Normal Operating Sounds You may or may not hear the following sounds from your new washer: A. DRAIN HOSE The washer has a flexible drain hose to carry water from the washer to the stand pipe of your home.
-
Page 7: Operating Instructions
Operating Instructions Operating Your Washer Add laundry load to washer. WARNING To reduce the risk of fire, electric shock or injury to persons, read the IMPORTANT SAFETY INSTRUCTIONS in this Use and Care Guide before operating your washer. Sort laundry into loads that can be washed together. - Page 8 Operating Instructions Operating Your Washer, continued Add laundry products to the dispenser. For best results Use a low-sudsing, high efficiency detergent to prevent oversudsing in front load washers. Look for this symbol on the detergent label: Detergent, liquid chlorine bleach and liquid fabric softener will be dispensed at the proper times in the cycle.
-
Page 9: Fabric Softener
Operating Instructions Operating Your Washer, continued Other Wash Products Liquid Chlorine Bleach Color-safe bleach, water conditioner, detergent booster and • If desired, add liquid chlorine bleach to the chamber. enzyme products may be added with the detergent. Put liq- • DO NOT fill above the maximum fill line. •... - Page 10 Operating Instructions Operating Your Washer, continued Select the appropriate cycle and settings for the load. • If changes to the settings or options are attempted after • Press the Power button to turn on the unit. the cycle starts, you will hear several beeps when the •...
- Page 11 Operating Instructions Power Button My Favorites Button Soil Level Button Cycle Selection Cycle Options / Cycle Status Display Start/Pause Button This manual covers many models and not all cycles, options, or features listed are available on every model. Console shown above for reference only.
- Page 12 Operating Instructions Steam Cycle Selection Specialty Cycle Selection To scroll through the steam cycles, continue to press the To scroll through the specialty cycles, continue to press the steam cycles icon. The selected cycle will be displayed on specialty cycles icon. The selected cycle will be shown on the text display.
- Page 13 Operating Instructions Cycle Settings cold For best results Some warm water will automatically blend with cold tap supply to achieve a precise cold. Use this setting for lightly Follow the fabric care label soiled non-colorfast items, knits, delicates, and hand instructions on items to be washables.
- Page 14 Operating Instructions Other Features control lock fresh rinse default indicator cycle count down/ key combination delay start timer delay start status display door lock chime on/off indicator My Favorites key combination control lock key combination My Favorites After some time of initial usage, the washer will automatically remember the 3 most used cycles with their settings and options.
- Page 15 Operating Instructions Washer Settings Chart These Temperatures, Spin Speeds, Soil Levels and Options are available with the following cycles: steam cycles specialty cycles temperature sanitize warm ...
-
Page 16: Stain Removal Guide
Stain Removal Guide Safe Stain Removal Procedures WARNING To reduce the risk of fire or serious injury to persons or prop- HARMFUL VAPOR HAZARD erty, comply with the basic warnings listed below: Do not use or mix liquid chlorine bleach with other •... - Page 17 Stain Removal Guide Stain Removal Suggestions STAIN TREATMENT Adhesive tape, chewing gum, Apply ice. Scrape off excess. Place stain face down on paper towels. Saturate with pre- rubber cement wash stain remover or nonflammable dry cleaning fluid. Baby formula, dairy products, egg Use product containing enzymes to pretreat or soak stains. Soak for 30 minutes or more. Wash.
-
Page 18: Care And Cleaning
Care and Cleaning Inside Routine Cleaning (Preventive) To help prevent odors, mold or mildew, leave the door open for a few hours after use or whenever the washer is not in use. CAUTION ENTRAPMENT and TIP-OVER HAZARD Do not leave the door open if there are small children or pets present. - Page 19 Care and Cleaning Performing Manual Drain In the event the washer will not drain under its own power due to a power outage or clogged drain pump you can drain the water left in the drum manually. CAUTION BURN HAZARD Do not attempt to manually drain the drum if it is full of hot water.
- Page 20 Care and Cleaning Other Inside Routine Cleaning (Preventive) Cleaning Dispenser Drawer Area NOTE Detergent and fabric softener may build up in the dispenser drawer. Residue should be removed once or twice a month. • Remove the drawer by pulling the drawer out until it stops. •...
- Page 21 Care and Cleaning Inside Cleaning (Aggressive) In cases where the clean washer cycle along with care and cleaning of rubber gasket folds isn’t done, and severe odor, mold, mildew, or residue buildup have developed, follow the below cleaning procedure to help alleviate the problem. CLEANING PROCEDURE - Washer Drum Ensure the wash tub is empty (or no clothes load).
-
Page 22: Care And Cleaning
Care and Cleaning Outside Routine Cleaning • When washing is completed, wipe top and sides of washer with a damp cloth. Turn water faucets off to prevent pres- sure build-up in the hoses. • Clean the cabinet with mild soap and water. Never use harsh, gritty or abrasive cleansers •... -
Page 23: Solutions To Common Problems
Solutions to Common Problems Common Washing Problems Many washing problems involve poor soil and stain removal, residues of lint and scum, and fabric damage. For satisfactory washing results, follow these suggestions provided by The Soap and Detergent Association. PROBLEM POSSIBLE CAUSES SOLUTIONS PREVENTIVE MEASURES Blue stains... - Page 24 Solutions to Common Problems Common Washing Problems, continued PROBLEM POSSIBLE CAUSES SOLUTIONS PREVENTIVE MEASURES Wrinkling • Overloading the washer. • Reduce load size. • Do not overload washer. • Incorrect wash cycle for • Rinse in cold water with liquid •...
- Page 25 Solutions to Common Problems Service Prevention Checklist Before calling for service, review this list. It may save both time and expense. The list includes common occurrences that are not the result of defective workmanship or materials in this washer. OCCURRENCE POSSIBLE CAUSE SOLUTION NOISE...
-
Page 26: Solutions To Common Problems
Solutions to Common Problems Service Prevention Checklist, continued OCCURRENCE POSSIBLE CAUSE SOLUTION WATER Water collects in folds This is a result of the washing action of the bellows at the and is part of the normal operation end of the cycle. of the washer. -
Page 27: Major Appliance Warranty Information
• All parts — One year including labor. In addition, your appliance is covered by a one year, parts only, limited warranty. During the 2nd year from your original date of purchase, Electrolux will pay for parts needed for this appliance that have proven to be defective in materials or workmanship when your appliance is installed, used, and maintained in accordance with the provided instructions. - Page 28 www.electrolux.com/shop...