Advertisement
Table of Contents
- 1 Installation Manual
- 2 Table of Contents
- 3 Before Installation
- 4 Selecting Installation Site
- 5 Preparations before Installation
- 6 Indoor Unit Installation
- 7 Installing the Duct
- 8 Refrigerant Piping Work
- 9 Drain Piping Work
- 10 Electric Wiring Work
- 11 Electrical Characteristics
- 12 Wiring Example and How to Set the Remote Controller
- 13 Wiring Example
- 14 Installation of the Decoration Panel
- 15 Test Operation
- 16 Wiring Diagram
- Download this manual
See also:
Service Manual
Advertisement
Table of Contents

Related Manuals for Daikin FBQ50D2VEB


Summary of Contents for Daikin FBQ50D2VEB
-
Page 1: Installation Manual
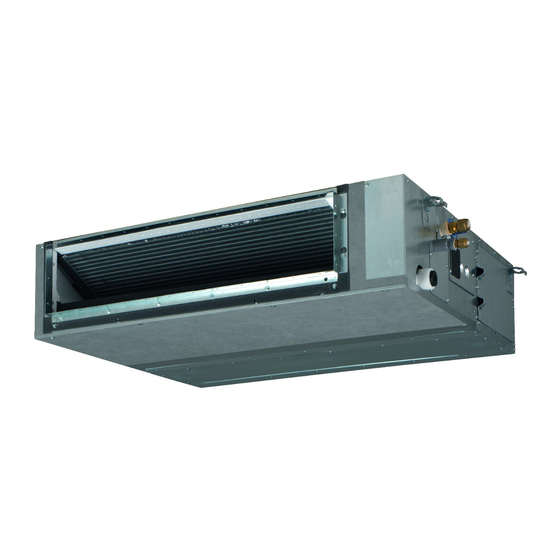
INSTALLATION MANUAL Split System air conditioners FBQ35D2VEB FBQ50D2VEB FBQ60D2VEB FBQ71D2VEB FBQ100D2VEB FBQ125D2VEB FBQ140D2VEB... - Page 2 ≥300 <45 ≤300 mm 1~1.5 m...
- Page 3 3P323721-9J...
-
Page 4: Table Of Contents
Insulation for Long sealing OTHER DAMAGE TO THE EQUIPMENT. BE SURE ONLY fitting 2 pieces TO USE ACCESSORIES MADE BY DAIKIN WHICH ARE SPECIFICALLY DESIGNED FOR USE WITH THE EQUIPMENT AND HAVE THEM INSTALLED BY A for liquid pipe PROFESSIONAL. -
Page 5: Selecting Installation Site
For the following items, take special care during • Do not place objects that are susceptible to moisture directly beneath the indoor or outdoor units. Under certain conditions, construction and check after installation is finished condensation on the main unit or refrigerant pipes, air filter dirt or drain blockage may cause dripping, resulting in fouling Tick ... -
Page 6: Indoor Unit Installation
For other installation than standard installation, contact NOTE an air filter whose dust collecting efficiency is at least 50% your Daikin dealer for details. in a gravimetric technique.) The included filter is not used when the intake duct is attached. -
Page 7: Refrigerant Piping Work
Refrigerant piping work Piping insulation procedure Gas piping Liquid piping For refrigerant piping of outdoor unit, refer to the installation manual supplied with the outdoor unit. Execute heat insulation work completely on both sides of the gas piping and the liquid piping. Otherwise, this can sometimes result in water leakage. -
Page 8: Drain Piping Work
Drain piping work How to perform drain piping (See figure 10) Installation of drain piping Ceiling slab Hanger bracket Install the drain piping as shown in the figure and take measures Adjustable range against condensation. Improperly rigged piping could lead to leaks and eventually wet furniture and belongings. -
Page 9: Electric Wiring Work
After confirming drainage, turn off the power. Caution for drain socket Switch box cover Do not remove the drain pipe plug. Water might leak out. Transmission wiring port The drain outlet is only used to discharge water if the drain Power supply wiring port pump is not used or before maintenance. -
Page 10: Wiring Example And How To Set The Remote Controller
Electrical characteristics Use the specified electric wire. Connect the wire securely to the terminal. Lock the wire down without applying excessive force to the terminal. Use torques according to the table below. Power supply Voltage Model Volts range Tightening torque (N•m) Terminal block for remote controller 0.79~0.97 Terminal block for power supply... -
Page 11: Wiring Example
Wiring example Setting for optional accessories In case of connecting optional accessories, refer to the operation Fit the power supply wiring of each system with a switch and manuals provided with the optional accessories and establish fuse as shown in figure 14 figure necessary settings. -
Page 12: Installation Of The Decoration Panel
Installation of the decoration panel If there is no change after airflow adjustment in the ventilation paths, be sure to perform setting the Refer to the installation manual attached to the decoration panel. automatic airflow adjustment again. After installing the decoration panel, ensure that there is no space Contact your dealer if there is no change after ... -
Page 13: Wiring Diagram
Wiring diagram : FIELD WIRING : BLACK : PINK : CONNECTOR : BLUE : RED : SCREW TERMINAL : BROWN : WHITE : GREEN : YELLOW : ORANGE A1P......PRINTED CIRCUIT BOARD R1T......THERMISTOR (SUCTION) A2P......PRINTED CIRCUIT BOARD (FAN) R2T......THERMISTOR (LIQUID) C1 ......CAPACITOR R3T......THERMISTOR (COIL) C105 ....CAPACITOR RC .......SIGNAL RECEIVER CIRCUIT... - Page 15 1 2 3 P1 P2 F1 F2 T1 T2 Sec A A’ A’ A’ 1 2 3 1 2 3 1 2 3 1 2 3 1 2 3 1 2 3 L N 1 2 3 L N 1 2 3 L N 1 2 3 1 2 3 1 2 3...
- Page 16 4P391818-1B 2015.01...