Crock-Pot Cook & Carry Owner's Manual
4-7 quart programmable
countdown portable slow cookers
Hide thumbs
Also See for Cook & Carry:
- Owner's manual (17 pages) ,
- Manual (16 pages) ,
- Owner's manual (15 pages)

Related Manuals for Crock-Pot Cook & Carry


Summary of Contents for Crock-Pot Cook & Carry
- Page 1 Cook & Carry™ For use with 4-7 quart programmable countdown portable slow cookers Owner’s Guide Read and Keep These Instructions www.crockpot.com...
-
Page 2: Important Safeguards
IMPORTANT SAFEGUARDS When using electrical appliances, basic safety precautions should always be followed, including the following: 1. READ ALL INSTRUCTIONS BEFORE USING. 2. Do not touch hot surfaces. Use handles or knobs. 3. To protect against electrical shock, do not immerse cord, plug, or heating base in water or other liquid. - Page 3 SAVE THESE INSTRUCTIONS HOUSEHOLD USE ONLY . This appliance is for There are no user-serviceable parts inside. Do not attempt to service this product. A short power-supply cord is provided to reduce the hazards resulting from entanglement or tripping over a longer cord. AN EXTENSION CORD MAY BE USED WITH CARE;...
-
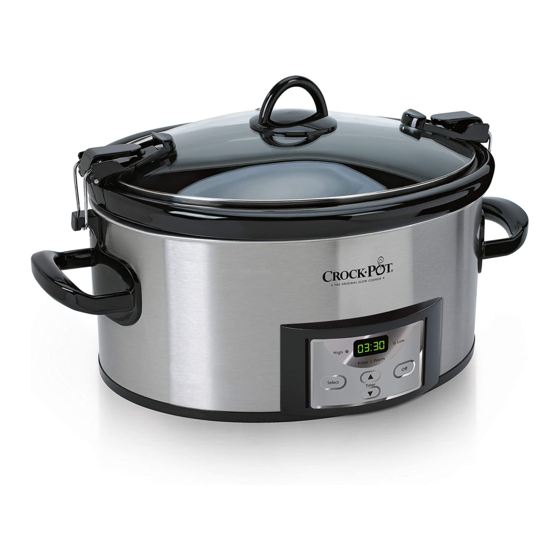
Page 4: Control Panel
Indicator Light Temperature Power Selection Setting Time Selection Settings PREPARING YOUR CROCK-POT SLOW COOKER FOR USE ® Before you use your slow cooker, remove all packaging components and wash the lid and stoneware in warm, soapy water and dry thoroughly. - Page 5 HOW TO USE YOUR LOCKING LID LOCKING THE LID 1. Place Lid on Stoneware. Hook Wire Clip onto Clip Hook (Figure 1). Flip Latch around to top (Figure 2) and push Latch down to securely lock (Figure 3). Repeat steps on other side of the lid. Fig.
-
Page 6: Usage Notes
The time can be set in increments of 30 minutes up to 20 hours. Select the time based on the length of time indicated in the recipe. The time will begin to count down in one minute increments. 4. When the cooking time has completed, the Crock-Pot slow cooker ®... - Page 7 HOW TO USE YOUR SLOW COOKER (CONT.) • Always cook with the lid on for the recommended time. Do not remove the lid during the first two hours of cooking to allow the heat to build up efficiently. • Always wear oven mitts when handling the lid or stoneware. •...
- Page 8 20 to 30 minutes. • For best pasta results, first partially cook the pasta in a pot of boiling water until just tender. Add the pasta to the slow cooker Crock-Pot ® during the last 30 minutes of cook time. BEANS •...
- Page 9 HINTS AND TIPS (CONT.) • Ground and/or dried herbs and spices work well in slow cooking and may be added at the beginning. • The flavor power of all herbs and spices can vary greatly depending on their particular strength and shelf life. Use herbs sparingly, taste at end of cook cycle and adjust seasonings just before serving.
- Page 10 • Ensure the stoneware is always filled a minimum of ½ full and a maximum of ¾ full, and conform to recommended cook times. Visit the Crock-Pot slow cooker website at ®...
-
Page 11: Baby Back Ribs
6–8 hamburger buns trimmed of fat 2–4 cups barbecue sauce or hard rolls 1. Place pork loin in Crock-Pot slow cooker. Top with onion and ® barbecue sauce. 2. Cover and cook on Low for 7–9 hours or on High for 4–5 hours, or until meat is tender. -
Page 12: Beef Bourguignon
1–2 inch pieces 1 10-ounce can beef broth 1. Coat beef in flour seasoned with salt and pepper. Sear beef in a skillet on stovetop (optional). 2. Place meat in Crock-Pot slow cooker and add remaining ® ingredients. -
Page 13: Chicken Cacciatore
Kosher salt and pepper 5 cloves garlic, minced ½ cup dry white wine or broth Cooked pasta 1. Place sliced onion in Crock-Pot slow cooker and cover with chicken. ® 2. In a bowl, stir tomatoes, salt, pepper, garlic and white wine together. -
Page 14: Year Limited Warranty
SERVICE INSTRUCTIONS 1. Do NOT attempt to repair or adjust any electrical or mechanical functions on this unit. Doing so will void the Warranty. 2. If you need to exchange the unit, please return it in its original carton, with a sales receipt, to the store where you purchased it.