Vidyo VidyoRoom HD-200 User Manual
Hide thumbs
Also See for VidyoRoom HD-200:
- User manual (48 pages) ,
- User manual (56 pages) ,
- User manual (53 pages)
Table of Contents
Advertisement
Quick Links
Download this manual
See also:
User Manual
Advertisement
Table of Contents

Related Manuals for Vidyo VidyoRoom HD-200


Summary of Contents for Vidyo VidyoRoom HD-200
- Page 1 VidyoRoom : Users Guide ™ HD-200 & HD-100 Version 1.4...
-
Page 2: Table Of Contents
Initial VidyoRoom Setup for HD-100 Initial VidyoRoom Setup Overview of the VidyoRoom Homepage Using the VidyoRoom During a Meeting Overview of the Browse Meetings & Users Page Managing Speed Dials Settings Product Specifications System Specifications Installation Safety Appendix ©2009 Vidyo, Inc. All rights reserved. -
Page 3: Document Overview
All traditional video conferencing vendors offer high-definition room systems, but do you know of any that are capable of delivering up to 60 fps encoding? The VidyoRoom HD-200 and HD-100 do just that. The VidyoRoom HD-200 delivers 60 fps encoding as well as decoding and displaying multiple HD... -
Page 4: Definitions
Definitions As a new Vidyo user, it is helpful to have a basic understanding of the following terms that are used throughout this document: DESTInATIOnS Places where you may interact with the VidyoConferencing System: VidyoPortal — The Web interface of the VidyoConferencing System ƒ... - Page 5 Definitions physical world. MEETInG ROOMS (OF EITHER TyPE) OFFER ATTRIBUTES Set by the administrator — such as “maximum bandwidth” and “maximum number of participants.” Rooms may be locked/unlocked and/or PIn-protected. A PIn-protected room requires the meeting invitees to enter the specified PIn in order to be admitted to the room.
-
Page 6: Overview Of The Vidyoroom Remote Control
Overview of the VidyoRoom Remote Control The VidyoRoom comes with a remote control allowing quick key shortcuts to frequent VidyoRoom activities. It also provides the input mode/keyboard for typing information. Not In Conference COnnECT Starts meeting from the homepage. ARROWS / OK Use the arrow keys to navigate on-screen. - Page 7 Overview of the VidyoRoom Remote Control In Conference DISCOnnECT Ends meeting ARROWS / OK Left/Right – pans camera Up/Down – tilts camera VOlUME / MUTE / SElFVIEW / ZOOM Volume — adjusts the sound level Mute — mutes your microphone or recording source MUTE SELFVIEW Selfview —...
-
Page 8: Overview Of Vidyoroom On-Screen Icons
Overview of VidyoRoom On-Screen Icons Speaker Mute — Displayed when local speakers are muted (volume turned all the way down via remote control). Microphone Mute — Displayed when local microphone is muted remote control. Privacy — Displayed when local camera is muted (Privacy mode enabled via remote control). -
Page 9: Overview Of Input Modes
Overview of Input Modes ABC Mode ABC input mode features the numbers 0 through 9, the pound sign, and the asterisk, along with corresponding symbols and letters, in a layout similar to a touch-tone phone. Selecting the button once enters the first superscript character or alpha letter into the form field. -
Page 10: Initial Vidyoroom Setup For Hd-200
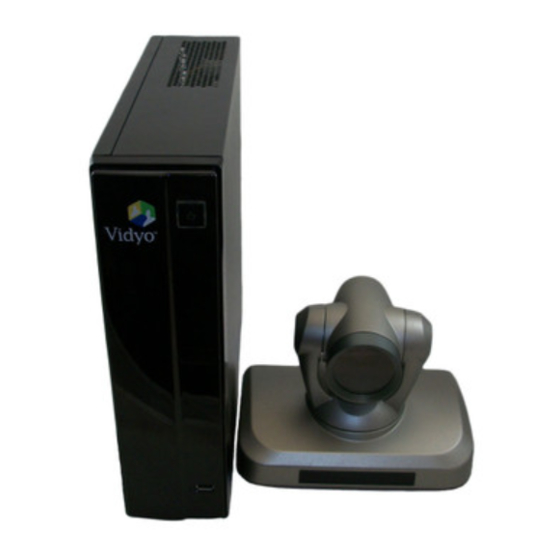
Initial VidyoRoom Setup for HD-200 Connecting your VidyoRoom for your HD-200 System Front Power VGA2USB (optional) yamaha PJP-25UR Primary Display Back Camera Secondary Display VISCA Ethernet Connect Power cable. Connect Ethernet cable to ETH-1 and to your network. Connect to TV using DVI to HDMI cable on TV-1. A second screen can be connected to TV-2. - Page 11 VISCA Serial Cable In order for the Sony EVI-HD1 Camera to Sync with your ƒ ƒ VidyoRoom HD-200, you need to set the System Select POT screw on the rear of the camera to #2. Connect Power Supply to power input. ƒ...
-
Page 12: Initial Vidyoroom Setup For Hd-100
Initial VidyoRoom Setup for HD-100 Connecting your VidyoRoom for your HD-100 System HDMI Secondary Display D89-COnnECTIOn Primary Display USB TO SERIAl VISCA Ethernet Chat 50 Camera yamaha PJP-25UR Use only one audio device between the above two HDMI CAMERA VGA2USB (optional) Power Front Back... - Page 13 Initial VidyoRoom Setup for HD-100 SDI HD Camera Kit Setup SD OUT D OUT HD OUT HD O DC IN Power Supply VIDEO S VIDEO VIDEO O S VIDEO COMPONENT COMPONENT COMPO ONENT HD-SDI SYSTEM VISCA SELECT 1 2 3 IR SELECT VISCA Serial BnC Coax HD-SDI...
- Page 14 Initial VidyoRoom Setup for HD-100 Audio Connection Using Yamaha PJP-25UR AUDIO DC IN 5V...
-
Page 15: Initial Vidyoroom Setup
Initial VidyoRoom Setup Creating a VidyoRoom Account on the VidyoPortal Please refer to the VidyoPortal Admin Guide. Configuring the VidyoRoom System Upon bootup you will receive the following screen and message: Press on your VidyoRoom remote control. ƒ ƒ Enter system name — arrow right to scroll to input modes area; ƒ... - Page 16 Initial VidyoRoom Setup Select Obtain network settings automatically for DHCP ƒ ƒ Or Select Use the following network settings for Static IP and enter your ƒ ƒ appropriate information. Press on remote, or scroll down to Save button and press ƒ...
-
Page 17: Overview Of The Vidyoroom Homepage
Overview of the VidyoRoom Homepage From the VidyoRoom homepage you can easily start a meeting, place a direct call, and manage your speed dial contacts (if you have added users to your speed dials list). Actions You Can Take from the Homepage: Start Meeting: If you want to host a meeting, you can ask participants to meet in your VidyoRoom. - Page 18 Call Meeting Room button on-screen and press or simply press the on the remote control. This will place a call using the Vidyo- Room. If the room is locked, the Call Meeting Room button will be grayed out/inactive. you cannot join a locked room.
- Page 19 Overview of the VidyoRoom Homepage Selecting a Public Room will bypass the overlay process because there is no option to call direct. Unless the room is full or locked, you will be directly connected with the meeting. Speed Dials: you can create a custom Speed Dials list of commonly called numbers.
-
Page 20: Using The Vidyoroom During A Meeting
Using the VidyoRoom During a Meeting Upon starting or joining a meeting, the VidyoRoom will display a progress bar. Once you’ve entered a meeting, you may utilize the following functions to optimize your meeting: Toggle — Many participants may share their application screens, but you may only view one screen at a time. -
Page 21: Overview Of The Browse Meetings & Users Page
Overview of the Browse Meetings & Users Page At the top of the Browse Meetings & Users page is a search box that is identical to the Place a Call to... search box on the VidyoRoom homepage. Below the search box is the Browse Meetings & Users table. Using this table allows you to arrow through a list of meeting rooms/users in the system, arrow over to get more details about the room’s/user’s status, and select buttons to call the room or join the meeting. -
Page 22: Managing Speed Dials
Managing Speed Dials Adding a User or Room to Speed Dials From the Browse Meetings & Users table, scroll down to highlight the name you wish to add to your speed dials. When you’ve highlighted a name you wish to add, press on the remote control. - Page 23 Managing Speed Dials Using Speed Dials From the VidyoRoom homepage, arrow over to the Speed Dials button and press on the remote control. you may arrow down to the user’s or room’s name and press on the remote to place a call; an overlay screen will appear as previously outlined asking you to select Call Meeting Room or Direct Call.
-
Page 24: Settings
Settings The Settings section allows you to maintain and change your VidyoRoom settings. Arrow to the red Restart button and press on the remote control to restart VidyoRoom. you will get the following screen: Either Press the button on the remote, or scroll down to highlight the Proceed button and press on the remote, to reboot the system. - Page 25 Settings General In the first field on the General Settings page, you can name (or rename) your VidyoRoom system. This is the name that will be associated with your VidyoRoom box; the rest of the VidyoConferencing System will recognize this name.
- Page 26 Settings Preferences To set your room to be PIn-protected, arrow to the box that says Use a PIn Code and press on the remote control. (Conversely, to unset the PIn requirement, press O on the remote control so that the checkmark disappears.) Then use the remote control buttons to enter/change your PIn.
- Page 27 Settings local IP To change your VidyoRoom’s network settings – Select Use the following network settings: to manually set your addresses, and enter your network’s settings appropriately. your VidyoRoom is set to Obtain network settings automatically (DHCP) by default.
- Page 28 Settings network To change your VidyoRoom’s network settings – Select Use the following network settings: to manually set your addresses, and enter your network’s settings appropriately.
- Page 29 Settings Audio HD-200 HD-100 Select your microphone and speakers by arrowing to the system you’re using and pressing on the remote control. Adjust the volume for each by scrolling to that control and pressing left or right on the arrows on the remote control. Press the button on the remote control or scroll over to the Save button and press...
- Page 30 Settings Video HD-200 HD-100 To select the number of displays you have connected to the VidyoRoom system, select Single or Dual and press on the remote control. To reset the camera, select Reset Camera and press on the remote control. To turn the camera’s backlight compensation On, select Backlight On and press on the remote control.
- Page 31 Settings About HD-200 HD-100 The About page lists your VidyoRoom model number, serial number, and version.
- Page 32 Settings System The System page allows you to select between Internal IR Receiver and External IR Receiver.
-
Page 33: Product Specifications
Product Specifications HD-200 HD-100 Video Available in future version. Primary Video Codec H.264 Annex G (SVC) H.264 Annex G (SVC) Support in Point-to-Point calls in Arithmetic coding future version. legacy Video Codec H.264 AVC, H.263+ H.264 AVC, H.263+ via the VidyoGateway Transmit Max Resolution &... - Page 34 Product Specifications HD-200 HD-100 User Interface Customizable, Customizable, Multi-language Multi-language Support and Enterprise Support and Enterprise Branding Branding Conference Control Integrated in Endpoint Integrated in Endpoint and Through and Through VidyoPortal VidyoPortal Network and IP Protocol SIP RFC 3261 Maximum Data Rate 6 Mbps 4 Mbps nAT &...
-
Page 35: System Specifications
System Specifications HD-200 HD-100 Form Factor Stand-alone Chassis, Stand-alone (Freestanding or 19” Freestanding Chassis Rack-mountable) Dimensions Height 3.6” (91mm) 13” (330mm) Width 17.4 (442mm) 3.5” (89mm) Depth 17.1 (434mm) 12.75” (324mm) Gross Weight 32 lbs (14.5kg) 4.6 lbs (2.1kg) Form Factor 2U Rackmount Physical Interfaces Camera In... - Page 36 System Specifications HD-200 HD-100 Operating Environment Operating 10 to 35 °C (50 to 95 °F) 10 to 35 °C (50 to 95 °F) Temperature Range non-Operating -40 to 70 °C -40 to 70 °C Temperature (-40 to 158 °F) (-40 to 158 °F) Humidity Range 8% to 90% 8% to 90%...
-
Page 37: Installation Safety Appendix
Installation Safety Appendix HD-200 Installation Instructions A. Elevated Operating Ambient – If installed in a closed or multi-unit rack assembly, the operating ambient temperature of the rack environment may be greater than room ambient. Therefore, consideration should be given to installing the equipment in an environment compatible with the maximum ambient temperature (Tma) of 40°... - Page 38 Installation Safety Appendix HD-100 Installation Instructions A. Power Supply Cord – The power supply cord is used as the main disconnect device. Ensure that the socket outlet is located/installed near the equipment and is easily accessible. B. Circuit Overloading – This product relies on the building’s installation for short-circuit (overcur- rent) protection.