Table of Contents
Advertisement
Quick Links
Advertisement
Table of Contents

Related Manuals for Minelab GPZ7000


Summary of Contents for Minelab GPZ7000
- Page 1 Instruction Manual...
- Page 2 Since there may be a variety of options available for this detector, equipment may vary according to the Model or items ordered with your detector. Certain descriptions and illustrations may also differ (in this manual) from the exact Model that you purchased. In addition, Minelab reserves the right to respond to ongoing technical progress by introducing changes in design, equipment and technical features at any time.
- Page 3 Minelab’s new ZVT and Super-D technologies. With the assistance of this Instruction Manual, and the accompanying Field Guide, you will quickly learn how set up your detector for the best results. Minelab wishes you every success in your quest for gold!
-
Page 4: Table Of Contents
Changing Coils Coordinates Format GA 10 Guide Arm Length Units XChange 2 PRO-SWING 45 Weight Units Charging Batteries Minelab XChange 2 Guides BC 10 Battery Charger PC System Requirements User Button GPZ 7000 Battery Install XChange 2 on Your PC Backlight WM 12 Battery... - Page 5 Assembly This section will show you how to assemble your GPZ 7000, charge the batteries, and will familiarise you with the control panel.
-
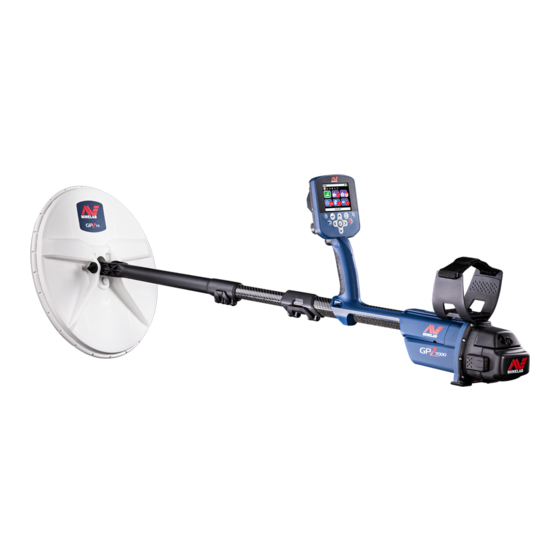
Page 6: Detector Parts
Detector Parts Detector Parts Headphone Module Battery Pack Armrest Strap Battery Latches Armrest Stand Armrest Lock Control Box Handle Control Panel Upper Shaft USB Connector Trigger Upper Cam Lock Mid Shaft Lower Cam Lock Lower Shaft GPZ 14 Coil* * Coil is waterproof to 1 metre (3 feet) depth Skidplate... - Page 7 Detector Parts See page 57 for parts and accessories available for GPZ 7000. Items may vary from those shown. XChange 2 Software and Getting Started Guide 2 x Field Guides Warranty Card Instruction Manuals CD (multiple languages) BC 10 Universal Plug Pack Car Charger Battery Terminal Battery Charger...
-
Page 8: Assembly
Assembly Assembly Lock the cam lock by pushing the lever towards the shaft Assembling the Detector Attach mid shaft to upper shaft Release the cam lock on the upper shaft by pulling the lever away from the shaft. Attach coil and lower shaft to mid shaft Release the cam lock on the lower shaft by pulling the lever away from the lower shaft. - Page 9 Assembly Attach control box Attach battery and headphone module Going detecting with a fully charged battery is recommended. See page 9 for information on how to WARNING recharge the GPZ 7000 battery. PINCH POINTS - CONTROL BOX Fit the battery pack onto the control box and close Take care when sliding the control box onto the latches to secure it in place.
-
Page 10: Connecting Headphones
Undo the hook and loop armrest strap. Tighten the strap until your arm is secure in the NOTE armrest, and fasten. All Minelab GPZ coils come with the lower shaft pre-assembled to the coil. Disassembling a coil from its lower shaft is not recommended. -
Page 11: Ga 10 Guide Arm
Assembly To listen to audio via the WM 12, insert the headphone Attach the Flex-link to the GA 10 shaft. Align the plug into the WM 12 headphone socket. holes in the shaft with the key on the Flex-link. Push the Flex-link onto the end of the shaft until it clicks into place. -
Page 12: Pro-Swing 45
Assembly PRO‑SWING 45 NOTE The GPZ 7000 comes with a PRO-SWING 45 harness that evenly distributes the weight of your detector from your Adjust the position of the GA 10 on the shaft shoulders, via the J-strut, making your detecting swing until it is comfortable when swinging the lighter. -
Page 13: Charging Batteries
Charging Batteries Charging Batteries Power LED No input power, charger is OFF BC 10 Battery Charger Correct input voltage, charger is ON, Steady on green normal operation WARNING Incorrect input voltage, charger may Fast flashing red not operate † Do not immerse the BC 10 Steady on green Battery is fully charged charger in any liquid or allow... -
Page 14: Wm 12 Battery
Charging Batteries Recharge the Lithium‑Ion Battery Pack remain steady on green when the battery is fully charged (this may take up to four hours). Remove the battery pack from the detector and place it into the charger unit, ensuring that the connector pins align. -
Page 15: Wireless Audio Module
Wireless Audio Module Wireless Audio Module ‘Connect WM 12’ in the Settings menu and select it to start the Guide sequence. The Wireless Audio Module (WM 12) receives wireless During the Guide sequence, a random channel will be audio using advanced Wi-Stream technology to achieve displayed. -
Page 16: Control Panel
Control Panel Control Panel The GPZ 7000 control panel contains the full-colour LCD display and has control buttons that are used to activate detector functions, navigate the GPZ 7000 user interface, and to adjust detector settings. Detect Press to access and scroll through the six Detect Press to access the Map screen and to scroll through menu pages to change the settings of your detector the four Map menu pages to change the settings... - Page 17 Quick Start This section contains Quick Start steps to help you go detecting quickly and easily. It also includes information that will familiarise you with the GPZ 7000 menus and their functions.
-
Page 18: Quick Start
Quick Start Quick Start Start detecting quickly with these six Noise Cancel easy steps: Carry out Noise Cancel noise reduction by following the Guide sequence When the detector is turned on for the first time, or following a Reset All, you will be prompted to set the Language, the Weight and Length Units, and the Time Zone before the Detect page will be displayed. -
Page 19: Gpz 7000 Menus
GPZ 7000 Menus GPZ 7000 Menus Navigating the Detect Menu Pages Within the Detect menu, use the up, down, left and The GPZ 7000 graphical user interface has two main right Arrow buttons to move between the pages and menus that provide you with access to all GPZ 7000 page functions. -
Page 20: The Detect Menu
GPZ 7000 Menus The Detect Menu This menu contains functions and settings relating to the detector. You can change audio, control panel, detection and connectivity settings via the following six pages: • Detect • Detect Plus • Settings • Preferences •... -
Page 21: The Map Menu
GPZ 7000 Menus The Map Menu This menu contains functions and settings relating to the Map and built-in GPS. There are grouped into the following five pages: • Map • Display • View • GeoStore • Create GeoData The Map page (page 35) The GeoStore page (page 40) The Create GeoData page (page 43) The Display page (page 38) -
Page 22: Gpz 7000 Control Panel
GPZ 7000 Control Panel GPZ 7000 Control Panel Status Bar Elements The Status Bar is displayed at the top of all screens and Screen Elements provides status information for WM 12 connectivity, GPS, GeoHunt, Backlight, and detector and WM 12 battery The GPZ 7000 graphical user interface on the control levels. -
Page 23: Types Of Selection Screens
Types of Selection Screens Types of Selection Screens When you select a function on a page, the options relating to that function will appear. These options will be adjustable via an adjustment bar, a selection box, a selection list, or check-mark selection. Adjustment Bar Selection List A bar with incremental steps that can be increased... -
Page 24: Detect Menu
Detect Menu This section describes each function in the GPZ 7000 Detect menu, and explains how to use them to optimise your detector’ s performance. Use the Detect button to access the Detect Menu pages. -
Page 25: Detect
Detect High Yield Detect This setting is ideal for searching for small and medium sized nuggets (typically 0.1 – 50 grams) and also has good performance The Detect page is where you can set all of the essential detector functions. for detecting larger nuggets in shallow ground. -
Page 26: Ground Type
Detect Ground Type NOTE When detecting in ground with high levels of mineralisation, movement of When changing the Ground Type setting, the detector over the ground can the threshold tone will become silent for produce false signals. These unwanted approximately one second once a new signals are known as ground noise. -
Page 27: Sensitivity
Detect Sensitivity Auto Noise Cancel Auto Noise Cancel automatically scans and Sensitivity controls the amount of listens to every frequency channel, then amplification applied to signals received selects the one with least interference. by the detector. The Sensitivity control Auto is the recommended setting. has a range from 1 to 20 with a default setting of 9. - Page 28 Detect Low Volume Audio range that you are able to hear High Volume Audio range that you are able to hear Signals are amplified Signal audibility with high and low Volume settings Adjust Volume Settings Select the Volume function on the Detect page. An adjustment bar with a range from 1 to 20 will appear.
-
Page 29: Detect Plus
Detect Plus harder to hear above the Threshold ‘hum’ . Detect Plus If the Threshold Level is too low, the slight variation caused by a small or deep target may not be sufficient to hear. Adjusting the level to below audible will ensure The Detect Plus page contains the following functions: silent operation but could mask the audio response from small or deep targets. -
Page 30: Volume Limit
Detect Plus Volume Limit Applying Audio Smoothing may cause you to miss some targets, and as such, it is recommended that you The Volume Limit sets the maximum lower Sensitivity and increase the Threshold Level before volume for target signals. When deciding whether it is necessary to add Audio Smoothing. - Page 31 Detect Plus Auto Auto ground balance automatically tracks the ground mineralisation levels and adjusts the ground balance as necessary to maintain stability and detection depth. Auto is the recommended setting for Ground Balance Mode. In Auto mode the ground balance will automatically stabilise, after power on or a settings change, within 10 to 15 seconds of normal detecting.
-
Page 32: Settings
Settings NOTE Settings Once GPS is turned On, a flashing GPS icon will appear on the Status Bar. When a position fix has been established (which may The Settings page allows you to adjust detector GPS, take several minutes), the GPS icon on the backlight, and wireless connectivity settings. -
Page 33: Connect Wm 12
Settings Connect WM 12 Removing Additional WM 12s To remove all additional WM 12s, re-connect the primary To connect a WM 12 to a detector, select WM 12 using the Connect WM 12 function. Connect WM 12 and then follow the instructions displayed by the Guide. NOTE Note: The Connect WM 12 Guide will be displayed even if Guides are turned ‘Off’... -
Page 34: Preferences
Preferences Coordinates Format Preferences The Coordinates Format provides the conversion of latitude and longitude coordinates. There are two available The Preferences page contains the following functions: options: • Time Zone • DMS – Degrees° minutes' seconds" (default) • Time Format (e.g. -
Page 35: User Button
User Button Ground Balance Mode User Button Press the User button to display the Ground Balance Mode selection box. Use this page to assign the function of the User button. Choose from either Auto or Manual. (page 26) Noise Cancel ‑ Manual The User Button Press the User button to display the Manual Noise Cancel adjustment... -
Page 36: Assign A Function To The User Button
User Button Assign a Function to the User Button Highlight the function you would like to assign to the User button and press Select. If you select ‘More’ a selection list with additional options will appear. Scroll to the desired function and press Select. A check-mark will appear in the status circle of the selected function: The selected function will be assigned to the User button. -
Page 37: Reset
• Arabic The Reset Page Product Verification Code Reset GeoStore Generates a verification code to verify your detector is a genuine Minelab Select the Reset GeoStore option to clear product. the contents from the GeoStore. All (Customer service function) FindPoints, WayPoints and GeoHunts will Product Verification Code is also available in the System be deleted. -
Page 38: Map Menu
Map Menu This section explains the Map screen and the functions within the GPZ 7000 Map menu. Use the Map button to access the Map Menu pages. -
Page 39: Map
• View your current location and GPS coordinates wirelessly. • View your GeoTrail, WayPoints, FindPoints and GeoHunts • GPS and GeoStore data is NOT transmitted to Minelab from your detector or PC. • Navigate to a location • Your data is NOT accessible by others via the internet •... -
Page 40: Map Elements
Map Elements Map Zoom The Map Zoom indicator is displayed at the top left of The information on the Map will vary according to its the Map. It indicates the current size of the grid square in current state and your user preferences. The Map can metres or yards (10 x 10, 20 x 20 or 100 x 100). -
Page 41: North Marker
WayPoint North Marker A WayPoint is similar to a FindPoint with the The North Marker is displayed at the top right of exception that no detector or target related the screen. It indicates a fixed northerly direction information is stored. The WayPoint is used to in relation to the detecting trail. -
Page 42: Display
Display Clear GeoTrail Display Clear GeoTrail removes the current non-recorded GeoTrail (blue) from the Map. The recorded GeoTrail (red) remains. The Display page is where you can adjust the zoom levels Any saved GeoHunts (grey) that are of the Map, show your current position on the Map, and being displayed (page 41) will also remain. -
Page 43: View
View View Coordinates View View Coordinates will show or hide the Coordinates label on the Map. View Coordinates is Off by default. The View page is where you control which elements you want to appear on the Map. Show or Hide Map Screen Elements The View page contains the following functions: Select the Map element you want to show/hide. -
Page 44: Geostore
GeoStore storing any detector related information. The WayPoints function on the GeoStore page allows you to go to, view, GeoStore or delete WayPoints that have been saved to the GeoStore database. The GeoStore page allows you to sort, view, and delete up GeoHunts to 100 FindPoints, 100 WayPoints and 10 GeoHunts, and to display GeoTrails from previous GeoHunts on the Map. -
Page 45: Geotrails
GeoStore GeoTrails • Name (alphabetically A to Z) The GeoTrail Function allows you to display GeoTrails from saved GeoHunts on the Map. These can be displayed even if you are recording a new GeoHunt. Proximity Time Name Show a Saved GeoHunt On the Map Select your preferred sort option. -
Page 46: Delete A Geostore Item
GeoStore Delete a GeoStore Item Individual FindPoints, WayPoints and GeoHunts can be deleted from the GeoStore. To delete a GeoStore item: From the GeoStore page, Select from the FindPoints, WayPoints, or GeoHunts functions. Select the item you wish to delete from the list. Select the Delete option. -
Page 47: Create Geodata
Create GeoData Create FindPoint Create GeoData Use the Create FindPoint function to save the time, location, depth, and weight of your finds. They are stored as View the Create GeoData page by navigating to it via the FindPoints in the GeoStore. Map menu, or by pressing the Store button. -
Page 48: Create Waypoint
Create GeoData Create WayPoint Stop GeoHunt Use the Create WayPoint function to save Stop a GeoHunt at any time to cease time and location information for a point recording a GeoHunt. Once a GeoHunt of interest. These are stored as WayPoints has been stopped, it cannot be resumed. -
Page 49: Loss Of Gps Position Fix During A Geohunt
Create GeoData Loss of GPS Position Fix During a GeoHunt In the event of a GPS position fix not being available, the GeoHunt Status Bar icon will flash. The GeoTrail location dots will not be displayed, and the logging of data will cease temporarily (it will continue automatically once a position fix becomes available). - Page 50 Your Detecting Connection The XChange 2 PC app that comes with your detector, on CD, allows you to map your finds and the ground you have covered so you don’t miss any gold! This section will show you how to install the app on your PC so you can get started.
-
Page 51: Xchange 2
Once downloaded, double click the application and follow the install prompts. Start the XChange 2 Application Double click the XChange 2 application icon on your desktop, or open your Start menu and navigate to: All Programs > Minelab > XChange 2. XChange 2 desktop icon... -
Page 52: Detecting Basics
Detecting Basics This section contains information and tips to maximise gold recovery. It covers detecting ergonomics, interpreting detector sounds, and how to locate and recover gold in various soil types. -
Page 53: Holding The Detector
Detecting Basics Detecting Basics Sweeping the Coil Holding the Detector CAUTION Sweeping the coil incorrectly may cause you Thread your arm through the to miss targets or generate false signals. armrest and strap. Grasp the handle of the detector and rest your forearm in the armrest. -
Page 54: Detector Sounds
Detecting Basics Electrical Noise Ground Balance and Tracking The detector may produce false signals (Noise) when Most ground contains not only sand but also many the coil is held motionless or in the air. These signals are different chemicals, minerals, and salts. These extra electromagnetic interference (EMI). -
Page 55: Detecting Tips And Techniques
Detecting Basics Detecting Tips and Techniques • Dig all target signals, even in previously detected areas. The GPZ 7000 has superior ground balancing and depth Follow these hints and techniques to maximise your so it is possible to find new targets in well-worked areas success with the GPZ 7000 detector. -
Page 56: Pinpointing
Super-D coils also have electronic calibration resulting in quieter detecting, and have excellent detection depth. NOTE Only Minelab GPZ coils are compatible with the GPZ 7000 detector. -
Page 57: Target Recovery
If it is not, the The Minelab PRO-FIND 25 pinpointer is another useful target should be amongst the moved surface tool for quickly narrowing down the location of a target. -
Page 58: Detector Care
Detector Care This section covers GPZ 7000 safety, and describes how to care for your battery and detector to ensure its long and productive life. The accessories that are available for use with your GPZ 7000 are also listed. -
Page 59: Detector Care And Safety
Detector Care and Safety Detector Care and Safety • Minelab recommends that prior to use, care is taken to ensure the battery seal (o-ring), the seal seating groove The GPZ 7000 is a high-quality electronic instrument, and the mating face of the battery are undamaged and finely engineered and packaged in a durable housing. -
Page 60: Battery Care And Safety
• The Lithium-Ion battery is specifically designed for the facilities. GPZ 7000 and CTX 3030 detectors. Attempting to use • In the event of a fault, return the battery to a Minelab the Lithium-Ion battery pack with other detectors may Authorised Service Centre for repair. The use of damage the detector or the battery pack. -
Page 61: Gpz 7000 Parts And Accessories
• PRO-SWING 45 Harness Crosspiece • GA 10 Guide Arm • PRO-FIND 25 Pinpointer If you would like to purchase any accessories for your GPZ 7000 or any other Minelab product, please contact Minelab directly or via your local Authorised Minelab dealer. -
Page 62: Reference Tables
Reference Tables The tables in this section list the options available for each function in the Detect and Map menus, and their preset setting. The GPZ 7000, battery, and BC 10 battery charger technical specifications are also listed. -
Page 63: Detect Menu Reference Tables
Detect Menu Reference Tables Detect Menu Reference Tables The following tables provide a quick reference guide to the functions on each page in the Detect menu. The GPZ 7000 is delivered in its factory preset state, the factory presets (where applicable) are shown in red. The factory preset detector functions are optimised for ease of use, to start detecting successfully with minimal adjustment. -
Page 64: Map Menu Reference Tables
Map Menu Reference Tables Map Menu Reference Tables The following tables provide a quick reference guide to the functions on each page in the Map menu. The GPZ 7000 is delivered in its factory preset state, the factory presets (where applicable) are shown in red. The factory preset detector functions are optimised for ease of use, to start detecting successfully with minimal adjustment. -
Page 65: Troubleshooting
Troubleshooting Troubleshooting Detector does not • Check the condition of the battery and battery connections. turn on • Check that the battery is sufficiently charged. • Ensure that the battery is fully inserted into the control box, and it has been latched into place (page 5). -
Page 66: Technical Specifications
Technical Specifications Technical Specifications WARNING Minelab reserves the right to respond to ongoing technical progress by introducing changes in design, equipment and technical features at any time. GPZ 7000 Technical Specifications Transmission Zero Voltage Transmission (ZVT) Coil GPZ 14 - 13" x 14" Super-D Audio Output 6.3 mm (¼") Non-waterproof headphone socket, Wi-Stream wireless audio (UR 30 100Ω... - Page 67 Minelab Electronics Pty. Ltd Australia, Asia & Oceania Tel: +61 (0) 8 8238 0888 Email: minelab@minelab.com.au Minelab International Ltd. Europe, Middle East & Africa Tel: +353 (0) 21 423 2352 Email: minelab@minelab.ie Minelab Americas Inc. North, South & Central America Tel: +1 888 949 6522 Email: info@minelabamericas.com...