Advertisement
Quick Links
5. PREPARATORY WORK
Please read the chapter with your desired installation method in chapter 6 first.
5.1 Prepare ISOFIX
1. If your vehicle is not equipped with the ISOFIX insert guides
as standard, clip the two insert guides
02
which are inclu-
02
01
ded with the seat* with the cut-out facing upwards onto
the two ISOFIX attachment points
01
of your vehicle.
TIP: The ISOFIX attachment points are located between the
surface and the backrest of the vehicle seat.
2. Move the head restraint on the vehicle seat to the upper
position.
3. Pull the grey fabric loop
03
to pull out both locking arms
03
15
until you hear a click sound which indicates they are
fully engaged.
15
4. On both sides of the seat squeeze the green safety button
04
and the red release button
05
together and remove
the connector protection
06
.
05
04
06
* The insert guides make it easier to install the child safety seat with the aid of the ISOFIX
attachment points and prevent damage to the seat covering. When not in use, they should
be removed and stored in a safe place. On vehicles with a folding backrest the insert guides
must be removed before the backrest is folded.
Any problems which occur are usually caused by dirt or foreign objects on the insert guides
and on the hooks. Clean off any dirt or foreign objects to remedy this type of problem.
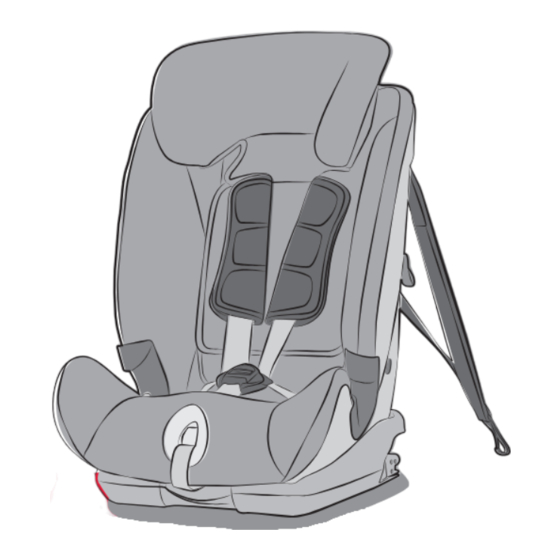
5.2 Adjusting the headrest in 5-point harness installation
A correctly adjusted headrest
07
ensures optimal protection
for your child in the safety seat:
07
The headrest
07
must be adjusted so that the shoulder belts
are at the same level as your child's shoulders.
08
CAUTION! The shoulder belts
08
must not run behind the
08
back of the child or at ear height or above the ears.
The shoulder belts are adjusted as follows:
1. Loosen the 5-point harness
38
of the child seat as much
as possible.
Back side of the child seat:
38
2. Press the button of the shoulder belt height adjuster
at
10
the rear of the seat shell and tilt the shoulder belt height
adjuster
towards you.
10
3. Slide the shoulder belt height adjuster
10
to select the
correct height of the shoulder belts
08
and engage it in the
10
positon that fits for your child by releasing the button.
5.3. Adjusting the headrest in Vehicle belt installation
A correctly adjusted headrest
07
ensures that the diagonal
07
seat belt section
is optimally positioned, and gives your
11
child the optimal protection.
The headrest
must be adjusted so that there is a space
07
two fingers wide between the headrest
07
and your child's
11
shoulders.
To adjust the height of the headrest to fit your child:
1. Squeeze the adjustment handle
12
on the back of the
12
headrest
.
07
This unlocks the headrest.
2. You can now move the unlocked headrest
to the desired
07
height. As soon as you release the adjustment handle
12
the headrest
07
will lock into place.
3. Place the child seat on the vehicle seat.
4. Have your child sit down in the child seat and check the
height. Repeat this process until the headrest
07
is at
the optimal height. If in the lowest position the headrest
07
is still too high, additional adjustment can be made
through the shoulder belt height adjuster
10
, as explanied
in section 5.2
140826_ADVANSAFIX_EN_WIP_gb-GB.indd 1
6. INSTALLATION
GROUP 1 (9-18 kg) &
A
GROUP 2 (15-25 kg)
With ISOFIT + Top Tether + Vehicle belt + 5-Point Harness
1. Make sure that the child seat´s 5-point harness is installed
correctly (see section 10).
13
2. Follow the steps in section 5.1
3. Follow the steps in section 5.2
4. Take the Top Tether
from the storage bag
and lay it
13
14
14
over the child seat.
5. Place the child seat facing in the direction of travel on the
vehicle seat.
6. Grasp the child seat with both hands and slide the two
15
locking arms
15
firmly into the insert guides
02
until the lo-
cking arms engage with a clicking noise on both sides. The
green safety button
04
must now be visible on both sides.
CAUTION! The locking arms are only correctly engaged if
both of the safety buttons
04
are completely green.
7. Push the child seat towards the backrest applying firm, even
pressure on both sides.
04
8. Shake the child safety seat to make sure it is safely attached
and re-check the green safety buttons
04
to make sure that
both of them are completely green.
9. Pull the Vehicle belt
22
out and guide it through the belt
22
guides
23
of the child seat. Make sure that the belt is not
twisted.
23
10. Engage the buckle tongue in the vehicle seat buckle
29
this
29
should make a click noise.
11. On the side opposite the car seat belt buckle, swivel clam-
25
ping lever
24
down and insert diagonal belt in belt lock-off
24
25
.
12. Apply your body weight to the child seat (kneel into the
seat). At the same time pull the diagonal belt strongly to
tighten (hold tension) and swivel the clamping lever
24
upwards until it engages.
13. Remove body weight from child seat and re-tension by
25
pulling the diagonal belt with the belt lock-off
25
closed.
14. Take the Top Tether
13
and press the metal tongue
16
17
away from the strap to lengthen the strap and pull the Top
Tether
13
by the snap hook
17
until it makes a V-shape.
15. Route the Top Tether
13
on the left and right hand sides of
the vehicle headrest.
16
17
16. Hook the snap hook
17
into the Top Tether anchoring point
recommended in your vehicle owner's guide.
CAUTION! Be sure not to use the luggage hook instead of
the Top Tether point. Check your vehicle and look for this
sign:
17. To Tension the Top Tether
13
remove the slack by pulling the
free end of the belt through the metal tongue
, equalising
16
the strap tension on both sides. The Top Tether is correctly
tensioned when the green tension indicator
is extended
18
18
by 1 cm.
18. Follow the steps in section securing your child with 5-point
harness.
SECURING YOUR CHILD WITH 5-POINT HARNESS
The more snugly the harness fits over your child's body, the better your child will be protected.
Therefore avoid putting thick clothes on your child under the belt.
19
21
1. Open the harness buckle
(press red button)
08
2. Press the adjusting button
and at the same time pull both
26
21
shoulder belts
08
forwards. Do not pull on the shoulder pads
26
19
.
3. Have your child sit down in the child seat.
4. Make sure that your child´s back
lies flat against the backrest of
the child seat.
5. Guide the two buckle latches
20
11
together and engage them befo-
21
20
re putting them into the harness
buckle
21
- this should make a
27
click noise.
6. Pull shoulder straps
11
to remove all slack from the lap
section ensuring the harness lies flat.
09
7. Pull on the adjuster strap
09
until the harness lies flat and is
close against your child's body.
CAUTION! Pull the adjuster strap
09
straight (not
upwards or downwards).
CAUTION! The harness straps
27
must be positioned as
low as possible over your child's hips.
8. Pull down on the shoulder pads
19
to ensure they are correctly
19
positioned.
For the safety of your child, before every journey in the car check that...
►the child safety seat is engaged on both sides with the ISOFIT locking arms
15
in the
ISOFIX attachment points
01
and that both green safety buttons
04
are completely
green;
►the child seat is firmly installed in the vehicle;
►the belt is not twisted;
►the Top Tether
13
is tightly tensioned over the backrest of the car seat and the tension
indicator
18
is green;
►the diagonal belt is only clamped by the lock-off which is located on the opposite side
from the car seat belt buckle;
►the straps of the child safety seat are close to the body without constricting the child;
►the shoulder belts
08
are correctly adjusted and the straps are not twisted;
►the shoulder pads
19
are at the same level as your child´s shoulders;
►the buckle latches
are engaged in the harness buckle
;
21
20
►the vehicle belt
22
clamped in the lock-off
25
is tensioned correctly.
Caution: If your child attempts to open the green safety buttons
or the harness
04
buckle
21
, make sure to stop at the earliest opportunity. Check that the child safety
seat is correctly attached and make sure that your child is properly secured. Teach
your child about the dangers involved.
To remove the child seat follow the steps in section 8
GROUP 2 (15-25 kg) &
B
GROUP 3 (22-36 kg)
With ISOFIT + Top Tether + Vehicle belt
1. Make sure that the child seats 5-point harness is removed
correctly (see section 9)
13
2. Follow the steps in section 5.1
3. Follow the steps in section 5.3
4. Take the Top Tether
13
from the storage bag
14
and lay it
14
over the child seat.
5. Place the child seat facing in the direction of travel on the
vehicle seat.
6. Grasp the child seat with both hands and slide the two
15
locking arms
15
firmly into the insert guides
02
until the
locking arms engage with a clicking noise on both sides.
The green safety button
04
must now be visible on both
sides.
CAUTION! The locking arms are only correctly engaged if
both of the safety buttons
04
are completely green.
7. Push the child seat towards the backrest applying firm, even
pressure on both sides.
04
8. Shake the child safety seat to make sure it is safely attached
and re-check to the green safety buttons
04
to make sure
that both of them are completely green
9. Take the Top Tether
13
and press the metal tongue
16
away
17
from the strap to lengthen the strap and pull the Top Tether
13
by the snap hook
17
until it makes a V-shape.
10. Route the Top Tether
13
on the left and right hand sides of
the vehicle headrest.
16
11. Hook the snap hook
17
into the Top Tether anchoring point
17
recommended in your vehicle owner's guide.
CAUTION! Be sure not to use the luggage hook instead of
the Top Tether point. Check your vehicle and look for this
sign:
12. To Tension the Top Tether
13
remove the slack by pulling the
free end of the belt through the metal tongue
16
, equalising
the strap tension on both sides. The Top Tether is correctly
tensioned when the green tension indicator
18
is extended
by 1 cm.
18
13. Have your child sit down in the child seat.
14. Pull out the vehicle seat belt and guide it in front of your child
to the vehicle seat buckle
29
.
CAUTION! Do not twist the belt.
15. Engage the buckle tongue in the vehicle seat buckle
29
29
CLICK!
16. Place the diagonal seat belt section
11
and lap belt section
28
on the side of the vehicle seat belt buckle
29
under the
28
armrest and into the light red belt guide
23
of the child seat.
11
CAUTION! The vehicle seat belt buckle
29
must not be
positioned between the light red belt guide
23
and the armrest.
23
17. Place the lap belt section
28
on the other side of the child
seat in the light red belt guide
23
.
CAUTION! The lap belt section
28
must lie as low as pos-
28 23
sible over your child's hips on both sides
18. Guide the diagonal seat belt section
11
into the dark red
07
belt holder
30
of the headrest
07
until it lies completely in
30
the belt holder
30
and is not twisted.
Tip! If the backrest
31
conceals the belt holder
30
, you can
adjust the headrest
upwards. The diagonal seat belt section
07
11
11
can now be easily inserted. Now return the headrest
07
to
the proper height, as in Section 5.3.
19. Make sure that the diagonal seat belt section
11
runs over
07
11
your child's shoulder bone, and not in front of his or her
neck.
Tip! You can still adjust the height of the headrest
again here
07
in the vehicle.
CAUTION! The diagonal seat belt section
must run dia-
11
gonally backward. You can adjust the course of the belt with your
vehicle's adjustable belt deflector.
CAUTION! The diagonal seat belt section
11
must never
lead forward to the vehicle's belt deflector.
In this case, only use the child seat on the rear seat.
For the safety of your child, before every journey in the car check that...
►the child safety seat is engaged on both sides with the ISOFIT locking arms
15
in the
ISOFIT attachment points
01
and that both green safety buttons
04
are completely green;
►the child safety seat is securely fastened;
►the Top Tether
13
is tightly tensioned over the backrest of the car seat and the tensi-
on indicator
18
is green;
►the lap belt section
28
runs through the light red belt guides
23
on both sides of the
seat cushion;
►the diagonal seat belt section
11
on the side of the vehicle seat belt buckle
29
also
runs through the light red belt guide
23
of the seat cushion;
►the diagonal seat belt section
11
runs through the dark red belt holder
30
of the
headrest;
►the diagonal seat belt section
11
runs diagonally backward,
►the straps are tight and not twisted;
►the vehicle seat belt buckle
29
is not positioned between the light red belt guide
23
and the armrest of the seat cushion.
CAUTION! If your child attempts to open the safety buttons
04
or the harness
buckle
, make sure to stop at the earliest opportunity. Check that the child safety
21
seat is correctly attached and make sure that your child is properly secured. Teach
your child about the dangers involved.
To remove the child seat follow the steps in section 8
7. CARE INSTRUCTIONS
To ensure the full protective effect of the child safety seat:
►In the event of an accident with an impact speed above 10 km/h it is possible that the
child safety seat may have been damaged, but that the damage may not be immedia-
tely obvious. In this case the child safety seat must be replaced.
Please dispose of it properly.
►Regularly check all important parts for damage. Make sure that the mechanical com-
ponents in particular are all in perfect working order.
►To prevent damage, ensure that the child safety seat does not become jammed bet-
ween hard objects (car door, seat runners etc.).
►Always have the child safety seat checked if it has been damaged (e.g. if it is drop-
ped).
►Never lubricate or oil parts of the child seat.
►In order to properly protect your baby, it is imperative that you install and use the
ADVANSAFIX exactly as described in this manual.
Disposal of packaging
Container for cardboard
Cover
Residual waste, thermal utilisation
Plastic parts
In accordance with the labelling in the designated container
Metal parts
Container for metals
Harness straps
Container for polyester
Buckle & latch
Residual waste
8. REMOVAL OF THE CHILD SEAT
CAUTION! Remove the child seat from the vehicle. The child seat must never be
transported in the car if it is not properly secured.
Group 1 and Group 2 (ISOFIT, Vehicle belt & Top Tether)
1. To release the ISOFIT fastening, squeeze the green safety button and the red release
button together,first on one side, then on the other.
2. Open the buckle of the vehicle seat belt and take the diagonal belt with a short pull
out of the belt lock-off. This countermovement releases the interior clamping of the
belt lock-off and the clamping lever is now easy to open.
3. To release the TopTether anchoring loosen the belt by lifting the metal tongue of the
adjuster away from the belt. Then take the spring hook out of the anchoring point.
4. Slide the ISOFIT locking arms back into the seat shell and put the connector protec-
tion on the ISOFIX.
Group 2 and Group 3 (ISOFIT & Top Tether)
1. Release vehicle seat buckle if securing the child seat.
2. To release the ISOFIT fastening, squeeze the green safety button and the red release
button together,first on one side, then on the other.
3. To release the TopTether anchoring loosen the belt by lifting the metal tongue of the
adjuster away from the belt. Then take the spring hook out of the anchoring point.
4. Slide the ISOFIT locking arms back into the seat shell and put the connector protec-
tion on the ISOFIX
26.08.2014 14:59:52
Advertisement

Related Manuals for Britax ADVANSAFIX


Summary of Contents for Britax ADVANSAFIX
- Page 1 , equalising ADVANSAFIX exactly as described in this manual. 10. Engage the buckle tongue in the vehicle seat buckle this positon that fits for your child by releasing the button.
- Page 2 Top Tether and the 3-point belt (Vehicle belt) or the ISOFIX anchoring and • The ADVANSAFIX child safety seat must only be used to secure your child in the On seats featuring: the Top Tether, even when there is no child in the seat vehicle.