Table of Contents
Advertisement
Advertisement
Table of Contents

Related Manuals for Northern Telecom Unity Two-Line


Summary of Contents for Northern Telecom Unity Two-Line
-
Page 2: Table Of Contents
Optional A-Lead Connection / 14 Directory Card Installation / Wall Mounting / 16 Operational problems / Basic Operation Manual Dialing / On-hook Dialing / Hanging Up / 19 Using the LINK key / 20 UNITY Two-Line Business Terminal, User Guide - Issue 1... -
Page 3: Contents I
Storing a required link / 27 Storing Telephone Numbers / 28 Using the Shift Key / 29 Automatic Dialing of Stored Numbers / 29 Two stroke dialing / 29 One stroke dialing / 30 UNITY Two-Line Business Terminal, User Guide - Issue... -
Page 4: Package Contents
To cancel call forward / 31 Do-Not-Disturb /32 Handset Receive Volume Adjustment / 32 Saved Number Redial / 33 Selectable Headset Operation / 34 Warranty Warranty / 35 Regulatory Information / 38 Quick Reference Programming Guide UNITY Two-Line Business Terminal, User Guide - Issue... -
Page 5: Features
Features Two line capability Prime line selection line 1, line 2, or neither Eight (8) programmable memory keys for automatic dialing Shift key that enables each memory ke to store two (2) tele- phone numbers, for a total of 16 stor ec! numbers or codes Visual indicators for ringing, off-hook, call forward, message waiting for each line, feature-in-use, do-not-disturb, hold and line in use Program Mode Shift... - Page 6 Key type systems Differentiated ringing control Power failure operation Adjustable handset and receive volume Selectable headset option Memory protection retains programmed phone numbers up 72 hours without AC power Program key UNITY Two-Line Business Terminal, User Guide - issue 1...
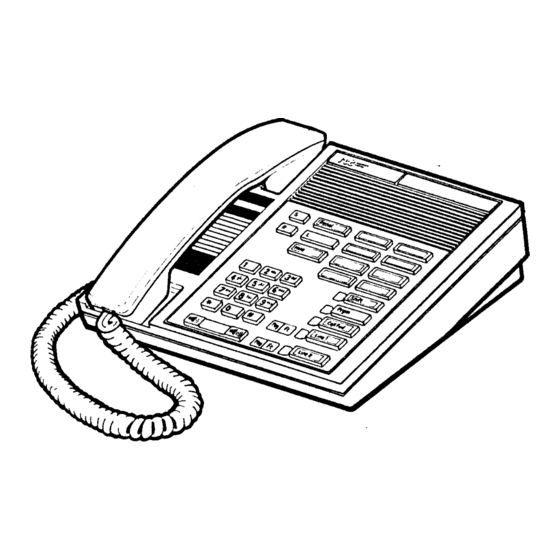
- Page 7 Features / 7 Programmable Memory Keys (8) Last Number Redial (Redial) Link Key (L) Saved Number Redial (S) Release Kev Dial Pad Volume Control Rocker Switch Fig. 1...
-
Page 8: Assembly And Installation
Assembly and Installation The Unity Two-Line is a Two line electronic telephone designed and factory wired for use with PBX, CENTREX or CENTRAL OFFICE (CO) switching system. No wiring changes are required. Follow these simple installation steps and start using your new Unity telephone set. -
Page 9: To Connect The Handset Cord
- Route the cord through the handset cord channel as shown in Figure 2. Then connect the plug at the other end of the cord to the handset. A “click” indicates that it is locked in place. Fig. 2 UNITY Two-Line Business Terminal, User Guide - Issue 1... -
Page 10: To Connect The Line Cord
- Route the line cord through the line cord channel. See Figure 3 Fig. 3 Power The Unity Two-Line is a powerful telephone with many features Transformer such as automatic dialing and a built-in speaker for call monitor- ing. Therefore, your telephone is equipped with a transformer for Connections the power needed to enable these additional features. - Page 11 Two-Line like a standard telephone, but only on Line 1. You can dial out manually (in tone mode) and receive incoming calls. Set reverts to factory default setting. Fig. Fig. 5 Fig. 4 UNITY Two-Line Business Terminal, User Guide - Issue 1...
-
Page 12: Tone/Pulse Selection
Assembly and Installation 12 / Tone/PuIse The Unity Two-Line is shipped from the factory already pro- rammed for tone dialing. You can alter the setting to pulse dial- Selection g ing if you do not have tone service. See ‘Tone/Pulse Selection’ in the ‘Programmable Features’... -
Page 13: Configuration Of Your Two Telephone Lines
Assembly and Installation / Configuration Of TheUnityT wo-Line is shipped from Northern Telecom ready to Your Two use. Your phone is configured for tone dialing; Line 1 is your Prime Line, Automatic Hold, two stroke dialing and volume con- Telephone o ls set to nominal. -
Page 14: Optional A-Lead Connection
14 / Assembly and Installation Optional A-Lead u sing your Unity Two-Line with certain systems may require A- lead control. To enable compatibility with this type of system, Connection you can order the optional A-lead cord to plug into the second jack (designated 'J1’) on the underside of your phone. - Page 15 - Connect the other end of the A-lead cord to a wall jack that is specially wired for this type of system. Transformer Telco Wall Optional ‘A’ Lead Cord TELADAPT Plug Fig. 9 UNITY Two-Line Business Terminal, User Guide - Issue 1...
-
Page 16: Directory Card Installation
16 / Assembly and Installation Directory Card Your Unity Two-Line comes with a plastic faceplate covering and a directory card that fits beneath the area where the handset rests. Installation Type or rint your telephone number and any number or codes you nee z for quick reference on the card. -
Page 17: Operational Problems
Power disconnected or Make sure power trans- oes not work ower off for greater than former is connected to a hours live AC outlet Reprogram memory locations Tone/Pulse may be pro- Check Tone/Pulse UNITY Two-Line Business Terminal, User Guide - Issue... - Page 18 18 / Assembly and Installation Possible Problem Cause Cannot hear called Handset volume level low Use volume control switch to raise receive party level Use volume control Calling party too Handset volume control switch turned up too high switch to lower receive level line cord is con- Line 2 LED is per- Line 2 is not connected...
-
Page 19: Basic Operation
Release m key. T for two down seconds an 2 allows you to dial again as soon as you have a dial tone. UNITY Two-Line Business Terminal, User Guide - Issue 1... -
Page 20: Using The Link Key
Waiting), or transfer a call to a third party (Call Transfer). When using these services you need to free your line momentarily. For convenience and reliability, the Unity Two-Line is equipped with an electronically precision-timed Link (L) key. Pressing this key frees the line for the appropriate length of time regardless of how long you hold it down. -
Page 21: Attenuated Ringing
Visual Your Unity Two-Line has LED’s that tell you at a glance what fea- tures are in use. Call Forward, Program, Line in Use, Hold, Visual Indicators Ring, Shift keys all have these visual indicators. -
Page 22: Factory Default Settings
22 / Basic Operation Factory Defau The Unity Two-Line is shipped from the factory preprogrammed in what is known as Default Mode. You have the option of alter- Settings ing these features for your particular office environment. Once you have changed these settings, you can revert to the original factory default settings at any time. -
Page 23: Programmable Features
All programming of features require the set to be on-hook and idle, except where noted in the instructions. Your Unity Two-Line comes from the factory preprogrammed to dial in tone mode. However you have the option of selecting pulse mode. -
Page 24: Line Hold Selection
24 / Programmable Features Line Hold The Unity Two-Line comes from the factory preprogrammed for Selection Automatic Hold. This means that when you are on one line and you press the other line key to either dial out or answer an incom- ing call, you automatically place the first call on hold. -
Page 25: Prime Line Select
If you have altered the original factory setting and want to repro gram your Unity Two-Line to designate Line 1 as prime: - Press the (1 key. - Press the [I key. -
Page 26: Answering Calls
26 / Programmable Features To program your Unity Two-Line so that neither line is designated as your Prime Line: - Press the FPrgm key. - Press the II key. - Press the I] key. - Press the 1-1 key. Answering Calls The Unity Two-Line can be programmed to automatically select the ringing line. -
Page 27: Storing Commands
Link and Pause commands. Storing a Required The design of the Unity Two-Line enables you to store pauses Pause between access codes and long distance numbers when you pro- gram memory keys. Automatic dialing resumes immediately... -
Page 28: Storing Telephone Numbers
When you have finished with the keys you want programmed press the \=I key to take the Unity Two-Line out of pro- gramming mode. This will turn off the red light. To Clear a Memory Press the I/ key. -
Page 29: Using The Shift Key
II key before pressing the memory key The number you have stored will automatically be dialed. UNITY Two-Line Business Terminal, User Guide - issue... -
Page 30: One Stroke Dialing
One Stroke Dialing You can program the Unity Two-Line to dial stored numbers by p r o g r a m m e d m e m o r y k e y s w i t h o u t even picking up the handset or pressing a line key Your tele- phone automatically selects the prime line and dials the number. -
Page 31: To Activate Call Forward
Programmable Features / Press either the I[ or (=I key. Enter the Call Forward activation code. Dial in the number to which you want to forward your calls. Press the key again. (Call Fwd ] The red light (LED) next to the Forward key will go off. Enter the Call Forward cancellation code. -
Page 32: Do-Not-Disturb /32
32 / Programmable Features Do-Not-Disturb Unity Two-Line is equipped with a volume control switch (LEDs) that allows you to turn off the ringer. The red lights beside the line keys will flash to visually indicate any incoming calls. To activate Do-Not-Disturb and turn off the ringer: - Ensure that your telephone is idle and on-hook. -
Page 33: Saved Number Redial
Programmable Features / 33 Saved Number The Unity Two-Line has a programmable Saved Number Redial Redial or storing an important number. It is useful for storing access codes to long distance carriers and holds up to 40 digits. You can even program the ]sl key during a conversation. -
Page 34: Selectable Headset Operation
34 / Programmable Features Selectable If your job requires a considerable amount of phone time, you may consider using a headset with your Unity Two-Line. Most Headset electret type headsets will work with the Unity Two-Line. Operation onnecting both a headset and a handset to a Y-adapter that plugs into the headset box allows parallel use of the headset and hand- set. -
Page 35: Warranty / 37
Montreal North, Quebec T2E 6N9 M9L 2X6 HlG 3Ll Tel.: 403-275-2772 Tel.: 416-749-0110 Tel.: 514-324-2020 Saint John, N.B. HiIlyard Place Saint John, N.B. Call Toll Free E2L 4H8 l-800-361-7800 Tel.: 506-642-1000 UNITY Two-Line Business Terminal, User Guide - issue 1... - Page 36 The total of the load number for all the telephones connected to any one line should not exceed 100. UNITY Two-Line Business Terminal. User Guide - Issue 1...
- Page 37 100. In this case, you will have to disconnect on 100. of the telephones to reduce your total load number below UNITY Two-Line Business Terminal, User Guide - Issue 1...
-
Page 38: Regulatory Information
- P r e s s (Prgml, II, I] Volume, Ringer, Press the volume control to Increase and decrease receive volume Handset/Headset -Press left side to decrease, right side to increase volume. UNITY Two-Line Business Terminal, User Guide - fssue I... - Page 39 Press FPrgm Conversation) (Stores up to 40 digits) UNITY Two Line redial feature saves the last number dialed manually on the key pad Last Number Redial (Stores up to 40 digits) UNITY Two-Line Business Terminal, User Guide - issue 1...
- Page 40 Quick Reference Programming Guide / 43 To Deactivate Automatic Hold Do-Not-Disturb Set is on-hook press the left side of the volume control until the Feature-In-Use light (LED) (labelled ‘Ft’) illuminates. To cancel, press the right side until you reach the desired ringer loudness Required Pause To store a pause between access codes and long distance numbers...