Sony PMW-350K Operating Instructions Manual
Solid-state memory camcorder
Hide thumbs
Also See for PMW-350K:
- Operating instructions manual (180 pages) ,
- Brochure & specs (35 pages) ,
- Supplement manual (27 pages)
Table of Contents
Advertisement
Quick Links
Download this manual
See also:
User Manual
Advertisement
Table of Contents

Related Manuals for Sony PMW-350K


Summary of Contents for Sony PMW-350K
-
Page 1: Operating Instructions
4-164-464-15 (1) Solid-State Memory Camcorder Operating Instructions Before operating the unit, please read this manual thoroughly and retain it for future reference. PMW-350K PMW-350L Printed on recycled paper. Printed in Japan © 2009 Sony Corporation... - Page 2 apparatus has been exposed to rain or WARNING moisture, does not operate normally, or has been dropped. To reduce the risk of fire or WARNING electric shock, do not Excessive sound pressure from earphones and headphones can cause hearing loss. expose this apparatus to In order to use this product safely, avoid rain or moisture.
- Page 3 (controlled EMC environment, ex. TV studio). AVERTISSEMENT Une pression acoustique excessive en The manufacturer of this product is Sony provenance des écouteurs ou du casque Corporation, 1-7-1 Konan, Minato-ku, peut provoquer une baisse de l’acuité Tokyo, 108-0075 Japan.
- Page 4 Le fabricant de ce produit est Sony Für die folgenden elektromagnetischen Corporation, 1-7-1 Konan, Minato-ku, Umgebungen: E1 (Wohnbereich), E2 Tokyo, 108-0075 Japon. (kommerzieller und in beschränktem Maße Le représentant autorisé pour EMC et la industrieller Bereich), E3 (Stadtbereich im sécurité des produits est Sony Deutschland...
-
Page 5: Table Of Contents
Power Supply .................. 13 Accessory Attachments..............14 Operating and Connectors Section..........15 Monochrome LCD Panel ..............24 Auto Focus Lens (Supplied with the PMW-350K)......25 Viewfinder..................27 Viewfinder Screen Display................ 28 Chapter 2 : Preparations Preparing a Power Supply ................ 33 Using a Battery Pack............... - Page 6 Attaching a UHF Portable Tuner (for a UHF Wireless Microphone System) ..................45 Tripod Mounting ..................46 Connecting a Video Light ................. 47 Using the Shoulder Strap ................48 Adjusting the Shoulder Pad Position ............49 Chapter 3 : Adjustments and Settings Setting the Video Format ................
- Page 7 Chapter 4 : Shooting Handling SxS Memory Cards..............67 About SxS Memory Cards .............. 67 Loading and Ejecting SxS Memory Cards........68 Selecting the SxS Memory Card to Use.......... 69 Formatting (Initializing) SxS Memory Cards ......... 69 Checking the Remaining Recording Time........70 Restoring SxS Memory Cards............
- Page 8 Adding and Deleting Shot Marks (HD Mode Only)....... 94 Changing Clip Index Pictures (HD Mode Only)......95 Dividing Clips (HD Mode Only) ............ 95 Chapter 6 : Menu and Detailed Settings Setup Menu Organization and Levels............96 Setup Menu Organization ............... 96 Setup Menu Levels................
- Page 9 Audio Block .................. 169 Display ..................169 Media Block .................. 169 Inputs/Outputs ................169 Lens Block (PMW-350K Only) ............ 170 Supplied Accessories ..............170 Recommended Additional Equipment .......... 170 Chart of Optional Components and Accessories ........173 About i.LINK ................... 174 MPEG-2 Video Patent Portfolio License ..........
-
Page 10: Foreword
For details of these settings, see “Setting the Area of Use” (page 40). Note Before attaching/removing optional components or accessories to/from the PMW-350K/350L (referred to as “the camcorder”), be sure to turn the power of the camcorder off. Foreword... -
Page 11: Chapter 1 : Overview
720/59.94P, 720/29.97P, 720/23.98P, or 1080/ -type full-HD (1920 × 1080) CMOS 25P, 720/50P, 720/25P), thus offering the image sensors flexibility needed for worldwide HD recording. The PMW-350K/350L Solid-State Memory (For 23.98P, native frequency recording is Camcorder is provided with three newly possible.) developed -type “Exmor”... -
Page 12: Using The Cd-Rom Manual
Note display and metadata management, and improves If you have lost or damaged the CD-ROM, you can them by introducing an improved man-machine purchase a new one from your Sony dealer or Sony interface. service counter. Camcorder system configuration When you install the optional CBK-CE01 50 Pin... -
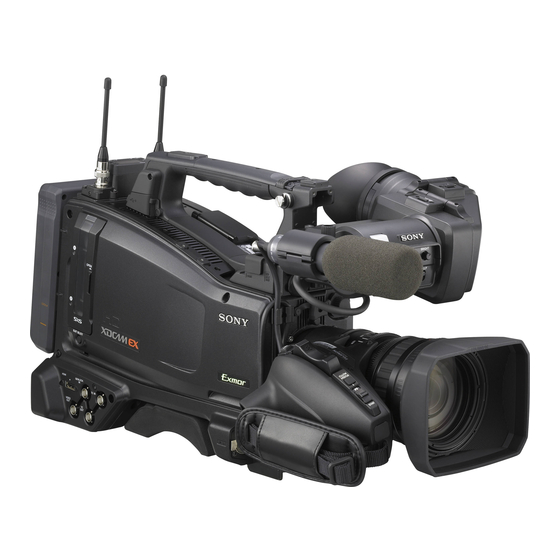
Page 13: Locations And Functions Of Parts And Controls
(for a UHF Wireless Microphone System)” (page 45). Note For your safety, and to ensure proper operation of the camcorder, Sony recommends the use of the BP-L80S Battery Pack. Adaptor connector a LIGHT switch Enables connection of an XDCA-55 HD Camera Adaptor or an HDCA-702 MPEG TS Adaptor. -
Page 14: Accessory Attachments
DXF-20W viewfinder. Attach the lens. For connecting the DXF-51, optional parts are Consult a Sony service representative for required. Consult a Sony service representative for information about available lenses. information about connecting the DXF-51. Locations and Functions of Parts and Controls... -
Page 15: Operating And Connectors Section
r Lens locking lever c FILTER selector After inserting the lens in the lens mount, rotate Switches between four ND filters built into this the lens mount ring with this lever to lock the lens camcorder. in position. When this selector is used, the new setting After locking the lens, be sure to use the lens appears on the viewfinder screen for about three mount securing rubber to prevent the lens from... - Page 16 adjustment, the adjustment is cancelled and the You can use this as an assignable switch (see black balance setting returns to the original page 141). setting. c ALARM (alarm tone volume f MIC (microphone) LEVEL control adjustment) knob Adjusts the input level of audio channels 1, 2, 3 Controls the volume of the warning tone that is and 4 (see page 60).
-
Page 17: Gain Selector
f ASSIGN. (assignable) 0 switch settings in memory A or memory B. You can assign the desired function to this switch B (ATW ): When this switch is set to B and on OPERATION >Assignable SW in the setup OPERATION >White Setting >White menu (see page 142). -
Page 18: Monochrome Lcd Panel
CANCEL/PRST: Pushing this switch up to this Right side (near the rear) position after a setting is changed in the setup menu displays the message to confirm whether the previous settings are cancelled. Pushing this switch up to this position again cancels the previous settings. -
Page 19: Access Lamp
c WARNING indicator clip (or the first frame of the current clip when no preceding clips exist). Lights up or flashes when an abnormality occurs (see page 158). k STOP button d ACCESS lamp Press this button to stop playback. Lights up in blue when data is written to or read l NEXT button from the recording media. -
Page 20: Backlight Button
Thumbnail screen operations section and audio Settings of switches To reset control section DISPLAY switch: User bits data to 00 00 00 U-BIT PRESET/REGEN/ CLOCK switch: PRESET F-RUN/SET/R-RUN switch: SET a) Of the timecode bits for every frame recorded on the media, those bits which can be used to record useful information for the user such as scene number, shooting place, etc. -
Page 21: Essence Mark Button
k AUDIO SELECT CH1/CH2 (audio For details, see “Setting the Timecode” (page 62) and “Setting the User Bits” (page 63). channel 1/2 adjustment method selection) switches f LEVEL CH1/CH2/CH3/CH4 (audio Select the audio level adjustment method for each channel 1/2/3/4 recording level) knobs of audio channels 1 and 2. -
Page 22: Pc Connector
b PC connector Left side and upper section Used to put this camcorder into USB connection mode and use it as an external storage device for a computer. When a computer without ExpressCard slot is connected to this connector, every memory card inserted in the camcorder is recognized as a drive for that computer. - Page 23 l VIDEO OUT connector (BNC type) connector, you can monitor picture being shot (camera picture) or playback picture. Outputs video signals for monitoring. The output 1) The terms HDMI and HDMI High-Definition signals can be selected either composite video or Multimedia Interface, and the HDMI Logo are HD-Y depending on the setting of OPERATION trademarks or registered trademarks of HDMI...
-
Page 24: Monochrome Lcd Panel
b TALLY switch h AUDIO OUT connector (XLR type, 5- pin, male) Set to ON to activate the TALLY indicator function. Outputs the audio signals recorded on audio channels 1 and 2 or audio channels 3 and 4. The c EARPHONE jack (stereo, minijack) audio signals are selected by the MONITOR You can monitor the E-E sound during recording switch. -
Page 25: Auto Focus Lens (Supplied With The Pmw-350K)
When the HOLD button is pressed to hold the Auto Focus Lens (Supplied with timecode value, the timecode is displayed in the the PMW-350K) format shown below. When the HOLD button is pressed again to release the hold, the timecode is displayed in the normal format. -
Page 26: Push Auto Button
j PUSH AUTO button M (manual): The manual mode allows focusing adjustment with the focus ring. When the IRIS switch is in the M position for In manual mode, auto focus adjustment is also manual adjustment, press this button for an possible, by pressing the PUSH AF button. -
Page 27: Viewfinder
f Viewfinder barrel seconds recorded appear on the viewfinder screen (recording review) (see page 72). You can raise this up or rotate when required by Pressing this button (single click) during the situation. recording or playback records a Shot Mark 1 g Tally indicator mark, and double-clicking records a Shot Mark 2 mark (see page 74). -
Page 28: Viewfinder Screen Display
L/R: Reverse the image horizontally. Viewfinder Screen OFF: Do not reverse the image. B/T: Reverse the image vertically. Display o Viewfinder cable p Microphone holder The viewfinder screen displays not only the video picture but also characters and messages indicating the camcorder settings and operating status, a center marker, a safety zone marker, etc. -
Page 29: Color Temperature
x2D: The digital extender function of this Indication Meaning camcorder is on. zS&Q REC Recording in progress in Slow & Ex2D: The lens extender and the digital extender Quick Motion mode function of this camcorder are both on. S&Q STBY Standby in Slow &... -
Page 30: Video Format
+: The value of Offset White is greater than Bottom of viewfinder screen 3200K. –: The value of Offset White is less than 3200K. k Number of system lines Indicates the number of system lines (1080/720/ 576/480) of video currently being recorded or played back. -
Page 31: Gain Value
6300: When the assignable switch to which Color Indication Meaning Temp SW 6300K has been assigned is on zREC DV recording in progress STBY Standby for DV recording m Gain value e Video level indication Indicates the gain value (in dB) of the video amplifier, as set by the GAIN selector. - Page 32 Reference Indicator value –0.5 Left two segments are lit in white. –0.75 Left two segments and lower right segment are lit in white. –1 All segments are lit in white. Viewfinder Screen Display...
-
Page 33: Chapter 2 : Preparations
Note The battery pack operating time depends on the frequency of use of the battery pack, and the ambient For safety, use only the Sony battery packs and temperature when used. AC adaptors listed below. • BP-L80S Lithium-ion Battery Pack Before use, charge the battery pack with a charger •... -
Page 34: Using Ac Power
The AC-DN2B/DN10 can supply up to 100 W of power. To an AC outlet 1 “LOCK” arrow 2 Matching line on the camcorder Note If the battery pack is not attached correctly, the terminal may be damaged. To detach the battery pack Holding the release button in, pull the battery pack up. -
Page 35: Attaching The Viewfinder
Couple the viewfinder connector to the Attaching the Viewfinder VF connector (26-pin). VF connector (26-pin) CAUTION When the viewfinder is attached, do not leave the camcorder with the eyepiece facing the sun. Direct sunlight can enter through the eyepiece, be focused in the viewfinder and cause fire. -
Page 36: Adjusting The Viewfinder Angle
To raise up the viewfinder barrel Adjusting the Viewfinder Angle Push the clip on the bottom to release and flip up the viewfinder barrel. You can adjust the angle of the viewfinder. It locks at the 120-degree position. To reverse the display (image/text indication) vertically The viewfinder can be rotated as much as 180 degrees toward the direction facing the subject. -
Page 37: Adjusting The Viewfinder Focus And Screen
To detach the viewfinder barrel Adjusting the Viewfinder Focus and Screen To adjust the viewfinder focus Turn the diopter adjustment ring until the viewfinder image is sharpest. Diopter adjustment ring You can also attach a commercially available protection filter, close-up lens, etc. that is 52 mm in diameter. -
Page 38: Attaching A 5-Inch Electronic Viewfinder
You can attach an optional DXF-51 (5-inch) Electronic Viewfinder. To attach it, an Accessory Shoe Kit (service part number: A-8274-968-B) is required. For details, consult a Sony service representative. Note It is not possible to use the supplied viewfinder and a 5-inch viewfinder at the same time. - Page 39 Fixing ring Guide plate VF cable Shoe Stopper screw a) Supplied with the Accessory Shoe Kit Attaching the Viewfinder...
-
Page 40: Setting The Area Of Use
Press the MENU knob. Setting the Area of Use The settings for selectable areas of use are displayed. When using the camcorder for the first time The area of use is not factory preset. Before using the camcorder, you need to set this item. (You cannot use the camcorder without setting this Turn the MENU knob to select the item.) -
Page 41: Setting The Date/Time Of The Internal Clock
Setting the Date/Time of Mounting and Adjusting the Internal Clock the Lens You can set or change the date and time of the Note internal clock. The date and time set are reflected Always power the camcorder off before mounting or in the timecode. -
Page 42: Adjusting The Flange Focal Length
The lens supplied with the PMW-350K is an aberration correction lens. Contact a Sony service Set the ZOOM switch to SERVO representative for information about other (power zoom mode). -
Page 43: Preparing The Audio Input System
Use manual or power zoom to set the Preparing the Audio lens to telephoto. Input System Point the camcorder at the chart by turning the focus ring and focus on it. Set the zoom ring to wide angle. Turn the F.f or F.B ring until the chart Connecting a Microphone to the is in focus, being careful not to disturb MIC IN Connector... -
Page 44: Connecting Microphones To The Audio In Connectors
Connecting Microphones to the AUDIO IN Connectors You can connect up to two monaural microphones to the AUDIO IN CH-1/CH-2 connectors, using an optional CAC-12 Microphone Holder. The following is the procedure for attaching an electret condenser microphone such as the ECM- 674/678. -
Page 45: Attaching A Uhf Portable Tuner (For A Uhf Wireless Microphone System)
Note The optional WRR Mount Bracket (service part number: A-8278-057-B) is required to fit the WRR-862. For details, contact your vendor or a Sony service representative To fit the DWR-S01D or WRR-855S 1 AUDIO IN selectors 2 Monaural microphone... -
Page 46: Tripod Mounting
Insert the DWR-S01D or WRR-855S Tripod Mounting into the housing slot, and fasten the four fixing screws. DWR-S01D or WRR-855S Attach the optional VCT-14/U14 Tripod Adaptor to the tripod. Tripod adaptor Set the AUDIO IN selector for the channel to which you want to input audio signal to WIRELESS (see page 21). -
Page 47: Connecting A Video Light
Connecting a Video Light With this camcorder, you can use the Anton Bauer Ultralight 2 or equivalent video light Red button (powered by 12 V with maximum power Lever consumption of 50 W). • If you connect the video light to the LIGHT Note connector on the camcorder and set the LIGHT switch to AUTO, you can turn the light on and... -
Page 48: Using The Shoulder Strap
To remove the shoulder strap Using the Shoulder Press here and pull in the direction Strap shown by the arrow to release. To attach the shoulder strap Fit one of the clips to a shoulder strap fitting. Pull up the strap to lock the fitting. Clip Fit the other clip to the shoulder strap fitting on the other side of the grip in the... -
Page 49: Adjusting The Shoulder Pad Position
Adjusting the Shoulder Pad Position You can slide the shoulder pad back and forth within a 40 mm range. This adjustment helps you get the best balance for shooting with the camcorder on your shoulder. Shoulder pad Raise the lever in the center of the shoulder pad to unlock the shoulder pad. -
Page 50: Chapter 3 : Adjustments And Settings
Adjustments and Settings Chapter For menu operations, see “Basic Setup Menu Operations” (page 97). Setting the Video Format The following recording formats can be selected for different combinations of video resolution and system frequency. OPERATION >Format menu settings Video format (recording Frame size format/system frequency) HD/SD HD System... -
Page 51: Changing The Video Format
Changing the Video Format Adjusting the Black Balance and the White Refer to the above table and change the settings of the relevant items. Balance Select OPERATION >Format in the setup menu (see page 100). To ensure excellent image quality when using this camcorder, conditions may require that both the black balance and the white balance be adjusted. -
Page 52: Adjusting The White Balance
For information about this internal check, contact Push the AUTO W/B BAL switch to your vendor or a Sony service representative. WHITE and then release the switch. Note The message “Executing...” appears during If the lens cable is not firmly connected to the LENS execution, and changes to “OK: (color... - Page 53 C.Temp<2-4>]. For information about this internal check, contact Turn the MENU knob to select the your vendor or a Sony service representative. desired color temperature. As you turn the MENU knob, the color temperature changes as follows: 3200K y 4300K y 5600K y 6300K.
- Page 54 of the memories are not linked to ND filter To switch between electrical CC filters settings in the following cases. with an assignable switch • When the number of memories allocated to each of A and B is limited to one by setting You can assign the function that switches OPERATION >White Setting >Filter White between electrical CC filters to an assignable...
-
Page 55: Setting The Electronic Shutter
As shown in the following tables, the range of Setting the Electronic shutter speeds that can be set varies depending on whether the Slow & Quick Motion (S&Q) Shutter function is on or off. System lines: 1080 System Shutter speed (unit: Hz) frequency S&Q: Off S&Q: On... - Page 56 To switch between Speed mode and To set the shutter speed in ECS or SLS Angle mode mode Select OPEARTION >Shutter Select Set the shutter mode to ECS or SLS (see >Shutter Select in the setup menu (see the previous item). page 112).
-
Page 57: Changing The Reference Value For Automatic Iris Adjustment
To set the automatic iris window Changing the Reference Value for Automatic Iris Set OPERATION >Auto Iris >Iris Window Indication in the setup menu to Adjustment The current automatic iris window appears on the viewfinder screen. The reference value for automatic iris adjustment If it is not necessary to display the auto iris can be changed to aid the shooting of clear window on the screen, set to Off. -
Page 58: Zooming
Zooming Adjusting the Focus The lens supplied with the PMW-350K allows The lens supplied with the PMW-350K allows you to shoot with manual and servo zooming. you to adjust the focus in the following three ways. Full MF (full manual focus) mode... -
Page 59: Adjusting In Mf Mode
White line indicating the current distance Adjusting in AF Mode When you slide the focus ring forward, and set the FOCUS switch to A (auto), the focus mode becomes AF mode, in which auto focus is always active. The distance indications on the ring are invalid in AF mode. -
Page 60: Adjusting The Audio Level
Set the AUDIO SELECT switch(es) Adjusting the Audio corresponding to the channel(s) selected in step to MANUAL. Level With the LEVEL control(s) for the channel(s) selected in step 1, adjust so that the audio level meter shows up to –20 dB for a normal input volume. When you set the AUDIO SELECT switch to AUTO, the input levels of analog audio signals Correspondence between recording level... -
Page 61: Recording Audio On Channels 3 And 4
Turn the MIC LEVEL control, and CH3 switch Channel 3 recording target adjust so that the audio level meter FRONT Front microphone audio shows up to –20 dB for a normal input REAR Audio signal input to AUDIO IN volume. CH-1 connector WIRELESS Wireless microphone audio... -
Page 62: Setting The Time Data
Setting Knob Setting the Time Data Side4 LEVEL (CH4) knob Front MIC LEVEL cotrol Front+Side4 LEVEL (CH4) knob and MIC LEVEL cotrol (linked operation) You can now adjust the levels of audio Note channels 3 and 4 with the knobs selected When picture cache mode is enabled, it is not possible to here. -
Page 63: Setting The User Bits
To make the timecode consecutive Synchronizing the Timecode When the F-RUN/SET/R-RUN switch is set to R-RUN, recording a number of scenes on the You can synchronize the internal timecode media normally produces consecutive timecode. generator of this camcorder with an external However, once you remove the media and record generator for the regeneration of an external on another media, the timecode will no longer be... - Page 64 Example 2: Interconnecting a number of This operation synchronizes the internal camcorders (including one reference timecode generator with the external camcorder) timecode. After about 10 seconds, you can disconnect the external timecode without losing the synchronization. Notes • When you finish the above procedure, the internal timecode is immediately synchronized with the external timecode and the counter display will show the value of the external timecode.
-
Page 65: Checking Camcorder Settings And Status Information (Status Screens)
AUDIO status screen Checking Camcorder This screen displays settings and status Settings and Status information related to audio input and output. Information (Status Screens) The status screens allow you to check camcorder settings and various types of status information. CH-1/CH-2/CH-3/CH-4: Audio level meters There are five status screens, listed below. - Page 66 BATTERY/MEDIA status screen This screen displays the status of the battery mounted on the camcorder and the media status. Battery: The remaining battery capacity Charge Count: The number of times the battery has been charged HDD A/HDD B: Remaining battery capacity of PHU-220R Media A/Media B: •...
-
Page 67: Chapter 4 : Shooting
• Carry and store SxS memory cards in their cases, and lock the cases securely. Use the following Sony SxS memory cards (SxS PRO or SxS-1) with this camcorder. SxS PRO • SBP-32 (32 GB) •... -
Page 68: Loading And Ejecting Sxs Memory Cards
Before discarding or disposing of a memory card, erase it using commercial data erasure software, or physically destroy it. Sony cannot be responsible for any failure to erase data completely. • Clip operations may not be possible when the remaining capacity of the media is low. -
Page 69: Selecting The Sxs Memory Card To Use
The camcorder switches automatically to the To eject SxS memory cards other card if the selected card becomes full during recording. Open the cover, and then press the Note EJECT button to release the lock and pull the button out. The SLOT SELECT button is disabled during playback. -
Page 70: Checking The Remaining Recording Time
In this case, an error message appears. Following Note the instructions in the error message and About up to 600 clips can be recorded on one SxS exchange the card for an SxS memory card that memory card. can be used with this camcorder. The display of remaining recording time changes to “0”... -
Page 71: Basic Operations
3 Copy the required clips back to the Basic Operations newly formatted SxS memory card. Recording and playback during restoration Even while restoration is in progress, you can record and play an SxS memory card in the other card slot. Note This section explains the basic shooting and recording procedures. -
Page 72: Playing Recorded Clips
- Press the REC START button (see Repeat steps to continue page 15). recording. - Press the VTR button on the lens (see With each repetition, another clip is created page 27). on the memory card. - Turn on the assignable switch to which the Clip 1 Clip 2 Clip 3... -
Page 73: Deleting Recorded Clips
Insert the SxS memory card to play (see Turn the MENU knob to select page 68). [Execute], and then press the knob. Press the PREV button (see page 19) or the F REV button (see page 19) to cue up the clip to play. Press the PLAY/PAUSE button. -
Page 74: Advanced Operations
To add/delete OK marks Advanced Operations You can also use the THUMBNAIL menu to add and delete OK marks in previously recorded clips. For details, see “Adding and Deleting OK Marks (HD Mode Only)” (page 91). Starting to Record from Pre- Recording Shot Marks stored Video (Picture Cache Function) -
Page 75: Recording Time-Lapse Video (Interval Rec Function)
automatically whenever you select Frame Rec, SET. Interval Rec, or Slow & Quick Motion mode. To set time data, exit picture cache mode. • The data stored in picture cache memory is cleared • If the remaining free capacity of the media in when you change the system settings, for example by the currently selected slot is less than the picture selecting a different video format. - Page 76 Turn the MENU knob to select [On], Interval time and then press the knob. The camcorder enters Interval Rec mode, the “Interval” indication on the viewfinder screen flashes. Select [Number of Frames], turn the MENU knob to select the number of frames to record in one take, and then press the knob.
-
Page 77: Shooting Stop Motion Animations (Frame Rec Function)
“INT REC” and “INT STBY” appear Shooting Stop Motion Animations alternatively at the position of the REC (Frame Rec Function) indication. The TALLY indicators and the tally indicator on the front panel of the viewfinder light The Frame Rec function is useful for shooting as they do during normal recording. -
Page 78: Shooting With Slow & Quick Motion
frames to record in one take, and then If power is lost during recording • If you set the camcorder’s POWER switch to press the knob. OFF, the camcorder is powered off You can select from 1, 3, 6, 9 (or from 2, 6, automatically after a few seconds, during which 12 when the video format setting is 720/ the media is accessed to record the video and... -
Page 79: Framing Shots With The Freeze Mix Function
• Slow & Quick Motion is disabled when the slow Note shutter function (viewfinder display “SLS”) function is It takes longer than normal for recording to stop when enabled. The slow shutter function is disabled when Frame Rate is set to a low value (for a slow frame rate). the Slow &... -
Page 80: Planning Metadata Operations
Display the picture that you want to use Planning Metadata as the frame, and then turn on the assignable switch to which the Freeze Operations Mix function has been assigned. The recording review picture is frozen and overlaps the camera picture. Note Planning metadata is information about shooting The following functions are disabled at the freeze mix... -
Page 81: Loading A Planning Metadata File Into Camcorder's Internal Memory
64 or less, all of the planning metadata files may the selected item only. not appear if the directory where they are located on the SxS memory card (General/Sony/Planning) To clear the planning metadata loaded contains 512 or more files. -
Page 82: Defining Clip Names In Planning Metadata
When a clip name is set with planning metadata, clip name is used. the name is displayed under the depth of field You can use the Sony Planning Metadata Add-in indication on the viewfinder screen. application software supplied with the CBK-WA01 Note Wi-Fi Adapter to define clip names. -
Page 83: Defining Shot Mark Names In Planning Metadata
Names can be either in ASCII specified, except within essence mark name strings. format (up to 32 characters) or UTF-8 format (up You can use the Sony Planning Metadata Add-in to 16 characters). application software supplied with the CBK-WA01 “sp”... -
Page 84: Chapter 5 : Clip Operations
Clip Operations Chapter Clip Playback A thumbnail screen appears if you press the THUMBNAIL button in E-E or playback mode. Thumbnail screens display lists of the clips stored on SxS memory cards in the form of index pictures. (A message appears if you insert a memory card that contains no clips.) You can select any clip (see page 86) in a thumbnail screen and start playback of that clip (see page 86). -
Page 85: File Format
a Index picture f Video format of recording When a clip is recorded, its first frame is set g Special recording information automatically as the index picture. You can This displays the mode of clips that have been change to index picture to any frame (see recorded in a special mode (Slow &... -
Page 86: Playing Clips
c Date and start time of recording To play clips sequentially starting from a selected clip d Clip name/Number of components The number after the clip name (delimited by /) is Select the thumbnail of the clip that you the number of components. This appears only for want to play first. -
Page 87: Using Thumbnails To Search Inside Clips
select clip thumbnails (see page 86) and to start To cue up clips clip playback (see page 86). To return to the top of the current clip To search for scenes in clips with the Press the PREV button. expand thumbnail screen •... -
Page 88: Thumbnail Operations
Thumbnail Operations You can use the THUMBNAIL menu to perform various operations on clips, to check clip properties, and to change clip metadata. THUMBNAIL Menu Configuration Menu items Sub-items Description Clip Properties — Displays detailed properties (see page 90). — Changes index pictures in the expand thumbnail screen or Set Index Picture the shot mark thumbnail screen (see page 95). -
Page 89: Basic Thumbnail Menu Operations
To hide the clip properties screen Basic THUMBNAIL Menu Operations Do one of the following. Press the RESET/RETURN button: This returns to the THUMBNAIL menu. See “Basic Setup Menu Operations” (page 97) for information about menu operations. Press the THUMBNAIL button: The camcorder enters E-E mode, and the camera To display the THUMBNAIL menu picture appears. -
Page 90: Displaying Clip Properties
Displaying Clip Properties The clip properties screen appears when you select Clip Properties in the THUMBNAIL menu. HD mode SD mode a Image of the current clip When clip names are 12 characters or longer, only the first five characters and the last five characters b Image of the previous clip are displayed. -
Page 91: Adding And Deleting Ok Marks (Hd Mode Only)
f OK mark (HD mode only) An OK mark is added to the selected clip. This appears only when an OK mark has been To delete an OK mark added. A Delete OK Mark item appears in the g Date and start time of recording THUMBNAIL menu when you have selected a clip that has an OK mark. -
Page 92: Deleting Clips
Select [Execute], and press the MENU To copy all files together with all clips, select THUMBNAIL >Copy All >All Clips & General knob. Files in step 1. The copy starts. During the copy, an execution message and Deleting Clips progress bar are displayed. When the copy finishes, the display returns to the You can delete clips from SxS memory cards. -
Page 93: Displaying The Expand Thumbnail Screen
If you executed the deletion in HD mode, This displays frame information using icons. only HD-mode clips are deleted. Index picture If you executed the deletion in SD mode, only SD-mode clips are deleted. Frame with Shot Mark1 To cancel the deletion Frame with Shot Mark2 Press the RESET/RETURN button. -
Page 94: Displaying The Shot Mark Thumbnail Screen (Hd Mode Only)
divided into 12 equally-sized blocks (a clip or file Example shot mark thumbnail screen that has been divided into 12 is further divided (with Shot Mark1 selected) into 12, for 12 × 12 = 144 divisions). You can repeat the same operation to increase the number of division. -
Page 95: Changing Clip Index Pictures (Hd Mode Only)
The properties screen of the selected frame To delete shot marks appears, and a confirmation message appears below the image. Select the frame where you want to delete a shot mark, and then select Select [Execute], and press the MENU THUMBNAIL >... -
Page 96: Chapter 6 : Menu And Detailed Settings
Menu and Detailed Settings Chapter OPERATION Menu (see page 100) Setup Menu OPERATION Organization and Levels Format Format Media Input/Output Super Impose Rec Function On this camcorder, settings for shooting and playback are made in the setup menu, which Assignable SW appears in the viewfinder. -
Page 97: Basic Setup Menu Operations
MAINTENANCE Menu (see page 122) Basic Setup Menu MAINTENANCE White Shading Operations Black Shading Battery Audio WRR Setting To display the setup menu Timecode Essence Mark Set the MENU ON/OFF switch to ON, or press Camera Config the MENU button. Preset White The camcorder enters menu mode and the menu list appears on the screen. - Page 98 • The menu item selection area displays a Turn the MENU knob, or press the J or maximum of seven lines. You can scroll j button, to move the cursor to the sub- through menus with more than seven lines item that you want to set, and then by moving the cursor up and down.
- Page 99 Turn the MENU knob, or press the J or j button, to select a character, and then confirm by pressing the MENU knob or the SET button. The cursor moves to the next position. To return to the previous position, push the MENU CANCEL/PRST/ESCAPE switch down to the ESCAPE side.
-
Page 100: Menu List
Menu List OPERATION Menu Settings in bold are the factory default values. OPERATION Menu items Sub-item Settings Description Format HD/SD HD/SD Switches between HD or SD as the Specifies the operating mode (execute by camcorder’s operating selecting Execute). mode and recording HD System Line 1080/720 When the operating mode is HD,... - Page 101 OPERATION Menu items Sub-item Settings Description Format Rec Format The available settings Selects the recording format Specifies the vary depending on the (execute by selecting Execute). camcorder’s operating settings in HD/SD, HD mode and recording System Line, and System format. Frequency.
- Page 102 OPERATION Menu items Sub-item Settings Description Input/Output Output& i.LINK HD&HDV/SD&HDV/ Selects the signals output from the Makes settings related SD&DV/480P (576P) video connectors and the i.LINK to I/O signals. (HDV/DV) connector. • When the HD/SD setting is SD, “SD&DV” is selected. •...
- Page 103 OPERATION Menu items Sub-item Settings Description Input/Output Down Converter Crop/Letter/Squeeze Selects the signal conversion mode Makes settings related for output of SD signals. to I/O signals. Crop: Crop the edges of the 16:9 picture and output as a 4:3 picture. Letter: Mask the top and bottom of the 4:3 picture and display in the center of the screen as a...
- Page 104 OPERATION Menu items Sub-item Settings Description Rec Function Slow & Quick On/Off Turns the Slow & Quick Motion Makes settings related function on or off. (When this is set to special recording to On, the Picture Cache Rec, modes. Interval Rec, and Frame Rec sub- items are set to Off.) Note Frame Rate...
- Page 105 OPERATION Menu items Sub-item Settings Description Rec Function Interval Time 1/2/3/4/5/6/7/8/9/10/15/ When the Interval Rec setting is On, Makes settings related 20/30/40/50 (sec) sets the interval for Interval Rec to special recording 1/2/3/4/5/6/7/8/9/10/15/ shooting. modes. 20/30/40/50 (min) 1/2/3/ 4/6/12/24 (hour) Note Pre-Lighting Off/2sec/5sec/10sec...
- Page 106 OPERATION Menu items Sub-item Settings Description VF Setting Color –99 to ±0 to +99 Adjusts the density of the colors Makes settings related displayed in the viewfinder screen. to the viewfinder Mode Color/B&W Selects Color or B&W as the display screen.
- Page 107 OPERATION Menu items Sub-item Settings Description Marker Safety Zone On/Off Turns the safety zone display on or Makes settings related off. to marker display in the Note viewfinder screen. When Center Marker, User Box, and Guide Frame are set to [On], this setting cannot be turned on.
- Page 108 OPERATION Menu items Sub-item Settings Description Gain Switch Gain Low –3dB/0dB/3dB/6dB/9dB/ Specifies the gain value for the Makes settings related 12dB/18dB/24dB/30dB/ L position of the GAIN switch. to the GAIN switch. 36dB/42dB Gain Mid –3dB/0dB/3dB/6dB/9dB/ Specifies the gain value for the 12dB/18dB/24dB/30dB/ M position of the GAIN switch.
- Page 109 OPERATION Menu items Sub-item Settings Description Display On/Off Video Level On/Off Turns the warnings that appear when Selects the items to Warnings the video level is too bright or too display in the dark on or off. viewfinder screen. Brightness Display On/Off Turns the numerical indication of the video brightness on or off.
- Page 110 OPERATION Menu items Sub-item Settings Description Display On/Off System Line On/Off Turns the indication of the system Selects the items to lines on or off. display in the Rec Mode On/Off Turns the indication of special viewfinder screen. recording modes (S&Q, Interval, Frame Rec, Picture Cache Rec) on or off.
- Page 111 OPERATION Menu items Sub-item Settings Description White Setting White Switch<B> Memory/ATW Specifies the operating mode Makes settings related selected by the B position of the to auto white balance WHITE BAL switch. adjustments. Memory: Auto white balance ATW: Auto tracing white balance Shockless White Off/1/2/3 Specifies the reaction speed when...
- Page 112 OPERATION Menu items Sub-item Settings Description Offset White Offset White <A> On/Off Specifies whether to add (On) or not Makes settings related to add (Off) an offset value to the to white balance offset white balance value in memory A. values.
- Page 113 OPERATION Menu items Sub-item Settings Description Clip Auto Naming Title/Plan Selects the clip naming format. Make settings for clip Title: Name specified by Title Prefix name or clip Plan: Name specified in planning management. metadata (if no name is specified in planning metadata, Note the name specified by Title Do not assign clip...
- Page 114 OPERATION Menu items Sub-item Settings Description Clip Title Prefix Text input Specifies the title part (4 to 46 Make settings for clip alphanumeric characters) of clip name or clip titles. management. When the currently specified title is eight characters or fewer in length, Note the entire title appears.
- Page 115 OPERATION Menu items Sub-item Settings Description Clip Number Set 0001 to 9999 Specifies the initial value of the Make settings for clip numeric part (four digits) of clip name or clip names (unless the name specified in management. planning metadata with Auto Naming set to [Plan]).
-
Page 116: Paint Menu
PAINT Menu Settings in bold are the factory default values. PAINT Menu items Sub-item Settings Description Switch Status Gamma On/Off Turns gamma correction on or off. Turns various signal Black Gamma On/Off Turns black gamma correction on or correction functions off. - Page 117 PAINT Menu items Sub-item Settings Description Flare Flare On/Off Turns flare correction on or off. Makes settings related Master Flare –99 to ±0 to +99 Sets the master flare correction to flare. level. Flare is light generated R Flare –99 to ±0 to +99 Sets the R flare correction level.
- Page 118 PAINT Menu items Sub-item Settings Description Knee Knee On/Off Turns knee correction on or off. Makes settings related Knee Point 50.0% to 95.0% to Specifies the knee point. to knee correction. 109.0% Knee correction is Knee Slope –99 to ±0 to +99 Specifies the knee slope.
- Page 119 PAINT Menu items Sub-item Settings Description Detail(HD Mode)/ Detail On/Off Turns detail adjustment on or off. Detail(SD Mode) Level –99 to ±0 to +99 Specifies the detail level. Makes settings related H/V Ratio –99 to ±0 to +99 Specifies the mix ratio between the to details adjustments H detail level and the V detail level.
- Page 120 PAINT Menu items Sub-item Settings Description Skin Detail Skin Detail On/Off Turns skin detail correction on or Makes settings related off. to skin detail Area Detection Color detection screen Detects the color to be targeted by correction. skin detail correction. Skin detail correction is Area Indication On/Off...
- Page 121 PAINT Menu items Sub-item Settings Description Multi Matrix Multi Matrix On/Off Turns the multi matrix correction Makes settings related function on or off. to multi matrix Area Indication On/Off Turns on or off the function that correction. displays a zebra pattern in the color Multi-matrix correction area targeted by multi matrix allows specific colors...
-
Page 122: Maintenance Menu
MAINTENANCE Menu Settings in bold are the factory default values. MAINTENANCE Menu items Sub-item Settings Description White Shading Channel Select Red/Green/Blue Selects the target of white shading Makes settings related correction. to white shading. R/G/B White H Saw –99 to ±0 to +99 Specifies a SAW white shading White shading is correction value for the horizontal... - Page 123 Other End 11.0V to 14.0V (0.1V Specifies a threshold value that step) triggers a “Battery End” warning when a non-Sony battery pack is used. DC In Before End 11.5V to 11.8V to 17.0V Specifies a threshold value that (0.1V step) triggers a “Battery Near End”...
- Page 124 MAINTENANCE Menu items Sub-item Settings Description Audio Front MIC Select Mono/Stereo Selects whether the front Makes settings related microphone is monaural (Mono) or to audio. stereo (Stereo). Audio CH3/4 Mode Ch1/2 / Switch Selects the input signals for the AUDIO IN CH-3/CH-4 connectors. Ch1/2: The same signals as the AUDIO IN CH-1/ CH-2 connectors.
- Page 125 MAINTENANCE Menu items Sub-item Settings Description Audio CH3&4 AGC Mode Mono/Stereo For automatic adjustment of the Makes settings related input level of analog audio signals to audio. recorded on channels 3 and 4, specifies whether to make the adjustments separately for each channel (Mono) or in stereo mode (Stereo).
- Page 126 MAINTENANCE Menu items Sub-item Settings Description Audio Rear1/WRR Level Side1/Front/Front+Side1 Selects the knob that adjusts the Makes settings related audio levels of a wireless to audio. microphone and a device connected to the AUDIO IN CH-1 connector on the rear panel. Side1: The LEVEL knob (left) on the side panel Front: The MIC LEVEL cotrol on...
- Page 127 MAINTENANCE Menu items Sub-item Settings Description WRR Setting WRR Valid CH Sel All/CH1 Selects whether to enable channels 1 Makes settings related and 2 of the wireless receiver (All) to the wireless tuner. or channel 1 only (CH1). WRR CH Select TX1/TX2 Specifies the target channel for other sub-items.
- Page 128 MAINTENANCE Menu items Sub-item Settings Description Timecode TC Out Auto/Generator Selects the source for timecode Makes settings related output. to timecode. Auto: During recording, output values generated by the timecode generator, and during playback output values obtained by the timecode reader.
- Page 129 MAINTENANCE Menu items Sub-item Settings Description Camera Config HD SDI Remote I/F Off/Chara/G-Tally/ Selects whether to use the function Makes settings related R-Tally that enables recording control from to various camcorder this camcorder of an external device operations. connected to the HD/SD SDI OUT connector (HDSDI output).
- Page 130 MAINTENANCE Menu items Sub-item Settings Description Preset White Color Temp<P> 1500K to 3200K to Specifies the white balance preset Makes settings related 50000K value. to white balance preset Color Temp –99 to ±0 to +99 Specifies finer color temperature values. Balance<P>...
- Page 131 MAINTENANCE Menu items Sub-item Settings Description DCC Adjust DCC Function Select DCC/Fix Enables or disables automatic knee Makes settings related point adjustment when the to DCC (dynamic OUTPUT/DCC switch is set to contrast control). CAM, DCC: ON. DCC: Automatically adjust the knee point according to the luminance of the subject.
- Page 132 MAINTENANCE Menu items Sub-item Settings Description Auto Iris2 Iris Window 1/2/3/4/5/6/Var Selects the type of iris detection Makes settings related window. to auto iris. Var: Variable Iris Window Ind On/Off Turns on or off the function that displays a frame marker for the auto iris detection window.
- Page 133 MAINTENANCE Menu items Sub-item Settings Description ND Comp ND Offset Adjust On/Off ND filter color compensation Makes settings related function. to ND filter color Clear ND Offset Execute/Cancel Clears ND filter color compensation compensation. values (execute by selecting Although the Execute).
- Page 134 MAINTENANCE Menu items Sub-item Settings Description Network Setting DHCP Enable/Disable Selects whether to acquire the IP Makes settings for address automatically from a DHCP network connection. server (Enable) or not (Disable). IP Address 0.0.0.0 to When DHCP is set to [Disable], sets Notes 255.255.255.255 the IP address.
- Page 135 MAINTENANCE Menu items Sub-item Settings Description Wi-Fi Setting Encryption Disable/WEP/TKIP/AES Selects whether to apply data Makes settings for encryption and the type of data Wi-Fi connection. encryption. Disable: Do not apply data Notes encryption. • The CBK-WA01 WEP: Apply WEP (Wired Wi-Fi Adapter is Equivalent Privacy) when required.
- Page 136 MAINTENANCE Menu items Sub-item Settings Description Clock Set Date/Time Sets the current date and time. Sets the internal clock. 12H/24H 12H/24H Selects the 12-hour format (12H) or the 24-hour format (24H) for display of times. Date Mode YYMMDD/MMDDYY/ Selects the display format for dates. DDMMYY YYMMDD: Year, Month, Day MMDDYY: Month, Day, Year...
-
Page 137: File Menu
FILE Menu Settings in bold are the factory default values. FILE Menu items Sub-item Settings Description Display Mode Date&Time/Model Selects the items to be displayed in Makes settings related Name the list box that appears when a file to ALL file operations. is saved or loaded. - Page 138 FILE Menu items Sub-item Settings Description Reference Reference Store Execute/Cancel Stores the current settings of Makes settings related reference file items in the reference to reference file file that is maintained in internal operations. memory (execute by selecting Execute). Reference Clear Execute/Cancel Clear the reference file (execute by selecting Execute).
- Page 139 FILE Menu items Sub-item Settings Description Lens Display Mode Date&Time/Model Selects the items to be displayed in Makes settings related Name the list box that appears when a file to lens file operations. is saved or loaded. Lens Recall Mem Execute/Cancel Loads a file from internal memory (execute by selecting Execute).
- Page 140 FILE Menu items Sub-item Settings Description Lens Lens Center H –40 to 0 to 40 Sets a center marker horizontal Makes settings related position in the lens file. to lens file operations. Lens Center V –40 to 0 to 40 Sets a center marker vertical position in the lens file.
-
Page 141: Assigning Functions To Assignable Switches
Assigning Functions to Assignable Switches Using the Assignable SW item of the OPERATION menu, you can assign user-specified functions to the ASSIGN. 0 to 3 switches, the ASSIGNABLE 4 and 5 switches, the COLOR TEMP. button, and the RET button on the lens. The following tables lists the functions that are assigned when the camcorder is shipped from the factory. -
Page 142: Functions That Can Be Assigned To The Assign. 2 Switch
Functions That Can Be Assigned to the ASSIGN. 2 Switch Note Immediately after you assign a function to the ASSIGN. 2 switch or you switch the recording format, the setting of the switch at that point may not match the camcorder’s internal state. After assigning a function, switch the ASSIGN. 2 switch or power the camcorder off and on again. - Page 143 Assignable switch Function State when camcorder setting is next powered on Histogram Turn the histogram display on or off. Setting retained Lens Info Switch the depth of field indication between off, displayed Setting retained in meters, and displayed in feet. Zoom Tele/Wide When a lens that supports serial communication is —...
-
Page 144: Functions That Can Be Assigned To The Ret Button On The Lens
Assignable switch Function State when camcorder setting is next powered on CC5600K Apply a 5600K electrical CC filter to white balance Setting retained adjustment values. Turn the screen magnification function on or off when the Setting not retained Digital Extender optional CBK-CE01 50 Pin Interface and Digital Extender is installed. -
Page 145: Chapter 7 : Saving And Loading User Setting Data
Saving and Loading User Setting Data Chapter Saving Setting Data Saving and Loading Settings This section explains how to save setting data in an ALL file. Before starting, insert a writable SxS memory card into a memory card slot. See “Basic Setup Menu Operations” (page 97) for You can save setup menu settings in the information about menu operations. -
Page 146: Loading Setting Data
Turn the MENU knob to select the Error message Problem What to do desired file number. NG:Cannot Save No recordable Insert media is recordable Press the MENU knob. inserted. media. A confirmation message appears. NG:Media Full The media is Use media with full. -
Page 147: Saving And Loading Scene Files
To execute the save, select [Execute], Saving and Loading and then press the MENU knob. To cancel the save, select [Cancel], and Scene Files then press the MENU knob. If you selected Scene Store SxS in step 2, the ACCESS lamp lights when you execute the save (in blue on the right-side panel and in orange in the card slot section). -
Page 148: Saving And Loading Lens Files
Select Lens Store Mem or Lens Store Saving and Loading SxS, and press the MENU knob. Select Lens Store Mem if you want to save Lens Files the data in the camcorder’s internal memory, and select Lens Store SxS if you want to save the data on an SxS memory card. -
Page 149: Loading Lens Files Automatically
To cancel the load, select [Cancel], and then press the MENU knob. If you select [Execute], a list box of lens files appears. File numbers where “No File” is displayed are empty file numbers. Select the desired file number, and then press the MENU knob. -
Page 150: Chapter 8 : Connecting External Devices
Connecting External Devices Chapter You can connect a control device such as an RM-B150/B170/B750 Remote Control Unit or RCP-1001/ 1501 Remote Control Panel and operate this camcorder. For details on connection and operation of the control device, refer to the Supplement supplied in the CD-ROM (labeled “Manuals for Solid-State Memory Camcorder”). -
Page 151: I.link (Hdv/Dv) Connector
HD/SD SDI OUT connector (BNC) i.LINK (HDV/DV) connector The HD/SD SDI OUT connector can be used to The i.LINK (HDV/DV) connector supports HDV connect a device that supports SDI. The device and DV input/output. However, DV streams type can be a monitor, switcher, or VTR or other cannot be recorded on this camcorder. -
Page 152: Operating Clips With A Computer
• Operation is not guaranteed with all computers. For support information for the driver, visit the following URL: Notes http://www.sony.net/SxS-Support/ • When connecting the USB cable to the computer, be careful to check the form and direction of the PC To the ExpressCard slot connector. - Page 153 Disabling the USB connection • To disconnect the PHU-220R’s cable from the memory card slot or plug again the cable into the slot To disable the USB connection, follow the same • To turn on the tally indicator on the viewfinder screen procedure as that for removing a device from the to warn the operator computer.
-
Page 154: Connecting An External Device (I.link Connection)
To use a nonlinear editing system Connecting an External For a nonlinear editing system, optional editing Device (i.LINK software that corresponds to the recording formats used with this camcorder is required. Connection) Store the clips to be edited on the HDD of your computer in advance, using the supplied application Software. -
Page 155: Nonlinear Editing
• Set OPERATION >Input/Output >Output Nonlinear Editing & i.LINK in the setup menu (see page 102) to “HD & HDV” or “SD & You can transfer an HDV stream to a nonlinear HDV”. editing system connected via the i.LINK (HDV/ HD &... -
Page 156: Configuring A Shooting And Recording System
Make the following settings with Configuring a Shooting OPERATION >Input/Output in the setup menu (see page 102). and Recording System • Set Output&i.LINK to [HD&HDV] or [SD&HDV]. • Set i.LINK I/O to [Enable]. • Set Source Select to [i.LINK]. The input video is displayed on the If you install the optional CBK-CE01 on this viewfinder screen or the monitor connected camcorder, you can attach the XDCA-55 HD... -
Page 157: Chapter 9 : Maintenance
Periodic inspections are recommended to keep the unit working properly and to prolong its usable lifetime. Contact a Sony service or sales representative for more information about inspections. Testing the Camcorder / Maintenance... -
Page 158: Operation Warnings
(If power cannot be turned off by setting the POWER switch to OFF, remove the battery pack or the AC power source.) If the problem continues after the camcorder is restarted, contact your Sony service representative. Operation Warnings... -
Page 159: Warning Indication
Warning Indication WARNING indicator Warning sound Tally/REC Battery remaining — Problem Operation in the recorder Action to take module Free space on the SxS Recording continues. Replace it with another at the earliest opportunity. memory card has become insufficient. WARNING indicator Warning sound Tally/REC Battery remaining —... - Page 160 Problem Operation in the recorder Action to take module The remaining power Recording continues. Refer to a Sony service representative to replace of the backup battery the battery with a new one. is insufficient. WARNING indicator Warning sound Tally/REC Battery remaining —...
- Page 161 WARNING indicator Warning sound Tally/REC Battery remaining — — — — Problem Operation in the recorder Action to take module The maximum number Recording stops. Replace it with another card. of clips for a single memory card is reached. No more clip can be recorded on the card.
- Page 162 WARNING indicator Warning sound Tally/REC Battery remaining — — — — Problem Operation in the recorder Action to take module The external signal Recording stops. Change settings of OPERATION >Format in the input via the i.LINK setup menu to match it to that of the external connection cannot be signal.
- Page 163 WARNING indicator Warning sound Tally/REC Battery remaining — Problem Operation in the recorder Action to take module Recording The battery power of continues Change the battery at the earliest opportunity. the connected HDD will be exhausted soon. WARNING indicator Warning sound Tally/REC Battery remaining —...
- Page 164 WARNING indicator Warning sound Tally/REC Battery remaining — — — — Problem Operation in the recorder Action to take module There is no clip to be Recording continues. — displayed. WARNING indicator Warning sound Tally/REC Battery remaining — — — —...
-
Page 165: Appendix
• Close to radio or TV transmitters producing may be damaged. In such a case, stop using it strong electromagnetic fields. and contact your dealer or a Sony service • In direct sunlight or close to heaters for representative. extended periods... - Page 166 About the LCD panels LCD panels are manufactured with extremely high-precision technology that yields effective pixel rates of 99.99% or higher. However, very rarely, one or more pixels may be permanently dark or permanently lit in white, red, blue, or green.
-
Page 167: Exchanging The Battery Of The Internal Clock
Internal Clock The camcorder’s internal clock is powered by a lithium battery. If the message “BackUp Battery End” appears in the viewfinder, this battery must be exchanged. Contact a Sony service representative. Exchanging the Battery of the Internal Clock... -
Page 168: Specifications
Audio Specifications LPCM (16 bits, 48 kHz, HD: 4 channels, SD: 2 channels) Recording/playback time With one SBP-32/SBS-32G1A SP or DVCAM mode: Approx.130 min. HQ mode: Approx. 100 min. With one SBP-64A/SBS-64G1A General SP mode: About 280 minutes DVCAM mode: About 260 minutes Power requirements HQ mode: About 200 minutes 12 V DC (11 V to 17.0 V) -
Page 169: Audio Block
Video S/N Media Block 56 dB (Noise Suppress Off) 59 dB (Noise Suppress On) Card slots Horizontal resolution Type: Express Card34 1000TV lines or more Number of slots: 2 Gain Connector: Conforms to PCMCIA Express Card –3, 0, 3, 6, 9, 12, 18, 24, 30, 36, 42 dB, AGC Standard Shutter speed Writing rate... -
Page 170: Lens Block (Pmw-350K Only)
Supplying power to the lens Lens mount cap 11 to 17 V DC, maximum rated current: Flange back adjustment chart 1.0 A Auto focus lens (supplied with the PMW-350K) (1) REMOTE: 8-pin Operating Instructions LIGHT: 2-pin Japanese version (1) USB: 4-pin English version (1) i.LINK (HDV/DV): 6-pin, complies with... - Page 171 Equipment for remote control Other peripheral devices Remote Control Unit Tripod adaptor RM-B170/B750 VCT-14/U14 RCP-1000/1500/1530 Video Light RCP-751/921 UC-D200A (PROTECH) RCP-1001/1501 Ultralight (Anton Bauer) Note CBK-SP01 Soft Type Shoulder Pad The command network unit (CNU) is not supported. Equipment for maintenance and easier handling 50 Pin Interface and Digital Extender Hard Carrying Case CBK-CE01...
- Page 172 ANY OTHER MEDIA OR STORAGE SYSTEMS TO RECORD CONTENT OF ANY TYPE. • Always verify that the unit is operating properly before use. SONY WILL NOT BE LIABLE FOR DAMAGES OF ANY KIND INCLUDING, BUT NOT LIMITED TO, COMPENSATION OR...
-
Page 173: Chart Of Optional Components And Accessories
Chart of Optional Components and Accessories HD monitor/SD monitor ECM-680S/678/ 674/673 Microphone XDCAM HD series recorder CAC-12 PDW-F1600/HD1500, PDW-F75 Microphone Holder HDCAM series recorder DXF-20W HDW-2000 series recorder, HDW-S280 Viewfinder WRR-855S UHF Synthesized Tuner Unit WRR-860C/861/862 UHF Synthesized Diversity Tuner DXF-C50W DWR-S01D Digital Wireless Receiver Viewfinder... -
Page 174: About I.link
IEEE 1394 proposed by Sony, is a trademark supported by many companies worldwide. IEEE 1394 is an international standard defined by IEEE, the Institute of Electrical and Electronics Engineers, Inc. -
Page 175: Mpeg-2 Video Patent Portfolio License
MPEG-2 Video Patent About Bitmap Fonts Portfolio License ANY USE OF THIS PRODUCT OTHER THAN This product uses RICOH Bitmap Fonts CONSUMER PERSONAL USE IN ANY produced and sold by Ricoh Company, Ltd. MANNER THAT COMPLIES WITH THE MPEG-2 STANDARD FOR ENCODING VIDEO INFORMATION FOR PACKAGED MEDIA IS EXPRESSLY PROHIBITED WITHOUT A LICENSE UNDER... -
Page 176: About Openssl
About OpenSSL Because it uses the OpenSSL Toolkit, this product uses software developed by the OpenSSL Project (http://www.openssl.org/). OpenSSL License --------------- /* ==================================================================== * Copyright (c) 1998-2008 The OpenSSL Project. All rights reserved. * Redistribution and use in source and binary forms, with or without * modification, are permitted provided that the following conditions * are met: * 1. - Page 177 * LOSS OF USE, DATA, OR PROFITS; OR BUSINESS INTERRUPTION) * HOWEVER CAUSED AND ON ANY THEORY OF LIABILITY, WHETHER IN CONTRACT, * STRICT LIABILITY, OR TORT (INCLUDING NEGLIGENCE OR OTHERWISE) * ARISING IN ANY WAY OUT OF THE USE OF THIS SOFTWARE, EVEN IF ADVISED * OF THE POSSIBILITY OF SUCH DAMAGE.
- Page 178 * the apps directory (application code) you must include an acknowledgement: * "This product includes software written by Tim Hudson (tjh@cryptsoft.com)" * THIS SOFTWARE IS PROVIDED BY ERIC YOUNG ``AS IS'' AND * ANY EXPRESS OR IMPLIED WARRANTIES, INCLUDING, BUT NOT LIMITED TO, THE * IMPLIED WARRANTIES OF MERCHANTABILITY AND FITNESS FOR A PARTICULAR PURPOSE * ARE DISCLAIMED.
-
Page 179: Index
Index Camera adaptor 13 Clip(s) batch copy 92 copying 91 cue up 87 defining names 82 deleting 73, 92 AC power 34 displaying properties 90 ACCESS lamps 19, 22 dividing 95 Accessories (optional) 173 operating with a computer 152 Accessory fitting shoe 14 operations 84 Adaptor connector 13 playing 72, 86... - Page 180 External input 31 Iris External power source 29 position 31 Eyecup 27 ring 26 IRIS switch 26 F FWD button/indicator 19 F REV button/indicator 19 LCD panel 18 Filter position 31 Lens FILTER selector 15 cable clamp 14 Fitting for optional microphone holder 14 locking lever 15 Flange focal length, adjusting 26, 42 mount 14...
- Page 181 RESET/RETURN button 19 RET button 26 ND filter 15 NEXT button 19 Nonlinear editing 154, 155 Number of system lines 30 S×S memory card slots 22 S×S memory cards 67 ejecting 69 formatting 69 OK mark(s) 85, 91 loading 68 adding 91 restoring 70 deleting 91...
- Page 182 Status information 65 Video format 30, 91 STATUS ON/SEL/OFF switch 17 setting 50 Status screens 65 Video level indication 31 ASSIGN SWITCH 65 Video light, connecting 47 AUDIO 65 VIDEO OUT connector 23 BATTERY/MEDIA 66 Viewfinder 27 CAMERA 65 adjusting focus 37 VIDEO 65 adjusting position 35 STOP button 19...
- Page 183 Index...