Icom IC-F9511T User Manual
Ic-f9510 series vhf and uhf mobile transceivers
Hide thumbs
Also See for IC-F9511T:
- Operating manual (70 pages) ,
- Instruction manual (24 pages) ,
- Instruction manual (24 pages)

Related Manuals for Icom IC-F9511T


Summary of Contents for Icom IC-F9511T
- Page 1 IC-F9511 RadioÊ G uide NovemberÊ 2009 YourÊ Smart P25Ê Choice P25Ê T runking P25Ê C on ventional AnalogÊ C on ventional ALLÊ I NÊ O NE 110WÊ H ighÊ P o weredÊ F 9511HTÊ V ersionÊ S ho wn...
- Page 2 The systems and applications described herein are for information and reference purposes only. ■Handbook Revisions Icom reserves the right to make changes to the content of this handbook at any time without notice or obligation. ■IPR and Copyrights ■IPR and Copyrights The Icom products described in this handbook may include Icom Intellectual Property Rights (IPR) and/or copyrighted Icom computer programs stored in radio memories or other media/devices.
-
Page 3: Table Of Contents
4-1-2 Function Display IC-F9511S, IC-F9511T · · · · · · · · · · · · · · · · · · · · · · · · · · · · · · · · · · ·... -
Page 4: Introduction
Company Profile Icom, the wireless communication experts Icom Inc. is a company located in Osaka, Japan, and is a manufacturer of wireless communication products. Since Icom’s establishment in 1954, we have had a long record as a trusted manufacturer of land mobile radio, amateur radio, marine radio, navigation products, aviation radio and communications receivers. -
Page 5: Overview Product Line Up
Product Line Up VHF P25 Trunking Mobile Transceivers (USA Version) (USA Version) (USA V (USA Version) IC-F9511T / IC-F9521T / IC-F9523T includes supplied Hand Microphone HM-148G and External Speaker SP-22 UHF P25 Trunking Mobile Transceivers UHF P25 Trunking Mobile Transceivers (USA Version) -
Page 6: Common Features
Common Features APCO P25 DIGITAL RADIO SYSTEM – Conventional and Trunking in one radio ! APCO Project P25 Digital migration is now an inevitable trend for Federal, State and Local government users of 2-way radios. The IC-F9510 series, much more evolved from the IC-F1700 series, are not simply enabling migration from analog to digital but also covers wide range of features. - Page 7 Common Features Tactical group function Tactical group function Self-grounding Mic, HM-148G* The tactical group function allows you to copy The supplied HM-148G self-grounding memory channels to the tactical zone and microphone has a mechanism for temporarily regroup memory channels. Using the self grounding where a grounding wire optional zone copy cable, memory channels in the is no longer required.
- Page 8 Command to specify various environmental tests Command, to specify various environmental tests to prove that equipment qualified to the standard will survive in the field Icom makes rugged products that have been tested to and passed the following MIL-STD requirements and strict environmental standards.
-
Page 9: Ip Classification Codes
IP Classification Codes Ingress Protection (IP) ratings are developed by the European Committee for Electro Technical Standardization. International Standard IEC 60529 outlines an international classification system that describes the sealing characteristics of electrical equipment. The classification system defines the level of protection provided by enclosures to prevent the ingress of foreign objects and moisture into the electrical equipment. -
Page 10: Project 25
– even under from 2.0 to 9.6 kbps and Icom IC-F9510 series adverse conditions – with minimal training. include this AMBE+2™ enhanced vocoder. -
Page 11: Function And Specifications Comparison
Function and Specifications Comparison Model No. IC-F9511HT IC-F9511S IC-F9511T IC-F9521S IC-F9521S IC-F9521T IC-F9521T Version Destinations USA-01 USA-01 USA-01 USA-01 USA-01 USA-01 USA-01 Keypad or Speaker 10 keypad Speaker 10 keypad Speaker Speaker 10 keypad 10 keypad Type Approval FIPS 140-2 Certified... - Page 12 Function and Specifications Comparison Model No. IC-F9523S IC-F9523S IC-F9523T IC-F9523T Version Destinations EXP-01 EXP-01 EXP-01 EXP-01 Keypad or Speaker Speaker Speaker 10 keypad 10 keypad Type Approval FIPS 140-2 Certified *1 *2 Function Comparison CTCSS ✔ ✔ ✔ ✔ DTCS ✔...
-
Page 13: Accessories
Accessories Supplied Accessories Connection 3-1-1 IC-F9511S, IC-F9511T Supplied Accessories IC-F9511S Microphone hanger Microphone Speaker *1 and screw set Key caps Key caps Function name Function name DC power cable DC power cable Function name Function name stickers *2 stickers *2... -
Page 14: Mounting The Transceiver
IC-F9511S, IC-F9511T Function name stickers ■Antenna There are no names on the programmable function A key element in the performance of any keys since the functions can be freely assigned to communication system is an antenna. Contact your these keys. -
Page 15: Ic-F9511Ht
Supplied Accessories Connection 3-1-2 IC-F9511HT Supplied Accessories IC-F9511HT Microphone hanger Microphone Mounting bracket for Flat washers Mounting screws and screw set main unit Mounting screws (M5) (M5x12) (M5x12) Self-tapping screws Spring washers Self-tapping DC power cable Black and red cables (M5x16) (M5) screws... - Page 16 IC-F9511HT Mounting the transceiver Main unit The universal mounting bracket supplied with your transceiver allows overhead mounting. • Mount the main unit securely with the 4 supplied screws to a thick surface which can support more screws to a thick surface which can support more than 8 kg (17.63 lb).
- Page 17 Front plate ▒ cable. ▒ NOTE: The following connections should be ▒ ▒ performed by your Icom dealer or distributor. ▒ The supplied or optional separation cable is Main unit ▒ required for the controller and the main unit 2Connect the opposite side of the separation cable ▒...
-
Page 18: Mobile Radio Installation
Mobile Radio Installation PREPARATION ANTENNA Many types and sizes of antennas are available, The locations to whatever you choose you need to consider some basic Check points obtain points : Check if there are installation Vehicle Check points Potential action instructions available for your manufacturer car. - Page 19 Mobile Radio Installation INSTALLATION Switch on ignition (but not engine) and check that all Start the installation with any mechanical work that is instruments, warning lights etc are displaying “normal” required for fitting the radio mount, cables, etc. readings. Now transmit and verify that nothing changes Before drilling any hole in a vehicle check exactly what is and that no instrument is disturbed.
-
Page 20: D-Sub 25 Pin Configuration
D-Sub 25 Pin Configuration D-sub accessory connector The IC-F9511 series has a D-SUB 25 pin ACC connector for connecting various external devices. D-SUB 25 Pin Configuration D SUB 25 Pin Configuration Pin No. Pin Name Description H_OUT2 22W Hi Power AMP BTL Output Serial Data Output *Built-in RS-232C Interface Serial Data Input... -
Page 21: Additional Function Keys
Zone Scan A Start/Stop, Scan B Start/Stop IC-F9511S Scan Add/Del (Tag) Prio A, Prio A (Rewrite), Prio B, Prio B (Rewrite) MR-CH 1/MR-CH 2/MR-CH 3/MR-CH 4 Moni Front A Unit (IC-F9511T) Public Address RX Speaker Light Lock Lone Worker High/Low... -
Page 22: Optional Accessories
Same as Same as 3000 Pl 3000 Plus by cable cable supplied with Motorola ) IC-F9511T SEPARAION KIT SEPARAION CABLES CLONING SOFTWARE CS F9511 #01 EXP : CS-F9511 #01 EXP : For programming all versions of the IC-F9510 series. -
Page 23: Self-Grounding Microphones Hm-148G/Hm-148T
Self-grounding Microphones HM-148G / HM-148T Th HM 148G The HM-148G and HM-148T, Heavy duty self- d HM 148T H grounding microphones are designed to do without connecting wires to the vehicle’s ground. The self- grounding is enabled by a newly designed microphone hanger. -
Page 24: Optional Internal Unit Installation
Encryption Encryption Unit Unit ▒ CAUTION! Optional unit installation should be done ▒ at an authorized Icom service center only. ENCRYPTION UNIT INSTALLATION IC-F9511S, IC-F9511T 1Unscrew 4 screws, A, then remove the bottom cover. 2Unplug J1(B) and J6 (C; F9511S only). -
Page 25: Maintenance
MAIN UNIT as below. (Make sure the battery Fuse rating: 20 A USE a 20 A fuse only. polarity is correct.) for IC-F9511S, IC-F9511T 3Recover the transceiver, and re-set the date and time in set mode. (Refer to 4-1-8 Basic Operation, Clock function.) -
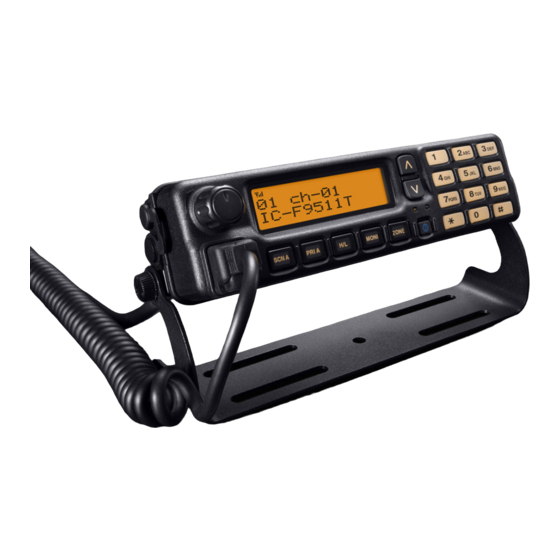
Page 26: Operation And Function
Operation and Function 4-1-1 Operation and Function IC-F9511S, IC-F9511T ▒ NOTE : Operation of the IC-F9521/F9523/S/T is also based on this instruction. 10 keypad model Up/Down Key Simple model Dial Key ➑DEALER-PROGRAMMABLE KEYS ➊ AF VOLUME CONTROL KNOB Desired functions can be programmed independently Rotate the knob to adjust the audio output level. - Page 27 * When high output power is selected, no indicator ▒ See the operating guide for details of Analog appears. ▒ and P25 Trunking/Conventional system ▒ operations. Consult your Icom dealer or system ➌AUDIBLE INDICATOR ➌ ▒ operator for details concerning your ▒...
- Page 28 The scan restarts after the specified time [UP], [DOWN], [P0], [P1], [P2], [P3] and [P4] period has passed when the scan (started programmable function keys. Consult your Icom with this key) is cancelled by this key dealer or system operator for details concerning your operation.
-
Page 29: Programmable Functions Keys Ic-F9511S, Ic-F9511T
Programmable Function Keys IC-F9511S, IC-F9511T PUBLIC ADDRESS KEY USER SET MODE KEY Push to activate the Public Address (PA) function for ➥ Push and hold to enter user set mode. voice amplification. When the PA function is • During user set mode, push this key to select... -
Page 30: Operation And Function Ic-F9511Ht
4-1-4 Operation and Function IC-F9511HT ➒MICROPHONE CONNECTOR ➊AF VOLUME CONTROL KNOB Connect the supplied or optional microphone. Rotate the knob to adjust the audio output level. • When you connect a microphone, be sure to fit the • Minimum audio level is pre-programmed. connector cover of the microphone into the connector to maintain the controller’s dust protection connector to maintain the controller s dust protection... -
Page 31: Function Display Ic-F9511Ht
* When high output power is selected, no ▒ See the operating guide for details of Analog indicator appears. ▒ and P25 Trunking/Conventional system ▒ operations. Consult your Icom dealer or system ➌AUDIBLE INDICATOR ➌ ▒ operator for details concerning your ▒... -
Page 32: Programmable Functions Keys Ic-F9511Ht
1 Push to display the scan list, then push [CH Up] [DOWN], [P0], [P1], [P2], [P3] and [P4] or [CH Down] to select the desired list. programmable function keys. Consult your Icom 2 Push to add or delete the channel to/from the dealer or system operator for details concerning selected scan list. - Page 33 Programmable Function Keys IC-F9511HT RX SPEAKER KEY USER SET MODE KEY Push to turn the RX speaker function ON or OFF. ➥ Push and hold to enter user set mode. When the RX speaker function is turned ON, the •During user set mode, push this key to received audio can be heard via the external speaker.
-
Page 34: Preparation For Operation
Scan B Start/Stop *Available on 10-key models only Scan Add/Del (Tag) Prio A, Prio B Consult your Icom dealer or system operator for Consult your Icom dealer or system operator for Prio A (Rewrite), details concerning your transceiver’s PC Prio B (Rewrite) programming. - Page 35 Preparation for Operation Analog mode operation Analog mode operation When this function is turned ON, and a signal is input from an external unit that is connected to the D-sub (Common operation) 25-pin connector, the operating channel changes to the desired memory channel. RE-DIAL KEY In this case, a memory channel selection with the Push to transmit the last-transmitted DTMF code.
- Page 36 Preparation for Operation APCO P25 mode operation APCO P25 mode operation ➥ Push and hold for 1 sec to cancel and return (Common operation) to normal operation. ZEROIZE KEY DIGITAL STATUS KEY Push and hold this key for 1 sec to zeroize the ➥...
- Page 37 Preparation for Operation TALKGROUP KEY TALKGROUP KEY ENCRYPTION SWITCH (APCO P25 mode only) ENCRYPTION SWITCH (APCO P25 mode only) Push to directly enter the Talkgroup ID selection (The optional UT-125 AES/DES encryption unit is mode. Then select the desired Talkgroup ID code required.) Turns the Encryption function ON or OFF.
-
Page 38: Basic Operation
4-1-8 Basic Operation (IC-F9510 series) Turning power ON AUTOMATIC SCAN TYPE: Channel setting is not necessary for this type. When When you use the transceiver for the first time, or turning power ON, the transceiver automatically after the transceiver has not been used for a long starts scanning. -
Page 39: Clock Function
Basic Operation 2Push and hold [Clock] for 1 sec to enter the time 2Push and hold [Clock] for 1 sec to enter the time • Time-out timer and date setting mode. After continuous transmission for the pre- • The time indication format, “24HR” or “12HR” programmed time period, the time-out timer is blinks. -
Page 40: User Set Mode
Basic Operation Push [CH Up] or [CH Down], or rotate [CH Up/Down]* to Input the ‘hour’ data for sleep time. After entering, push [Clock] to set. • The ‘minutes’ data blinks. Push [CH Up] or [CH Down], or rotate [CH Up/Down]* to input the ‘hour’ data for wake up time. - Page 41 Basic Operation Push [P0] several times to select the appropriate item. Then, push [Up] or [Down] or rotate [DIAL] to set the desired level/condition. • Available set mode functions are Backlight, LCD Contrast, Beep, Beep Level, Ringer Level, SQL Level, AF Min.
-
Page 42: Analog Mode Operation
4-1-9 Analog Mode Operation (IC-F9510 series) ■DTMF transmission NOTES Depending on the pre-set value, the following If the transceiver has [DTMF Autodial] assigned to it, functions are automatically activated. the automatic DTMF Transmission function can be used. Up to 8 DTMF channels are selectable. •... -
Page 43: 4-1-10 Apco P25 Mode Operation
4-1-10 APCO P25 Mode Operation (IC-F9510 series) ■ General ■ General APCO Project-25 (P25) is designed for public safety digital radio, and allows you to make a call to a specific station (Individual call) or to a particular group (Talk-group call or Announcement call*) in the Conventional and Trunking mode. - Page 44 APCO P25 Mode Operation If the control channel is found, the transceiver ■ Site Lock function ■ Site Lock function attempts registration and group affiliation. (P25 Trunking mode only) Blinks when registration and group affiliation The transceiver can be locked into the current site are performed.
- Page 45 APCO P25 Mode Operation ■ Individual call ■ Individual call Receiving Receiving 1 When an Individual call is received; Transmitting • The Busy indicator lights green. Individual call allows you to make a call to a specific • The ringer sounds. (Depending on the pre- station, and it provides private communication.
-
Page 46: Pager Function
APCO P25 Mode Operation 2 P h 2 Push and hold [PTT] and speak into the d h ld [PTT] k i t th microphone. ▒ NOTE: Only one station is permitted to speak at a ▒ time. 2 Select the desired Talkgroup ID (or name) 3Release [PTT] to receive a response. - Page 47 APCO P25 Mode Operation 2 Push [Digital Button] again to enter the 2 An acknowledgement is automatically Individual ID selection mode. transmitted. • A pre-programmed ID name is displayed. •The Transmit indicator lights red. • When the ID name is not programmed, the ID 3 Push any key (except for [ ]) to stop the display code is displayed.
- Page 48 APCO P25 Mode Operation ✔ For Trunking mode operation ✔ For Trunking mode operation: 5P h [PTT] 5Push [PTT] to transmit the radio inhibit signal to di i hibi i This function is available only for a dispatcher in the the target station.
- Page 49 APCO P25 Mode Operation 4Push [CH Up] or [CH Down], or rotate Receiving (Reviving the transceiver) [CH Up/Down] to select the desired ID (or name). A Radio Uninhibit signal revives the inhibited • Push and hold [Digital Button] for 1 sec to transceiver.
-
Page 50: Status Message
APCO P25 Mode Operation Receiving ✔ For Trunking mode operation: ➥ When a radio check signal is received, the This function is available only for a dispatcher in the transceiver automatically transmits an Trunking mode. acknowledgement. 1Push [Digital Button] to enter the digital call •... - Page 51 APCO P25 Mode Operation ■ Short Message 5Push [Digital Button] (or [Digital Status]) again to enter the Individual ID selection mode. Transmitting • A pre-programmed ID name is displayed. The transceiver can send one of up to 10 different • When the ID name is not programmed, the ID pre-programmed Short Messages.
- Page 52 APCO P25 Mode Operation ■ St t ■ Status Query function 6Push [CH Up] or [CH Down], or rotate [CH Up/Down] to select the desired ID (or name). Transmitting • Push and hold [Digital Button] (or [Digital A Status Query function allows you to send a signal Message]) for 1 sec to cancel and return to that requests the last transmitted Status Message normal operation.
- Page 53 APCO P25 Mode Operation Receiving ▒ To edit the Phone number with the 10-keypad: ➥ When a status transmitted Status Message is ▒ Input the phone number directly with the 10- automatically transmitted. ▒ keypad. • The Busy indicator lights green while ▒•...
-
Page 54: Emergency Transmission
APCO P25 Mode Operation ■ Announcement function ■ Announcement function Moreover while in the emergency mode Emergency Moreover, while in the emergency mode, Emergency calls can be transmitted with [PTT] to a Talkgroup. Transmitting If your transceiver is programmed for Silent The Announcement function allows you to send an operation, you can transmit Emergency alarms and announcement signal to only a specific group, and... -
Page 55: Encryption Function
APCO P25 Mode Operation Transmitting an Emergency call along with Transmitting an Emergency call along with 2An acknowledgement is automatically transmitted 2An acknowledgement is automatically transmitted. an Emergency alarm • The Transmit indicator lights red. 3Push any key (except for [ ]) to stop the display 1Push and hold [Emergency]*1 for the specified from blinking and return to normal operation. - Page 56 APCO P25 Mode Operation Key Fail Indication ▒ NOTE: There are 2 models of KMM— Standard The transceiver indicates “Key Fail” for the ▒ and Packet. If the pre-programmed KMM type specified time period* when the Common Key ▒ is not matched to the system to which the Reference (CKR) of the selected channel is not ▒...
-
Page 57: 4-1-11 Tactical Group Function
4-1-11 Tactical Group Function (IC-F9510 series) ■ Tactical Group function Clearing the tactical group in zone 128 — Individual channel clearing The Tactical Group function enables commonly 1Push [CH Up] or [CH Down], or rotate used channels to be placed together in zone 128. [CH Up/Down] to select the channel which you ▒... - Page 58 Tactical Group Function ▒ NOTE: When the “DEALER” indication does not ▒ NOTE: When the DEALER indication does not Mobile to Mobile connection ▒ clear after entering 6 digits, the input code ▒ number may be wrong. In that case, turn the ▒...
-
Page 59: Apco P25 Trunking And Conventional Basic Functions
4-1-12 APCO P25 Trunking and Conventional Basic Functions This list shows each function that is supported by P25 trunking mode, by P25 conventional mode, or by both. Trunking Conventional Functions System System Enable the radio to operate on the Multiple Network Support multiple different networks by selecting new parameter in SU. - Page 60 APCO P25 Trunking and Conventional Basic functions Trunking Conventional Functions System System Monitoring the arrival of groupcall Priority Group Monitor signals with high priority level. Emergency Alarm Emergency alarm. Call Alert Call alert. Short Message Short message function Status Update Request Status message function Status Query Status message function...
- Page 61 APCO P25 Trunking and Conventional Basic functions Trunking Conventional Functions System System Packet Data communication ready Packet Data ARP (APR) UDP/IP (support for OS i/f or LwIP UDP/IP adaptable. implementation) SLIP/PPP (support for OS i/f or LwIP SLIP/IP adaptable. implementation) Subnetwork Dependent SNDCP Convergence Protocol adaptable...
-
Page 62: Cloning Software Cs-F9510/F9510
‘Programs’ folder of the start menu, and ‘CS- F9010_F9510’ short cut icon appears on the desktop screen. •To uninstall the cloning software, select the “Control Panel” in the start menu, and click the “Add or Remove Programs.” Then, select the program group ‘Icom CS-F9010/9510’ and click [Remove]. - Page 63 Basic Setup of Cloning Software ■ Connections All cloning operations are performed from the computer’s keyboard — the operation required on the transceiver side is; 1 First, connect the cloning cable as illustrated below. 2 Then, rotate [VOL] to turn power ON. to the MIC to USB port connector...
- Page 64 Basic Setup of Cloning Software ■ Programming information ■ Programming information We recommend that you should read out all the transceiver's data before start entering/editing parameters even when the transceiver is factory fresh. 1Double-click the desired cell in the contents list screen directory, or right-click the cell to display the edit menu.
-
Page 65: Cloning Items
4-2-2 Cloning Items RELATED ITEMS RELATED ITEMS For IC-F9510 series Confirming the COM port Connect the cloning cable, OPC-1122U to the [MIC] Changing the COM port connector first and then push [POWER] to turn power ➣Quitting the CS-F9010/F9510 program Select [Exit (X)] in the [File (F)] menu or Click or select <Read <- TR>... - Page 66 Cloning Items Remote Monitor Digital Set the TX to make a call to listen to the targeted Set the TX to make a call to listen to the targeted radio's audio frequency without requiring any action from the targeted radio user. Phone Number List Make a list for easy recognition of the phone number.
- Page 67 Cloning Items External I/O DTMF Settings Set the time period/signal length for the DTMF Timer, First Timer, * # Timer. Continuous Tone CH Switch Table Available for mobile radios only. Port Setting The desired function can be assigned to some of Continuous Tone the D-sub 25 pins on the screen.
-
Page 68: Apco P25 Trunking Cloning Software Setup
4-2-3 APCO P25 Trunking – Cloning Software Setup When "SYSTEM" is selected for the Coverage Type, APCO P25 Trunking APCO P25 Trunking this Home WACN ID and Home System ID must match to those of a control channel to register for This is the overall construction of the P25 the channel. - Page 69 APCO P25 Trunking – Cloning Software Setup Coverage Type When a CH ID list with no valid channel is selected, Select the coverage type for the area that the radio "X" appears in the cell and "System Registration" in is allowed to roam from UNRESTRICTED, SYSTEM, the tree view screen.
- Page 70 APCO P25 Trunking – Cloning Software Setup Trigger Enable ▒ NOTE: This function activates the back ground scan only ▒ Do not assign [High/ Low] function if transmit when the Received Signal Strength Indication (RSSI) ▒ power setting must not be changed by an operator. level of a control channel becomes lower than the L1: Low1 [High/Low] selects "Low1"...
- Page 71 APCO P25 Trunking – Cloning Software Setup Hunt List TX CH ID Enter a control channel ID from the broadcast channel structure to set an uplink frequency. The ID is defined by TIA TSB-102. AABD. Even if the available number of control channels in a list has been set by the Capacity item in the List TX CH Number Operation screen, you can add or delete a channel in...
- Page 72 APCO P25 Trunking – Cloning Software Setup Lowest channel Frequency (MHz) To create a new roaming area, point to the cell on Enter the lowest channel frequency that frequencies the [New] line which is located at the bottom of the start at for the channel identifier.
-
Page 73: Otar - Cloning Software Setup
4-2-4 OTAR – Clone Software Setup OTAR Setting For details on how to set up the OTAR function in Set the Common Key Reference (CKR) used for the cloning software, please see the instructions below. system within the range of 1 to 4095. The CKR is used for encrypting Key Management Messages (KMMs-Registration, Deregistration, Hello and Unable To Decrypt). - Page 74 OTAR – Clone Software Setup KMM Enc ON/OFF Gateway Address (Available when "IPv4 Static" is Select whether or not to encrypt Key Management selected in Network Address Type above.) Messages (KMMs). Enter the IPv4 gateway address for the system. Unconfirmed The radio uses unconfirmed packets to Subscriber OTAR Port exchange KMMs with the KMF.The Set the User Datagram Protocol (UDP) port of the...
- Page 75 OTAR – Clone Software Setup General Delayed Acknowledge Interval Timer (Sec) Enter the time period for Interval Timer within the range of 0.0 to 25.5 (in 0.1 sec steps). The radio delay transmitting acknowledgment for this set period after receiving a Key Management Message (KMM) that requests Delayed Acknowledgment.
-
Page 76: Apco P25 Access Code Types
APCO P25 Access Code Types The IC-F9510 series provides capability to set up your own talk groups and quiet stand-by when others are The IC F9510 series provides capability to set up your own talk groups and quiet stand by when others are talking. -
Page 77: Scan
Scan 2) Priority Scan: ■Scan List Priority scan. "Primary CH" and "Secondary CH" are A total of 17 scanning groups are available for a used as the priority channels. Selected channels are wide variety and flexible scanning operation. In this scanned in sequence while monitoring "Primary CH"... - Page 78 Scan The compatibility of the previous and current scan The compatibility of the previous and current scan TX CH TX CH mode: Select the desired channel as the transmission channel. Last CH Transmission is performed in the channel that the scan stopped last. If it is no last channel, the scan start channel is selected for transmission.
- Page 79 Scan Last CH Scan is cancelled in the channel that the scan stopped last. If it is no last channel, the scan start channel is selected when the scan is canceled during scanning. Prio-A CH Scan is cancelled in the priority A channel channel.
-
Page 80: Display Text
Display Text ■Display Text ➣ You can use and make an original character that Enter up to a 24-character text for easy recognition is edited in the Character Editor Screen. of the scan group. The programmed texts are indicated in the scan selection mode. ■Text-Mobile Right click to display the [Edit... -
Page 81: Voice Scrambling/Encryption
Voice Scrambling/Encryption 4-6-1 Voice Scrambling/Encryption ■Voice scrambling function ■Voice scrambling function The optional voice scrambler unit provides high performance private communication between stations with the same scrambler code. The IC-F9510 series has a built-in inversion type voice scrambler. (Analog mode only) What is ‘Inversion type voice scrambler’... -
Page 82: Encryption Setup
Voice Scrambling/Encryption 4-6-2 Encryption Setup Activating Encryption Press Enter. This CKR (TEK) is now stored in the P25 radios have the ability to use DES or AES KVL and can be loaded into the radio using the encryption. To enable encryption, you will need a loading instructions detailed below. -
Page 83: Otar
OTAR What is OTAR ? What is OTAR ? OTAR or Over-The-Air-Rekeying is the common name Without OTAR, the operator has to collect all radios for the method of changing the encryption keys over and reprogram them to change the keys. Or a a radio channel or “over the air”. -
Page 84: Apco P25 Dvsi Ambe+2™ Vocoder
APCO P25 DVSI AMBE+2™ Vocoder IC-F9510 series has DVSI AMBE +2™ New The Mean Opinion Score Values Vocoder Ready In multimedia using codecs to compress the bandwidth requirement (for example, of a digitized voice connection from the standard 64 kilobit/sec Digital Voice Systems, Inc. -
Page 85: Useful Information On Icom America's Web Site
Useful Information on Icom America’s Web site The information about the APCO P25 and IC-F9510 series is also available on the Icom America Inc. home page. Please browse http://www.icomamerica.com/en/default.aspx Icom America Inc. Home page Icom Global Site These materials are downloadable from this site. -
Page 86: Other Materials
Mobile Radio IC-F9511S/T IC-F9511HT IC-F9010 series Installation IC-F9521S/T IC-F9510 series (Guide to installing IC-F9523S/T radio in vehicle) The following Materials are available upon request through local Icom Distributors in your region. Service Manual: Service Manual: Sales Handbook IC-F9511HT IC-F9511S/T IC-F9510 Series... - Page 87 IC-F9511 RadioÊ G uide ForÊ P eopleÊ W hoÊ MakeÊ SmartÊ Choices 2380Ê 116thÊ AvenueÊ NE Bellevue,Ê WAÊ 98004 phone:Ê 425-454-8155 fax:Ê 425-454-1509 www.icomamerica.com...