Table of Contents
Advertisement
Dear customer
Thank you for purchasing this product.
For optimum performance and safety, please read these
instructions carefully.
Before connecting, operating or adjusting this product,
please read the instructions completely. Please keep this
manual for future reference.
PP
En Cf
Model No.
If you have any questions contact
In the U.S.A. and Puerto Rico:
In Canada:
For U.S.A. and Puerto Rico only
The warranty can be found on pages 86 and 87.
Please register via the Internet at:
www.Panasonic.com/register
For Canada only
The warranty can be found on pages 84 and 85.
Owner's Manual
IC Recorder
RR-XS410
RR-XS400
1-800-211-PANA (7262)
1-800-561-5505
VQT3T13
M0611KZ0
Advertisement
Table of Contents

Related Manuals for Panasonic RR-XS410


Summary of Contents for Panasonic RR-XS410
- Page 1 Owner’s Manual IC Recorder RR-XS410 Model No. RR-XS400 If you have any questions contact In the U.S.A. and Puerto Rico: 1-800-211-PANA (7262) In Canada: 1-800-561-5505 For U.S.A. and Puerto Rico only Dear customer The warranty can be found on pages 86 and 87.
-
Page 2: Supplied Accessories
Supplied accessories Please check and identify the supplied Features accessories. Use numbers indicated in parentheses when asking for replacement parts. Recording (Product numbers correct as of June 2011. These may be subject to change.) This unit supports the Linear PCM (hereinafter referred to as “PCM”) recording. -
Page 3: Table Of Contents
Table of contents Preparation Advanced Operations Supplied accessories............2 Selecting the recording scene ........18 Part names ............... 5 Selecting recording mode ..........20 Screen display ..............6 Switching microphone sensitivity ........21 Inserting the battery/Charging .......... 7 Reducing noise (LOW CUT FILTER) ......21 Turning the Power ON/OFF/Hold function ...... - Page 4 Table of contents Recycle bin function ............47 Using the timer ............... 48 Common menu ............... 51 Using with a computer System requirements ............55 Connecting this unit to a computer ......... 56 Using USB power ............58 Opening folders of this unit ..........59 Importing files to a computer/Organizing files ....
-
Page 5: Part Names
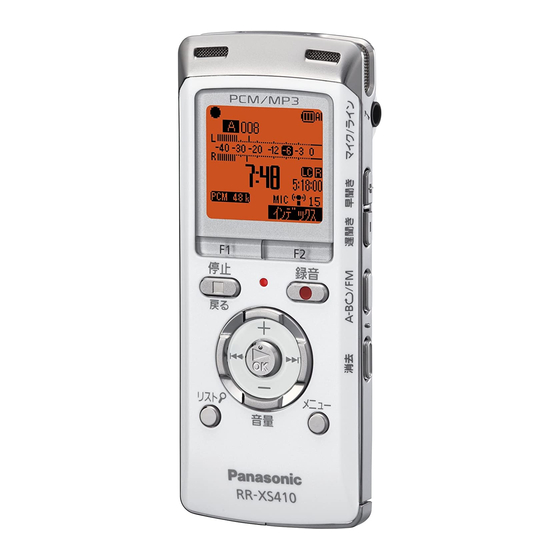
Part names i (Fast forward) MENU External microphone/Line-in jack ( ) FAST (Fast playback) SLOW (Slow playback) Recording indicator (Status indicator) A-B & ERASE Strap eyelet Built-in speaker OPR/HOLD switch (OPR: Operation) Line/Mic switch USB plug lever Headphone/earphone jack ( ) Battery cover USB plug cover USB plug... -
Page 6: Screen Display
Screen display • The following screen examples explain each item. Some items may not be displayed simultaneously. Screen display during recording: Index (➜ page 33) Timer indication (➜ page 50) File number (➜ page 14) Battery indicator (➜ page 9) Status indication (➜... -
Page 7: Inserting The Battery/Charging
Inserting the battery/Charging Upon purchasing, charge once before initial use. Insert the unit’s USB plug into the computer. Use your computer for charging. If the battery has completely run out, it takes approx. 2 hours for a full recharge. Insert the USB plug Inserting the rechargeable battery (included) straight in the same direction as that of... - Page 8 Inserting the battery/Charging The status indicator lights and recharging starts. If charging does not start, switch Hold off once and Also, “CHARGING” is shown in the unit’s display and switch Hold on again. the battery indicator changes as shown below. If the temperature of this unit has risen or an undesignated rechargeable battery has been inserted, “...
-
Page 9: Turning The Power On/Off/Hold Function
Turning the Power ON/OFF/Hold function Some level of battery is required when recording, or ON / OFF OPR HOLD OPR/HOLD switch performing Deleting files (➜ page 17), Dividing files (➜ page 44), Deleting index (➜ page 33), FORMAT Turning the power ON: (➜... -
Page 10: Setting The Clock
Setting the clock The clock has not been set at the time of purchase. The clock is used as a file name (➜ page 61) or to preserve recording date and time information. Set the correct date and time. Press +, – to set the clock indication •... -
Page 11: File And Folder
File and Folder Selecting the folder File • Press [g STOP/RETURN] to stop the unit. Press [F2 (FOLDER)]. Recorded audio data from the starting point to the ending point is saved as a file. Press +, –, u, i to The saved data is called a file. -
Page 12: Selecting The Folder Or File In The List Screen
Selecting the folder or fi le in the list screen You can select recorded files by displaying them on the list. (e.g. Artist A), select “Artist A” and press [q OK]. Then, the • Press [g STOP/RETURN] to stop the unit. folder under “Artist A”... -
Page 13: Recording
Recording Press [* REC] (Recording starts). • Turn the power on. (➜ page 9) • Press [g STOP/RETURN] to stop the unit. STOP Press [F2 (FOLDER)]. The recording indicator g STOP/RETURN RETURN lights on. Press u, i F1 F2 Press [g STOP/RETURN] to stop * REC to select the recording. - Page 14 Recording Screen display during recording: Note when recording This unit is equipped with a high-sensitivity microphone. Accordingly, if a breath or wind directly hits the microphone during recording, the wind-cutting sound may be recorded or voice may be difficult to hear. 1.
-
Page 15: Playing
Playing Select a fi le • Press [g STOP/RETURN] to stop the unit. • Select a folder. (➜ page 11) Press u , i to select. • Select a file. (➜ right) Each time you press, the file number changes. Press [q OK] (Playback starts). -
Page 16: Listening To The Audio Using Earphones
Listening to the audio Playing using earphones Checking information. You can check the file information or current time. Connect stereo earphones (not included). • Press [g STOP/RETURN] to stop the unit. Plug type: ø 3.5 mm (1/8") stereo mini plug Press [g STOP/RETURN]. -
Page 17: Deleting Files
Deleting fi les To exit the deletion screen, press • Select a file to delete beforehand. (➜ page 15) [F2 (CLOSE)]. • Press [g STOP/RETURN] to stop the unit. Press [ERASE] . g STOP/RETURN Deleting fi les from the list Press +, –... -
Page 18: Selecting The Recording Scene
Selecting the recording scene This unit offers recommended recording settings for each recording scene. Selecting the recording scene enables easy recording with the most appropriate settings. Press +, – to select “LOAD” • Press [g STOP/RETURN] to stop the unit. and press [q OK] to enter. - Page 19 Changing recording scene settings To select the changed recording scene, select “LOAD” (➜ page 18). The setting details of each recording scene can be To exit the setting screen, press [F2 (CLOSE)]. changed according to preference. Initializing recording scene settings •...
-
Page 20: Selecting Recording Mode
Selecting recording mode You can change the sound quality. This allows you to provide the best sound quality for the particular purpose. Press +, – to • Press [g STOP/RETURN] to stop the unit. g STOP/RETURN select the setting Press [MENU] . (PCM sampling Press +, –... -
Page 21: Switching Microphone Sensitivity
Switching microphone sensitivity Reducing noise (LOW CUT FILTER) Switch the microphone sensitivity according to Sound of low frequency range is reduced during the volume of the sound source. When the sound microphone recording. This is effective when source volume is loud, set the sensitivity to “LOW”. reducing noise of air conditioning equipment, etc. -
Page 22: Setting The Recording Level Manually
Setting the recording level manually The recording level can be adjusted automatically or manually on this unit. When the recording level adjustment is AUTO, the sound distortion is reduced by adjusting the recording level automatically. To record the original sound volume level faithfully such as an instrument playing and nature sound, set the recording level adjustment to MANUAL. - Page 23 Setting the recording peak limiter to ON OVER indication Even if the recording level adjustment is MANUAL, Level meter when the excessive volume is input, the recording level is automatically adjusted and the sound distortion is reduced. Recording level • Press [g STOP/RETURN] to stop the unit. If the level meter swings and “...
-
Page 24: Setting The Recording Eq
Setting the recording EQ Using the recording EQ enables you to set bass, middle and treble range of recording level according to your preferred settings for recording. The recording EQ includes 7 types of fixed mode and the “USER” mode with which you can set the recording level according to each frequency band. -
Page 25: Self Timer
Self timer You can select your preferred time period from when [* REC] is pressed until when the recording starts. This function is very useful where you need time for preparation before recording should start – for example in musical instrument practice. g STOP/RETURN •... -
Page 26: Preventing Unnecessary Recording (Vas)
Preventing unnecessary recording (VAS) When VAS (Voice Activated System) is set, if silence continues for approx. 2 seconds during microphone recording, the recording is paused automatically. If the unit detects sound, the recording resumes. g STOP/RETURN • Set the recording level adjustment to AUTO beforehand. -
Page 27: Past Recording Function (Pre-Record)
Past recording function (PRE-RECORD) If you start recording from the standby state of the past recording function, recording can be started with the audio approx. 5 seconds before the recording operation. To set the past recording to ON: Press and hold [* REC] for 1 second or more. The unit enters the past recording •... -
Page 28: Recording By Connecting An External Microphone
Recording by connecting an external microphone Use this setting when recording by connecting an external microphone to the external microphone/Line-in jack of this unit. Connect the external microphone. • Press [g STOP/RETURN] to stop the unit. External microphone Slide the Line/Mic switch to [MIC]. (not included) Insert securely. -
Page 29: Copying To Other Devices
Copying to other devices Connect the headphone/earphone jack Start recording on the external device. ( ) of this unit with the audio input (mic) Play the fi le that you want to copy on this terminal of the external device with an audio unit. -
Page 30: Recording From Other Devices
Recording from other devices This is the method to record to the “L” folder by connecting an external device to the external microphone/ Line-in jack of this unit. Connect the external device • Press [g STOP/RETURN] to stop the unit. Audio Cable without resistor Slide the Line/Mic switch Audio device... - Page 31 Press and hold [* REC] for This unit has the following synchro recording function. 1 second or more. This function detects the silence between tracks, etc. and then records each track into different files, such as a The unit enters the recording first track, second track, etc.
- Page 32 Recording from other devices To exit the setting screen, press [F2 (CLOSE)]. When approx. two seconds or more of silence cannot be detected, or depending on the combination of external Connect the device, slide the Line/Mic devices, the synchro recording may not function. switch to [LINE] and “...
-
Page 33: Index Function
Index function By adding Index (position information on the file) to the file, playback position jumps to the specified position by skip operation (➜ page 15) during playback. g STOP/RETURN Files within the MUSIC (M) folder and recycle bin ( ) folder cannot be indexed. -
Page 34: Changing The Playback Speed
Changing the playback speed A-B Repeat play The playback speed of MP3 files can be adjusted Playback repeats between the start point (A) and with 21 stages between slow playback (50%) and finish point (B) if those points are set. fast playback (200%). -
Page 35: Playback From A Specified Position (Time Search)
Playback from a specifi ed Slight return playback position (TIME SEARCH) This function returns a short amount of time during playback to enable you to listen again. It is a useful function for language learning, or if you miss Playback is possible from the time-specified hearing something. -
Page 36: Repeat Play (Repeat)
Repeat play (REPEAT) OFF: Playback is performed in succession from the • Put the unit into the stopped state or playback state. selected file to the last file in one folder. The unit is Press [MENU]. stopped when the playback finishes. (When playback is in progress, go to step ONE: Plays one file repeatedly. -
Page 37: Skip At Regular Intervals (Time Skip)
Skip at regular intervals (TIME SKIP) This function skips the set time using skip operation (➜ page 15) during playback. This allows you to quickly move to a position for playback, or repeat playback of the same portion in a file. Skip at regular intervals To change the skip interval Press [F1 (SKIP)] during playback. -
Page 38: Setting The Playback Eq (Sound Eq)
Setting the playback EQ (SOUND EQ) Using the sound EQ enables you to set bass, middle and treble range of volume level according to your preferred settings for playback. The sound EQ includes 6 types of fixed mode and the “USER” mode with which you can set the volume level according to each frequency band. -
Page 39: Using An Sd Card
Pull towards yourself, the support site below. then open upwards. http://panasonic.net/support/ Insert the SD card and If an SD card is inserted but “microSD” is not displayed close the SD card slot on the SELECT FOLDER screen, etc., this unit does not cover. -
Page 40: Using The File Search Function
Using the fi le search function Press +, – to select the type of fi le search Folders and files are displayed in a list to enable you to quickly and easily choose the desired file. and press [q OK] to enter. g Types of fi... -
Page 41: Listening To Music On This Unit (Wma/Mp3 Music Files)
Listening to music on this unit (WMA/MP3 music fi les) In MUSIC folder, up to 199 files per one • Transfer music files to this unit from the folder can be recognized and played back. computer. (➜ page 65) If subfolders are created, number of files Selecting a fi... -
Page 42: Using The Playlist Function
Using the playlist function Listening to music on this unit (WMA/MP3 music fi les) You can register tracks in the MUSIC (M) folder to a playlist and play them in the desired order. Folder cue function Registering your favorite tracks to a This function enables you to switch subfolders playlist within the MUSIC (M) folder easily while playing... - Page 43 Playing tracks registered to the playlist Canceling tracks registered to the playlist Select the playlist (from P1 to P5) (➜ page 11). Select the playlist (from P1 to P5) (➜ page 11). Press +, – to select the fi le to play and press [q OK].
-
Page 44: Editing: Dividing Files
Editing: Dividing fi les Using the editing settings, you can edit files recorded on this unit in a variety of methods. Displaying the editing setting screen Select “DIVIDE” in the editing setting screen (➜ left). • Press [g STOP/RETURN] to stop the unit. Press +, –... -
Page 45: Editing: Combining Files
Editing: Combining fi les 2 files recorded on this unit can be combined into 1 file. Select “COMBINE” in the editing setting Press +, – to select “NEXT” and press screen (➜ “Displaying the editing setting [q OK] to enter. Press +, –... -
Page 46: Editing: Copying Or Moving Files
Editing: Copying or moving fi les Recorded files can be copied or moved between the internal memory and SD card. Microphone recording files can be copied or moved among folders A, B, C and D. Copying fi le Press +, – to select the copy destination folder and press Select “COPY”... -
Page 47: Recycle Bin Function
Recycle bin function When deleting files with the recycle bin function set to ON, deleted files are moved to the recycle bin ( ) folder (excluding MUSIC (M) folder). Files moved to the recycle bin can be returned to the original folders, so you do not have to worry about deleting files by mistake. -
Page 48: Using The Timer
Using the timer Audio can be recorded at the set date and time. The timer can also be used as an alarm by playing back files or sounds. Set the clock correctly beforehand. (➜ page 10) • Press [g STOP/RETURN] to stop the unit. g STOP/RETURN Be sure to perform the “OK”... - Page 49 Setting Item Details Setting Item Details OFF: Timer does not operate. BEEP: Plays the alarm sound. SETTING PLAY ON: Timer operates. FILE: Plays a file. The file list of the folder being selected is REPEAT ONCE: Recording or playback is performed displayed.
- Page 50 Using the timer g Checking the timer condition or execution After setting the file to be played for timer playback, if the set file is deleted, the alarm sounds for approx. 30 state seconds at the timer start time. Timer indication When the file length of the specified file is shorter than the period from timer start time until timer end time, the timer playback is stopped before the timer end time...
-
Page 51: Common Menu
Common menu The following are the settings used for both recording and playback. Common settings operation BEEP SOUND g STOP/RETURN The button operation sound can be set. • Press [g STOP/RETURN] to stop the unit. Press [MENU]. Press +, – to select “COMMON MENU”... -
Page 52: Auto Power Off
Common menu BATT. SETTING BACKLIGHT Set the type of batteries used (rechargeable nickel Set the backlight lighting time when the button is metal-hydride batteries or alkaline batteries). pressed. Type of battery : Rechargeable battery : Alkaline battery Type of battery: RECHARGEABLE, ALKALINE (The factory setting is “RECHARGEABLE”.) Lighting time: OFF (does not light), 5 sec, 15 sec, always If the type of battery and setting do not match, the... - Page 53 RECYCLE BIN FORMAT When the recycle bin function is used, deleted files All files on the internal memory or SD card are are moved to the recycle bin. Before the recycle bin deleted. Deleted files cannot be recovered. is emptied, deleted files can be restored so you do Select “INTERNAL MEMORY”...
- Page 54 Common menu INIT MENU LANGUAGE If the settings of this unit are initialized, settings Set the language displayed on the screen. except for the “DATE & TIME” setting are restored to the default state. Select “YES”, press [q OK] to enter and the settings are initialized.
-
Page 55: System Requirements
✽ Depending on the computer environment, malfunctions may occur (e.g. Audio data recorded on this unit cannot be used. etc.). Panasonic and Panasonic dealers cannot be held liable for any lost audio data or other direct or indirect damage except in cases of intentional of gross negligence. -
Page 56: Connecting This Unit To A Computer
When the unit is connected to the computer, the use the USB extension cable (optional: RP-CUMB20). computer may not start (restart). It is recommended that Always use a genuine Panasonic USB extension cable the unit is removed from the computer when starting (RP-CUMB20: optional). - Page 57 g Disconnecting the unit Operation is not guaranteed in the following cases. • When two or more USB devices are connected to Double-click the icon (Windows XP: [ ], Windows Vista/ one computer (excluding the mouse and keyboard in Windows 7: [ ]) on the task tray at the bottom of the normal operation) computer screen and follow the on-screen instructions to...
-
Page 58: Using Usb Power
Using USB power g Disconnecting the unit Power can be supplied from the computer’s USB terminal to operate this unit. After switching off the unit’s power, disconnect the unit. • Start the computer beforehand. When using USB power, the continuous recording •... -
Page 59: Opening Folders Of This Unit
Opening folders of this unit This example assumes that the inserted SD card was formatted on this unit. The illustrations show Windows XP (OS). The display may differ depending on the OS. 2. Right-click to open the “IC RECORDER (G:)” •... -
Page 60: Importing Files To A Computer/Organizing Files
Importing fi les to a computer/Organizing fi les • Connect this unit to a Computer beforehand. Do not change the folder names (➜ page 56) If you change the names of folders (“MIC_A, MIC_B, Importing fi les recorded on this unit MIC_C, MIC_D, LINE, MUSIC”, etc.) of this unit or SD to a computer card, new “MIC_A, MIC_B, MIC_C, MIC_D, LINE and... -
Page 61: File Name
File name File naming rules when recording on this unit: Example: Recording information: September 20, 2011, 17:20/folder A/MP3 File number (001 to 199) 001_110920_1720A0.MP3 Recording information (1-byte number, 6 characters) Recording time (1-byte number, 4 characters) Folder name (A to D and L) “_”... - Page 62 File name Returning the fi les imported to the computer to File name in the MUSIC folder and order of this unit: playback: By returning the files imported to the computer to this unit, If numbers are added at the beginning of file names in the such files can be played back on this unit.
-
Page 63: Folder Structure On This Unit
Folder structure on this unit Folders “A”, “B”, “C”, “D”, “L” and “M” are displayed as “MIC_A”, “MIC_B”, “MIC_C”, “MIC_D”, “LINE” and “MUSIC” (for the internal memory) respectively on the computer or the list screen of this unit. The “DATA” folder is used to store data files. - Page 64 Folder structure on this unit g RECYCLE folder This is the recycle bin. When the recycle bin function is “ON”, deleted recording files are moved to the RECYCLE folder (recycle bin). Files in the MUSIC (M) folder are not moved to the recycle bin and are completely deleted from the unit irrespective of the recycle bin function settings.
-
Page 65: Transferring Music Files To This Unit
Transferring music fi les to this unit You can enjoy music by transferring music files stored in the computer to this unit. This unit can play back MP3, WMA, and PCM (WAV) music files. Only PCM (WAV) files recorded on this unit. Transferring music fi... -
Page 66: Q & A (Frequently Asked Questions)
• You can play files recorded on IC recorders using MP3 or PCM format by transferring them to MUSIC folder. (➜ page 65) But cannot play files Panasonic IC recorders? with other formats (i.e. ADPCM and TRC formats) because the recording format is different. -
Page 67: Error Message
Error message Checkpoints CAN’T PLAY THIS FILE WITH VARIABLE • This is displayed when you attempt to change the playback speed during SPEED PCM file playback or when the PCM file is played back with the playback speed changed. (➜ page 34) CAPACITY FULL •... - Page 68 Error messages Error message Checkpoints • MEMORY WRITE SPEED IS SLOW • This may be displayed when recording is performed using a slow write • microSD CARD WRITE SPEED IS speed SD card, or using the internal memory/SD card whose writing SLOW speed is temporarily slow due to fragmentation*.
- Page 69 Error message Checkpoints EMPTY RECYCLE BIN • This is displayed when you attempt to delete files or folders with the maximum number of files (199) present in the recycle bin folder and no more files can be moved to the recycle bin ( ).
- Page 70 Error messages Error message Checkpoints CAN’T ✽✽✽. FILE IS OUTSIDE PLAY • This is displayed when you attempt to select files beyond the playback RANGE OF ALL SONG MODE (MAX range (max. 3,000 files) for all repeat (random) of MUSIC file, or when you attempt to set all repeat (random) while selecting files beyond the 3,000 SONGS) playback range (max.
-
Page 71: Troubleshooting Guide
Troubleshooting guide Before requesting service, make the following checks. If you are in doubt about some of the check points, or if the remedies indicated in the chart do not solve the problem, refer to “Customer Services Directory (United States and Puerto Rico)” on page 87 if you reside in the U.S.A. - Page 72 SD card. • For details on cards that are confirmed to operate correctly according to our manufacturing standards, see the support site below. http://panasonic.net/support/ • VAS is functioning. (➜ page 26) Noise is heard from the recorded • If you brush this unit with your hand or an object touches this unit during voice.
- Page 73 Symptom Checkpoints Recording Recorded sound is distorted. • Set the microphone sensitivity to “LOW” or keep the microphone distance There is a noise at the beginning farther away from the recording source. (➜ page 21) of sound. If the sound is still distorted, set the Low Cut filter setting to ON (➜ page 21), set the recording level adjustment to Manual and adjust the recording level before recording.
- Page 74 Troubleshooting guide Symptom Checkpoints Playing A file in the MIC_A to MIC_D, • The file name was changed. Only files named according to the file naming LINE or RECYCLE folder cannot rules can be played in folder MIC_A through MIC_D, LINE or RECYCLE. Even be played.
- Page 75 Symptom Checkpoints Playing The selected file changes on its • If this unit is connected to the computer, the selected file on this unit is own. changed. For the MUSIC folder, the file immediately under the MUSIC folder “NO PLAYABLE FILES” is is selected.
- Page 76 Troubleshooting guide Symptom Checkpoints Others The power automatically turns off. • Did you set the “AUTO POWER OFF” function? (This function turns the power off if there is no operation for a certain period of time such as when the unit is stopped or recording is paused.) (➜...
- Page 77 Symptom Checkpoints Others This unit is not recognized by a • The OS on the computer may not be compliant with this unit. (➜ page 55) computer. • Connect this unit with the computer properly. (➜ page 56) • Disconnect this unit from the computer and connect it again. •...
-
Page 78: Specifications
40 Hz to 20,000 Hz [MP3 192kbps] recording/playback) 40 Hz to 17,000 Hz [MP3 128kbps] The bracket [ ] shows the Internal Memory 4 GB (RR-XS410) 40 Hz to 7,500 Hz [MP3 64kbps] recording mode.) 2 GB (RR-XS400) 40 Hz to 6,500 Hz [MP3 32kbps]... - Page 79 Battery life (may be less depending on the operating Standard recordable time (may be less depending on the conditions.) operating conditions.) RR-XS410: When using the internal memory (4 GB) When the supplied rechargeable battery (HHR-4AGA) is used Recording mode Recording time...
-
Page 80: Care And Use
Care and use To reduce risk of radio interference caused by • Battery mishandling can cause electrolyte headphone-, earphone- or microphone cables, only leakage which can damage items the fluid use adequate accessories with a cable length of contacts and may cause a fire. If electrolyte leaks less than 3 m (9.8 ft.). - Page 81 g SD card compatibility g Allergies microSD card and microSDHC card can be used • Discontinue use if you experience discomfort with on devices that support each card. (microSD the earphones or any other parts that directly card can also be used on devices that support contact your skin.
- Page 82 Once you have established a comfortable sound level: earphones at a • Leave it there. high volume. Hearing experts advise against continuous RR-XS410 extended play. If you experience a ringing in your ears, reduce volume or discontinue use. Do not use while operating a motorized vehicle. It...
-
Page 83: Maintenance
In the U.S.A. and Puerto Rico, refer to “Customer Services Directory (United States and Puerto Rico)” on page 87. In Canada, contact the Panasonic Canada Inc. Customer Care Centre at 1-800-561-5505, or visit the website (www.panasonic.ca), or an authorized Servicentre closest to you. -
Page 84: Limited Warranty (Only For Canada)
Ninety (90) days This warranty is given only to the original purchaser, or the person for whom it was purchased as a gift, of a Panasonic brand product mentioned above sold by an authorized Panasonic dealer in Canada and purchased and used in Canada, which product was not sold “as is”, and which product was delivered to you in new condition in the original packaging. - Page 85 THIS EXPRESS, LIMITED WARRANTY IS IN LIEU OF ALL OTHER WARRANTIES, EXPRESS OR IMPLIED, INCLUDING ANY IMPLIED WARRANTIES OF MERCHANTABILITY AND FITNESS FOR A PARTICULAR PURPOSE. IN NO EVENT WILL PANASONIC CANADA INC. BE LIABLE FOR ANY SPECIAL, INDIRECT OR CONSEQUENTIAL DAMAGES RESULTING FROM THE USE OF THIS PRODUCT OR ARISING OUT OF ANY BREACH OF ANY EXPRESS OR IMPLIED WARRANTY.
-
Page 86: Limited Warranty (Only For U.s.a. And Puerto Rico)
Limited Warranty (ONLY FOR U.S.A. AND PUERTO RICO) Panasonic Consumer Electronics Company, Division of Panasonic Corporation of North America One Panasonic Way, Secaucus, New Jersey 07094 Panasonic Portable Audio Products Limited Warranty Limited Warranty Coverage (For USA and Puerto Rico Only) - Page 87 CONSEQUENTIAL DAMAGES RESULTING FROM THE USE OF Purchase Parts, Accessories and Instruction Books online for all THIS PRODUCT, OR ARISING OUT OF ANY BREACH OF THIS Panasonic Products by visiting our Web Site at: WARRANTY. http://www.pstc.panasonic.com (As examples, this excludes damages for lost time, travel to and from the...
- Page 88 This Class B digital apparatus complies with Canadian shielded interface cables with ferrite core when ICES-003. connecting to computer or peripheral devices. Panasonic Consumer Electronics Company, Division of Panasonic Corporation of North America http://www.panasonic.com One Panasonic Way, Secaucus, New Jersey 07094 Panasonic Canada Inc.