Kenwood DDX8046BT Instruction Manual
Gps navigation system dnx series; monitor with dvd receiver ddx series
Hide thumbs
Also See for DDX8046BT:
- Installation manual (33 pages) ,
- Instruction manual (196 pages) ,
- Instruction manual (36 pages)
Table of Contents
Advertisement
Quick Links
GPS NAVIGATION SYSTEM
DNX SERIES
DNX9960
MONITOR WITH DVD RECEIVER
DDX SERIES
DDX896
INSTRUCTION MANUAL
Take the time to read through this instruction manual.
Familiarity with installation and operation procedures will help you obtain the
best performance from your new GPS Navigation System/DVD Receiver.
For your records
Record the serial number, found on the back of the unit, in the spaces designated on the
warranty card, and in the space provided below. Refer to the model and serial numbers
whenever you call upon your Kenwood dealer for information or service on the product.
Model DNX9960/DNX7160/DNX7020EX/DDX896/DDX8046BT Serial number
US Residence Only
Register your Kenwood product at www.Kenwoodusa.com
© B64-4673-10/01 (KW/K2W/RW)
DNX7160
DDX8046BT
Register Online
DNX7020EX
Advertisement
Table of Contents

Related Manuals for Kenwood DDX8046BT


Summary of Contents for Kenwood DDX8046BT
- Page 1 Record the serial number, found on the back of the unit, in the spaces designated on the warranty card, and in the space provided below. Refer to the model and serial numbers whenever you call upon your Kenwood dealer for information or service on the product. Model DNX9960/DNX7160/DNX7020EX/DDX896/DDX8046BT Serial number...
-
Page 2: Table Of Contents
Contents Before Use Notes How to read this manual Functions of the buttons on the front panel Basic Operation How to Display Top Menu Screen Customization of Top Menu Screen How to play media How to Display the Source Control Screen 18 Operation on the Playback Screen of Visual Sources How to Display the Navigation Screen... - Page 3 Music CD/Audio file/Video file/ Picture file (AUD mode) iPod (AUD mode) Radio (AUD mode) Navigation (NAV mode) TV (TV mode) DDX series DDX896/ DDX8046BT Setup Menu How to Display SETUP Menu Screen DivX Setup (DNX9/ DDX8 series) Software Information User Interface...
-
Page 4: Before Use
In such a situation, remove the disc and wait for the condensation to evaporate. If the unit still does not operate normally after a while, consult your Kenwood dealer. Handling discs • Do not touch the recording surface of the disc. -
Page 5: Notes
• If you experience problems during installation, consult your Kenwood dealer. • When you purchase optional accessories, check with your Kenwood dealer to make sure that they work with your model and in your area. • Select a language used to display menus, audio file tags, etc. - Page 6 MPEG2 (.mpg, .mpeg, .m2v) DivX (.divx, .div, .avi) * H.264/MPEG-4 AVC (.mp4, .m4v) * WMV 9 (.wmv, .m2ts) * ⁄ DNX9960, DDX896, DDX8046BT only CD-R/RW/ROM, DVD±R/RW only Mass-storage-class USB device only • Acceptable media CD-R/RW/ROM, DVD±R/RW, mass-storage- class USB device, iPod with KCA-iP301V...
- Page 7 Changing the browse item will display a correct title, etc. • When the iPod is connected to this unit, "KENWOOD" or "✓" is displayed on the iPod to indicate that you cannot operate the iPod. About USB device •...
- Page 8 For how to update the software, refer to the instruction manual of the navigation unit. For the latest information on connectable navigation units, access www.kenwood. com/cs/ce/. About Satellite Radio tuner This unit supports Satellite Radio tuners which are released by SIRIUS and XM.
-
Page 9: Region Codes In The World
16:9 LB (4:3) with a black band at both the top and bottom of the screen (letter box). DDX series DDX896/ DDX8046BT Operation regulatory marks With this DVD, some functions of this unit such as the play function may be restricted depending on the location where the DVD is playing. -
Page 10: How To Read This Manual
How to read this manual This manual uses illustrations to explain its operations. The displays and panels shown in this manual are examples used to provide clear explanations of the operations. For this reason, they may be different from the actual displays or panels used, or some display patterns may be different. - Page 11 The left example indicates to press the button for 2 seconds. DDX series DDX896/ DDX8046BT About the model groups If different functions are used in different model groups, the model groups are described as shown below.
-
Page 12: Functions Of The Buttons On The Front Panel
Functions of the buttons on the front panel Security indicator (page 82) Reset button (page 4) Attenuation of the volume On/Off. 1 sec. Store the tag data of the current music from HD Radio. (page 52) Volume adjustment. Displays Graphic Equalizer screen. * 1 sec. - Page 13 When the Picture in Picture function (page 20) is activated, this function is disabled. When the unit is powered off, pressing any one of Î, ¯ and Ï turns it on. DDX series DDX896/ DDX8046BT Functions of the buttons on the front panel...
-
Page 14: Basic Operation
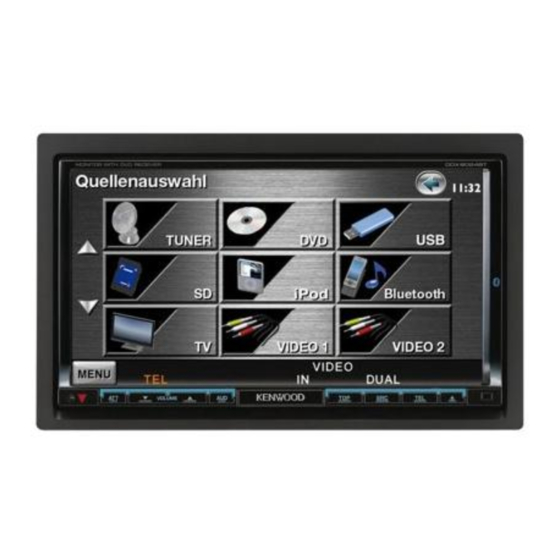
Basic Operation How to Display Top Menu Screen How to Display Top Menu Screen Top Menu Screen is the entrance to all the functions. You can select sources and various setup menus from this screen. Top Menu screen How to display the Top Menu screen DNX series and DDX DNX series and DDX series with navigation... -
Page 15: Customization Of Top Menu Screen
] Displays SETUP Menu screen. (page 78) ] Displays the EXT SW (External Switch) Control screen. (page 55) DDX series DDX896/ DDX8046BT Basic Operation ] Closes the function bar. Customization of Top Menu Screen Customization of Top Menu Screen Up to 3 sources or setups frequently used on the Top Menu screen can be registered. -
Page 16: How To Play Media
Basic Operation How to play media How to play media 7 Disc media Press the [0] button to open/close the front panel. If a disc is already inserted, it is ejected by pressing the [0] button. 7 iPod To disconnect the iPod, stop the playback by touching the [0] button on the source control screen, and then disconnect the iPod. - Page 17 Basic Operation Next page 3 DDX series DDX896/ DDX8046BT English...
-
Page 18: How To Display The Source Control Screen
Basic Operation How to Display the Source Control How to Display the Source Control Screen Screen On the Source Control screen you can find all the control buttons for the selected source. Source Control Screen • For how to use each button, see the operation pages of each source. -
Page 19: Operation On The Playback Screen Of Visual Sources
3. • For the function of each touch control area, see the pages of each source. How to display the playback screen DDX series DDX896/ DDX8046BT The Playback screen of a visual source While watching the Source Control Screen... -
Page 20: How To Display The Navigation Screen
Basic Operation How to Display the Navigation How to Display the Navigation Screen Screen DNX series DNX series The navigation screen appears. DDX series with DDX series with navigation unit navigation unit The navigation screen appears. • For how to set up and use the navigation function, see the Navigation Instruction Manual. -
Page 21: Secondary Window Function
Displays the navigation screen with Secondary window. Navigation screen with Information window Displays the Source Control screen with navigation window. DDX series DDX896/ DDX8046BT Navigation screen with Easy Control window 1 sec. Navigation screen with Split Screen Control window Buttons on the Secondary window ] Displays the navigation screen with Information window. -
Page 22: Watching Dvd/Video Cd
Watching DVD/Video CD You can play DVD/Video CD using various functions. • Set the remote controller mode switch to "DVD" mode before starting operation, see <Remote Controller mode switch> (page 105). Playback Screen Playback Screen Basic functions are available even when the playback screen is displayed. -
Page 23: Source Control Screen
[0] Ejects a disc. [1], [¡] Fast Forwards or Fast Backwards. Changes the speed (2 times, 3 times, or off ) each time the button is touched. DDX series DDX896/ DDX8046BT [4], [¢] Searches for a chapter. DVD-VIDEO DVD-VIDEO Selects a scene (when PBC is... -
Page 24: Dvd-Video Disc Menu
Watching DVD/VCD Video CD Video CD [REP] Switches the Repeat Play operations in the following sequence. Track Repeat, Repeat Off (Available when the PBC is off ) [TIME] Switches the play time display in the following sequence. Track ("P"), remaining discs ("R") (Effective only when the PBC function is off ) [PBC] Turns the PBC On or Off. -
Page 25: Video Cd Zoom Control
[2], [3], [5], [∞] Scrolls the screen in the direction you touch. [Return] Returns to the Menu Control 2 screen. [Exit] Exits the Zoom Control screen. DDX series DDX896/ DDX8046BT Video CD Zoom Control Video CD Zoom Control Displays an enlarged VCD screen. Display the playback screen See <Operation on the Playback Screen... -
Page 26: Music Cd/ Audio File Listening & Video File/ Picture File Watching
Music CD/ Audio File Listening & Video File/ Picture File Watching You can recall various control screens during playback of CD, audio file, video file and picture file. • See <List of playable discs> (page 5) for playable discs. • See <About Audio files> (page 6), <About Video files> (page 6) or <About Picture files> (page 6) for playable files. - Page 27 [TIME] Switches the play time display between Track ("P"), and Disc Remaining Time ("R"). [INFO] Displays music information of CD-TEXT being played. DDX series DDX896/ DDX8046BT Audio File Audio File Au Au Au Au MPEG/DivX® MPEG/DivX®...
-
Page 28: List Search
Music CD/ Audio File Listening & Video File/ Picture File Watching List Search List Search Folder list: Searches folders and Audio/ Video/ Picture files stored in media and devices according to hierarchy. Play list: Lists and searches music contained in the USB device. Display the Source Control Screen See <Source Control Screen>... -
Page 29: Album Artwork (Usb)
2 Returns to the Source Control screen. Scrolls to the position of the specified character Scrolls to the selected character. DDX series DDX896/ DDX8046BT Album artwork (USB) Album artwork (USB) Searches for songs in an album artwork in USB. -
Page 30: Link Search (Audio File In Usb)
Music CD/ Audio File Listening & Video File/ Picture File Watching Link search (Audio File in USB) Link search (Audio File in USB) Searches for another song of the currently selected artist. Display the Source Control Screen See <Source Control Screen> (page 26). Start Link search Select a song 1 Plays the touched song. -
Page 31: Easy Control Screen (Video File, Picture File)
Stops playing. Disc Disc [38] Plays or pauses. DDX series DDX896/ DDX8046BT Picture Control (USB) Picture Control (USB) Adjusting the picture display. Display the Playback Screen See <Operation on the Playback Screen of Visual Sources>... -
Page 32: Movie Menu Control (Disc)
Music CD/ Audio File Listening & Video File/ Picture File Watching Movie Menu Control (Disc) Movie Menu Control (Disc) Selects an option from the Movie Menu. Display the playback screen See <Operation on the Playback Screen of Visual Sources> (page 19). Display the Menu Control screen Operation on the Menu Control screen... -
Page 33: Ipod Control
(Resume Function). • If the played song is not a video content, "No Video Signal" is displayed on the video screen. DDX series DDX896/ DDX8046BT Easy Control Screen Easy Control Screen Displays the basic operation buttons on the screen. -
Page 34: Source Control Screen
iPod Control Source Control Screen Source Control Screen Switches to the source control screen to use various playback functions. Display the Source Control Screen See <How to Display the Source Control Screen> (page 18). Operation on the Source Control Screen [38] Plays or pauses. -
Page 35: Ipod List
Touch a category name to view its contents. If music title is displayed, the music is played by touching it. 2 Returns to the Source Control screen. DDX series DDX896/ DDX8046BT ] When appears, the text display is scrolled by touching it. -
Page 36: Ipod Album Artwork
iPod Control iPod Album Artwork iPod Album Artwork Searches for songs in an album artwork in iPod. Display the Source Control Screen See <Source Control Screen> (page 34). Display the iPod artwork Screen Select album 1 Touching an album artwork twice plays the first song in the album. -
Page 37: Radio Listening
"Preset" Preset number "MHz"/ "kHz" Frequency display ] When appears, the text display is scrolled by touching it. DDX series DDX896/ DDX8046BT Multi Function [1/2] Switches the multi function display. ] Closes the multi function bar. [P1] – [P6] When [P1] to [P6] buttons appear, you can recall the stations on memory. -
Page 38: Preset Select
Radio Listening [CRSC] Switches to Monaural to FM FM decrease noise when reception is poor. Preset Select Preset Select Lists and selects memorized station. Display the Source Control Screen See <Source Control Screen> (page 37). Display the Tuner Preset List Screen Select a station 1 Memorized stations are displayed. -
Page 39: Manual Memory
Select a station you wish to store in memory Store in memory 2 sec. Continue to touch until the memory number appears. DDX series DDX896/ DDX8046BT Radio Text Radio Text You can display the radio text. (Only when receiving the FM broadcast) Select a station See <Source Control Screen>... -
Page 40: Traffic Information
Radio Listening Traffic Information Traffic Information When a traffic bulletin starts, any source is switched to the traffic information and it is displayed automatically. Display the Source Control Screen See <Source Control Screen> (page 37). Set the Traffic information mode When the traffic bulletin starts... -
Page 41: Tv Watching
Visual Sources> (page 19). Operation on the TV screen 1 Switches to TV1 or TV2. 2 Displays Easy Control Screen. 3, 4 Selects a channel. DDX series DDX896/ DDX8046BT Easy Control Screen Easy Control Screen Displays the basic operation buttons on the screen. -
Page 42: Source Control Screen
TV Watching Source Control Screen Source Control Screen Switches to source control screen to use various functions. Display the Source Control Screen See <How to Display the Source Control Screen> (page 18). Operation on the Source Control Screen [BAND] Switches to TV1 or TV2. [4], [¢] Select a channel. -
Page 43: Auto Memory
Auto Memory terminates when 6 stations are stored or when all stations are tuned ⁄ • The operation ends automatically if you do not operate within 10 seconds. DDX series DDX896/ DDX8046BT Manual Memory Manual Memory Stores the current receiving channel in memory. -
Page 44: Preset Select
TV Watching Preset Select Preset Select Lists and selects memorized station. Display the Source Control Screen See <Source Control Screen> (page 42). Start Preset Select Select a station 1 Memorized stations are displayed. Touch to tune in. 2 Returns to the Source Control screen. ] Switches to the TV screen. -
Page 45: Sirius/Xm Control (North American Sales Area Only)
Artist Name, Composer Name, to Category Name. Changes the display from XM XM Channel Name, Artist Name, Song Title Name, to Category Name. DDX series DDX896/ DDX8046BT Displays the ID number when Channel 0 is selected. Displays the SIRIUS ID. SIRIUS SIRIUS Displays the RADIO ID. -
Page 46: Category/ Channel Search
SIRIUS/XM Control (North American sales area only) [DIR] You can tune in by entering the desired channel number. See <Direct Channel Search> (page 48). [INFO] Displays the program information screen. [SCN] Starts or stops Channel Scan (that tunes channels one after the other). [PRE] Lists and selects memorized channel. -
Page 47: Channel Memory
Select a channel you wish to store in memory Store in memory 2 sec. Continue to touch until the memory number appears. DDX series DDX896/ DDX8046BT Preset Select Preset Select Lists and selects memorized channel. Display the Source Control Screen See <Source Control Screen> (page 37). -
Page 48: Direct Channel Search
SIRIUS/XM Control (North American sales area only) Direct Channel Search Direct Channel Search Tuning in by entering the desired channel number. Display the Source Control Screen See <Source Control Screen> (page 45). Start Direct Channel Search Enter the channel number 1 Enters the channel number. -
Page 49: Hd Radio™ Control
"MHz"/ "kHz" Frequency display "HD" Channel display ] When appears, the text display is scrolled by touching it. DDX series DDX896/ DDX8046BT Multi Function [1/2] Switches the multi function display. ] Closes the multi function bar. [P1] – [P6] When [P1] to [P6] buttons appear, you can recall the stations on memory. -
Page 50: Auto Memory
HD Radio™ Control Auto Memory Auto Memory Stores stations with good reception in memory automatically. Display the Source Control Screen See <Source Control Screen> (page 49). Select a band you wish to store in memory Select the Auto Memory mode Start Auto Memory Auto Memory terminates when 6 stations are stored or when all stations are tuned... -
Page 51: Preset Select
Select a station 1 Memorized stations are displayed. Touch to tune in. ] Returns to the Source Control screen. DDX series DDX896/ DDX8046BT Receive mode Receive mode Sets the radio broadcasts receive mode. Display the Source Control Screen See <Source Control Screen> (page 49). -
Page 52: Direct Search
HD Radio™ Control Direct Search Direct Search Tuning by entering the desired frequency or channel number. Only with KTC-HR300 (optional accessory) connected. Display the Source Control Screen See <Source Control Screen> (page 49). Start Direct Search Enter the frequency or channel number 1 Enters the frequency or channel number. - Page 53 Select the "Tagging Information" display. ⁄ • Up to 50 TAGs (song’s information) can be registered to this unit. When iPod is connected, the TAG information registered to this unit is transferred to the connected iPod. DDX series DDX896/ DDX8046BT English...
-
Page 54: Bluetooth Audio Control
Bluetooth Audio Control You can listen to audio files stored in a Bluetooth audio player or cell-phone. Before Use Before Use • For details on the Bluetooth Audio player which can be connected, see <About the Bluetooth Audio player> (page 8). •... -
Page 55: Other Functions
Connect the external device to be controlled to that relay unit. • Refer to <EXT SW Setup> (page 83) for information on setting the power on or off specification. DDX series DDX896/ DDX8046BT Muting Audio Volume upon Muting Audio Volume upon Reception of Phone Call... -
Page 56: Voice Control (Dnx9960 Only)
Voice Control (DNX9960 only) The unit is equipped with Advanced Speech Recognition function which allows you to operate it with your voice. The supported languages are US English, UK English, French, German, Dutch, Italian, and Spanish. For information on the voice commands, refer to <Voice command table>... - Page 57 • The voice control is canceled if no operation is continued for a certain period of time. DDX series DDX896/ DDX8046BT English...
-
Page 58: Screen Control
Screen Control Setting the monitor screen. Screen Control Screen Control Display the Easy Control Screen See <Operation on the Playback Screen of Visual Sources> (page 19). Display the Screen Control screen When the navigation screen is displayed, press the [TEL] button for 1 second or more. -
Page 59: Hands Free Unit Control
50* characters representing a name. (* 50: Number of alphabetical characters. Fewer characters can be input depending on the type DDX series DDX896/ DDX8046BT of characters.) • Depending on the type of your cell-phone, the following restrictions are placed: - The phonebook data cannot be downloaded normally. -
Page 60: During A Call
Hands Free Unit Control During a Call During a Call ] Switches the voice output between phone and speaker. [DTMF] Outputs dial tone. See <Controlling Tone-based Services> (page 65). ] Disconnecting a call Adjusting the Voice Volume during a Call Call Waiting Call Waiting ] •... -
Page 61: Calling By Phonebook
• Setting the cell-phone in the private mode can disable the hands-free function. DDX series DDX896/ DDX8046BT Calling by Phonebook Calling by Phonebook You can call a person using his/her phone number that you have registered in the Phonebook. -
Page 62: Calling By Entering A Phone Number
Hands Free Unit Control Select the phone number to call Make a call ⁄ • To use the Phonebook, it must have been downloaded from the cell-phone. For more details, see the instruction manual of your cell- phone. • Characters with no corresponding name will not be displayed. -
Page 63: Making A Call Using Call Records
Missed Calls list screen shows the list of the calls originated from or received at this unit. They are not the ones stored in the cell-phone memory. DDX series DDX896/ DDX8046BT Calling by Voice Recognition Calling by Voice Recognition (DNX7/ DDX8 series) (DNX7/ DDX8 series) Calls by recognizing the registered voice. - Page 64 Hands Free Unit Control Make a call ■ If there is more than one phone number assigned under the registered name Say the key word registered for the category When a beep is heard, say the category within 2 seconds. Make a call DNX series DNX9960/ DNX7160/ DNX7020EX ■...
-
Page 65: Controlling Tone-Based Services
See <Calling by Entering a Phone Number> (page 62). Display the DTMF input screen You can send tones during a call DDX series DDX896/ DDX8046BT Setting Up the Hands-Free Phone Setting Up the Hands-Free Phone The Hands-Free system can be set as follows. -
Page 66: Voice Registration (Dnx7/ Ddx8 Series)
Hands Free Unit Control [Call Beep] Sets the beep of the incoming call. ( "ON") "ON": Beep is heard. "OFF": Beep is canceled. [SMS Receive Beep] Sets the beep of the incoming SMS. ( "ON") "ON": Beep is heard. "OFF": Beep is canceled. [Phone Information Use] Sets whether to use cell-phone phonebook, outgoing calls list, incoming calls list and missed... -
Page 67: Key Word Voice Registration (Dnx7/ Ddx8 Series)
Read the message for the further operation. • Repeat from 1st try if the voice is different from the 1st try. DDX series DDX896/ DDX8046BT Key Word Voice Registration Key Word Voice Registration (DNX7/ DDX8 series) (DNX7/ DDX8 series) Registers the voice to select the Phone number category by Voice Recognition. -
Page 68: Phone Number Preset
Hands Free Unit Control Display voice registration screen Say the phone category to register (1st try) Say within 2 seconds after the Beep. Say the phone category to register (2nd try) Say within 2 seconds after the Beep. End voice registration ⁄... -
Page 69: Sms (Short Message Service)
Uses SMS function. Display the Hands-Free Control screen See <Making a Call> (page 60). Display the SMS Select screen DDX series DDX896/ DDX8046BT Select a function ] Displays the SMS Create Menu screen. See <Create a message>. ] Displays received message list. - Page 70 Hands Free Unit Control SMS Message screen SMS] Creates a new message for the selected message. Create a message Input the destination ] Select a destination from the phonebook. [Direct Number] Enter the phone number. [SET] Display the Create SMS Message screen.
- Page 71 DDX series DDX896/ DDX8046BT English...
-
Page 72: Audio Control
Audio Control Audio Control Menu Audio Control Menu Displays the Audio Control menu to set the sound effect function of this unit. Display the Source Control Screen When a video screen is displayed, press the [SRC] button. Display the Audio Control menu In this manual, the above selection is indicated as: >... -
Page 73: Equalizer Control
[Natural], [Rock], [Pops], [Easy], [Top40], [Jazz], [Game], [iPod], [User] Selects an equalizer curve type. You can select any of the following equalizer curves. DDX series DDX896/ DDX8046BT ⁄ • [iPod] During iPod source only. [EQ] Displays the Graphic Equalizer setup screen. (page 73) -
Page 74: Zone Control
Audio Control Set the Graphic Equalizer DNX9/ DDX8 series DNX7 series 1 Gain level can be adjusted by touching the each frequency bar. [2], [3] Sets a frequency. [5], [∞] Sets a gain level. [EQ Init] Returns to the previous level which the gain level is adjusted. -
Page 75: Space Enhancer (Dnx7 Series)
Enhancer]. (page 72) Set the Space Enhancer 1 Sets the soundscape level. ⁄ • You cannot set Space Enhancer in tuner source. DDX series DDX896/ DDX8046BT Listening Position Listening Position You can adjust the sound effects according to your listening position. -
Page 76: Srs Wow Control (Dnx9/ Ddx8 Series)
Audio Control • Only the adjusted distance of position setup (Position and Position DTA values) is stored in memory. Therefore, the final adjustment distance changes if you change the Car Type Set Up value (page 95). Position DTA Control You can fine-adjust your listening position. Display the Position DTA screen Select a speaker you wish to adjust 1 Center speaker (DNX9/ DDX8 series) -
Page 77: Surround Control (Dnx9/ Ddx8 Series)
PCM, MPEG, SDDS, AAC or MP3/WMA), input channels (front or rear channels), and sampling frequency are displayed. DDX series DDX896/ DDX8046BT ⁄ • When you have selected the TV or TUNER source and when you set the Dolby PL, we recommend you to select the "Dolby PLII Matrix"... -
Page 78: Setup Menu
Setup Menu You can set up various receiver parameters. How to Display SETUP Menu Screen How to Display SETUP Menu Screen Displays the Setup menu to set various functions. Display the Source Control Screen When a video screen is displayed, press the [SRC] button. -
Page 79: Divx Setup (Dnx9/ Ddx8 Series)
Deactivating DivX Code Display the DivX Deactivation Confirm screen DDX series DDX896/ DDX8046BT Cancel the registration [DivX(R) Touching the screen displays a confirmation message. Touch [OK]. To cancel clearing, touch [Cancel]. -
Page 80: User Interface
Setup Menu User Interface User Interface You can setup user interface parameters. Display the User Interface screen > > > > Touch [ [User Interface]. (page 78) Set each item [Beep] Turns the key touch tone On or Off. ( "ON") [Remote Sensor] Selects a remote control signal. -
Page 81: Touch Panel Adjustment
[User Text Language Select] Selects the language used for tag text (song information). "American English (en)") DDX series DDX896/ DDX8046BT Touch Panel Adjustment Touch Panel Adjustment You can adjust the touch panel operations. Display the Touch panel Adjustment screen >... -
Page 82: Clock And Date Setup
Setup Menu Clock and Date Setup Clock and Date Setup You can adjust the clock time. Display the Clock Setup screen > > > > Touch [ [Clock]. (page 78) Setup the Clock 1 Adjusts month, day, year, hours, and minute. -
Page 83: Ext Sw Setup
Sets to turn output on/off each time the button on the EXT SW Control screen is touched. See <External Device Power Supply Control> (page 55). DDX series DDX896/ DDX8046BT [Pulse Set] Sets the Pulse signal output time. Outputs 500ms when "1" is set. -
Page 84: Setup Memory
Setup Menu Setup Memory Setup Memory Audio Control, AV-IN SETUP, AV Interface, Navigation, and Audio SETUP settings can be memorized. The memorized settings can be recalled at any time. For example, even when the settings are cleared due to replacement of the battery, the settings can be restored. -
Page 85: Changing Background Image
[Change] Selects an image for background. [Delete] Deletes the background image. Touching the screen displays a confirmation message. Touch [Yes]. To cancel clearing, touch [No]. DDX series DDX896/ DDX8046BT Select the image to load > > [Display] Load the image ] Rotates counter clockwise. -
Page 86: Panel Color Coordinate
Setup Menu ⁄ • See <About Picture files> (page 6) for readable image specifications. • The [Memory] button on the “Background” screen becomes active only in STANDBY source mode. • Pressing the [Memory] button on the “Background” screen switches the AV OUT source to OFF. -
Page 87: Screen Control
Select a Preset number to register 2 sec. Adjusted color is registered to the selected Preset button. Complete the color coordination DDX series DDX896/ DDX8046BT Screen Control Screen Control You can adjust the screen mode of the monitor. Display the Screen Control screen >... -
Page 88: Registering Bluetooth Unit
Setup Menu Registering Bluetooth Unit Registering Bluetooth Unit Registers the Bluetooth unit to be connected. Display the Bluetooth Setup screen > > > > Touch [ SETUP]. (page 78) Display the Connect Device List screen Search for a Bluetooth unit 1 Displays the registered Bluetooth units. -
Page 89: Registering Bluetooth Unit Pin Code
Confirm whether to register ⁄ • Only models in Bluetooth unit name list can be registered. DDX series DDX896/ DDX8046BT Go through the procedure of <Registering Bluetooth Unit> and complete the registration (pairing) Registering Bluetooth Unit PIN... -
Page 90: Bluetooth Unit Connection
Setup Menu Bluetooth Unit Connection Bluetooth Unit Connection Selects the Bluetooth unit to connect. Display the Bluetooth Setup screen > > > > Touch [ SETUP]. (page 78) Display the Connect Device List screen Select a registered Bluetooth unit Select the service to use [TEL (HFP)] Connects/disconnects cell- phone to use for Hands Free. -
Page 91: Av Input Setup
[iPod AV Interface Use] and three are displayed when not selected. • [AV-IN3 Name] DNX9/ DDX8 series only DDX series DDX896/ DDX8046BT AV Output Interface Setup AV Output Interface Setup You can set AV output parameters. Display the AV-OUT Interface screen [AV-IN SETUP]. -
Page 92: Camera Setup
Setup Menu Camera Setup Camera Setup You can set Camera parameters. Display the Camera Setup screen > > > > Touch [ SETUP]. (page 78) Set each item [Rear Camera] Selects the type of rear camera to use. ( "Other") "CMOS-300": When the CMOS-300 with ID 1 set is connected. -
Page 93: Navigation Setup
Navigation System to connect via its interface cable. "AV-IN": Allows a third-party navigation system to connect via the AV INPUT1 DDX series DDX896/ DDX8046BT port. "OFF": Must be used if no navigation system is connected. (The navigation display is cancelled when the AV [Navigation]. -
Page 94: Speaker Setup
Setup Menu Speaker Setup Speaker Setup You can select a speaker type and its size to get the best sound effects. Display the Speaker Select screen > > > > Touch [ > > [Speaker Select]. (page 78) Select a speaker you wish to adjust When the speaker type and size are set, the speaker crossover network and equalizer curve are set automatically. -
Page 95: Car Type (Dta) Setup
[LPF FREQ] Low Pass Filter adjustment. (When Subwoofer is selected on Speaker Select screen) [Slope] Sets a crossover slope. DDX series DDX896/ DDX8046BT Car Type (DTA) Setup Car Type (DTA) Setup You can setup the car type and speaker network, etc. - Page 96 Setup Menu Speaker Location setup Display the Speaker Location Setup screen Set the speaker locations [Front Speaker] Sets the location of the front speaker. "Door", "On Dash", "Under Dash" [Rear Speaker] Sets the location of the rear speaker. "Door", "Rear Deck" "2nd Row", "3rd Row"...
-
Page 97: Channel Level (Dnx9/ Ddx8 Series)
3 Calculate the distance difference in accordance with the farthest speaker. 1.6feet 2.5feet 5feet +0feet DDX series DDX896/ DDX8046BT Channel Level (DNX9/ DDX8 series) Channel Level (DNX9/ DDX8 series) You can set the volume at each setup position. Display the Car Type Setup screen Touch [ >... -
Page 98: Dvd Setup
Setup Menu DVD Setup DVD Setup You can set up the DVD play. Display the DVD Setup screen > > > > Touch [ (page 78) Set each item [Menu Language]* Selects a disc menu language. See <DVD Language Setup> (page 99). [Subtitle Language]* Selects a subtitle language. -
Page 99: Dvd Language Setup
[Original] Sets the DVD's original language (only when setting an audio language). [Clear] Clears the language code. DDX series DDX896/ DDX8046BT Set the language you use [DVD SETUP]. DVD Parental Level Setup DVD Parental Level Setup Sets a parental level. -
Page 100: Disc Setup
Setup Menu [Clear] Clears the code number. ⁄ • The number you enter first is set as your code number. Display the Parental Level SETUP screen Select a parental level and complete the setup Selects a parental level. ⁄ • If a disc has higher parental lock level, you need to enter the code number. -
Page 101: Usb Setup
"Auto") "Auto": Information is displayed for 5 seconds when updated. "OFF": Information is displayed when you touch on the screen. DDX series DDX896/ DDX8046BT iPod Setup iPod Setup Performs setup when using iPod. Display the iPod Setup screen Touch [... -
Page 102: Sirius Parental Code Setup
Setup Menu SIRIUS Parental Code Setup SIRIUS Parental Code Setup Sets a SIRIUS Parental code. (with the optional accessory SIRIUS Tuner connected only) Display the SIRIUS Setup screen > > > > Touch [ SETUP]. (page 78) Display the Parental Code screen ⁄... -
Page 103: Sirius Parental Lock Setup
Enter the same code number as you originally input <SIRIUS Parental Code Setup> (page 102). Display the Parental Code screen Enter the code number DDX series DDX896/ DDX8046BT Select a category [SIRIUS 1 Category list Displays all the channels in the selected category. -
Page 104: Sirius Skip Channel Select
Setup Menu SIRIUS Skip Channel Select SIRIUS Skip Channel Select Sets the undesired channels unselected. Display the SIRIUS Setup screen > > Touch [ SETUP]. (page 78) Display the Skip Category Select screen Select a category 1 Category list Displays all the channels in the selected category. -
Page 105: Remote Controller
In such instances, replace the both batteries with new ones. DDX series DDX896/ DDX8046BT Remote Controller mode switch Remote Controller mode switch The functions operated from the remote controller differ depending on the position of the mode switch. -
Page 106: Common Operations (Aud Mode)
Remote Controller TV mode This is switched when controlling TV. NAV mode This is switched when controlling Navigation unit. ⁄ • The position of the remote control mode switch is indicated in the title of each mode, e.g., "(AUD mode)". •... -
Page 107: Dvd/Vcd (Dvd Mode)
Switches the function screen. MODE Switches the screen mode. Screen mode changes each time you press this key. DDX series DDX896/ DDX8046BT DVD/VCD (DVD mode) DVD/VCD (DVD mode) Track search and file search Selects the track or file to be played. - Page 108 Remote Controller VCD 1.X, VCD 2.X (PBC OFF) Track number Cancel VCD 2.X (PBC ON) Scene number Number Cancel Once you have switched to the direct search feature, specify the search number from the numeric keypad, and then press [ENTER] key. Numeric keypad •...
-
Page 109: Music Cd/Audio File/Video File/Picture File (Aud Mode)
Audio files in DVD/CD disc Folder number File number Cancel Once you have switched to the direct DDX series DDX896/ DDX8046BT search feature, specify the search number from the numeric keypad, and then press [38] key. Numeric keypad • Specify the number to search in direct search. -
Page 110: Radio (Aud Mode)
Remote Controller Radio (AUD mode) Radio (AUD mode) FM band switching Switches to bands received by the unit. AM band Station selection Switches to broadcast stations received by the unit. Seek mode switching Switches the Seek mode (AUTO1, AUTO2, MANU). Direct tuning After pressing this key, use the keypad to specify the broadcast station you wish to... -
Page 111: Navigation (Nav Mode)
Zooms in or out the navigation map. MENU Displays Main menu. CANCEL Displays previous screen. POSITION Displays the current position. DDX series DDX896/ DDX8046BT ROUTE M Displays Route Option menu. VIEW Switches between 2D and 3D map displays. VOICE Plays Voice guidance. -
Page 112: Tv (Tv Mode)
Remote Controller TV (TV mode) TV (TV mode) Switching Band/Video It switches between the station of the TV band to receive and video input. Channel Selection The TV channel to receive is selected. Direct tuning (NTSC TV type only) Press this key first, and then specify the station to receive with the numeric keypad. -
Page 113: Initial Setup
[EXT SW] Setting up external switch power mode. (page 83) [Camera] You can set Camera parameters. See <Camera Setup> (page 92). DDX series DDX896/ DDX8046BT End initial setup ⁄ • The settings above can be changed in <Setup Menu> (page 78). -
Page 114: Status Bar Indicator Items
Status bar Indicator items Shown below is a list of indicators displayed on the Status bar. Source Display Overview "ATT" Indicates that the attenuator is active. "DUAL" Turns on the Dual zone function. "TEL" Indicates the connection state of the Bluetooth hands-free unit. -
Page 115: Ddx Series Ddx896/ Ddx8046Bt
Persian Finnish Fiji Faroese French Frisian Irish Scots Gaelic Galician Guarani Gujarati Hausa Hebrew Hindi Croatian Hungarian Armenian Interlingua DDX series DDX896/ DDX8046BT Code Language Interlingue Inupiak Indonesian Icelandic Italian Japanese Javanese Georgian Kazakh Greenlandic Cambodian Kannada Korean Kashmiri Kurdish... -
Page 116: Help? Troubleshooting
Help? Troubleshooting Some functions of this unit may be disabled by some settings made on this unit. • Cannot set up the subwoofer. • Cannot set up subwoofer phase. • No output from the subwoofer. • Cannot set up the low pass filter. •... - Page 117 "Mecha Error" : The disc player is malfunctioning. ➡ Eject the disc and try inserting it again. Contact the Kenwood dealer if this indicator continues blinking or the disc cannot be ejected. "Disc Error" : An unplayable disc is inserted.
-
Page 118: Help? Error
This unit does not support the connected navigation unit. ➡ The latest information on the connectable navigation unit can be obtained from http://www.kenwood.com/cs/ce. No navigation unit is connected. ➡ Connect a supported navigation unit. "CHECK SIRIUS" : The unit cannot recognize the connected SIRIUS Tuner Box. -
Page 119: Specifications
: 0.008 % (1 kHz) S/N Ratio (dB) : 98 dB (DVD-Video 96 kHz) Dynamic Range : 98 dB (DVD-Video 96 kHz) DDX series DDX896/ DDX8046BT Disc Format : DVD-Video/ VIDEO-CD/ CD-DA Sampling Frequency : 44.1/ 48/ 96 kHz Quantifying Bit Number... - Page 120 Frequency Range 200 kHz : 87.9 MHz – 107.9 MHz (DNX9960/ DNX7160/ DNX7020EX/ DDX896) 50 kHz : 87.5 MHz – 108.0 MHz (DDX8046BT) Usable Sensitivity (S/N : 30 dB) : 9.3 dBf (0.8 μV/ 75 Ω) Quieting Sensitivity (S/N : 50 dB) : 15.2 dBf (1.6 μV/ 75 Ω)
- Page 121 : -50 – +10 dB Although the effective pixels for the liquid crystal panel is given as 99.99% or more, 0.01% of pixels may not light or may light incorrectly. DDX series DDX896/ DDX8046BT Navigation section (DNX series Navigation section (DNX series only)
- Page 122 The Bluetooth word mark and logos are owned by the Bluetooth SIG, Inc. and any use of such marks by Kenwood Corporation is under license. Other trademarks and trade names are those of their respective owners. The "AAC" logo is a trademark of Dolby Laboratories.
-
Page 123: Laser Product
Kenwood Corporation 2967-3, ISHIKAWA-MACHI, HACHIOJI-SHI TOKYO, JAPAN KENWOOD CORP. CERTIFIES THIS EQUIPMENT CONFORMS TO DHHS REGULATIONS N0.21 CFR 1040. 10, CHAPTER 1, SUBCHAPTER J. Location : Bottom Panel DDX8046BT: The marking of products using lasers... - Page 124 This symbol mark indicates that Kenwood manufactured this product so as to decrease harmful infl uence on the environment.