Table of Contents
Troubleshooting

Related Manuals for Windsor chariot iScrub 20 CS20


Summary of Contents for Windsor chariot iScrub 20 CS20
- Page 1 iScrub 20 Operating instructions (ENG) MODELS: CS20 10061250 CSC20 10061330 CSX20 10061370 CSXC20 10061380 CS22SP 10061300 CSC22SP 10061340 Read these instructions before using the machine. 86333220-AM 02/02/11...
-
Page 2: Machine Data Log/Overview
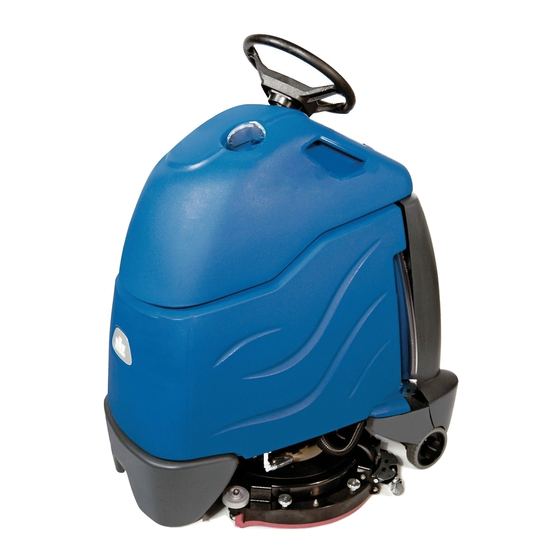
Machine Data Log/Overview OVERVIEW The Chariot Scrubber is a battery powered, stand-on, hard floor scrubber intended for commercial use. The appliance applies a cleaning solution onto a hard floor, scrubs the floor with brush or pad, and then vacuums the soiled water back into the recovery tank. -
Page 3: Table Of Contents
Table of Contents Machine Data Log/Overview....2 Battery Discharge Indicator Troubleshooting ..52 Table of Contents ......3 Parts How to Use This Manual . -
Page 4: How To Use This Manual
They are listed in this general Parts may be ordered from authorized Windsor order: dealers. When placing an order for parts, the machine •... -
Page 5: Safety
Safety IMPORTANT SAFETY INSTRUCTIONS When using an battery powered appliance, basic precaution must always be followed, including the following: READ ALL INSTRUCTIONS BEFORE USING THIS MACHINE. To reduce the risk of fire, electric shock, or injury: Use only indoors. Do not use outdoors or expose to rain. Use only as described in this manual. -
Page 6: Hazard Intensity Level
WHEN SERVICING MACHINE: Avoid moving parts. Do not wear loose clothing; jackets, shirts, or sleeves when working on the machine. Use Windsor approved replacement parts. Batteries emit hydrogen gas. Explosion or fire can result. Keep sparks and open flame away. Keep solution tank in raised position when charging. -
Page 7: Safety Label Locations
Safety Safety Label Locations These drawings indicate the location of safety labels on the machine. If at any time the labels become illegible, promptly replace them. 86244300 PRV NO. 500955 WARNING LABEL CAUTION 86244310 PRV NO. 500956 CAUTION LABEL 86335010 (2X) CAUTION LABEL 86252520 PRV NO. -
Page 8: Operations
Operations Technical Specifications ITEM DIMENSION/CAPACITY Nominal Power-Disk 1080 W Nominal Power-Cylindrical 1512 W Rated Voltage 36 Volts DC Rated Amperage -Disk 30 amps Rated Amperage -Cylindrical 42 amps Batteries 3 X12 Volt 130 AH @ 20 hr. rate Battery Compartment Dimensions 20-1/2 in. - Page 9 Operations ITEM MEASURE Height 51.8 in (1316mm) Length 44.0 in (1118mm) Width without squeegee - Disk 23.4 in (594mm) Width without squeegee - Cylindrical 25.4 in (645mm) Width of squeegee - Disk 27.2 in (691mm) Width of squeegee - Cylindrical 29.3 in (744mm) Width of scrub path - Disk 20 in (508mm)
-
Page 10: How This Machine Works
Operations How This Machine Works The function of the recovery system is to vacuum the The Chariot® is a battery powered, self-propelled, hard soiled water back into the recovery tank. The recovery floor scrubber intended for commercial use. The system consists of the squeegee, vacuum motor, float appliance applies a cleaning solution onto a hard floor, ball, recovery tank. -
Page 11: Components
Operations Deluxe Disk & Cylindrical Cylindrical Components 7. Recovery Sight Dome 1. Drive Control 8. Recovery Drain Hose 2. Scrub Controls 9. Scrub Deck Skirt 3. Control Console 10. Solution Cover 4. Pedal Platform 11. Solution Drain Hose/Solution Level Indicator 5. -
Page 12: Drive Controls
Operations Drive Controls 86333220 CS20... - Page 13 Operations 1. Key Switch 6. Steering Wheel 2. Emergency Stop/Brake Switch 7. Speed Control 3. Directional Control / Drive Reset Switch 8. Battery Discharge Indicator 4. Throttle Pedal 9. Hour Meter 5. Horn Button 10. Operator Presence Switch 1. KEY SWITCH Controls the power for machine functions.
- Page 14 Operations 4. THROTTLE PEDAL Controls the speed of the vehicle within the speed control setting selected. Pressing the pedal causes the machine to travel in the direction selected by the Directional Control Switch. To increase speed, increase pressure on the pedal. To decrease speed, decrease pressure on the pedal.
- Page 15 Operations 8. BATTERY DISCHARGE INDICATOR Indicates the charge level of the batteries. The indicator will be illuminated if the batteries have a sufficient charge. A slow, continuous flash indicates the batteries require charging. The Battery Lockout function will activate when the batteries are low. Once active, the LED status indicator will begin to flash slowly and the controller will inhibit the scrub motor and water solenoid.
-
Page 16: Scrub Controls
Operations Scrub Controls 1. FUNCTION MODE SWITCH The first two positions are for transport only. See drive controls section. A1 - Light cleaning This mode is used for light cleaning. In this mode the machine will propel at fast speed. The ‘floating’ scrub deck and squeegee is in the down position. - Page 17 Operations B - Vacuum only mode This mode is used for picking up solution only. The brush and water will both be up and off. In this mode the machine will propel at fast speed. The squeegee is lowered and the vacuum will come on. C - Double Scrub cleaning This mode is used for putting down solution and scrubbing without picking it back up.
-
Page 18: Scrub Controls-Squeegee
Operations Scrub Controls-Squeegee DISK 1. Squeegee Latch 2. Squeegee Hose and Tube 3. Squeegee Wheels (3) 4. Double Scrub Support Cable 5. Double Scrub Cable Hook 86333220 CS20... - Page 19 Operations 1. Squeegee Latch The squeegee latch holds the squeegee in place. 2. Squeegee Hose and Tube The squeegee hose and tube carry the recovered solution to the recovery tank. 3. Squeegee Wheels The three squeegee wheels support the squeegee at the correct height and angle so that no adjustment is required.
-
Page 20: Pre-Run Machine Inspection
Operations Machine Operation 3. Fill the solution tank with clean water, leaving enough room for the required amount of cleaning solution. The solution tank capacity filled to fill inlet Pre-Run Machine Inspection is 10 gallons (38 liters). The water must not be hot- Do a pre-run inspection to find possible problems that ter than 140°... -
Page 21: Normal Scrubbing
Operations 3. Measure the chemical into the solution tank. Liquid To Begin Scrubbing chemicals should be added to the solution tank When operating the machine around people, pay after filling with water. Dry chemicals should be close attention for unexpected movement. Use thoroughly mixed before being added into solution extra caution around children. -
Page 22: To Stop Scrubbing
Operations To Stop Scrubbing 1. Rotate the function knob to either transport posi- tion. The brush motor and vacuum will stop and the scrub deck will rise to the park position. 2. Allow the throttle pedal to return to neutral. 3. -
Page 23: Emptying And Cleaning Tanks
Operations Emptying and Cleaning Tanks Solution Tank 1. Park the machine next to a floor drain. Drain hoses 1. Pull the solution drain hose from its mounting are at the rear of the machine. pocket. Lower hose in direction of drain. 2. -
Page 24: Maintenance
Maintenance Service Schedule BEFORE EACH AFTER EACH MAINTENANCE WORK PERIOD WORK PERIOD Check water level of batteries after charging; add distilled water if necessary. (Wet cell only) Visually check for damaged or worn tires. Check brush or pad for proper installation. Check vacuum hose connections. -
Page 25: Batteries
Maintenance Batteries 1. Cover Retainer Latch 2. Rear Cover 3. Battery Connector-Machine 4. Batteries 5. Battery Tray 86333220 CS20... -
Page 26: Battery Maintenance
Maintenance Batteries (Wet Cell) The batteries provide the power to operate the machine. The batteries require regular maintenance to When servicing machine, avoid contact with keep them operating at peak efficiency. battery acid. The machine batteries will hold their charge for long periods of time, but they can only be charged a certain number of times. -
Page 27: Checking Battery Specific Gravity
Maintenance Checking Battery Specific Gravity Charging Batteries Use a hydrometer to check the battery specific gravity. When servicing machine, avoid contact with battery acid. Batteries emit hydrogen gas. Explosion or fire can result. Keep sparks and open flame away. Keep covers open when charging. - Page 28 Maintenance 5. Replace the battery caps, and leave them in place 6. Disconnect main positive lead and secure cable while charging. terminals away from batteries. 6. Unplug the battery connector from the machine. 7. Loosen both terminals on each jumper cable and remove one at a time.
-
Page 29: Battery Charger Programming
Maintenance Battery Charger Programming Switching From Maintenance Free to Wet Cell Batteries NOTE: For machines equipped with optional on- board charger. When replacing batteries, charger Program charger from alternate mode (All LED’s flash) programming changes may be required. If replacing to normal mode (red LED flashes): batteries with same type, (e.g. - Page 30 Maintenance DISK CYLINDRICAL 1. Squeegee Retainer Latch 2. Squeegee Squeegee Blades - Disk The rear blade wipes the floor to a near dry condition. It The front squeegee blade allows solution to pass is important the rear blade be in good condition to through channels in the blade into the squeegee properly do its job.
-
Page 31: To Remove Squeegee Assembly
Maintenance To Remove Squeegee Assembly Squeegee Blades-Cylindrical 1. With the squeegee in the up position, turn key The front squeegee blade allows solution to pass switch “OFF”. through channels in the blade into the squeegee assembly while maintaining vacuum to provide lift. The 2. -
Page 32: Scrub Deck-Disk
Maintenance DISK CYLINDRICAL Scrub Deck-Disk Scrub Deck-Cylindrical 1. Scrub Deck Side 1. Scrub Deck Side Squeegee 2. Scrub Brush Motor 2. Scrub Brush Motor 3. Scrub Deck Lift Actuator 3. Scrub Deck Lift Actuator 86333220 CS20... -
Page 33: Scrub Brush-Disk
Maintenance Scrub Brush-Disk There are different types of brushes available to cover applications from cleaning heavily soiled floors to polishing. A pad driver is also available to take advantage of the many cleaning pads on the market. Please refer to the following to assist in selecting the proper brush or pad for the work at hand. -
Page 34: To Replace Scrub Brush Motor - Disk
Maintenance Do not use a pressure washer to clean around the brush motors. Use tap pressure only. To Replace Scrub Brush Motor - Disk With the scrub deck in the lowered position, disconnect brush motor wiring connector from harness. 1. Disconnect the two(2) connectors from solenoid valve. 2. - Page 35 Maintenance Do not use a pressure washer to clean around the brush motors. Use tap pressure only. To Replace Scrub Brush Motor-Cylindrical 1. Lower scrub deck using selector knob. Turn off key in down position. 2. Disconnect the two connectors from solenoid valve. 3.
-
Page 36: Scrub Deck Actuator Removal / Replacement
Maintenance Scrub Deck Actuator Removal / Replacement FOR SAFETY: Before leaving or servicing machine, stop on a level surface. Turn off machine. 1. Support deck under pad driver so that actuator pins can be removed. 2. Remove bumper screws (2). 3. -
Page 37: Circuit Protection
Maintenance Circuit Protection CIRCUIT BREAKERS Circuit Breakers Circuit breakers interrupt the flow of power in the event of an electrical overload. When a circuit breaker is tripped, reset it by pressing the exposed button. If a circuit breaker continues to trip, the cause of the electrical overload should be found and corrected. -
Page 38: Replacing Or Installing Scrub Brushes (Disk)
Maintenance Replacing or Installing Scrub Brushes 4. Remove brush/pad from holder and replace with new brush/pad. (Disk) 5. To reinstall, lift deck shroud upward as shown. FOR SAFETY: Before leaving or servicing the machine; stop on level surface, turn OFF machine and remove Center the brush/pad driver under the brush drive key. -
Page 39: Replacing Or Installing Scrub Brushes (Cylindrical)
Maintenance Replacing or Installing Scrub Brushes 4. Slide new brushes into receptacle at far side of deck, lift upward and snap into position. Ensure (Cylindrical) brushes are secure. FOR SAFETY: Before leaving or servicing the machine; stop on level surface, turn OFF machine and remove key. -
Page 40: Solution
Maintenance Solution CYLINDRICAL 1. Solution Strainer-Coarse 2. Shut-off Valve 3. Solenoid Valve 86333220 CS20... - Page 41 Maintenance 1. SOLUTION STRAINER Located in bottom of tank. The strainer protects the ball valve and solenoid valve from debris. If the ball valve and solenoid valve are not working, then check the strainer for debris. Drain the solution tank. Reach down to the strainer and remove debris.
-
Page 42: Tank Assembly Removal
Maintenance Tank Assembly Removal 9. Disconnect the five electrical plugs located just forward of the battery tray. To disconnect, lift the In order to access the frame or drive components, the plugs off of their mounting plate, locate and entire tank/console cover assembly can be removed as depress the lock tab and pull the connectors apart. -
Page 43: Drive Unit Removal
Maintenance Drive Unit Removal 1. Remove tank assembly. 2. Pull the brake and drive electrical connectors off of their support plate. 3. Remove the P-clamp holding the cable. 4. Lift the chain cover plate off of the motor. 5. Support the chassis on the tip pads so that the front wheel is 10 inches off the floor. -
Page 44: Vacuum & Float Shutoff
Maintenance Vacuum & Float Shutoff 1. Recovery Tank Float Shut-off 2. Vacuum Motor 86333220 CS20... -
Page 45: Vacuum Motor Carbon Brush Replacement
Maintenance RecoveryTDank Float Shut-off FOR SAFETY: before leaving or servicing machine, stop on a level surface, turn off machine and When water is no longer being vacuumed from the floor disconnect power. and the vacuum fan is operating, the ball float has engaged. -
Page 46: Drive Motor
Maintenance Drive Motor Transporting Drive Motor Carbon Brush Replacement Pushing Machine This machine is equipped with a drive gear engage- ment/disengagement lever. Do not use a pressure washer to clean around the The brake automatically engages and keeps the motors. Use tap pressure only. machine from moving whenever the operator stops the FOR SAFETY: Before leaving or servicing machine, machine. -
Page 47: Inclines
Maintenance Drive gear engaged Inclines Machine can be driven. When navigating an incline the machine may come to a stop. Turn the machine off. Wait 5 minutes and start the Rotate lever firmly in direction of arrow. machine and proceed up the incline. Overheating may occur if you do not wait the full 5 minutes. -
Page 48: Machine Tie-Downs
Maintenance Preparation for Loading/Unloading Trailer Before loading or unloading machine from trailer, remove squeegee and scrub brush (pad) to eliminate interference with ramp. Scrub head must be in the up position before loading. When transporting the machine on a trailer or in a truck, in addition to using tie-downs, be sure to block the tires to prevent the machine from rolling. -
Page 49: Machine Tie-Downs (Deluxe)
Maintenance Machine Tie-Downs (Deluxe) There are two tie points located in front of the rear wheels on the frame, one on the front bumper tie-down bar, and a Tie-down wrap point on the recovery tank. Tie-down devices must be of the proper type and strength. The combined strength of all tie-downs must be strong enough to lift two times the weight of the machine. -
Page 50: Troubleshooting
Maintenance Troubleshooting PROBLEM CAUSE SOLUTION No machine function Console lid is open Close console lid No power to machine Battery disconnected Check all battery cable connections Emergency shut-off activated Reset Battery cables corroded Clean connections Faulty key switch Replace switch Batteries not plugged in Plug batteries in On Board charger plugged in... - Page 51 Maintenance PROBLEM CAUSE SOLUTION Vacuum motor does not run, or Faulty vacuum circuit or switch Check wires & connections runs slowly Worn vacuum motor brushes Replace brushes, check commutator Vacuum circuit breaker tripped Reset circuit breaker Poor scrubbing performance Debris caught in scrub brush Remove debris Worn brush or pad Replace brushes or pads...
-
Page 52: Battery Discharge Indicator Troubleshooting
Maintenance Battery Discharge Indicator Troubleshooting The battery indicator flashes when a problem occurs. The table below list solutions for the indicated problems. Number of Problem Solution flashes The battery needs charging, there is a bad connection to If the connections are good, try the battery or dependent on the programming, may charging the battery. -
Page 53: Parts
Parts 86333220 CS20... -
Page 54: Bumper
Bumper 86333220 CS20... - Page 55 Bumper SERIAL NO. PART NO. QTY DESCRIPTION NOTES FROM 86318180 BUMPER, TRIM, GRAY 86276980 SCREW 5/16-18 X 2 HHCS SS 86010670 WASHER 5/16 FLAT SS 86276070 SCR, 5/16-18 X 3/4 CARRIAGE SS 86270830 NUT 5/16-18 HEX NYLOCK SS 86323950 PAD, TIP SCR, KA50X16, PT OHS, WN1412, A2 86327510 86333220 CS20...
-
Page 56: Bumper-Deluxe & Cylindrical
Bumper-Deluxe & Cylindrical 86333220 CS20... - Page 57 Bumper-Deluxe & Cylindrical SERIAL NO. PART NO. QTY DESCRIPTION NOTES FROM 86342940 BUMPER, TRIM, CSX20 86276980 SCREW 5/16-18 X 2 HHCS SS 86010670 WASHER 5/16 FLAT SS 86276070 SCR, 5/16-18 X 3/4 CARRIAGE SS 86270830 NUT 5/16-18 HEX NYLOCK SS 86323950 PAD, TIP SCR, KA50X16, PT OHS, WN1412, A2...
-
Page 58: Console
Console 86333220 CS20... - Page 59 Console SERIAL NO. PART NO. QTY DESCRIPTION NOTES FROM 86276330 SCR, 1/4-20 X 1.25 CARRIAGE BZ 86279520 WASHER, 1/4 ID FLAT BLK 86317960 CONSOLE, CS20 DISK 86342490 CONSOLE, CSX20 DELUXE & CYLINDRICAL 86276780 SCR, 5/16-18 X 3/4 HHCS SS 86010670 WASHER, 5/16 FLAT SS 86006530 SCREW 1/4-20 X 1 PPHMS SS...
-
Page 60: Control Panel
Control Panel A 18 A TORQUE 45-55 IN-LBS 86333220 CS20... - Page 61 Control Panel SERIAL NO. PART NO. QTY DESCRIPTION NOTES FROM 86339950 PANEL, CONTROL 86337210 SPACER, .14ID X .25OD X .38, NYL 86336110 RELAY, SPST-NO 86336100 CLIP, RELAY 86336090 CIRCUIT BOARD, 4 RELAY 86329690 CONTROLLER, 20" SCRUB RIDE ON 86326390 CONN, 8MM PITCH, 10 POSN 86005710 NUT, 1/4-20 HEX W/STAR 86313900...
- Page 62 Control Panel 86333220 CS20...
- Page 63 Control Panel SERIAL NO. PART NO. QTY DESCRIPTION NOTES FROM 86002010 BOOT, 3/8 CIRCUIT BREAKER 86332510 BOOT, SEAL PUSH BUTTON 11MM 86328180 BREAKER, 12A, 250VAC, 32VDC DISK 86349290 BREAKER, 25A, 250VAC, 32VDC CYLINDRICAL 98408880 KIT, CS20 ROTARY SWITCH 86316160 BREAKER, 18A, 250VAC, 32VDC 86315470 METER, HOUR, LCD 86314150...
-
Page 64: Decals - Disk
Decals - Disk 86333220 CS20... - Page 65 Decals - Disk SERIAL NO. PART NO. QTY DESCRIPTION NOTES FROM 86328490 LABEL, RIGHT, iSCRUB 20 86328500 LABEL, LEFT, iSCRUB 20 86004970 LABEL WINDSOR LOGO DOMED 86328550 LABEL, SOLUTION LEVEL 86326360 LABEL, CONTROL PANEL 86335710 LABEL, BATTERY WIRING 86333220 CS20...
-
Page 66: Decals-Deluxe & Cylindrical
Decals-Deluxe & Cylindrical 86333220 CS20... - Page 67 Decals-Deluxe & Cylindrical SERIAL NO. PART NO. QTY DESCRIPTION NOTES FROM 86342020 LABEL, WINDOSR DOMED LOGO 86328550 LABEL, CONTROL PANEL 86342000 LABEL, SIDE ISCRUB DLX DISK 86346630 LABEL, ISCRUB 22X SP CYLINDRICAL 86335710 LABEL, BATTERY WIRING 86333220 CS20...
-
Page 68: Drive-Lower
Drive-Lower A TORQUE 15/18 FT/LBS B TORQUE 80 IN/LBS C TORQUE 15 FT/LBS 86333220 CS20... - Page 69 Drive-Lower SERIAL NO. PART NO. QTY DESCRIPTION NOTES FROM 86326710 KEY, 5 X 5 X 16 86321670 WASHER, WHEEL SPACER 86319810 AXLE, DRIVE WHEEL 86319670 SLEEVE, BEARING 86319660 MOTOR, DRIVE WHEEL 86331990 BRUSH SET, 8.631-966.0 DRIVE MTR BRAKE REPLACEMENT SMALL 98408960 STAND ON 86319650...
-
Page 70: Drive-Chain
Drive-Chain A TORQUE 78 IN/LBS 86333220 CS20... - Page 71 Drive-Chain SERIAL NO. PART NO. QTY DESCRIPTION NOTES FROM 86330720 CHAIN TENSIONER 86329350 NUT, 1/4-20 X 7/8 HEX COUPLING SS 86329340 PLATE, CHAIN GUARD 86328050 WASHER, SHOULDER.48ID X 1.25OD 86005810 NUT, 1/4-20 HEX NYLOCK SS 86327110 BRACKET, CONNECTORS 86273100 SCR, 1/4-20X2-1/4 HXHD CAP 86322060 COLLAR, 12MM ID 86322050...
-
Page 72: Drive Mounting
Drive Mounting 86333220 CS20... - Page 73 Drive Mounting SERIAL NO. PART NO. QTY DESCRIPTION NOTES FROM 86326080 BRACKET, LINKAGE MOUNT, RIGHT 86319730 BRACKET, LINKAGE MOUNT, LEFT 86331630 BRACKET, ROLLER GUIDE 86010670 WASHER, 5/16 X 3/4 SS 86276690 SCR, 5/16-18 X 1.75 CARR SS 86276070 SCR, 5/16-18 X 3/4 CARRIAGE SS 86270830 NUT, 5/16-18 HEX NYLOCK SS 86333220 CS20...
-
Page 74: Frame & Rear Wheels
Frame & Rear Wheels 86333220 CS20... - Page 75 Frame & Rear Wheels SERIALNO. PART NO. QTY DESCRIPTION NOTES FROM 86326260 BRACKET, FRAME LEFT 86326250 BRACKET, FRAME RIGHT 86340610 ASM FRAME, CS20 INCLUDES ITEM 8 & 9 SPACER, FLG .887ID X 1.055D X 86326220 .345LG 86318030 AXLE, 20MM X 562 MM 86318020 WHEEL, PU 150MM X 40MM 86223470...
-
Page 76: On Board Battery Charger-Disk
On Board Battery Charger-Disk 86333220 CS20... - Page 77 On Board Battery Charger-Disk SERIAL NO. PART NO. QTY DESCRIPTION NOTES FROM 98408740 KIT, CHARGER, SPE 36V 15A 86332690 BRKT, CHARGER METER 86332370 BRACKET, CORD WRAP 86327690 BRACKET, CHARGER 86259400 WASHER, THRUST .51 ID X 1 ODBRO 86010670 WASHER, 5/16 X 3/4 SS 86276070 SCR, 5/16-18 X 3/4 CARRIAGE SS 86006770...
-
Page 78: On Board Battery Charger-Deluxe & Cylindrical
On Board Battery Charger-Deluxe & Cylindrical 86333220 CS20... - Page 79 On Board Battery Charger-Deluxe & Cylindrical SERIAL NO. PART NO. QTY DESCRIPTION NOTES FROM 98408740 KIT, CHARGER, SPE 36V 15A 86332690 BRKT, CHARGER METER 86348390 BRACKET, CORD STORAGE DELUXE 86327690 BRACKET, CHARGER 86259400 WASHER, THRUST .51 ID X 1 ODBRO 86010670 WASHER, 5/16 X 3/4 SS 86276070...
-
Page 80: Pedal Platform
Pedal Platform 86333220 CS20... - Page 81 Pedal Platform SERIAL NO. PART NO. QTY DESCRIPTION NOTES FROM 86007110 SWITCH, 25A SPST 125-250V SNAP SCR, KA50X10, PT OHS, WN1412, 86172980 PLTD 86264930 CABLE TIE, 3.5" UL/CS 86326150 BRKT, LINEAR POT 86326140 PIN, DOWEL .25 X 2.75, STEEL 86318010 PEDAL, HEEL 86318000 PEDAL, ACCELERATOR...
-
Page 82: Pedal Platform Mounting
Pedal Platform Mounting 86333220 CS20... - Page 83 Pedal Platform Mounting SERIAL NO. PART NO. QTY DESCRIPTION NOTES FROM 86327510 SCR, KA50 X 16, WN1412 A2 SS 86198440 CLAMP, 1/4 PLASTIC CABLE SCR, KA50X25, PT OHS, WN1412, 86327910 PLTD 86173330 WASHER, M5, FLAT, ISO7093, SS 86333220 CS20...
-
Page 84: Recovery Tank
Recovery Tank A TORQUE 15/17 IN/LBS 86333220 CS20... - Page 85 Recovery Tank SERIAL NO. PART NO. QTY DESCRIPTION NOTES FROM 86329510 PLATE, INTAKE RETAINER 86328020 HOSE ASM, 1.25 ID X 18.0, 4:1 SCR, KA50X25, PT OHS, WN1412, 86327910 PLTD 86327850 GASKET, REC TANK 68” 86327840 GASKET, VAC MOUNT 27” 86327590 LANYARD, 15.0 W/LOOP &...
-
Page 86: Scrub Brush/Pad Driver
Scrub Brush/Pad Driver 10A - 10E 86333220 CS20... - Page 87 Scrub Brush/Pad Driver SERIAL NO. REF PART NO. QTY DESCRIPTION NOTES: FROM 86000410 PAD DRIVER, 20" SD 86000420 BRUSH, 20" POLYPROPYLENE SD 86000430 BRUSH, 20" NYLON SD 86283870 BRUSH, 20" NYLON POLISH SD 86005070 LOCK, PAD CENTER SNAP, TWO STEP 86276590 SCR, #12 X 1 PPHSMS SS 86276580...
-
Page 88: Scrub Brush Deck-Disk
Scrub Brush Deck-Disk A TORQUE 18 FT/LBS B TORQUE 20 FT/LBS 86333220 CS20... - Page 89 Scrub Brush Deck-Disk SERIAL NO. REF PART NO. QTY DESCRIPTION NOTES FROM 86331340 BREATHER VENT, 10-32 THREAD 86331970 MOTOR, 36VDC 180RPM RT-ANG INCLUDES 86331340 86331980 BRUSH SET, 8.633-197.0 SCRUB MTR 86325200 BUSHNG, 30MM, BRNZ 86326430 SUPPORT ASSY, MOTOR, BRUSH DECK 86326560 WASHER, NYLON, 2.28ODX1.28IDX.12 THK 86271870...
-
Page 90: Scrub Brush Deck Mounting-Disk
Scrub Brush Deck Mounting-Disk 86333220 CS20... - Page 91 Scrub Brush Deck Mounting-Disk SERIAL NO. PART NO. QTY DESCRIPTION NOTES FROM 86277030 SCR, 5/16-18X1.25 CARRIAGE S 86270830 NUT 5/16-18 HEX NYLOCK SS 86010670 WASHER 5/16 FLAT SS 86259410 WASHER THRUST.51 ID X1ODX.063 86228990 BEARING,FLNGD,.314ID X.502OD 86277130 SCR, 5/16-18 X 1.00 CARRIAGE SS 86333220 CS20...
-
Page 92: Scrub Deck Drive Assembly-Cylindrical
Scrub Deck Drive Assembly-Cylindrical 86333220 CS20... - Page 93 Scrub Deck Drive Assembly-Cylindrical SERIAL NO. PART NO. QTY DESCRIPTION NOTES FROM 73031040 SCREW 5X16 -A2-70 (IN6RD) 50353850 COVER GEAR 63484670 TOOTHED BELT HTD-384-3M-20 CXPIII 56255060 BELT PULLEY 21Z 74011150 BALL BEARING 6002-2RS 50353840 CARRIER MOTOR WORKED R 73060890 SCREW M6X12 -8.8-R2R (IN6RD) 50354560 SLEEVE 41002440...
-
Page 94: Scrub Deck-Cylindrical
Scrub Deck-Cylindrical 86333220 CS20... - Page 95 Scrub Deck-Cylindrical SERIAL NO. PART NO. QTY DESCRIPTION NOTES FROM 73430030 LOCKING RING 12X1-RF-ST DIN 471 50353570 SIDE PLATE RUBBER LIP 50354280 RUBBER LIP 50354270 SCREEN SUCTION LIPS 73430470 LOCK WASHER 10-FST-A2E DIN 6799 73061810 SCREW M 5X 12-A2-70 (IN6RD) 50354250 SUCTION LIP 50354310...
-
Page 96: Scrub Deck Linkage-Cylindrical
Scrub Deck Linkage-Cylindrical 86333220 CS20... - Page 97 Scrub Deck Linkage-Cylindrical SERIAL NO. PART NO. QTY DESCRIPTION NOTES FROM 86270830 NUT 5/16-18 HEX NYLOCK SS 86010670 WASHER 5/16 FLAT SS WASHER, THRUST .51ID X 1 86259420 ODBRO 86347930 BRACKET, LINKAGE, BOTTOM 86348210 SPACER, .381D X .63OD X .50, AL 86228990 BEARING,FLNGD,.314ID X.502OD 86346430...
-
Page 98: Scrub Brush Deck Mounting-Cylindrical
Scrub Brush Deck Mounting-Cylindrical 86333220 CS20... - Page 99 Scrub Brush Deck Mounting-Cylindrical SERIAL NO. PART NO. QTY DESCRIPTION NOTES FROM 86327510 SCR, KA50 X 16, WN1412 A2 SS 88646520 BRACKET, LIFT FRAME 86226760 SPACER, 3.8 ODX.257IDX.38L NYL SCR, KA50X25, PT OHS, WN1412, 86327910 PLTD 86277030 SCR, 5/16-18X1.25 CARRIAGE S 86270830 NUT 5/16-18 HEX NYLOCK SS 86010670...
-
Page 100: Scrub Deck Lift
Scrub Deck Lift A TORQUE 50 IN/OZ 86333220 CS20... - Page 101 Scrub Deck Lift SERIAL NO. PART NO. QTY DESCRIPTION NOTES FROM 86271660 NUT 4-40 HEX NYLOCK 86007160 SWITCH 10A ROLLER MINI 86327390 SCR, 4-40 X 2 PPHMS 86323850 PLATE, SWITCH ACTUATOR DISK 86346540 PLATE, SWITCH ACTUATOR CYLINDRICAL 86320880 ACT, 36VDC, 3.0" STK, 8.74 LNG 86328040 PIN, CLEVIS, 1/4 X 2.0 L 86008650...
-
Page 102: Solution Tank
Solution Tank 86333220 CS20... - Page 103 Solution Tank SERIAL NO. PART NO. QTY DESCRIPTION NOTES FROM 86326310 FITTING, ELBOW 3/4 BSP, O-RING 86326620 HOSE, 3/4ID X .12W X 20"LG, CLR 86330960 LANYARD, ELASTIC, .125 X 4.0 86233150 SP CLAMP, 3/8 HOSE (D-SLOT) 86329670 COVER, FILL PORT 86326280 BRACKET, TANK BRACE 86321270...
-
Page 104: Solution Tank-Deluxe
Solution Tank-Deluxe CYLINDRICAL DISK DELUXE 86333220 CS20... - Page 105 Solution Tank-Deluxe SERIAL NO. PART NO. QTY DESCRIPTION NOTES FROM 86326310 FITTING, ELBOW 3/4 BSP, O-RING 86326620 HOSE, 3/4ID X .12W X 20"LG, CLR 86327510 SCR, KA50 X 16, WN1412 A2 SS 86330940 NIPPLE, HEX 3/8NPT X 1.25LG, PE BLACK 50507320 COVER METERING FRESH WATER 86326280...
-
Page 106: Squeegee
Squeegee ATTACHES TO FRAME 86333220 CS20... - Page 107 Squeegee SERIAL NO. PART NO. QTY DESCRIPTION NOTES FROM RIV-NUT, HEX, 5/16-18X.562, CLEAR 86332060 86327860 SQUEEGEE BLADE RETAINER ASSY 86327790 PLATE, WEIGHT, SQUEEGEE 86326520 SCR, 5/16-18 X 2.25 HHCS SS 86326510 PIVOT SHAFT, LATCH 86326490 SCR, 5/16-18 X 3.0 CARRIAGE SS 86326480 SCR, 1/4-20 X 2.25 CARRIAGE SS 86326470...
-
Page 108: Squeegee-Cylindrical
Squeegee-Cylindrical 86333220 CS20... - Page 109 Squeegee-Cylindrical SERIAL NO. PART NO. QTY DESCRIPTION NOTES FROM 86348190 NUT, 5/16 PUSH, HAT STYLE, PLTD 86348080 BRACKET, CASTER, CYL SQG 86348070 BRACKET, LATCH, CYL SQG 86348060 PLATE, WEIGHT, CYL SQG 86348050 BRACKET, WEIGHT MOUNT 86348040 AXLE, CASTER, CYL SQG 86010880 WHEEL 1.5OD X .31ID X.75W GRY 86348020...
-
Page 110: Squeegee Linkage-Cylindrical
Squeegee Linkage-Cylindrical 86333220 CS20... - Page 111 Squeegee Linkage-Cylindrical SERIAL NO PART NO. QTY DESCRIPTION NOTES FROM 86347830 SPRING, TORSION .048, 180 DEGREE 86346500 SHAFT, LATCH, SQUEEGEE 86346480 BRACKET, LATCH, SQUEEGEE 86346440 BRACKET, SWIVEL MOUNT 86325200 BUSHING, 30mm, BRNZ 86319820 PIVOT, SQUEEGEE LINKAGE 86279070 WASHER, M6 FLAT 86273850 SCR, 1/4-20 X 2.00 HHCS SS 86271870...
-
Page 112: Steering
Steering 86333220 CS20... - Page 113 86228790 BEARING FLANGE .88ODX.75IDX.75 86339320 SHAFT, STEERING KIT CS20 86339330 SHAFT, STEERING ASM DELUXE & CYLINDRICAL 86234810 COVER, STEERING WHEEL 66403520 CAP STEERING WHEEL WINDSOR DELUXE & CYLINDRICAL 86333950 BEARING, .75ID X 1.0OD X .63 DELUXE & CYLINDRICAL 86333220 CS20...
-
Page 114: Vacuum
Vacuum See maintenance section for motor mounting details. 86333220 CS20... - Page 115 WASHER 1/4 ID X 5/8 OD SS 86264930 CABLE TIE, 3.5" UL/CSA 86327500 MOUNT, VIBRATION 86012210 VAC MOTOR, 36VDC 2ST TD 86135310 BRUSH SET, 24/36V VAC, WINDSOR 86217750 ELBOW, VAC MUFFLER 90 DEG DELUXE ONLY 86264940 CABLE TIE, 11.38" UL/CSA DELUXE ONLY 86222220...
-
Page 116: Wiring-Battery
Wiring-Battery MAIN WIRING HARNESS 86333220 CS20... - Page 117 Wiring-Battery SERIAL NO. PART NO. QTY DESCRIPTION NOTES FROM 86329720 BATT, CBL, ASM, JUMPER 86334280 CBL, 6GA 5/16" RING 15" NOT SHOWN 86329710 BATT,CBL,ASM,W/ANDERSON 86334270 CBL, BATT RING W/ANDERSON NOT SHOWN 86228400 BATTERY, 12V, 130AH 86328630 BATTERY, 12V 114A/H AGM NOT SHOWN 86270920 SP NUT, 6-32 HEX NYLOCK SS...
-
Page 118: Wiring-Diagram -From Serial No. *(5)
Wiring-Diagram -From Serial No. *(5) +TRACTION 1 - 15/RT BRAKE 2 - 14/SW 1 - 19/BN 2 - 20/GE 1 2 3 3 - 18/OR 4 5 6 PLATFORM 4 - 17/GN 5 - 16/BL 6 - NC 1 - 21/RT TRACTION 2 - 22/WS -X13... - Page 119 Wiring-Diagram -From Serial No. *(5) SERIAL NO. PART NO. QTY DESCRIPTION NOTES FROM 86326170 HARNESS, OPERATOR PLATFORM 86333100 HARNESS, CS20 MAIN ACTUATOR HARNESS, CS20 MAIN POT AND 86333110 BRAKE 86333120 HARNESS, CS20 MAINCHARGER 86333130 HARNESS, CS20 MAIN TRACTION 86333140 HARNESS, CS20 MAIN VACUUM 86333150 HARNESS, CS20 MAIN BRUSH 86333160...
- Page 120 Wiring-Diagram-From Serial No. *(5) CONNECTOR X3 11-SW CHR/INT SW 1-BN MID SWITCH S9-X12 S5-X6 12-RT CHR/INT SW 2-BL LOWER SWITCH S10-X12 13-RT POWER ACT SW X12 3-WS ACTUATOR 14-SW BRAKE SOL 4-GE ACTUATOR 15-RT BRAKE SOL 5-WS HORN 16-BL PLATFORM 6-SW HORN 17-GN...
- Page 121 Wiring-Diagram -From Serial No. *(5) SERIAL NO. PART NO. QTY DESCRIPTION NOTES FROM 86338100 HARNESS, PANEL CS20 DESCRIPTION CIRCUIT BREAKER-BRUSH CIRCUIT BREAKER-VACUUM MOTOR CIRCUIT BREAKER-DRIVE CONTROL G1-G3 BATTERY 12V/70Ah SIGNAL LAMPS REVERSE DIRECTION SIGNAL LAMPS DIRECTION FORWARD HORN LED-BATT. RELAYS-REVERSE DIRECTION RELAYS DIRECTION FORWARD RELAYS BRUSH MOTOR RELAYS VACUUM MOTOR...
- Page 122 Wiring-Diagram -From Serial No. *(5) rt/48 Ubatt rt/57 rt/47 rt/27 10mm² 1,5mm² 10mm² /B3.6 /B3.7 rt/45 rt/46 2,5mm² 1,5mm² WIRE COLOR / B3.2 black 12V/70Ah white brown rt/25 ws/56 ws/23 blue 1,5mm² 1,5mm² 1,5mm² yellow 12V/70Ah orange gray 12V/70Ah green violet pink +PACKARD...
- Page 123 Wiring-Diagram -From Serial No. *(5) DESCRIPTION CIRCUIT BREAKER-BRUSH CIRCUIT BREAKER-VACUUM MOTOR CIRCUIT BREAKER-DRIVE CONTROL G1-G3 BATTERY 12V/70Ah SIGNAL LAMPS REVERSE DIRECTION SIGNAL LAMPS DIRECTION FORWARD HORN LED-BATT. RELAYS-REVERSE DIRECTION RELAYS DIRECTION FORWARD RELAYS BRUSH MOTOR RELAYS VACUUM MOTOR REALYS ACTUATOR RELAYS MAIN BRUSH NMOTOR TRACTION MOTOR...
- Page 124 Wiring-Diagram -From Serial No. *(5) B1.8 Ubatt Ubatt / B3.1 B5.1 J / B5.1 rt/13 bl/31 -X3 5 bl/16 1mm² rt/47 0,75mm² gn/20 0,75mm² 0,75mm² 1,5mm² rt/5 0,75mm² 0,5mm² +DEUTSCH B / B2.6 D / B2.6 vi/25 ge/21 C / B2.6 ws/52 1mm²...
- Page 125 Wiring-Diagram -From Serial No. *(5) DESCRIPTION CIRCUIT BREAKER-BRUSH CIRCUIT BREAKER-VACUUM MOTOR CIRCUIT BREAKER-DRIVE CONTROL G1-G3 BATTERY 12V/70Ah SIGNAL LAMPS REVERSE DIRECTION SIGNAL LAMPS DIRECTION FORWARD HORN LED-BATT. RELAYS-REVERSE DIRECTION RELAYS DIRECTION FORWARD RELAYS BRUSH MOTOR RELAYS VACUUM MOTOR REALYS ACTUATOR RELAYS MAIN BRUSH NMOTOR TRACTION MOTOR...
- Page 126 Wiring-Diagram -From Serial No. *(5) Ubatt B2.8 2,5mm² i-DRIVE i 36-70 /B4.2 36VDC/ 70A /B4.4 /B4.2 gr/36 rt/21 sw/22 sw/14 rt/15 ge/18 ws/38 or/20 rs/37 or/40 or/8 4mm² 6mm² 6mm² 1mm² 1mm² 1mm² 1mm² 1mm² 1mm² 1mm² 1mm² 0,75mm² /B2.8 B2.7 rs/12 B2.5...
- Page 127 Wiring-Diagram -From Serial No. *(5) DESCRIPTION CIRCUIT BREAKER-BRUSH CIRCUIT BREAKER-VACUUM MOTOR CIRCUIT BREAKER-DRIVE CONTROL G1-G3 BATTERY 12V/70Ah SIGNAL LAMPS REVERSE DIRECTION SIGNAL LAMPS DIRECTION FORWARD HORN LED-BATT. RELAYS-REVERSE DIRECTION RELAYS DIRECTION FORWARD RELAYS BRUSH MOTOR RELAYS VACUUM MOTOR REALYS ACTUATOR RELAYS MAIN BRUSH NMOTOR TRACTION MOTOR...
-
Page 128: Wiring-Diagram -From Serial No. *(5)
Wiring-Diagram -From Serial No. *(5) i-DRIVE 1 2 3 i 36-70 36VDC/ 70A /B3.2 /B3.1 /B3.3 vi/5 gr/32 ws/34 vi/39 ws/41 sw/54 1mm² 1mm² 0,75mm² 0,35mm² 0,75mm² 0,75mm² / B5.1 /B5.4 /B5.6 vi/9 0,5mm² +FRAME +FRAME-S7 BRUSH BATT +FRAME sw/10 0,3mm²... - Page 129 Wiring-Diagram -From Serial No. *(5) DESCRIPTION CIRCUIT BREAKER-BRUSH CIRCUIT BREAKER-VACUUM MOTOR CIRCUIT BREAKER-DRIVE CONTROL G1-G3 BATTERY 12V/70Ah SIGNAL LAMPS REVERSE DIRECTION SIGNAL LAMPS DIRECTION FORWARD HORN LED-BATT. RELAYS-REVERSE DIRECTION RELAYS DIRECTION FORWARD RELAYS BRUSH MOTOR RELAYS VACUUM MOTOR REALYS ACTUATOR RELAYS MAIN BRUSH NMOTOR TRACTION MOTOR...
-
Page 130: Wiring-Diagram -From Serial No. *(5)
Wiring-Diagram -From Serial No. *(5) bn/1 0,75mm² B2.1 rt/13 +FRAME-S9 rt/ws UBATT bl/2 bl/2 0,5mm² 0,5mm² 1mm² 0,75mm² +FRAME-S10 LOWER X4:2 X5:1 X5:43 270Ohm bn/42 1mm² /B5.4 /B5.4 /B5.4 /B5.4 /B2.2 /B5.5 24VDC /B5.6 /B5.5 POSITION 1 2 3 4 5 6 /B5.6 X4:42 X4:30... - Page 131 Wiring-Diagram -From Serial No. *(5) DESCRIPTION CIRCUIT BREAKER-BRUSH CIRCUIT BREAKER-VACUUM MOTOR CIRCUIT BREAKER-DRIVE CONTROL G1-G3 BATTERY 12V/70Ah SIGNAL LAMPS REVERSE DIRECTION SIGNAL LAMPS DIRECTION FORWARD HORN LED-BATT. RELAYS-REVERSE DIRECTION RELAYS DIRECTION FORWARD RELAYS BRUSH MOTOR RELAYS VACUUM MOTOR REALYS ACTUATOR RELAYS MAIN BRUSH NMOTOR TRACTION MOTOR...
-
Page 132: Wiring-Diagram -From Serial No. *(5)
Wiring-Diagram -From Serial No. *(5) FRONT HOURS FAST SLOW BACK i-DRIVE i 36-70 36VDC/ 70A X0 X2 i-DRIVE i 36-70 36VDC/ 70A X0 X2 H1/H2 86333220 CS20... - Page 133 Wiring-Diagram -From Serial No. *(5) DESCRIPTION CIRCUIT BREAKER-BRUSH CIRCUIT BREAKER-VACUUM MOTOR CIRCUIT BREAKER-DRIVE CONTROL G1-G3 BATTERY 12V/70Ah SIGNAL LAMPS REVERSE DIRECTION SIGNAL LAMPS DIRECTION FORWARD HORN LED-BATT. RELAYS-REVERSE DIRECTION RELAYS DIRECTION FORWARD RELAYS BRUSH MOTOR RELAYS VACUUM MOTOR REALYS ACTUATOR RELAYS MAIN BRUSH NMOTOR TRACTION MOTOR...
-
Page 134: Wiring-Control Panel -Prior To Serial No. *(5)
Wiring-Control Panel -Prior to Serial No. *(5) CB1.5A CB18A CB12A HOUR METER BATTERY METER BATT(-) *ALL GNDS ARE BLK BRUSH RELAY OPEN HORN BUTTON 52 11 49 RELAY RELAY RELAY KEY SWITCH ESTOP VACUUM RELAY DIRECTION SWITCH ROTARY CONTROLLER CONNECTOR B RELAY JUMPERS CONNECTOR A CONNECTOR C... - Page 135 Wiring-Control Panel -Prior to Serial No. *(5) SERIAL NO. PART NO. QTY DESCRIPTION NOTES FROM 86326190 HARNESS, MAIN PANEL 86261210 DIODE ASM, 76008 X 76008 86003410 DIODE ASM, 76075 X 76075 86333220 CS20...
-
Page 136: Wiring-Main Harness -Prior To Serial No. *(5)
Wiring-Main Harness -Prior to Serial No. *(5) CONTROL PANEL BRAKE SOLENOID TRACTION MOTOR HORN VACUUM MOTOR DIAGRAM T 7/GRN 1/BRN 6/ORG 2/BLU 3/RED 5/VIO MICRO OPEN 4/BLK SWITCHES MICRO SWITCH HARNESS DIAGRAM A DIAGRAM R 15/RED 3/BLK SOLENOID 2/WHT BRUSH MOTOR 1/BRN 14/BLK SQUEEGEE &... - Page 137 Wiring-Main Harness -Prior to Serial No. *(5) SERIAL NO. PART NO. QTY DESCRIPTION NOTES FROM 86333100 HARNESS, CS20 MAIN ACTUATOR HARNESS, CS20 MAIN POT AND 86333110 BRAKE 86333120 HARNESS, CS20 MAIN CHARGER 86333130 HARNESS, CS20 MAIN TRACTION 86333140 HARNESS, CS20 MAIN VACUUM 86333150 HARNESS, CS20 MAIN BRUSH 86333160...
-
Page 138: Wiring-Diagram -Prior To Serial No. *(5)
Wiring-Diagram -Prior to Serial No. *(5) +Ubatt -COIL 50/RT 49/RT -VAC /1.132 -BRUSH 7/GN /1.132 -VAC 40/OR 8/OR -X11 AUX3 AUX2 -TRACTION AUX1 -14 PIN TILLER /2.244 THROTTLE SLOW/FAST LOW REV KEY SWITCH BATTERY INHIBITS -X13 -X10 -X14 -X12 38/WS 37/RS 36/GR 41/GE... - Page 139 Wiring-Diagram -Prior to Serial No. *(5) +Ubatt 47/RT 52/WS -BRUSH -VAC -ESTOP 45/RT 51/WS 46/RT -KSI DIR LED 16/BL /2.239 -PLATFORM 17/WS 31/BL 17/WS 3.306 -K1. -K2. -HORN 14/SW /1.143 -WATER -BRK-REV(K2) -REV 6/SW HOUR 23/OR 21/GE -FWR -LED1 -LED2 -HORN -FWRSW 55/SW...
-
Page 140: Wiring-Diagram -Prior To Serial No. *(5)
Wiring-Diagram -Prior to Serial No. *(5) 1.137 -KA1 13/RT MICRO -KA1 31/BL -KA1 -KA1 LOWER MICRO -KA1 PIN6 PIN4 -KA1 30/RS 32/GR 34/WS 28/BL /3.331 /3.332 /3.334 /3.335 /3.338 29/SW /3.342 /3.317 /3.317 /3.342 /3.342 /3.342 POLE3 POLE2 POLE1 3/WS 4/GE 33/SW PIN13... -
Page 141: Suggested Spare Parts
86302360 DRAIN HOSE 86199840 090-12A FLOAT SCREEN CAGE ASSY (SLIP) 86331980 BRUSH SET, 8.633-197.0 SCRUB MTR 86135310 140686 BRUSH SET, 24/36V VAC, WINDSOR 86007970 73864 STRAINER, 3/8 IN. NPT 60 MESH 86312920 GASKET, VAC MOTOR 86326200 GASKET, VACUUM INTAKE 86327850 GASKET, REC TANK 68”... -
Page 142: Serial Numbers
Serial Numbers REF. NO MODEL: SERIAL # 10061250000400, 10061330000379 10061250000432, : 10061330000436 10061250000436, 10061330000445 10061250000481, 10061330000504 10061250000617, 10061330000632 100612500000938,100613300001062, 1006137000000014, 1006138000000001, 100613000000001, 100613400000001 86333220 CS20...