Symbol SPT 1700 Series Product Reference Manual
Spt 1700 series
Hide thumbs
Also See for SPT 1700 Series:
- Product reference manual (394 pages) ,
- Quick reference manual (28 pages) ,
- Quick reference (28 pages)
Table of Contents
Advertisement
Quick Links
Advertisement
Table of Contents
Troubleshooting

Related Manuals for Symbol SPT 1700 Series


Summary of Contents for Symbol SPT 1700 Series
- Page 1 SPT 1700 Series Product Reference Guide...
- Page 2 SPT 1700 Series Product Reference Guide 70-37544-02 Revision A —April 2000 Symbol Technologies, Inc. One Symbol Plaza, Holtsville N.Y. 11742-1300...
- Page 3 SPT 1700 Series Product Reference Guide 70-37544-02 Revision A April 2000...
- Page 4 The software is provided strictly on an “as is” basis. All software, including firmware, furnished to the user is on a licensed basis. Symbol grants to the user a non-transferable and non-exclusive license to use each software or firmware program delivered hereunder (licensed program).
-
Page 5: Table Of Contents
System Requirements............1-22 Symbol Palm Terminal Desktop Software Installation......1-22... - Page 6 SPT 1700 Series Product Reference Guide Attaching the Handstrap ............1-24 Chapter 2.
- Page 7 Contents Marking Private Entries........... . . 3-27 Beaming Information to Other SPT 1700 Terminals.
- Page 8 SPT 1700 Series Product Reference Guide Marking a Private Event ............7-11 Deleting an Event.
- Page 9 Contents Performing a Spectrum24 HotSync ..........9-19 Setting Up the Ethernet Cradle for Hotsync .
- Page 10 Beam Receive ............12-12 Network Preferences and Symbol Palm Terminal Desktop TCP/IP Software ....12-12 Selecting a Service.
- Page 11 Contents Creating Additional Service Templates ........12-18 Adding Detailed Information to a Service Template .
- Page 12 Removing the Symbol Palm Terminal Desktop Software ....... . 16-7...
- Page 13 Contents Battery Considerations ........... . . 18-3 Resetting Your SPT 1700 Terminal .
- Page 14 SPT 1700 Series Product Reference Guide...
-
Page 15: About This Guide
Symbol Spectrum24 ® radio to perform local area wireless communication. This model has the same available memory configurations as the SPT 1700. The SPT 1700 Series Product Reference Guide provides information about the SPT 1700 Series terminal and its accessories. xiii... -
Page 16: Chapter Descriptions
Chapter 1, Getting Started with Your SPT 1700, explains the physical buttons and controls on your SPT 1700 terminal, how to install and charge the battery, start your SPT 1700 terminal for the first time, and set up your Symbol Palm Terminal (SPT) Desktop software. -
Page 17: Notational Conventions
1- and 2-dimensional bar codes. Chapter 16, Installing and Removing Applications, explains how to install and remove applications on your SPT 1700 terminal and how to remove the Symbol Palm Terminal (SPT) Desktop software from your computer. -
Page 18: Related Documents
SPT 1740 Spectrum24 Driver Extensions Library Developer’s Guide, p/n 70-38524- Service Information If you have a problem with the SPT 1700 equipment, contact the Symbol Support Center. If your problem cannot be resolved over the phone, you may need to return your equipment for servicing. -
Page 19: Symbol Support Centers
About This Guide Symbol Support Centers For service information, warranty information or technical assistance contact or call the Symbol Support Center in: United States Canada Symbol Technologies, Inc. Symbol Technologies Canada, Inc. One Symbol Plaza 2540 Matheson Boulevard East Holtsville, New York 11742-1300... - Page 20 SPT 1700 Series Product Reference Guide Finland France Oy Symbol Technologies Symbol Technologies France Kaupintie 8 A 6 Centre d'Affaire d'Antony FIN-00440 Helsinki, Finland 3 Rue de la Renaissance 9 5407 580 (Inside Finland) 92184 Antony Cedex, France +358 9 5407 580 (Outside Finland)
-
Page 21: Warranty
This warranty is provided to the original owner only and is not transferable to any third party. It shall not apply to any product (i) which has been repaired or altered unless done or approved by Symbol, (ii) which has not been maintained in accordance with any operating or handling instructions supplied by... -
Page 22: Warranty Coverage And Procedure
Shipments from the US or other locations will be made F.O.B. Symbol’s manufacturing plant. Symbol will use new or refurbished parts at its discretion and will own all parts removed from repaired products. Customer will pay for the replacement product in case it does not return the replaced product to Symbol within 3 days of receipt of the replacement product. -
Page 23: Chapter Contents
System Requirements............1-22 Symbol Palm Terminal Desktop Software Installation......1-22... - Page 24 SPT 1700 Series Product Reference Guide...
-
Page 25: Unpacking The Terminal
This chapter explains the physical buttons and controls on your SPT 1700 terminal, how to install and charge the battery, start your SPT 1700 Series terminal for the first time, set up your cradle and install your Symbol Palm Terminal Desktop software. -
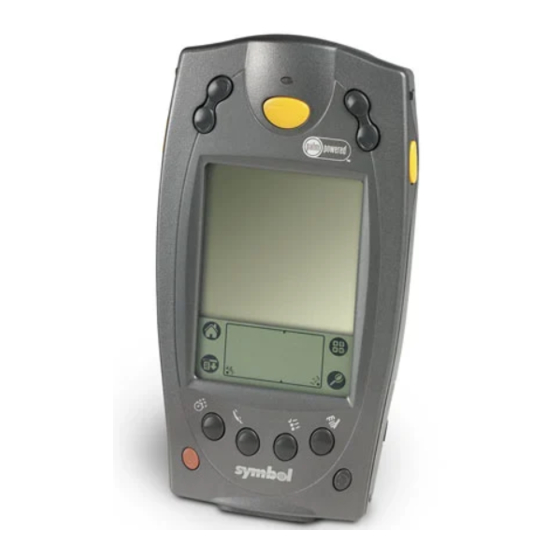
Page 26: Parts Of The Spt 1700
SPT 1700 Series Product Reference Guide Parts of the SPT 1700 Front View Laser Decode LED Center Scan Button Scroll Button Scroll Button (Up and Down) (Up and Down) Right Scan Trigger Graffiti Input Area LCD (Screen) Applications Icon Calculator Icon... - Page 27 Getting Started with the SPT 1700 Back View Stylus Infrared Port Stylus Silo Handstrap Connector Speaker Reset Button Battery Compartment Lithium-Ion Battery Battery Latch Battery Latch Battery Cover Handstrap Connector Top View Bottom View Scanner Exit Window Serial Port...
-
Page 28: Getting Started With The Spt 1700
SPT 1700 Series Product Reference Guide Getting Started with the SPT 1700 Before you can use your SPT 1700, perform the basic set up procedures covered on the following pages. Specifically: Set up the cradle (optional) Install and charge the battery Start the SPT 1700 Initiate the Spectrum24 network connection (SPT 1740 only). - Page 29 Getting Started with the SPT 1700 2. Insert the cable into the bottom of the terminal, as shown. Synchronization/ Charging Cable 3. Plug the power cable into a wall outlet and plug the other end into the battery charging receptacle on the side of the Synchronization/Charging Cable. Battery Charging Receptacle Power Supply...
- Page 30 SPT 1700 Series Product Reference Guide CRD1700-1000S Single-slot Serial Cradle To connect the cradle: 1. Turn off your computer. 2. Plug one end of the serial cable into the host connector on the back of the cradle. 3. Plug the other end of the serial cable into the serial communication port on your computer.
- Page 31 Getting Started with the SPT 1700 Note: You may require a 9-pin to 25-pin adapter, p/n 160-0072 to connect the cable to the serial port on the back of your computer. Note: Your SPT 1700 terminal requires a dedicated port. It cannot share a port with an internal modem or other device.
- Page 32 CRD1700-4000E Ethernet Cradle Before setting up the cradle, make sure that Symbol Palm Terminal Desktop Software (p/n SW-35138-xx) is installed and running on the host computer, as well as properly configured Network HotSync software on the SPT 1700 terminal. See the section Symbol Palm Terminal Desktop Software on page 1-21 for instructions on installing this software.
- Page 33 DHCP server, and power is restored. Note: Before communication between the SPT 1700 terminal and the host computer can take place, the Symbol Palm Terminal Desktop Software must be installed and running on the host computer. 1-11...
-
Page 34: Installing The Battery
SPT 1700 Series Product Reference Guide Installing the Battery To install the battery in your SPT 1700: 1. Open the latches on the battery cover and lift it away from the SPT 1700. Latch Latch 2. Insert the lithium-ion battery in the battery compartment, making sure it snaps into place. -
Page 35: Charging The Battery
Getting Started with the SPT 1700 Charging the Battery Before using your SPT 1700 for the first time, charge the lithium-ion battery. The terminal’s battery can be charged using the Cradle, the Synchronization/Charging Cable, or the Universal Battery Charger (UBC). For instructions on using the UBC to charge your batteries, see the Quick Reference Guide which came with your UBC. -
Page 36: Starting The Spt 1700
SPT 1700 Series Product Reference Guide Spare Battery Charging The CRD1700-1000S single-slot cradle has a spare battery charging slot which charges the terminal’s spare battery. Insert the battery in the spare battery charging slot in the back of the cradle. The spare battery charging LED turns red to indicate the spare battery is charging, then turns green after approximately two hours to indicate the battery is fully charged. -
Page 37: Calibrating The Screen
Getting Started with the SPT 1700 b. Press any other button to perform a soft reset. Note: With a hard reset, the current date and time are retained. Formats Preferences and other settings are restored to their factory default settings. After initial start up, always start the terminal by pressing the red power button. - Page 38 SPT 1700 Series Product Reference Guide 3. Tap the exact center of each target that appears on the screen with the tip of the stylus. If, at any time, you need to recalibrate the screen, open the Preferences application, tap on the pull-down menu at the top right corner of the screen, and select the digitizer option from the pull down menu.
- Page 39 Getting Started with the SPT 1700 Tap here 2. Tap the up or down arrows to change the hour. 3. Tap the minutes box, and then tap the arrows to adjust the settings for the current time. 4. Tap the AM or PM box to select the time of day. Note: Your SPT 1700 terminal can also display time based on a 24-hour clock.
-
Page 40: Configuring The Spectrum24 Network (Spt 1740 Only)
SPT 1700 Series Product Reference Guide Setting the Current Date The Set Date box in the General Preferences screen is used to set the current date for your SPT 1700 terminal. To set the current date: 1. Tap the Set Date box to open the Set Date dialog. -
Page 41: Using The Spt 1700
Getting Started with the SPT 1700 Using the SPT 1700 This section describes the procedures for the basic use of the SPT 1700 series terminal. Topics covered include powering on the terminal, using the backlight, adjusting the screen contrast, writing with the stylus, and using the onscreen keyboard. -
Page 42: Writing With The Stylus
SPT 1700 Series Product Reference Guide Writing with the Stylus Your SPT 1700 includes Graffiti handwriting software as the primary system for entering text and numbers. Graffiti is a system where simple strokes you write with the stylus are instantly recognized as letters or numbers. -
Page 43: Icon Descriptions
Series terminal to your computer. Although using Symbol Palm Terminal Desktop software is optional, when you use it with your SPT 1700 Series terminal and the built-in HotSync technology, you can fully synchronize the information on your SPT 1700 Series terminal with the information on your computer. -
Page 44: System Requirements
Microsoft Office. Do not simply copy the Symbol Palm Terminal Desktop files to your hard drive. You must use the installer to place the files in their proper locations and to decompress the files. - Page 45 Getting Started with the SPT 1700 To install the Symbol Palm Terminal Desktop software: 1. Insert the Symbol Palm Terminal Desktop Software CD into the CD-ROM drive on the PC (D: on most computers). 2. If your CD-ROM supports the auto-run feature, an installation menu automatically appears on your desktop.
-
Page 46: Attaching The Handstrap
SPT 1700 Series Product Reference Guide Attaching the Handstrap The SPT 1700 has an optional handstrap which increases comfort when holding the terminal for extended periods of time. To attach the handstrap to the back of the terminal: 1. Thread the metal piece through the metal handstrap connection on the back of the terminal. -
Page 47: Chapter 2. Spectrum24 Setup
Chapter 2 Spectrum24 Setup Chapter Contents Introduction ..............2-3 Configuring the Spectrum24 Network Connection (SPT 1740 Only) . - Page 48 SPT 1700 Series Product Reference Guide...
-
Page 49: Introduction
Spectrum24 Setup Introduction The Symbol Spectrum24 Wireless LAN allows SPT 1740 terminals on the same network to communicate wirelessly, and to send captured data “real time” to the host device. The SPT 1740 has an internal omnidirectional antenna and an integrated PCMCIA radio card. Before... - Page 50 SPT 1700 Series Product Reference Guide 3. Select the Network option. The Network Preference screen displays. 4. Tap on the Service pick-list and select Spectrum24, then tap Details. The Spectrum24 Preferences screen displays. 5. On the Spectrum24 Preferences screen, enter the following information: a.
- Page 51 Spectrum24 Setup c. On the IP Settings screen, enter the IP address, Subnet mask, and Gateway address for this terminal. Tap on each field to display a keypad for selection of the address information. Each part of the four-part address must be in the range of 0-255;...
- Page 52 SPT 1700 Series Product Reference Guide Enter the Host and Domain Names, using graffiti or the onscreen keyboard. Tap on the arrow to the right of these fields to display a blank screen if you need more space to enter name information.
-
Page 53: Chapter Contents
Chapter 3 Working with Your SPT 1700 Terminal Chapter Contents Introduction ..............3-3 Selecting Applications. - Page 54 SPT 1700 Series Product Reference Guide Edit Menu Commands ............3-20 Choosing Fonts .
-
Page 55: Introduction
Working with your SPT 1700 Introduction This chapter explains how to open applications, use the on-screen keyboard, write with the stylus, perform scanning, and use common features on your SPT 1700 terminal. Selecting Applications Your SPT 1700 terminal is equipped with a variety of applications which appear in the Applications Launcher. -
Page 56: Switching Applications
SPT 1700 Series Product Reference Guide Switching Applications When working in any application, you can tap the icon or press the buttons on the front panel to switch to any other application. Your SPT 1700 terminal saves your work in the current application and displays it when you return to the current screen. -
Page 57: Using The On-Screen Keyboard
Working with your SPT 1700 To display applications by category: 1. Tap the icon on the SPT 1700 terminal screen to open the Applications Launcher. 2. Tap the icon to open the Applications Launcher menus. 3. Tap Category from the App menu to open the Category dialog. 4. - Page 58 SPT 1700 Series Product Reference Guide 3. Tap the left target to open the Alpha keyboard, or tap the right target to open the Numeric keyboard. Tap here for numbers Tap here for letters keyboard keyboard Alpha Backspace Caps lock...
-
Page 59: Writing With The Stylus
Working with your SPT 1700 Writing With the Stylus Your SPT 1700 terminal includes Graffiti handwriting software as the primary system for entering text and numbers. Graffiti is a system where simple strokes you write with the stylus are instantly recognized as letters or numbers. This section explains the basics of Graffiti, and how to make strokes in the Graffiti writing area. -
Page 60: Writing Letters With Graffiti
SPT 1700 Series Product Reference Guide Note: A cursor appears in the upper-left corner of the Memo Page to indicate where new text will appear. Writing Letters With Graffiti Most people find they can enter text quickly and accurately with only minutes of practice. - Page 61 Working with your SPT 1700 Write letters here Write numbers here Division marks To write letters of the alphabet with Graffiti: 1. Tap the screen where you want your text to go. 2. Use the table on the next page to find the stroke shape for the letter you want to create.
-
Page 62: Graffiti Tips
SPT 1700 Series Product Reference Guide As soon as you lift the stylus from the screen, you can begin the stroke for the next character you want to write. Caution You must make the character strokes in the Graffiti writing area or your SPT 1700 terminal does not recognize them as text characters. -
Page 63: The Graffiti Alphabet
Working with your SPT 1700 The Graffiti Alphabet Letter Strokes Letter Strokes Space Back Space 3-11... -
Page 64: Writing Capital Letters With Graffiti
To enter only capital letters (Caps Lock) use the Caps Lock stroke: Caps Lock Tip: When Caps Lock is active, an underlined “up arrow” symbol appears in the lower- right corner of the SPT 1700 terminal screen. To return to lowercase, make the Caps Shift stroke. -
Page 65: Graffiti Numbers
Strokes Writing Punctuation Marks With Graffiti Graffiti can create any punctuation symbol that you can enter from a standard keyboard. All punctuation marks begin with a single tap on the Graffiti writing area. When you make this tap, you activate Punctuation Shift and a dot appears to show it is active. The next stroke you make with the stylus creates a punctuation mark. -
Page 66: Additional Graffiti Punctuation
All symbols and extended characters begin with the stroke in the Graffiti writing area of your SPT 1700: Symbol Shift When the Symbol Shift is active, a slanted shift symbol appears in the lower-right corner of the screen. The next stroke that you make creates the symbol or extended character. • ... -
Page 67: Writing Accented Characters
Working with your SPT 1700 Writing Accented Characters To create accented characters, draw the stroke normally used to letter, followed by an accent stroke. Graffiti then adds the accent to the letter. For example, the following diagram shows the strokes required to draw an accented “e.” Accent Strokes Using these accent strokes, you can write the following accented letters: à... -
Page 68: Navigation Strokes
ShortCuts. To use a ShortCut, draw the ShortCut stroke followed by the ShortCut characters. When you draw the ShortCut stroke, the ShortCut symbol appears at the insertion point to show that you are in ShortCut mode. -
Page 69: Using Application Controls
Working with your SPT 1700 Your SPT 1700 terminal includes the following predefined Graffiti ShortCuts: Entry ShortCut Entry ShortCut Date stamp Breakfast Time stamp Lunch Date / time stamp Dinner Meeting For example, to enter the current date and time, draw the following strokes: Using Application Controls SPT 1700 applications include several types of controls. -
Page 70: Using Menus
SPT 1700 Series Product Reference Guide Button.Tap a button to perform a command. Buttons appear with different text depending on their function. In most cases, tapping a button opens or closes a dialog. A dialog is a screen that appears on your SPT 1700 terminal, prompting you to enter information or make settings. -
Page 71: Choosing A Menu
Working with your SPT 1700 Tap the Menus icon In this example, three menus are available: Record, Edit and Options. The Record menu is selected and contains the “New Memo,” “Delete Memo” and “Beam Memo” commands. Choosing a Menu After you activate the menus for an application, tap the menu that contains the command you want to use. -
Page 72: Edit Menu Commands
To use the Graffiti menu commands, draw the Command stroke followed by the corresponding command letter. When you draw the Command stroke, the Command symbol appears just above the Graffiti writing area to indicate that you are in Command mode. -
Page 73: Choosing Fonts
Working with your SPT 1700 The following commands may appear in an Edit menu: Undo Reverses the action of the last edit command. For example, if you used the Cut command to remove text, the Undo command replaces the text you removed. Removes the selected text and stores it temporarily in the memory of your SPT 1700 terminal. - Page 74 SPT 1700 Series Product Reference Guide 2. Tap the icon to open the menus at the top of the screen. 3. Tap Font from the Options menu to open the Select Font dialog. Tap here for large font Tap here for bold font Tap here for small font 4.
-
Page 75: Using Categories
Working with your SPT 1700 Using Categories Categories can help you group Address entries, To Do items or Memos for easy review. You cannot, however, assign categories to Date Book events. When you first create an entry, it is “Unfiled,” which means it does not belong to any particular category. -
Page 76: Defining A New Category
SPT 1700 Series Product Reference Guide Tap here 2. Tap the category of entries that you want to view. The List screen changes to show only the records filed in that selected category. 3. Repeat the previous steps, and tap All in the category pick list to restore the list of all Address Book entries. - Page 77 Working with your SPT 1700 Tap here 2. Tap the Edit Categories item to open the Edit Categories dialog. 3. Tap the New button to open another Edit Categories dialog. 4. Enter the name of the new category, and tap the OK button to close the Edit Categories dialog.
-
Page 78: Renaming Categories
SPT 1700 Series Product Reference Guide Renaming Categories You can also use the Edit Categories dialog to change the names of any existing category. To change the name of an Address Book category: 1. Tap the category pick list in the upper-right corner of the screen. -
Page 79: Attaching Notes
Working with your SPT 1700 Attaching Notes SPT 1700 terminal applications (except the Memo Pad) enable you to attach a note to an entry. A note is anything that you want to write, and can be up to several thousand characters long. -
Page 80: Beaming Information To Other Spt 1700 Terminals
SPT 1700 Series Product Reference Guide Beaming Information to Other SPT 1700 Terminals Your SPT 1700 terminal is equipped with an IR (infrared) port that can “beam” information to other compatible printers and terminals. The IR port is located on the back of the terminal. - Page 81 Working with your SPT 1700 4. Point the IR port directly at the IR port of the receiving SPT 1700 terminal. Tip: SPT 1700 terminals transmit data at varying distances up to three ft., depending on lighting conditions when IR is activated. For best results, the IR windows should be aligned and clear of obstacles.
-
Page 82: Scanning With The Spt 1700
SPT 1700 Series Product Reference Guide Scanning with the SPT 1700 The SPT 1700 has an integrated laser bar code scanner which, if your unit is configured to use scanning input, allows you to collect data by scanning bar codes. -
Page 83: Chapter Contents
Chapter 4 Finding Information With Your SPT 1700 Terminal Chapter Contents Introduction ..............4-3 Using the Find Command . - Page 84 SPT 1700 Series Product Reference Guide...
-
Page 85: Introduction
Finding Information With Your SPT 1700 Introduction This chapter explains how to locate information on your SPT 1700 terminal with the Find command and the Phone Lookup command. Using the Find Command The Find command locates any text that you specify and is available in any SPT 1700 terminal application. -
Page 86: Using Phone Lookup
SPT 1700 Series Product Reference Guide Note: As your SPT 1700 terminal searches for the text, you can tap the Stop button at any time, for instance, if the entry you want appears before your SPT 1700 terminal finishes the search. To continue the search after you tap Stop, tap the Find More button. -
Page 87: Phone Lookup Tips
Finding Information With Your SPT 1700 4. Tap the phone number you want to use. Note: To find a phone number more quickly, you can enter the first letter of the name you want to find in the Look Up line at the bottom of the screen. - Page 88 SPT 1700 Series Product Reference Guide...
- Page 89 Chapter 5 Applications: Address Book Chapter Contents Introduction ..............5-3 Address Book Entries .
- Page 90 SPT 1700 Series Product Reference Guide...
-
Page 91: Chapter 5. Applications: Address Book
Applications: Address Book Introduction The Address Book enables you to keep names, addresses, phone numbers and other information about your personal or business contacts. With the Address Book, you can: Quickly look up or enter names, addresses, phone numbers and other information. Enter up to five phone numbers (home, work, fax, car, etc.) or e-mail addresses for each name. -
Page 92: Address Book Entries
Creating an Address Book Entry You can create Address Book entries on your SPT 1700 terminal, or use the Symbol Palm Terminal Desktop software to create Address Book entries on your computer and download the entries to your SPT 1700 terminal with the next HotSync operation. - Page 93 Applications: Address Book Cursor at Last name Tap New 3. Enter the last name of the person you want to add to your Address Book. Note: Your SPT 1700 terminal automatically capitalizes the first letter of each field (except numeric and e-mail fields). You do not have to use the Graffiti capital stroke to capitalize the first letter of the name.
-
Page 94: Editing An Address Book Entry
SPT 1700 Series Product Reference Guide Tap Done Tip: You can create an Address Book entry that always appears at the top of the list by beginning the Last name (or Company name) field with a blank space. For example, you might create an “If Found Call” entry that contains your name and phone number in case you lose your SPT 1700 terminal. -
Page 95: Deleting An Address Book Entry
Applications: Address Book 4. After you finish, tap the Done button to return to the Address List screen. Deleting an Address Book Entry Use the Menu Commands (described in Record Menu on page 5-12) or the Address Entry Details dialog to delete an entry. To delete an entry with the Address Entry Details dialog: 1. - Page 96 SPT 1700 Series Product Reference Guide Look Up line Note: The letter appears on the Look Up line and the list scrolls to the first entry that begins with that letter. If you write another letter, the list scrolls to the first entry that starts with those two letters. For example, writing an “s”...
- Page 97 Applications: Address Book triangle 4. Tap the new label you want to use. Assigning Address Categories Categories can help you file individual Address Book entries into groups for easy review. You can assign and edit categories in the Address Book or by using the Categories pick list in the Details dialog (see Using Categories on page 3-23 for a complete description of categories).
- Page 98 SPT 1700 Series Product Reference Guide 4. Tap the setting that you want for the Address List screen. 5. Tap the OK button to display the Address List screen with your new setting. Note: Entries with no company name sort by last name.
-
Page 99: Beaming Address Entries To Other Spt 1700 Terminals
Applications: Address Book Beaming Address Entries to Other SPT 1700 Terminals The IR port on your SPT 1700 terminal enables you to beam the following Address Book entries to other SPT 1700 terminals: Business card. A specially designated entry containing information you want to exchange with business contacts. -
Page 100: Address Book Menu Commands
SPT 1700 Series Product Reference Guide 3. Tap Beam Address from the Record menu to beam the current entry to another SPT 1700 terminal through the IR port. Tip: You can set the full-screen pen stroke to beam the current entry. See Pen Preferences on page 12-4 for details. - Page 101 Applications: Address Book Delete Address Opens an alert dialog prompting you to confirm deletion of the current entry. Tap the OK button to delete the entry from your SPT 1700 terminal, or tap the Cancel button to close the alert dialog and keep the entry. Note: By default, your SPT 1700 terminal removes the entry from the Address Book, but retains a copy of the entry and transfers it to an archive file on your computer the next time you perform a HotSync operation.
-
Page 102: Options Menu
SPT 1700 Series Product Reference Guide Options Menu When you select the Options menu, its commands appear on screen. Address View Address List Font Opens the Select Font dialog where you can choose a different font (text) style for your Address Book entries. See Choosing Fonts on page 3-21 for details. - Page 103 Applications: Address Book Rename Custom Enables you to define custom field names. Each Address Book entry Fields contains four “custom fields” that you can rename. Any changes you make to the names of the custom fields appear in all of your Address Book entries.
- Page 104 SPT 1700 Series Product Reference Guide 5-16...
-
Page 105: Chapter Contents
Chapter 6 Applications: Calculator Chapter Contents Introduction ..............6-3 Using the Calculator Screen . - Page 106 SPT 1700 Series Product Reference Guide...
-
Page 107: Introduction
Applications: Calculator Introduction The Calculator enables you to perform basic calculations. You can also store and retrieve values in the Calculator’s memory. To open the Calculator tap the icon next to the Graffiti area. ® Using the Calculator Screen The Calculator performs addition, subtraction, multiplication and division operations. To use the Calculator screen, use your finger or the stylus to tap the Calculator buttons that appear on the screen. -
Page 108: Calculator Menu Commands
SPT 1700 Series Product Reference Guide Places the current number into Memory. Each new number you enter with the M+ button is added to the total already stored in memory. The number that you add can be either a calculated value, or any number you enter by pressing the number buttons. - Page 109 Applications: Calculator 3. After you finish reviewing the dialog, tap the OK button to close the Recent Calculations dialog and return to the Calculator.
- Page 110 SPT 1700 Series Product Reference Guide...
- Page 111 Chapter 7 Applications: Date Book Chapter Contents Introduction ..............7-3 Scheduling an Event .
- Page 112 SPT 1700 Series Product Reference Guide...
-
Page 113: Chapter 7. Applications: Date Book
Applications: Date Book Introduction The Date Book enables you to quickly and easily schedule appointments or any kind of activity associated with a time and date. With the Date Book, you can: Enter a description of your appointment and assign it to a specific time and date. Display a chart of your appointments for an entire week. - Page 114 SPT 1700 Series Product Reference Guide When you create an event, its description appears on the time line, and its duration is automatically set to one hour. You can easily change the start time and duration for any event. You can also include events in your Date Book that occur on a particular date but have no specific start or end times, such as birthdays, holidays and anniversaries.
- Page 115 Applications: Date Book Tap the time of an event 4. Tap the time columns on the right side of the Set Time dialog to set the Start Time. Tap to scroll to Start Time earlier hours highlighted Tap to change hours Tap to change minutes Tap to scroll to later...
- Page 116 SPT 1700 Series Product Reference Guide Previous Next week week Tap to select the day of the current week " Tap the Go To button to open the Go to Date dialog. Select a date by tapping a year, month and day in the calendar.
- Page 117 Applications: Date Book 3. Tap OK, so that no start or end times are defined for the new event. Note: You can also create a new untimed event by making sure no event is selected, then writing letters in the Graffiti writing area. 4.
-
Page 118: Rescheduling An Event
SPT 1700 Series Product Reference Guide Rescheduling an Event You can easily make changes to your schedule with your SPT 1700 terminal. To reschedule an event: 1. Tap the event you want to reschedule. 2. Tap the Details button to open the Event Details dialog for that event. -
Page 119: Scheduling Repeating Events
Applications: Date Book Enter numeric setting here Tap here to select alarm unit 6. Tap the OK button to close the Event Details dialog and return to the Date Book screen. Note: You can set a silent alarm for an untimed event. In this case, the alarm triggers at the specified period of minutes, hours or days before midnight (beginning) of the day of the untimed event. -
Page 120: Considerations For The Repeat Function
SPT 1700 Series Product Reference Guide Tap the Repeat 4. Tap Day, Week, Month or Year in the Change Repeat dialog. 5. Enter a number that corresponds to how often you want the event to repeat in the “Every” area. For example, if you select Month and enter the number “2,” the event repeats every other month. -
Page 121: Marking A Private Event
Applications: Date Book Marking a Private Event You can designate a specific event as “private.” When you activate the Security features, your SPT 1700 terminal hides all private entries and you must enter a password to display them on the screen. To mark an event as private: 1. -
Page 122: Working In Week View
SPT 1700 Series Product Reference Guide To toggle through the different views, press the Date Book button repeatedly to display the next view. To display the current time tap the date in the Date Book title bar to display the current time. -
Page 123: Spotting Event Conflicts In Week View
Applications: Date Book Previous Next week week Tap for that day Bar indicates event above display Dot indicates untimed event Bar indicates event below display 3. Tap any of your events to show a description of the event. Event details Tap to show Event details If you want to reschedule an event, tap and drag the event to a different time or day. -
Page 124: Working In Month View
SPT 1700 Series Product Reference Guide In this case, any event conflict (time overlap) appears in the Week View as overlapping bars. The Day View displays bracketed bars to the left of the conflicting times. Event conflicts Working in Month View The Month View screen shows which days have events scheduled. -
Page 125: Date Book Menu Commands
Applications: Date Book Note: You can control the dots and lines that appear in the Month View. See “Options Menu” later in this chapter. Date Book Menu Commands The Date Book includes menu commands to perform common file and editing tasks. This section explains the menu commands that are specific to the Date Book. - Page 126 SPT 1700 Series Product Reference Guide Purge Opens an alert dialog, prompting you to confirm that you want to purge events older than a certain time period — based on the current date on the internal clock on the SPT 1700 terminal. You can use the Purge command to conserve memory on your SPT 1700 terminal.
-
Page 127: Options Menu
Applications: Date Book Options Menu When you select the Options menu, its commands appear on screen. Font Opens the Select Font dialog where you can choose a different font (text) style for your Date Book entries. See Choosing Fonts on page 3-21 for details. Preferences Enables you to set the range of times that appear in the Date Book, and to automatically activate alarms for each event. - Page 128 SPT 1700 Series Product Reference Guide Display Options Allows you to change the Date Book’s appearance and which events display. Show Time Bars. Activates the time bars that appear in the Day View. The time bars show the duration of an event and illustrate event conflicts.
- Page 129 Chapter 8 Applications: Expense Chapter Contents Introduction ..............8-3 Creating an Expense Item .
- Page 130 SPT 1700 Series Product Reference Guide...
-
Page 131: Chapter 8. Applications: Expense
Applications: Expense Introduction The Expense application enables you to keep track of your expenses and then transfer the information to a spreadsheet on your computer. With the Expense application you can: Record dates, type of expenses, amount spent, payment method and other details associated with any money that you spend. - Page 132 SPT 1700 Series Product Reference Guide Cursor of new item Tap New Note: You can also create a new expense item by writing on the number side of the Graffiti pad while in the Expense List screen. The first number ®...
-
Page 133: Changing The Expense Item Date
Applications: Expense Changing the Expense Item Date Initially, expense items appear with the date you enter them on your SPT 1700 terminal. You can use the Expense application to change the date associated with any expense item. To change the date of an expense item: 1. - Page 134 SPT 1700 Series Product Reference Guide 3. Select any of the following options: Category Defines the category for the Expense item. The default Category is Unfiled when All is selected. Otherwise, the default is the currently selected Category. An expense item remains in the default category until you change...
-
Page 135: Customizing The Currency Pick List
Applications: Expense Attendees Displays Attendees screen which resembles a memo in the Memo Pad. You can use this screen to list the people who attended the activity associated with the expense or to make notes, such as the purpose of the expense. Tap here Note: You can tap the Lookup button to display the names (and the corresponding companies) of the people in your Address Book. -
Page 136: Show Options
3. Tap the OK button to close the Select Currencies dialog and activate your selections. Note: If the currency you want to use is not in the list of countries, create your own custom country and currency symbol. See Expense Menu Commands later in this chapter for details. -
Page 137: Transferring Your Data To Microsoft Excel
Transferring Your Data to Microsoft Excel After you enter your expenses into the Expense application on your SPT 1700 terminal, the Symbol Palm Terminal Desktop software enables you to view and print the data with your computer. Note: You need Microsoft Excel version 5.0 (or later) to view and print your Expense data using one of the provided templates. - Page 138 SPT 1700 Series Product Reference Guide Click to select Categories Tip: Press Shift+click to select multiple categories. To print the expenses associated with all of your Expense categories, click the All button in the Categories area. 4. To define an end date for the expense report, enter the date in the End Date area.
- Page 139 1. Perform a HotSync operation to transfer your latest Expense data to your computer and make it available to Symbol Palm Terminal Desktop. 2. Click the Expense button in Symbol Palm Terminal Desktop to open Microsoft Excel and the Expense Report configuration dialog.
- Page 140 SPT 1700 Series Product Reference Guide Click to select Categories 3. Click the expense category that you want to use. Tip: You can press Shift+click to select multiple categories. If you want to view the expenses associated with all of your Expense categories, click the All button in the Categories area.
-
Page 141: Using Expense Report Templates
Using Expense Report Templates Symbol Palm Terminal Desktop software comes with several expense report templates. When you use one of these templates, you can edit your Expense data in Microsoft Excel. If you want to streamline or customize your expense reports, you can change these templates. -
Page 142: Expense Menu Commands
SPT 1700 Series Product Reference Guide 5. Click the OK button to return to the Expense Report Options dialog. Expense Menu Commands The Expense application includes menu commands to perform common file and editing tasks. This section explains the menu commands that are specific to the Expense application. -
Page 143: Options Menu
Custom Currencies Enables you to define additional currency symbols for the Expense application. Note: Use this command only if the currency symbol you need is not available in the Currency pick list of the Receipt Details dialog (see “Entering Receipt Details” earlier in this chapter). - Page 144 2. Tap one of the four Country boxes to open the Currency Properties dialog. 3. Enter the name of the country and the symbol that you want to appear in the Expense application, then tap the OK button to define your setting.
-
Page 145: Chapter Contents
Chapter 9 Applications: HotSync ® Chapter Contents Introduction ..............9-3 The HotSync Process and the HotSync Manager . - Page 146 SPT 1700 Series Product Reference Guide...
-
Page 147: Introduction
® terminals and the Symbol Palm Terminal Desktop software. To synchronize data, you must connect your SPT 1700 terminal and Symbol Palm Terminal Desktop either directly with a cable or cradle, or indirectly with a modem or network. With HotSync technology you can: Synchronize the data entries on your SPT 1700 terminal with the entries on your host system, and vice versa. - Page 148 To perform a HotSync operation for the first time: 1. Double-click the Symbol Palm Terminal Desktop icon on the Windows desktop (or select Symbol Palm Terminal Desktop from the Start menu) to start the Symbol Palm Terminal Desktop software. 2. Click the icon in the Windows System Tray to open the HotSync Manager menu.
- Page 149 Applications: HotSync Tip: The curved edge on the bottom of the SPT 1700 terminal should align smoothly with the cradle when it is inserted properly. 5. Press the button on the front of the SPT 1700 cradle to open the New User dialog.
-
Page 150: Conducting A Local Hotsync Operation
Every SPT 1700 terminal should have a unique name. Never try to synchronize more than one SPT 1700 terminal to the same user name. 7. Wait for the Symbol Palm Terminal Desktop to display a message indicating that the process is complete. - Page 151 Adds HotSync Manager to the Startup folder and constantly monitors the communication port for SPT 1700 terminal synchronization requests. With this option, the HotSync Manager conducts synchronizations even when the Symbol Palm Terminal Desktop is not running. Available only when...
- Page 152 Speed Determines the speed at which data is transferred between your SPT 1700 terminal and Symbol Palm Terminal Desktop. We suggest you try the As Fast As Possible rate first, and adjust downward if you experience problems. This setting allows the Symbol Palm Terminal Desktop and SPT 1700 terminal to find and use the fastest speed.
-
Page 153: Customizing Hotsync Application Settings
These options are called a “conduit.” By default, the Symbol Palm Terminal Desktop synchronizes all files between the SPT 1700 terminal and the Symbol Palm Terminal Desktop. In general, you should leave the settings to synchronize all files. The only... - Page 154 SPT 1700 Series Product Reference Guide 3. Select the appropriate user name from the list at the top of the dialog. 4. Click an application in the Conduit list to choose the conduit you want to change. 5. Click the Change button to open the Change HotSync Action dialog.
-
Page 155: Conducting A Hotsync Operation Via Modem
A modem connected to your SPT 1700 terminal with a special modem cable. (The cradle is not used for a modem HotSync operation.) The Symbol Palm Terminal Desktop software configured for use with a modem as described in Selecting HotSync Setup Options on page 9-6. -
Page 156: Preparing Your Spt 1700 Terminal For A Modem Hotsync Operation
Note: If you have Network HotSync software installed on your SPT 1700 terminal, the Remote Setup dialog appears instead. See Network Preferences and Symbol Palm Terminal Desktop TCP/IP Software on page 12-12 for more information. 4. Enter the telephone number to access the modem connected to your computer. -
Page 157: Selecting The Conduits For A Modem Hotsync Operation
Applications: HotSync 9. Tap the icon to open the HotSync menus. 10. Tap Modem Setup from the Options menu to display the Modem Preferences screen. 11. Enter the Modem Preference settings as described in Connection Preferences on page 12-7 Selecting the Conduits for a Modem HotSync Operation The Conduit Setup dialog on your SPT 1700 terminal enables you to define which files and/ or applications synchronize during a modem HotSync operation. -
Page 158: Performing A Hotsync Operation Via A Modem
HotSync application. 4. Tap the icon to dial the Symbol Palm Terminal Desktop modem and synchronize the applications selected under Conduit Setup. 5. Wait for the HotSync operation to complete. If you have any problems conducting a HotSync operation, see Troubleshooting on page 17-8. - Page 159 6. Repeat steps 3 and 4 for each Profile that you want to create, then click the OK button to close the Profiles dialog and return to the Symbol Palm Terminal Desktop. 7. Select the Profile from the User list and create the data for the Profile (e.g., company phone list, etc.).
-
Page 160: Using File Link
With File Link you can synchronize with data stored in any of the following formats: Comma-separated (*.csv) Memo Pad archive (*.mpa) Address Book archive (*.aba) Text (*.txt) For information on how to set up a File Link, see the Symbol Palm Terminal Desktop Software online Help. 9-16... -
Page 161: Conducting A Wireless Hotsync Via Spectrum24
Applications: HotSync Conducting a Wireless HotSync via Spectrum24 Note: This function is available on SPT 1740 ONLY. The SPT 1740 allows you to perform a HotSync without using a cradle, over the Spectrum24 wireless LAN. This section describes the setup necessary for a wireless HotSync to occur. Setting Up for a Wireless Spectrum24 HotSync Before a wireless HotSync can be performed, the SPT 1740 must be properly configured for use in the Spectrum24 environment. - Page 162 SPT 1700 Series Product Reference Guide Primary PC Name, Primary PC address, and the Subnet mask, and enter that information manually on your SPT 1740. Note: If the Subnet Mask box on your PC is empty, you do not need to enter anything in that section on your SPT 1740.
-
Page 163: Performing A Spectrum24 Hotsync
Applications: HotSync Performing a Spectrum24 HotSync Once all setup is complete, a wireless HotSync can be performed. To perform a HotSync via the Spectrum24 wireless LAN: 1. Select the HotSync application from the main application screen. 2. Make sure the Modem option is selected, and make sure Spectrum24 appears in the Service field. -
Page 164: Setting Up The Ethernet Cradle For Hotsync
SPT 1700 Series Product Reference Guide Setting Up the Ethernet Cradle for Hotsync The CRD1700-4000E appears to SPT 1700 terminals inserted into the cradle as a dial-up PPP service. Therefore, just as you would set up a Palm III terminal to connect to an Internet Service Provider (ISP) like Compuserve or Earthlink, the SPT 1700 terminals must be configured for use with the cradle. - Page 165 Applications: HotSync e. Tap “OK”. 3. To configure the Primary PC host Setup: Note: This panel is extremely important! It tells the SPT 1700 terminal how to locate the machine which it will synchronize with on the network. a. Select the HotSync application from the main application screen. b.
-
Page 166: Creating A Crd1700-4000E Modem Sync Service
SPT 1700 Series Product Reference Guide Creating a CRD1700-4000E Modem Sync Service The SPT 1700 terminal communicates with the CRD1700-4000E via a Modem Sync. The Modem Sync offers many options which must be configured for use with the CRD1700- 4000E. - Page 167 As stated earlier, if multiple slots are to be Hotsync’d simultaneously, each must communicate with a different host PC. If the application requires simultaneous connection to a single host database, additional software, available from Symbol, is required. Terminals inserted into daisy-chained cradles are Hotsynced in a round-robin fashion simultaneously with any HotSyncs from local slots.
- Page 168 SPT 1700 Series Product Reference Guide 9-24...
-
Page 169: Chapter Contents
Chapter 10 Applications: Mail Chapter Contents Introduction ..............10-3 Setting Up Mail on the Desktop . - Page 170 SPT 1700 Series Product Reference Guide Ignoring or Receiving Messages ..........10-22 Defining Filter Strings .
-
Page 171: Introduction
Setting Up Mail on the Desktop Before you use Mail for the first time, your desktop e-mail application should be up and running. You must also set up the Symbol Palm Terminal Desktop software for use with your desktop e-mail application. - Page 172 Windows System Tray to open the HotSync menu. 2. Click Custom from the HotSync menu to open the Custom dialog. Tip: You can also click Custom from the HotSync menu in the Symbol Palm Terminal Desktop. 3. Click Mail in the Custom list box.
-
Page 173: Synchronizing Mail With Your E-Mail Application
Windows System Tray to open the HotSync menu. 2. Click Custom from the HotSync menu to open the Custom dialog. Tip: You can also click Custom from the HotSync menu in the Symbol Palm Terminal Desktop software. -
Page 174: Message Fonts
SPT 1700 Series Product Reference Guide Previously read Tap a message in the list to open it. Header mode icons Recipient Sender Subject Time and date sent Message body Messages appear by default in the abbreviated mode. To switch from the abbreviated mode to the full header mode, see Displaying Full Header Information on page 10-6. -
Page 175: Creating Messages
Applications: Mail To display full header information: 1. Open a message. 2. Tap the Complete Header icon to display the full header. Complete Header icon Abbreviated Header icon 3. To redisplay the abbreviated header, tap the Abbreviated Header icon. Creating Messages Create messages with your SPT 1700 terminal the same way you create messages with your desktop e-mail application: identify the recipient(s) of the message, define a subject and create the body of the message. - Page 176 SPT 1700 Series Product Reference Guide Note: You can also display the New Message screen by tapping New from the Message menu. 2. Use the stylus to write Graffiti character strokes (or the on-screen keyboard) to ® enter the e-mail address of the recipient. The cursor indicates where new text will appear.
- Page 177 Applications: Mail Tap the name of the field to open Tap to return to New Message screen To reply to a message: 1. Tap a message in the Message List to display it on the screen. 2. Tap the Reply button to open the Reply Options dialog. 3.
-
Page 178: Looking Up An Address
SPT 1700 Series Product Reference Guide Looking Up an Address To identify the recipient of a message, enter that person’s e-mail address in the appropriate field of the Message screen. You can do this either by entering the data directly into the field or using the Look Up command to access the information in your Address Book. -
Page 179: Adding Message Details
Applications: Mail Tap to select Tap here to enter address in field Adding Message Details Before you send your message, you can attach additional attributes (called message details) to your message, such as a signature block, or flagging the message as high-priority. These features are dependent on the desktop e-mail application you use. -
Page 180: Sending A Blind Carbon Copy
SPT 1700 Series Product Reference Guide 1. Tap the Details button in the New Message screen to open the Message Details dialog. Tap here 2. Tap the Priority pick list and select the priority you want. Tap here Tap to select priority 3. -
Page 181: Adding A Signature To Your Message
Applications: Mail BCC field 3. Tap the BCC field and enter the address. Adding a Signature to Your Message Adding a signature to your message is a two-part process: first, you must create your signature, then you must select the signature option from the Message Detail dialog. To create a signature: 1. -
Page 182: Sending Messages
SPT 1700 Series Product Reference Guide Note: The signature block does not display in your message; only your recipient sees the signature block. Requesting Confirmations To receive a confirmation when your message is read: 1. Tap the Details button in the New Message screen to open the Message Details dialog. -
Page 183: Draft Messages
Applications: Mail 1. In the Message List screen, tap Outbox from the pick list in the upper-right corner to display the messages contained in the Outbox. Tap to display folder list 2. Tap the message you want to retrieve to display the message. Tap here to select message... -
Page 184: Filing A Message
SPT 1700 Series Product Reference Guide message. If you tap the Yes button, your SPT 1700 terminal saves a draft of your message. To save a message as a draft: 1. Create a message in the New Message screen. 2. Tap the icon to open the Mail menus. -
Page 185: Deleting Messages
Applications: Mail 3. Tap File from the Message menu to display the Message File Options dialog. 4. Tap No to save the message and move it to the Filed folder or tap Yes to file the message and keep a copy in the Inbox. To remove a message you created from the Filed folder: 1. -
Page 186: Purging Deleted Messages
SPT 1700 Series Product Reference Guide To remove a message you created from the Deleted folder: 1. In the Message List screen, tap Deleted from the pick list in the upper-right corner to display the contents of the Deleted folder. -
Page 187: Date Column
Applications: Mail Inbox Contains the mail from your desktop e-mail application Inbox, minus any that you have excluded using filtering options. See Creating Special Filters on page 10-22 for details. Outbox Contains the mail you created and sent on the SPT 1700 terminal since the last HotSync operation. -
Page 188: Hotsync Options
SPT 1700 Series Product Reference Guide Note: High-priority messages always appear first, no matter how you sort your message list. To sort the Message List: 1. Tap the Show button in the Message List to open the Show Options dialog. -
Page 189: Hotsync Options
Applications: Mail Tap here to display HotSync options Note: For more information about Local and Remote HotSync operations, see Chapter 9, Applications: HotSync®. 4. Tap the filtering option you want to apply. The following filtering options are available: During synchronization, all messages in your desktop e-mail Inbox synchronize with your SPT 1700 terminal and all messages in your SPT 1700 terminal Outbox are sent to your desktop e-mail application. -
Page 190: Creating Special Filters
SPT 1700 Series Product Reference Guide 5. If you selected All, Send Only or Unread, tap the OK button to confirm your selection and close the HotSync Options dialog. If you selected Filter, continue to the next section. Creating Special Filters You can create special filters to control the type of messages that download to your SPT 1700 terminal during synchronization. -
Page 191: Defining Filter Strings
Applications: Mail Ignore Tells your SPT 1700 terminal to exclude the messages that meet the defined Messages criteria and download all other messages during synchronization. In general, this Containing filter downloads more mail during synchronization because it blocks only one defined subset of mail. -
Page 192: High-Priority Messages
SPT 1700 Series Product Reference Guide Tap here to insert cursor 2. Enter your filter string for the selected header field using commas or spaces to separate the words, not AND or OR. 3. If your string exceeds the length of the field, tap the name of the field to display the Notes screen for that header field. -
Page 193: Truncating Messages
Applications: Mail 2. Select the Retrieve All High Priority check box to retrieve all messages marked high- priority. check 3. Tap OK to confirm your selection and close the HotSync Options dialog. Note: This setting is applicable only if your e-mail application has the capacity to flag high-priority messages. -
Page 194: Mail Menu Commands
SPT 1700 Series Product Reference Guide Tap to select maximum length Truncate 2. Tap to select the truncation setting you want. The values range from 250 characters to 8000 characters. Tip: If you select a low truncation value, you will have more room on your SPT 1700 terminal to store messages. - Page 195 Applications: Mail Displays the Create Message screen, where you can create a new e-mail message. Save Draft Saves the current message as a draft and moves it to the Draft folder where it is stored until you send or delete it. File Moves the current message to the Filed folder where it is stored until you delete it.
- Page 196 SPT 1700 Series Product Reference Guide Options Menu When you select the Options menu, its menu commands vary depending on whether you are creating or editing a message. Message List New Message Font Enables you to adjust the size of the text on the screen. This can make it easier to read the text or to fit more text in the display area.
- Page 197 Chapter 11 Applications: Memo Pad Chapter Contents Introduction ..............11-3 Creating a New Memo .
- Page 198 SPT 1700 Series Product Reference Guide 11-2...
-
Page 199: Introduction
With the Memo Pad, you can: Take notes or write any kind of message on your SPT 1700 terminal. Drag and drop memos into popular computer applications like Microsoft Word, when you synchronize using Symbol Palm Terminal Desktop software and HotSync ® technology. -
Page 200: Reviewing Memos
SPT 1700 Series Product Reference Guide To create a new memo: 1. Open the Memo Pad application. 2. Tap the New button to create a new memo. Tap New Note: In the Memo List screen, you can also begin writing in the Graffiti writing area to create a new memo. -
Page 201: Arranging Memos
Applications: Memo Pad Tap a memo to review its contents 2. Review or edit the text in the memo. 3. Tap the Done button to save your changes to the memo and return to the Memo List screen. Arranging Memos The Memo Preferences dialog enables you to sort your memos alphabetically or in any order that you want. -
Page 202: Choosing A Memo Category
SPT 1700 Series Product Reference Guide Note: The Manual setting of the Memo Preferences is not transferred to the Symbol Palm Terminal Desktop. If you choose to display your memos alphabetically on the Symbol Palm Terminal Desktop and then perform a HotSync operation, the memos are still arranged in the order defined in the Memo Preferences setting. -
Page 203: Deleting A Memo
Applications: Memo Pad Deleting a Memo There are three ways to delete a memo: simply delete the text of the memo, use the Menu Command (as described in the Record Menu on page 11-7) or use the Memo Details dialog. To delete a memo with the Memo Details dialog: 1. -
Page 204: Options Menu
SPT 1700 Series Product Reference Guide Options Menu New Memo Creates a new memo. Delete Memo Opens an alert dialog, prompting you to confirm that you want to delete the current memo. Tap the OK button to delete the memo from your SPT 1700 terminal, or tap the Cancel button to close the alert dialog and keep the memo. - Page 205 Beam Receive ............12-12 Network Preferences and Symbol Palm Terminal Desktop TCP/IP Software ....12-12 Selecting a Service .
- Page 206 SPT 1700 Series Product Reference Guide Creating Additional Service Templates ......... 12-18 Adding Detailed Information to a Service Template .
-
Page 207: Chapter 12. Applications: Preferences
Define a list of Graffiti abbreviations. ® Calibrate the screen on your SPT 1700 series terminal. Configure your SPT 1700 series terminal for use with a network, including the ® Spectrum24 network (SPT 1740 only). To open the Preferences screens: 1. -
Page 208: Pen Preferences
SPT 1700 Series Product Reference Guide If you assign a different application to a button, you can still access the original application using the Applications Launcher. See Selecting Applications on page 3-3. To change the Buttons Preferences: 1. Tap the pick list next to the button you want to assign in the Buttons Preferences screen to display a list of all the applications installed on your SPT 1700 terminal. - Page 209 Applications: Preferences Drag to top of screen To change the Pen preferences: 1. Tap the Pen button in the Buttons Preferences screen to open the Pen dialog. 2. Tap the pick list and select one of the following settings for the full-screen pen stroke: Backlight Activates the backlight feature of the SPT 1700 terminal.
-
Page 210: Hotsync Buttons Preferences
SPT 1700 Series Product Reference Guide 3. Tap the OK button to complete your selection and return to the Buttons Preferences screen. HotSync Buttons Preferences ® The Buttons Preferences screen also enables you to associate different applications with the HotSync button on the CRD1700-1000S and the HotSync button on the optional PalmPilot Modem. -
Page 211: Connection Preferences
Applications: Preferences Connection Preferences The Connection Preferences screen enables you to define the settings for the serial, modem, and IR communications. To define the Connection Preferences: 1. Tap either the modem or direct box, depending on whether you will be performing communication via a modem, or directly using a serial cable/cradle or IR communication. -
Page 212: Digitizer Preferences
SPT 1700 Series Product Reference Guide Digitizer Preferences The Digitizer Preferences screen activates the digitizer calibration screen. This is the same screen that appears when you start your SPT 1700 terminal for the first time. A complete description of how to use the digitizer calibration screen appears in Calibrating the Screen on page 1-15. -
Page 213: Time, Date, Week Start And Numbers Formats
Applications: Preferences Time, Date, Week Start and Numbers Formats The Time setting defines the format for the time of day. The time format that you select appears in all applications on your SPT 1700 terminal. To select the Time, Date, Week start and Numbers format: 1. -
Page 214: Setting The Current Date
SPT 1700 Series Product Reference Guide Tap here 2. Tap the up or down arrows to change the number for the hour. 3. Tap the minutes numbers, and then tap the arrows to adjust the settings for the current time. -
Page 215: Auto-Off Delay
Applications: Preferences Tap arrows to select year Tap to select month Tap to select date 3. Tap a month box to select the current month. 4. Tap the current date to set the date, close the Set Date dialog and return to the General Preferences screen. -
Page 216: Overall, System, Alarm And Game Sounds
Preferences application. To use the Symbol Palm Terminal Desktop TCP/IP, you must configure both the Modem Preferences and the Network Preferences settings. Note: Modem Preferences settings enable your SPT 1700 terminal to use an external modem (such as the SPT 1700 Modem Cradle) to communicate with remote devices. -
Page 217: Selecting A Service
Line Internet Protocol) connection with your ISP or dial-in server, by using menu commands from the Network Preferences screen or by using a third-party application. Note: Symbol Palm Terminal Desktop TCP/IP provides the ability to connect to your ISP or dial-in server, however, it does not come with any applications to view the transmitted data. -
Page 218: Entering A User Name
SPT 1700 Series Product Reference Guide Entering a User Name The User Name setting identifies the name you use when you log into your Internet Service Provider or your dial-in server. Although this field can contain multiple lines of text, only two lines appear on the screen. -
Page 219: Adding Telephone Settings
Applications: Preferences Enter password here Tap here 2. Enter the password you use to log into your server. 3. Tap OK to confirm your entry and return to the Network Preferences screen. Note: The Password field updates to display the word “Assigned.” Adding Telephone Settings When you select the Phone field, your SPT 1700 terminal opens a dialog where you define the telephone number you use to connect with your ISP or dial-in server. -
Page 220: Entering A Prefix
SPT 1700 Series Product Reference Guide Enter your ISP phone number here 2. Enter the phone number you use to reach your ISP or dial-in server. 3. If you need to enter a prefix or disable Call Waiting, perform those procedures. If not, tap OK to confirm your selection and return to the Network Preferences screen. -
Page 221: Using A Calling Card
Applications: Preferences To disable Call Waiting: 1. Select the Disable call waiting check box to activate this feature. Select this box Enter your disable code if you need to here disable Call Waiting 2. Enter the code to disable Call Waiting on the Disable call waiting line. Note: Each telephone company assigns a code to disable Call Waiting. -
Page 222: Connecting To Your Service
Remember that you need a third-party application, such as a web browser or news reader, to take advantage of this connection. Check the Symbol website (http://www.symbol.com/palm) for the latest information about third-party applications that support SPT TCP/IP. -
Page 223: Adding Detailed Information To A Service Template
Applications: Preferences To add a new service template: 1. Tap the icon in the Network Preferences screen to open the menus. 2. Tap New from the Service menu to create a new service template (called Untitled) to the Service pick list and display it in the Network Preferences screen. To duplicate an existing service template: 1. -
Page 224: Idle Timeout
SPT 1700 Series Product Reference Guide CSLIP Compressed Serial Line Internet Protocol Note: If you are not sure, try PPP; if that doesn’t work, ask your Internet Service Provider or your System Administrator for the correct connection type. Idle Timeout The Idle Timeout setting defines how long your SPT 1700 terminal waits before dropping the connection with your ISP or dial-in server when you switch out of a TCP/IP application. -
Page 225: Ip Address
Applications: Preferences Note: Ask your Internet Service Provider or System Administrator for the correct Primary or Secondary DNS IP numbers. Tip: Many systems do not require that you enter a DNS. If you are not sure, leave the DNS field blank. To enter a primary and secondary DNS: 1. -
Page 226: Creating A Login Script
SPT 1700 Series Product Reference Guide Tap to select automatic IP address To enter a permanent IP address: 1. Clear the IP Address check box to disable this option and display a permanent IP address field below the check box. - Page 227 Applications: Preferences Tap here 3. Tap the command you want from the Command list. If the command requires additional information, a field appears to the right of it for you to enter the information. The following commands are available: Wait For Tells your SPT 1700 terminal to wait for specific characters from the TCP/IP server before executing the next command.
-
Page 228: Deleting A Service Template
SPT 1700 Series Product Reference Guide Deleting a Service Template To delete a service template: 1. Tap the Service pick list in the Network Preference screen to open a list of available service templates. 2. Tap the service you want to delete. -
Page 229: Options Menu
Applications: Preferences Options Menu When you select the Options menu, its command appears on screen: View Log Displays the Network Log screen. TCP/IP Troubleshooting If you are having a problem establishing a network connection using the Desktop TCP/IP, check this section and try the suggestions listed. Displaying Expanded Service Connection Progress Messages It’s helpful to identify at what point in the login procedure the connection fails. -
Page 230: Owner Preferences
SPT 1700 Series Product Reference Guide connection fails. If this occurs, try adding a DNS number. Ask your ISP or your System Administrator for the correct Primary and Secondary DNS IP numbers. Owner Preferences The Owner Preferences screen enables you to record a name, company name, phone number or any other information that you want associated with your SPT 1700 terminal. -
Page 231: Shortcuts Preferences
4. Tap the OK button to close the ShortCut Entry dialog and define your ShortCut. Tip: To use a ShortCut, draw the ShortCut stroke followed by the ShortCut characters. When you draw the ShortCut stroke, the ShortCut symbol appears at the insertion point to show that you are in ShortCut mode. 12-27... -
Page 232: Editing A Shortcut
SPT 1700 Series Product Reference Guide ShortCut Editing a ShortCut After you create a ShortCut, you can modify it at any time. To edit a ShortCut: 1. Tap the ShortCut you want to edit in the ShortCuts Preferences screen. 2. Tap the Edit button to display the ShortCut Name and ShortCut text in the ShortCut Entry dialog. -
Page 233: Chapter Contents
Chapter 13 Applications: Security Chapter Contents Introduction ..............13-3 Assigning a Password . - Page 234 SPT 1700 Series Product Reference Guide 13-2...
-
Page 235: Introduction
Applications: Security Introduction Your SPT 1700 terminal comes with a Security application so that unauthorized users cannot view the entries you wish to protect. With the Security application you can: Hide record entries you mark as “Private.” You can hide private entries with or without a password. -
Page 236: Hiding Private Entries
SPT 1700 Series Product Reference Guide 4. Enter the same password a second time, and tap the OK button to assign that password to your SPT 1700 terminal. Hiding Private Entries You can hide the entries that you mark as private. If you assign a password, you must enter it to show entries you mark as private. -
Page 237: Locking Your Spt 1700 Terminal
Applications: Security Tap here 2. Enter your password. 3. Tap the Show box to close the Show Private Records dialog and display Private entries in your SPT 1700 terminal applications. Locking Your SPT 1700 Terminal You can also lock your SPT 1700 terminal, so that you need to enter your password to operate it. -
Page 238: Changing Or Deleting A Password
SPT 1700 Series Product Reference Guide Tap here 4. Tap the Off & Lock button to turn off the power for your SPT 1700 terminal. 5. Start your SPT 1700 terminal and enter the password. Changing or Deleting a Password Once you define a password for your SPT 1700 terminal, you can change or delete it at any time. -
Page 239: Recovering From A Forgotten Password
Applications: Security 4. To change the password, enter the new password and tap the OK button. To delete the password, tap the Delete button. Recovering from a Forgotten Password If you forget your password, you can delete the password from your SPT 1700 terminal. Deleting a forgotten password also deletes all entries and files marked as Private. - Page 240 SPT 1700 Series Product Reference Guide 13-8...
-
Page 241: Chapter Contents
Chapter 14 Applications: To Do List Chapter Contents Introduction ..............14-3 Opening the To Do List . - Page 242 SPT 1700 Series Product Reference Guide 14-2...
-
Page 243: Introduction
Applications: To Do LIst Introduction The To Do List is a convenient place to create reminders and prioritize the things that you have to do. With the To Do List, you can: Make a quick and convenient list of things to do. Assign a priority level to each task. -
Page 244: Setting Priority
SPT 1700 Series Product Reference Guide To create a To Do item: 1. Tap the New button in the To Do List screen to add an item to the list. New To Do item Tap New 2. Enter the text you want to appear in the To Do item. The text can be longer than one line. -
Page 245: Checking Off A To Do Item
Applications: To Do LIst Tap here Tap to select priority 2. Tap the Priority number that you want to set for the To Do item (1 is most important and 5 is least important). Note: You can also change the Priority setting for a To Do item with the To Do Details dialog described later in this chapter. -
Page 246: Choosing A To Do Category
SPT 1700 Series Product Reference Guide To activate the To Do Item Details dialog: 1. Tap anywhere on the text of a To Do item in the To Do List screen. 2. Tap the Details button to open the To Do Item Details dialog. -
Page 247: Deleting A To Do Item
Applications: To Do LIst One week later Assigns the date exactly one week from the current date. No Date Removes the due date from the To Do item. Choose date Opens the Due Date dialog where you can chose any due date that you want for the To Do item. - Page 248 SPT 1700 Series Product Reference Guide 2. Select any of the following settings: Sort by Enables you to sort the To Do items in one of the following ways: Priority, Due Date Due Date, Priority Category, Priority Category, Due Date Show Completed Displays your complete To Do items in the To Do List.
-
Page 249: To Do List Menu Commands
Applications: To Do LIst To Do List Menu Commands The To Do List includes menu commands to perform common file and editing tasks. See Using Menus on page 3-18 for information about menu commands that are common to all SPT 1700 terminal applications. Record Menu When you select the Record menu, its commands appear on screen. -
Page 250: Options Menu
SPT 1700 Series Product Reference Guide Beam Category Beams all To Do Items in the current category to another SPT 1700 terminal through the IR port. Options Menu When you select the Options menu, its commands appears on screen. Font Displays the Select Font dialog where you can choose a different font (text) style for your Address Book entries. - Page 251 Chapter 15 Applications: Laser Scanner Chapter Contents Introduction ..............15-3 Scanning with the SPT 1700 .
- Page 252 SPT 1700 Series Product Reference Guide 15-2...
-
Page 253: Introduction
Scanning with the SPT 1700 Included on the Symbol Palm Terminal Utility CD are two demonstration programs: SScan and Demo Scan. These programs are designed to assist the applications developer in writing an application for the scanner. Source code for these programs is located in the Samples subdirectory of the Scanner SDK directory, and the prc files are located in the prc subdirectory of the Scanner SDK directory. -
Page 254: Trigger Mode
SPT 1700 Series Product Reference Guide The List of Available Symbologies Allows you to select the symbologies to be recognized by the scanner by tapping on the box next to the name of the desired symbology. When selected, the box has a check mark. - Page 255 Scan Angle: defines the scan angle to be used by the scanner; wide angle or narrow angle. Decode LED On Time: defines the length of time the decode LED remains on when a symbol is decoded. Laser On Time: defines the length of time the laser beam remains on when the trigger is pressed.
-
Page 256: Receiving Demonstration Program
SPT 1700 Series Product Reference Guide 3. Aim the scanner at the bar code. 4. Press either the right, left or center scan trigger or tap the Scan Button. Make sure the red scan beam covers the entire bar code. The green scan LED lights and a beep sounds to indicate a successful decode. -
Page 257: Scanning Problems
Set up in the Scan Demo application. If you have checked all of these things and are still experiencing problems decoding your bar codes, please contact Symbol Technologies Technical Support Center. See page xvi for contact information. Battery Implications While Using the Laser Scanner If your battery becomes low while the scanning application is active, the scanning application deactivates and you receive the message, “Battery Low Error”. -
Page 258: Scanning 2-Dimensional Bar Codes
1. Aim the scanner at the PDF bar code and press the trigger. 2. Hold the trigger down and keep the scan line parallel to the rows of the symbol. 3. Manually raster the scan line by slowly moving the scanner up and down so it scans the entire bar code at a rate of one inch per second. - Page 259 Removing Applications............16-6 Removing the Symbol Palm Terminal Desktop Software ....... 16-7...
- Page 260 SPT 1700 Series Product Reference Guide 16-2...
-
Page 261: Introduction
Note: If you prefer to copy the application into another folder, navigate to that folder before you complete step 5. 2. Double-click the Symbol Palm Terminal Desktop icon on your Windows desktop (or select Symbol Palm Terminal Desktop from the Start menu) to open the Symbol Palm Terminal Desktop software. 16-3... - Page 262 3. Click the Install button to open the SPT Install Tool dialog. Tip: You can also access the Install Tool dialog by selecting Install Tool from the Symbol Palm Terminal Desktop program group or by double-clicking any file with a prc file extension. 16-4...
- Page 263 Installing and Removing Applications 4. Select the user name that corresponds to your SPT 1700 terminal in the User drop- down list. 5. Click the Add button to open the Open dialog. 6. Click the application(s) that you want to install on your SPT 1700 terminal. 7.
-
Page 264: Installing Games
SPT 1700 Series Product Reference Guide 8. Perform a local HotSync operation to install the application(s) you selected in step ® 6. See Conducting a Local HotSync Operation on page 9-6 for details. Installing Games The CD-ROM that comes with your SPT 1700 terminal includes several games that you can install with the SPT Install Tool. -
Page 265: Removing The Symbol Palm Terminal Desktop Software
Launcher. Removing the Symbol Palm Terminal Desktop Software If you no longer want to use the Symbol Palm Terminal Desktop software, you can remove it from your computer. To remove the Symbol Palm Terminal Desktop software: 1. Select Settings, then Control Panel from the Start menu to open the Windows Control Panel. - Page 266 SPT 1700 Series Product Reference Guide 16-8...
-
Page 267: Chapter Contents
Chapter 17 Getting Help With Your SPT 1700 Terminal Chapter Contents Introduction ..............17-3 Displaying Online Tips . - Page 268 SPT 1700 Series Product Reference Guide 17-2...
-
Page 269: Introduction
SPT 1700 terminal and you can review the troubleshooting section in this chapter and on your Symbol Palm Terminal Desktop Software CD. If you need additional assistance, there are several ways to contact Symbol Technical Support. This chapter provides details on each of these methods. -
Page 270: Spt 1700 Diagnostics Utility
SPT 1700 Series Product Reference Guide SPT 1700 Diagnostics Utility The SPT 1700 Diagnostics Utility is used to ensure that your SPT 1700 Terminal is operating properly. It can also assist you in troubleshooting problems you may encounter. The Diagnostics Utility tests the various features of the terminal, and reports whether or not they are operating properly. -
Page 271: Bar Code Scanner Test
Getting Help With Your SPT 1700 Terminal The attributes described on this screen are: Manufacturer: The manufacturer of the terminal. RAM Size: The amount of Random Access Memory. RAM Free/Used: The amount of free and used Random Access Memory. ROM Used: The amount of free and used Read-Only Memory. -
Page 272: Serial Port Test
SPT 1700 Series Product Reference Guide To test the scanner, select the Scanner Enabled checkbox and the Scan checkbox.To ensure that a specific type of bar code can be read, move to the next page by pressing the down button on the terminal, or by tapping on the arrow in the lower left corner of the screen with the stylus. - Page 273 Getting Help With Your SPT 1700 Terminal To run the serial port test: 1. Place your terminal in a cradle attached to a computer. 2. Determine which communications port is used by HotSync. To do this, right-click on the HotSync icon in your computer’s icon tray in the lower left corner of the screen, and choose Setup.
-
Page 274: Digitizer Alignment Test
Important: For troubleshooting tips not included in this handbook, refer to either the README.TXT file or the Help Notes file located in the Symbol Palm 17-8... -
Page 275: Installation Troubleshooting
ROM. Installation Troubleshooting Do not place your SPT 1700 terminal in the cradle while installing the Symbol Palm Terminal Desktop software, or the installation program may incorrectly detect that a modem is attached to one of your available serial ports. - Page 276 SPT 1700 Series Product Reference Guide Confirm that the Setup String in the Setup dialog box configures your modem correctly. You may need to select a different Modem Type or enter a custom Setup String. Most modems have a Setup String that causes them to send initial connection sounds to a speaker.
-
Page 277: Cradle Troubleshooting
Getting Help With Your SPT 1700 Terminal Cradle Troubleshooting Serial Cradle LEDs do not light when the cradle is plugged in: Cradle is not receiving power. Make sure the power supply is securely connected and receiving power. LED does not light when the terminal is inserted: Terminal is not seated firmly in the cradle. - Page 278 SPT 1700 Series Product Reference Guide Low battery warning after recharging the batteries: The battery warning message may appear immediately after recharging the battery. In addition, if you check the battery gauge in the Applications Launcher immediately after recharging the battery, the gauge may start at “empty” and slowly rise to “full.”...
-
Page 279: Security Troubleshooting
In this case, the following procedure restores your private entries and lets you access them: Use the Symbol Palm Terminal Desktop software and the SPT 1700 terminal cradle to synchronize your data. -
Page 280: Applications Troubleshooting
HotSync operation, the memos on your SPT 1700 terminal still appear in the order defined in the Memo Preferences setting. In other words, the sort settings that you use with Symbol Palm Terminal Desktop are not transferred to your SPT 1700 terminal. -
Page 281: Technical Support, Service And Repair
The actual error message or state you are experiencing The steps you take to reproduce the problem. Technical Support United States and Canada Phone: 1-800-659-2240 Web site: http://www.symbol.com/palm Outside North America, contact your local Symbol representative. See page xvii for the Technical Support number in your country. 17-15... - Page 282 SPT 1700 Series Product Reference Guide 17-16...
-
Page 283: Chapter Contents
Chapter 18 Maintaining Your SPT 1700 Terminal Chapter Contents Introduction ..............18-3 Caring for Your SPT 1700 Terminal . - Page 284 SPT 1700 Series Product Reference Guide 18-2...
-
Page 285: Introduction
Maintaining Your SPT 1700 Terminal Introduction This chapter provides information to help you take proper care of your SPT 1700 terminal and prolong battery life. It also discusses how to reset your SPT 1700 terminal. Caring for Your SPT 1700 Terminal Your SPT 1700 terminal is designed to be reliable and to provide years of trouble-free service. - Page 286 SPT 1700 Series Product Reference Guide Note: When the scanner is in use, battery life is shorter, and depends on the number of scans performed per minute. If the battery becomes low while using the scanner application, the scanner application de-activates, and you receive the message, “Battery low error”. The other functions still work until another low battery alert occurs.
-
Page 287: Resetting Your Spt 1700 Terminal
Maintaining Your SPT 1700 Terminal Resetting Your SPT 1700 Terminal Under normal circumstances, you will never have to use the reset button. However, on rare occasions your SPT 1700 terminal may “hang” (no longer respond to buttons or the screen). In this case, perform a reset to get your SPT 1700 terminal running again. - Page 288 SPT 1700 Series Product Reference Guide To perform a hard reset: 1. Open and remove the battery cover. 2. Hold down the power button on the front of the SPT 1700 terminal. 3. While holding down the power button, use the tip of the stylus to gently press the reset button on the back of the terminal.
-
Page 289: Appendix A Expense Templates
Expense Templates Introduction This appendix provides illustrations of the four expense templates that come with the Symbol Palm Terminal Desktop software. You may use or modify any of these templates when creating expense reports with data from the Expense application. -
Page 290: Sample 1
SPT 1700 Series Product Reference Guide Sample 1... -
Page 291: Sample 2
Expense Templates Sample 2... -
Page 292: Sample 3
SPT 1700 Series Product Reference Guide Sample 3... -
Page 293: Sample 4
Expense Templates Sample 4... - Page 294 SPT 1700 Series Product Reference Guide...
-
Page 295: Appendix B Creating A Custom Expense Report
Before creating or modifying an Expense template, it’s important to understand the function of Symbol Palm Terminal Desktop’s Expense application. In simple terms, the Expense application is designed to move Expense data from your SPT 1700 terminal into a Microsoft Excel spreadsheet. -
Page 296: Customizing Existing Sample Templates
Customizing Existing Sample Templates Four sample Expense Report templates come with the Symbol Palm Terminal Desktop. These templates are stored in the Templates folder (which is in the same folder as the Symbol Palm Terminal Desktop application). If the layout of one (or more) of these templates is appropriate for your reporting needs, you can easily customize the templates with your company name and other information. - Page 297 4. Choose Save As from the File menu to open the Save As dialog. 5. Click the Save as type drop-down list and choose Template (*.xlt). 6. Navigate to the Templates folder (in the Symbol Palm Terminal Desktop directory). Note: If you do not need to change the Maptable.xls file, save the template file with its original file name (e.g., Sample2.xlt).
-
Page 298: Determining The Layout Of The Expense Report
SPT 1700 Series Product Reference Guide Determining the Layout of the Expense Report This section describes the layout considerations for the Expense Report and explains the terms used for creating the report. Labels There are two kinds of labels you need to define for your report: day/date and expense type. -
Page 299: Analyzing Your Custom Expense Report
Creating a Custom Expense Report Section 1 (not prepaid) Section 2 (prepaid) Section 3 Because your Expense data maps to row and column areas of your final report, different Sections require different definitions for the data mapping. To create additional Sections with different mapping, create corresponding additional lines to the mapping table file named Maptable.xls. -
Page 300: Programming The Mapping Table
Section can have only one kind of Fixed or Variable Label for rows and each Section can have only one kind for columns. Place a copy of your custom Expense Report in the Templates folder (in the Symbol Palm Terminal Desktop directory). Change the file name so it has the file extension.xlt (which defines it as a Microsoft Excel Template). - Page 301 Creating a Custom Expense Report All rows associated with template are selected 4. Choose Copy from the Edit menu. 5. Scroll down to a blank area of the Maptable.xls file (below the rows used for Sample4.xlt), and click on a row number to select a blank row. 6.
- Page 302 SPT 1700 Series Product Reference Guide You may add or delete rows as necessary so that the total number of rows corresponds to the number of Sections in your custom Expense Report. To clear all of the existing settings in a row, click to select the row and press Ctrl+Delete. Name each row to correspond to a Section of your custom Expense Report.
- Page 303 Creating a Custom Expense Report In the Date cell, enter the row or column number where all the date information will be placed. In the Dates cell, enter the number of blank columns (or rows) separating the date fields. If there are no blank columns (or rows) between date entries, leave this number set to zero.
-
Page 304: Using Applications Other Than Microsoft Excel
SPT 1700 Series Product Reference Guide For these settings, simply enter the row or column number for the expense types that you want to appear in the Section. Note that the same row or column number can be used more than once. An example of this would be meals that encompass breakfast, lunch, dinner and snacks. -
Page 305: Expense File Details
Creating a Custom Expense Report Expense File Details The Expense.txt file contains four groups of data. It is easier to see these four groups if you open the file with a spreadsheet application. Trips Shows the number of Expense application categories, and lists each one followed by an “end”... - Page 306 SPT 1700 Series Product Reference Guide B-12...
-
Page 307: Appendix C Non-Ascii Characters For Login Scripts
Appendix C Non-ASCII Characters for Login Scripts Introduction The following information enables you to create custom login scripts that require non-ASCII characters. It is provided for advanced users who understand the use and requirements of such characters in a custom login script. Use of ^char You may use the caret ( ^ ) to transmit ASCII command characters. -
Page 308: Literal Characters
SPT 1700 Series Product Reference Guide For example, the string “waitfor Joe<cr><lf>” waits to receive Joe followed by a carriage return and line feed from the remote computer before executing the next command in the script. Literal Characters The backslash ( \ ) character defines that the next character is transmitted as a literal character, and is not subject to any special processing ordinarily associated with that character. -
Page 309: Appendix D The Scoutmts Client
Appendix D The ScoutMTS Client Introduction The Scout Multi-Threaded Server (ScoutMTS) is a server-based synchronization system that integrates Palm OS devices into an enterprise network using TCP/IP technology. ScoutMTS enables multiple users to simultaneously synchronize data stored on wireless and handheld SPT 1700 terminals with enterprise data stored in back-end applications and databases. - Page 310 SPT 1700 Series Product Reference Guide In addition to performing a synchronization session, the Scout server is capable of updating the Scout Sync Client on the SPT 1700 terminal. The update can occur under two circumstances: when the user initiates the update via the Scout Update client, and application installed on an SPT 1700 terminal.
- Page 311 Index Marking Private Event ..7-11 Menu Commands Adding Options Menu ... 7-17 Address Book entries ....5-4 menu commands Adding message details .
- Page 312 SPT 1700 Series Product Reference Guide customizing templates ..B-2 buttons ....12-3 lotus 1-2-3 .
- Page 313 Editing contacting Symbol ....xvi Address Book entries ....5-6 Creating Entering Receipt Details .
- Page 314 SPT 1700 Series Product Reference Guide File Infrared port ..... . 17-13 messages ..... 10-16 Installing games .
- Page 315 Index Menus File Link ..... . 9-16 Address Book ....5-12 HotSync options .
- Page 316 SPT 1700 Series Product Reference Guide Address Book ....5-4 hard reset ..... . 18-5 beaming .
- Page 317 We’d like to know what you think about this Manual. Please take a moment to fill out this questionnaire and fax this form to: (631) 738-3318, or mail to: Symbol Technologies, Inc. One Symbol Plaza M/S B-4 Holtsville, NY 11742-1300 Attn: Technical Publications Manager IMPORTANT: If you need product support, please call the appropriate customer support number provided.