Boss BR-600 Owner's Manual
Hide thumbs
Also See for BR-600:
- Owner's manual (228 pages) ,
- Workshop manual (15 pages) ,
- Recording manualbook (8 pages)
Table of Contents
Advertisement
Quick Links
Owner's Manual
Thank you, and congratulations on your choice of the BOSS
BR-600 Digital Recorder.
Before using this unit, carefully read the sections entitled:
• USING THE UNIT SAFELY (page 2–3)
• IMPORTANT NOTES (page 4–5)
These sections provide important information concerning the
proper operation of the unit.
Additionally, in order to feel assured that you have gained a good
grasp of every feature provided by your new unit, Owner's manual
should be read in its entirety. The manual should be saved and kept
on hand as a convenient reference.
■ Printing Conventions in This Manual
• Text or numerals enclosed in square brackets [ ] indicate buttons.
[PLAY]
PLAY button
[REC]
REC button
• Reference such as (p. **) indicate pages in this manual to which
you can refer.
Copyright © 2005 BOSS CORPORATION
All rights reserved. No part of this publication may be reproduced in any form
without the written permission of BOSS CORPORATION.
Advertisement
Table of Contents

Related Manuals for Boss BR-600


Summary of Contents for Boss BR-600
- Page 1 Owner’s Manual Thank you, and congratulations on your choice of the BOSS BR-600 Digital Recorder. Before using this unit, carefully read the sections entitled: • USING THE UNIT SAFELY (page 2–3) • IMPORTANT NOTES (page 4–5) These sections provide important information concerning the proper operation of the unit.
- Page 2 USING THE UNIT SAFELY symbol alerts the user to important instructions Used for instructions intended to alert or warnings. The specific meaning of the symbol is the user to the risk of death or severe determined by the design contained within the injury should the unit be used triangle.
- Page 3 108b • In households with small children, an adult • Before moving the unit, disconnect the AC should provide supervision until the child is adaptor and all cords coming from external capable of following all the rules essential for the safe devices.
-
Page 4: Important Notes
IMPORTANT NOTES 291a In addition to the items listed under “USING THE UNIT SAFELY” on page 2–3, please read and observe the following: Power Supply: Use of Batteries 355b • When moved from one location to another where the temperature and/or humidity is very different, water •... - Page 5 IMPORTANT NOTES • To prevent damage to the cards from static • When connecting / disconnecting all cables, grasp the electricity, be sure to discharge any static electricity connector itself—never pull on the cable. This way you from your own body before handling the cards. will avoid causing shorts, or damage to the cable’s •...
-
Page 6: Table Of Contents
Introduction to the BR-600 ....12 Adjusting the input sensitivity........36 Features ............12 Adjusting the recording level........37 Memory Cards Supported by Your BR-600 ..15 Displaying the Level Meter ........37 Formatting the memory card (CompactFlash) ..15 Using Insert Effects......38 How to remove the card cover .........15 Switch effect patches........38... - Page 7 Section 1 Section 2 Editing....71 Recording and Playback ..53 Registering Time (Locator) ....72 Recording ..........54 Registering a Locator Point......72 Moving to the Locator Point......72 Creating Songs for Recording ......54 Deleting a Locator Point........72 About data types............54 Selecting the Recording Track......55 Search for the Music’s Start and End (Scrub/Preview).........73 Changing V-Tracks ........56...
- Page 8 Section 3 Using Effects ..91 Foot Volume ..............104 Lo-Fi Box ..............105 Using the Insert Effects .......92 Noise Suppressor .............106 Octave ................106 Effect Patches and Banks.......92 Phaser .................106 Editing Insert Effect Settings ......93 Pitch Shifter ...............106 Saving Insert Effects Settings (Write)..94 Preamp ...............107 Changing the destination Insert Effects are Ring Modulator ............
- Page 9 Section 4 Fixing the Pitch of Vocals (Pitch Correction)......123 Using The Rhythm ..... 131 The Pitch Correction ........123 About Rhythms ........132 Makeup of the Pitch Correction....123 About the Drum Pads........132 Pitch Correction Patches ......123 About the Drum Sounds (Drum Kits)..132 Precautions for Pitch Correction Usage..123 What Are Patterns and Arrangements?..133 Using the Pitch Correction......124...
- Page 10 (Step Recording) ....148 Saving BR-600 Data to Computers Naming Patterns ......151 (Backup)............164 Copying Patterns ......152 Reading backup data back into the BR-600 Erasing Patterns ......153 from PC (Recover)........165 Saving BR-600 Track Data in WAV/AIFF Creating Original Arrangements ..154 Format Inserting Steps ..........156...
- Page 11 (Phrase Trainer) ......195 Slowing Down the Speed (Time Stretch) ..195 Canceling the Center Sound (Center Cancel) ..........196 Initializing the BR-600’s Settings ..197 Initializing All the BR-600’s Settings..197 Initializing the System Settings....197 Initializing the Effect Settings ....198 Initializing the Rhythm Arrangements/ Patterns/Drum Kits........198...
-
Page 12: Introduction To The Br-600
Slender shape for easy ■ portability With portability a priority in its design, the BR-600 features a What are V-Tracks? smaller than Letter size (183 x 257 mm (10-1/8 x 7-1/4 inches)) Each track consists of eight virtual tracks, and you can and is only 27 mm (1-1/8 inches) thick. - Page 13 Versatile digital effects processors Editing functions The BR-600 comes with five different types of effects With the BR-600, you can copy, move, and erase audio, and processors. These systems, including recording effects perform many other editing operations that are only (Insert effects), send/return (Loop Effects), tone adjustment possible with digital recorders.
- Page 14 Two-way power supply ■ allows you to record anywhere You can use the BR-600 powered by batteries (six size AA dry cells x 6, alkaline batteries recommended) or with the AC adaptor. And, thanks to its an onboard stereo microphone, you can...
-
Page 15: Memory Cards Supported By Your Br-600
The BR-600 uses CompactFlash cards as the storage media for recording and playback. The BR-600 uses 32 MB to 1 GB CompactFlash cards with a 3.3 V power supply. For more on supported memory cards (CompactFlash) for the BR-600, refer to “About Memory Cards” (separate sheet). -
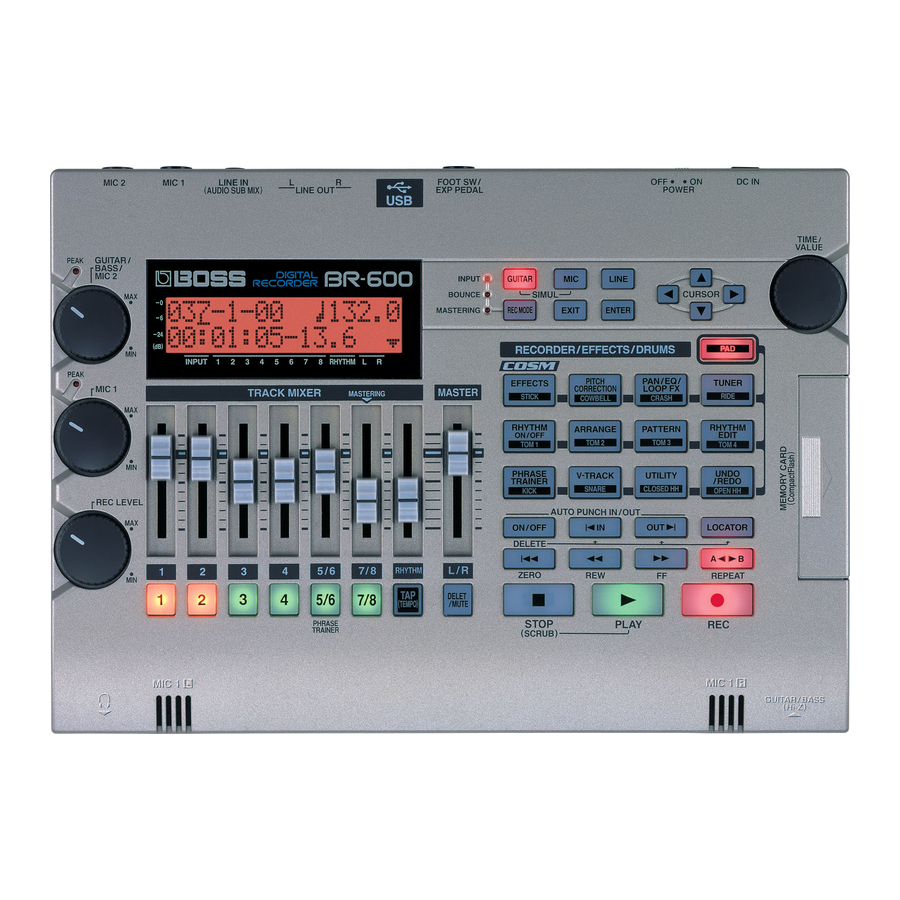
Page 16: Panel Descriptions
Panel Descriptions Front Panel fig.00-050 Input section REC LEVEL (Recording Level) dial GUITAR/BASS/MIC2 dial Use this dial to adjust the volume of the input source for This dial adjusts the input sensitivity for the GUITAR/ recording. BASS and MIC2 inputs. * If you use the REC LEVEL dial to turn down the volume of the input source during recording, the sound will be MIC1 dial... - Page 17 Panel Descriptions INPUT SELECT buttons TIME/VALUE dial Use these buttons to select the input source (input jack) that You can use this dial to shift the current position within a you wish to record. The selected button will light. You can song (e.g., fast forwarding and rewinding).
- Page 18 Panel Descriptions [TUNER] [V-TRACK] Use this button to turn on and off the tuner. Use this button to call up the screen for selecting a V-Track. “Tuning an Instrument (Tuner)” (p. 192) “What are V-Tracks?” (p. 12) “Changing V-Tracks” (p. 56) [RHYTHM ON/OFF] [UTILITY] This switches the Rhythm function on and off.
- Page 19 Panel Descriptions REC/PLAY section [ZERO] AUTO PUNCH Moves you to the time location 00:00:00-00.0. This button is used to make settings for the automatic punch in/out function. “Moving the current position” (p. 33) [ON/OFF] This turns the auto punch-in/out function on/off. When [REW] this is on, the button will light.
- Page 20 REC TRACK button for that track. MASTER fader Performing this same operation again cancels the mute. Controls the overall volume of the BR-600. While the sound is muted, the REC TRACK button for the “Listening to a Demo Song” (p. 32) track flashes orange or green.
-
Page 21: Eject Button
Panel Descriptions MEMORY CARD slot Display fig.00-051 fig.00-052 Eject button Information about items for which settings are available in volume level and menu screens, parameter settings screens, and other screens are displayed here. This slot is where memory cards (CompactFlash) are If the screen is difficult to view, see “Adjusting the Display inserted when you want to save data. -
Page 22: Rear Panel
7. POWER switch * Connecting a mic to MIC1 switches off the onboard stereo mic. This is the power switch. It turns the power of the BR-600 The pin assignment for the MIC1 and the MIC2 jack is as on/off (p. 31). -
Page 23: Front Panel
High-impedance input jack to directly connect your guitar or bass.(p. 34) 2. MIC1 L / R (onboard stereo microphone L / R) This microphone can be used for recording with the BR-600. “Selecting the Input” (p. 36) “Turning on the onboard stereo microphone” (p. 36) * This mic is not a speaker. -
Page 24: Inserting Batteries
Panel Descriptions Inserting Batteries Make sure that the power of the BR-600 is turned off. • When turning the unit upside-down, get a bunch of newspapers or magazines, and place them Turn over the BR-600. under the four corners or at both ends to prevent damage to the buttons and controls. -
Page 25: About The Play Screen
Panel Descriptions About the Play Screen The Play screen is the most fundamental screen of the BR- 600, and is the first screen that appears when the BR-600 is turned on (see below). fig.00-242 Play Screen Unless special note is made otherwise, the screen content referred to in the procedures described in this manual is that of the Play screen. - Page 26 MEMO...
-
Page 27: Quick Start
Quick Start Quick Start... -
Page 28: Connecting Peripheral Devices
Connecting Peripheral Devices Make connections as shown in the diagram below. When making any connections, make sure that all devices are turned off. fig.00-110 Front Panel Electric Guitar Stereo Headphone Electric Bass Rear Panel AC Adaptor (PSA series) CD Player etc. Computer Foot Switch (FS-5U etc.) -
Page 29: How To Use The Cord Hook
Connecting Peripheral Devices How to Use the Cord Hook The bottom of the BR-600 features a groove (cord hook) for • To prevent malfunction and/or damage to securing the AC adaptor (PSA series) cord. speakers or other devices, always turn down the... -
Page 30: Using A Mic Converter Cable
If your mic cable has an XLR connector, you can connect the Insert the memory card (CompactFlash) with the card label mic using the converter cable included with the BR-600. The facing upward. following describes how to connect the mic using this cable. -
Page 31: Turning On / Off The Br-600
■ Are all external devices connected properly? Confirm that "Keep power on!" is not indicated in the ■ Is the volume on the BR-600 and all other devices display. completely lowered? ■ Is the memory card inserted? Turn the BR-600’s POWER switch off. -
Page 32: Listening To A Demo Song
“SEL,” and press [ENTER]. The Song Select screen appears in the display. fig.00-180 • The BR-600 comes programmed with one demo song. When the power is first turned on, the demo song is automatically selected, and the data required for playback is loaded. -
Page 33: Moving The Current Position
Moving the current position You can use the following method to move the current Moving through a song in ■ position. measures or beats Fast Forwarding and ■ The current position in the song is indicated at the left of the Rewinding upper row as "measure-beat-clock."... -
Page 34: Connecting Instruments
Connecting Instruments Choose which jack you will ■ use to connect your instrument Your BR-600 is equipped with a number of input jacks to match the type of instrument that you will connect. Select an instrument appropriate for your purposes. fig.00-280 GUITAR/BASS : An electric guitar or bass can be connected to this jack. -
Page 35: Preparing Songs For Recording
The BR-600 uses a sample rate of 44.1 kHz. It is not possible to change the sample rate. Confirm that [PAD] is not lit, then press [UTILITY]. -
Page 36: Selecting The Input
Selecting the Input Select the input source to record. The selected button will Turning on the onboard ■ light. stereo microphone fig.00-290 fig.00-300 [GUITAR] Select to record the instrument connected to the GUITAR/ BASS jack or the MIC 2 jack. [MIC] Select to record the signal from a microphone connected to the MIC1 jack and the MIC2 jack or from the onboard stereo... -
Page 37: Adjusting The Recording Level
Selecting the Input ■ Adjusting the recording level ■ Displaying the Level Meter Adjust the volume of the input source for recording. This meter indicates the level for each track. In the Play screen, press CURSOR [ Lower the MASTER fader. * To return to the Play screen, press CURSOR [ fig.00-340 Turn the REC LEVEL dial to its center position and... -
Page 38: Using Insert Effects
Using Insert Effects The BR-600 comes with five onboard effects processors: an Switch effect patches insert effect, loop effects, track EQ, pitch correction and mastering tool kit. Below is an explanation of the operations related to the insert effects. Confirm that [PAD] is not lit, then press [EFFECTS] to display the currently selected effect patch. -
Page 39: Recording Without Insert Effects
The preset patches contain preset data. Their settings The BR-600 is set to output sound without the insert can be changed, but you cannot create a new preset effects applied, allowing you to record sounds without patch. -
Page 40: Using The Rhythm
Using the Rhythm What is the Rhythm? Pattern Mode and ■ ■ Arrangement Mode The “Rhythm” is a dedicated Rhythm track that can not only play back Rhythm sounds as a guide during recording, Switching to "Pattern mode" may be necessary in order to you can also use it to play internal Rhythm patterns and play patterns. -
Page 41: Playing Arrangements
Confirm that [PAD] is not lit, then press [ARRANGE] Confirm that [PAD] is not lit, then press [PATTERN] so that the button lights up (indicating the BR-600 is so that the button lights up (indicating the BR-600 is in Arrangement mode). -
Page 42: Changing Arrangements
Memory Card Memory Card BR-600 BR-600 Song Song Preset Preset Song Song... -
Page 43: Changing The Tempo Of The Arrangements Or Patterns
Using the Rhythm ■ Changing the tempo of the ■ Tapping to change the arrangements or patterns tempo of the arrangements or patterns You can temporarily change the tempo of the arrangement or pattern being played by carrying out the following You can temporarily change the tempo of the arrangement procedure while the Play screen is displayed. -
Page 44: Recording
Recording If INPUT SELECT [MIC] is lit Selecting the recording track ■ fig.00-490 Press either [1]–[7/8] at REC TRACK to select the recording track. If a mic is connected either to the MIC1 or MIC2 jack (not If the button flashes in red, that track is ready for both), the input will be mono, and you can select tracks recording. -
Page 45: About The Recording (Rec) Modes
(volume) optimized. Recording on the BR-600 is separated into three main modes. The Rhythm cannot be used in this mode. Use whichever mode is suitable in the course of bringing your song to completion. -
Page 46: Procedure
Press [REC MODE] repeatedly until INPUT is How the Tracks Are Organized indicated for REC MODE at the left of the screen. The BR-600 features eight audio tracks that can be used The BR-600 will now enter Input mode. for recording and playback. -
Page 47: Playing Back Recorded Music
Playing Back Recorded Music fig.00-561 Silencing the sound of ■ specific tracks (Track Mute) During playback, hold down [DELETE/MUTE] and press a REC TRACK button that is lit in green and orange alternating or green. The REC TRACK button will change to blinking in orange or green, and the sound of that track will be muted (silenced). -
Page 48: Recording An Additional Performance While Listening To An Existing Performance (Overdubbing)
(or right) and the sound you are playing to right (or left) to make it easier to hear yourself. Press [REC]. [REC] flashes in red and the BR-600 enters the “Adjusting the Perception of Stereo in the recording standby state. -
Page 49: Putting Multiple Tracks Together (Bounce)
Putting multiple tracks together (Bounce) Adjusting the Sound for Each Track Tracks 5/6 and 7/8 are stereo tracks, and any pan settings that are made apply to both of the tracks as a You can adjust the tone, panning, and volume balance for pair. -
Page 50: Adjusting The Tone (Track Eq)
(Loop Effect) frequency tonal qualities separately. The BR-600 features chorus, delay, and doubling (any one These are just like the tone control on a stereo. of these three can be selected at any one time) as loop effects, and includes reverb as well. - Page 51 Putting multiple tracks together (Bounce) Press CURSOR [ ] until “FX Type” or “Type” Press CURSOR [ ] to display the Send Level settings screen. is displayed, then turn the TIME/VALUE dial to select the loop effect. When using CHO/DLY fig.00-690 When using CHO/DLY Select from “CHORUS,”...
-
Page 52: Bouncing
Putting multiple tracks together (Bounce) Bouncing Press [REC]. [REC] flashes in red and the BR-600 enters the fig.00-720 recording standby state. fig.00-740 Flash Press [PLAY]. [PLAY] lights in green, the [REC] and REC TRACK buttons now light solidly instead of flashing in red, and recording begins. -
Page 53: Recording And Playback
Section 1 Recording Playback Section 1 Recording and Playback... -
Page 54: Recording
Creating Songs for Recording About data types ■ fig.00-250 When you record a new song, the BR-600 allows you to set 2,4,5 the data type. This enables you to select the combination of audio quality and recording time that is most suitable for the material you are recording. -
Page 55: Selecting The Recording Track
Recording If INPUT SELECT [MIC] is lit Selecting the Recording Track fig.00-490 Press either [1]–[7/8] at REC TRACK to select the recording track. If a mic is connected either to the MIC1 or MIC2 jack (not If the button flashes in red, that track is ready for both), the input will be mono, and you can select tracks recording. -
Page 56: Changing V-Tracks
Adjusting the Perception of Changing V-Tracks Stereo in the Input Sounds (Pan) The BR-600 is a eight-track multitrack recorder, and each To change the stereophonic sense of the instrument sounds track consists of eight V-Tracks. You can select any one of being input (pan), use the following procedure. -
Page 57: Recording Operations
· Switching to the Song Selection screen Press [REC]. · Switching to the Song New screen [REC] flashes in red and the BR-600 enters the · Switching to the Song Information screen recording standby state. · Switching to the Edit Song screen fig.00-550... -
Page 58: Repeating Playback (Repeat)
Repeating Playback (Repeat) By using the “Repeat function” you can repeatedly play back a specified part. Repeating playback allows you to If you want to save the registration for this repeating check the mixing balance or perform loop recordings (p. 63) segment, save the song. -
Page 59: Setting The Repeat Portion With Accurate Timing
Repeating Playback (Repeat) Setting the Repeat Portion with Accurate Timing Changing the tempo after having made the quantize function settings in a repeated portion will result in Normally, the repeat start and end points are registered at timing discrepancies between the repeat start and end the exact position where [REPEAT] is pressed. -
Page 60: Re-Recording Only A Mistake (Punch-In/Out)
[ REC ] [ REC ] [ STOP ] The BR-600 starts recording. With your BR-600, you can choose from manual or automatic punching in/out. To punch out, press [REC] (or [PLAY]) again. Manually Punching In/Out Each time you press [REC], you punch in and punch out, so if there is another location that you want to You can use the [REC] or a foot switch to punch in or out. -
Page 61: Manually Punching In And Out Using A Foot Switch
FOOT SW jack on punch-out points. the BR-600 and change the function of the FOOT SW jack by Specifying the area for auto ■... -
Page 62: Erasing A Registered Auto Punch In/Out Location
AUTO PUNCH [ON/OFF] and then press [IN]. • To erase an auto punch-out location, press and hold AUTO PUNCH [ON/OFF] and then press [OUT]. Press [REC] to place the BR-600 in recording standby and then press [PLAY]. When the settings are erased, the AUTO PUNCH Recording automatically starts at the auto punch-in [ON/OFF], [IN], and [OUT] go out. -
Page 63: Repeatedly Recording Over The Same Location (Loop Recording)
Re-recording Only a Mistake (Punch-in/out) Repeatedly Recording Over the Place the fader for track 1 at the location shown below. Same Location (Loop Recording) fig.01-180 The repeat function (p. 58) allows you to play a certain portion of a song (the loop portion) over and over again. If you used auto punch in/out together with the repeat function, the portion will be repeated so the result of the recording can be heard right away. -
Page 64: Canceling An Operation (Undo/Redo)
Canceling an Operation (Undo/Redo) Occasionally when the recording you make may not turn Reversing the Last Operation out as you wish, or the settings you make for an editing (Undo) operation are incorrect, and you want to reverse what you have done. -
Page 65: Putting Multiple Tracks Together (Bounce)
Although the BR-600 allows the simultaneous playback of The explanation below uses an example of mixing the eight tracks, when you run out of tracks, the BR-600 also lets monaural recording on tracks 1 and 2 and the stereo you copy the recordings of multiple tracks together onto recording on tracks 3 and 4, and bouncing them to V-Track one track (V-Track). - Page 66 Putting Multiple Tracks Together (Bounce) If you want to mix in the sound of the Rhythm as If you want to save the settings in the currently well, increase the Rhythm fader. selected song, hold down [STOP], and press [REC]. If you do not want to record the Rhythm, lower the * During updating, “Keep power on!”...
-
Page 67: Loading Songs Created With The Br-900Cd/Br-864/Br-532
L oading Songs Created with the BR-900CD/BR-864/BR-532 You can load songs created with the BR-900CD, BR-864, or BR-532 into the BR-600 via memory cards. Loading Songs Created with • Once you record, edit, or set parameters for imported BR-864 song data, that particular song the BR-900CD/BR-864 data can no longer be used by the BR-864. - Page 68 Loading Songs Created with the BR-532 When copying song data created with the BR-532 from SmartMedia to a BR-600 memory card, you can load the data as a BR-600 song. Fist, insert the memory card containing the copy of the desired data into the BR-600.
-
Page 69: Displaying The Song Information
Displaying the Song Information Displaying the Remaining Displaying the Memory Card Usage Available Recording Time Follow the procedure below to display the current condition of the memory card being used. Follow the procedure below to either display the elapsed recording time in the recording standby and recording Confirm that [PAD] is not lit, then press [UTILITY]. - Page 70 MEMO...
-
Page 71: Section 2 Editing
Section 2 Editing Section 2 Editing... -
Page 72: Registering Time (Locator)
Registering Time (Locator) Using the locator function, you can register any desired time in a song as a “locator point” so that you can jump to that point later with just the press of a button. This function is quite useful during editing. Registering a Locator Point At the Play screen, move to the location where you want to register the locator point. -
Page 73: Search For The Music's Start And End (Scrub/Preview)
Hold down [STOP] and press [PLAY]. To enable you to find these points accurately, the BR-600 is equipped with the Scrub function. The [PLAY] begins flashing and scrubbing starts. -
Page 74: Changing The Scrub Points
Search for the Music’s Start and End (Scrub/Preview) Changing the Scrub Points Enabling Use of the Preview Function with [REW] and [FF] Besides switching the scrub point in the Play screen (p. 73), you can also use the following method to switch the scrub Besides using [PLAY] for the Preview function (p. -
Page 75: Editing The Performance On A Track (Track Edit)
Editing the Performance on a Track (Track Edit) The BR-600 allows you to edit your songs by performing Copying Data (Track Copy) editing functions such as copying and moving data recorded on the tracks. Track Copy allows you to copy a specific part of data and then place it in a different location. - Page 76 Editing the Performance on a Track (Track Edit) Confirm that [PAD] is not lit, then press [UTILITY]. Press [ENTER]. fig.02-220 Press CURSOR [ ] to move the cursor to “TRK,” and press [ENTER]. fig.02-180 Use [CURSOR] and the TIME/VALUE dial to specify the ending of the portion “E”...
-
Page 77: Copying The Repeated Portion (Ab)
Editing the Performance on a Track (Track Edit) Confirm that [PAD] is not lit, then press [UTILITY]. After specifying the time in the procedure above, a “+” may appear to show that there is a discrepancy between Press CURSOR [ ] to move the cursor to the actual current position and the position displayed. -
Page 78: Copying A Complete Track (All)
Editing the Performance on a Track (Track Edit) Press [ENTER]. Press CURSOR [ ] to move the cursor to fig.02-150 “CPY,” and press [ENTER]. fig.02-260 Turn the TIME/VALUE dial to select the number of copies you want to be placed. Turn the TIME/VALUE dial to select “ALL”... -
Page 79: Moving Data (Track Move)
Editing the Performance on a Track (Track Edit) Moving Data (Track Move) Press CURSOR [ ] to move the cursor to “MOV,” and press [ENTER]. Track Move allows you to move a specific portion of data to fig.02-370 a different location. After the data is moved, the location it was in will be left empty. -
Page 80: Moving The Repeated Portion (Ab)
Editing the Performance on a Track (Track Edit) ■ Moving the repeated Press [ENTER]. portion (AB) fig.02-410 Perform the procedure given below to move the portion from the repeat start (A) to the repeat end (B). Ex. 1 : Moving to the same track fig.02-280 Use [CURSOR] and the TIME/VALUE dial to specify the time of the beginning of the location “T”... -
Page 81: Moving A Complete Track (All)
Editing the Performance on a Track (Track Edit) Moving a complete track ■ Turn the TIME/VALUE dial to select “AB” and press (ALL) [ENTER]. fig.02-320 Perform the procedure given below to move the complete data from one track to another. Confirm that [PAD] is not lit, then press [UTILITY]. -
Page 82: Erasing Data (Track Erase)
Editing the Performance on a Track (Track Edit) Erasing Data (Track Erase) Press [ENTER]. fig.02-450 Track Erase allows you to erase a specific part of data. Even if data exists after the specified part, it will not be moved forward to fill the gap left by the erasure. Like a normal tape recorder, erasing can be considered covering unwanted data by recording emptiness. -
Page 83: Erasing The Repeated Portion (Ab)
Editing the Performance on a Track (Track Edit) Press CURSOR [ ] to move the cursor to Press [UTILITY] (or press [EXIT] repeatedly) to “ERS,” and press [ENTER]. return to the Play screen. fig.02-520 * During updating, “Keep power on!” appears in the upper line of the display, while the lower line shows what is being processed. -
Page 84: Erasing A Complete Track (All)
Editing the Performance on a Track (Track Edit) fig.02-560 Press CURSOR [ ] to move the cursor to “ERS,” and press [ENTER]. fig.02-480 Turn the TIME/VALUE dial to select “AB” and press [ENTER]. Press CURSOR [ ] to move the cursor to fig.02-490 “ERS,”... -
Page 85: Exchanging Data (Track Exchange)
Editing the Performance on a Track (Track Edit) Exchanging Data When you are ready to execute the exchange, press (Track Exchange) [ENTER]. The display will ask “Are you sure?,” so that you can Perform the procedure given below to exchange the data confirm the operation. -
Page 86: Organizing The Songs You've Recorded
Organizing the Songs You’ve Recorded Copying a Song (Song Copy) Erasing Songs (Song Erase) Follow the procedure below to copy the currently selected Follow the procedure below to erase a song from the memory card. song. Confirm that [PAD] is not lit, then press [UTILITY]. Confirm that [PAD] is not lit, then press [UTILITY]. -
Page 87: Saving Memory On The Memory Card (Song Optimize)
Optimize. By performing a “Song Optimize”, you can have the BR-600 erase any unnecessary data on the memory card and increase the unused space. Confirm that [PAD] is not lit, then press [UTILITY]. -
Page 88: Naming A Song (Song Name)
Organizing the Songs You’ve Recorded Naming a Song (Song Name) Protecting a Song (Song Protect) When a new song is created, it is automatically given a You can imagine situations where, after taking care to create name such as “SONG 0001.” With your 600, you can use a song, you accidentally overwrite it with a recording, “Song Name”... -
Page 89: Saving The Current Settings To The Song (Song Save)
] to move the cursor to to the Song (Song Save) “PRT,” and press [ENTER]. The Song Protect screen appears in the display. The BR-600 can save the following contents as song data. fig.02-710 • Recorded data • Mixer settings (Pan, Track EQ, etc.) •... -
Page 90: Creating A Master Tape/ Disc
CD Recorder etc. Put the cassette tape recorder in record mode. Press [PLAY] on the BR-600 and start the playback of the recorded data. When playback is finished, stop recording with the recorder and then press [STOP] on the BR-600. -
Page 91: Section 3 Using Effects
Section 3 Using Effects Section 3 Using Effects... -
Page 92: Using The Insert Effects
Song Preset User Song Patch Patch Your BR-600 comes equipped with a number of preset effect Patch patches for use with vocals and instruments. These are grouped according to different input sources and each group is called a “bank.” fig.03-010... -
Page 93: Editing Insert Effect Settings
Using the Insert Effects Editing Insert Effect Settings If you wish to create a new effect sound, you should first By pressing [ENTER] while the cursor is at a Bank– select an existing patch that is closest to the sound you want, Number, you can display the Edit Effect screen directly. -
Page 94: Saving Insert Effects Settings (Write)
Using the Insert Effects Saving Insert Effects Settings Turn the TIME/VALUE dial to select the number to (Write) which to write the new effect patch. Follow the procedure below to enter a name (patch name) for an effect that you’ve modified, and save it as a new After you’ve selected the destination, press [ENTER]. -
Page 95: Changing The Destination Insert Effects Are Connected
However, sometimes you want to change the connection order. TRACK 1 (REC) On the BR-600, you can accommodate a wide variety of situations by changing the point to which the insert effects TRACK 1–8, 1 2, 3 4, 5 6, 7 8 : ■... -
Page 96: Insert Effect Parameter Functions
Insert Effect Parameter Functions Algorithm List The algorithms (the available effects and their connection order) that can be used as an insert effect are shown below. The algorithms that can be selected will differ for each bank. To select the algorithm that you wish to use, first select the effect bank that includes that algorithm, and then refer to the “Effect Patch List”... -
Page 97: Bass Sim
Insert Effect Parameter Functions 3. BASS SIM 5. ACOUSTIC GTR Simulates the sound of a bass guitar. Obtain the sound of a This is a multi-effect designed for acoustic guitar. Even bass guitar while playing an electric guitar. when an electric-acoustic is connected at line level, this provides a warm sound similar to what is obtained through * You should avoid playing chords when using the Bass a microphone. -
Page 98: Cosm Bass Amp
Insert Effect Parameter Functions 7. COSM BASS AMP 8. COSM COMP BSS This is a multi-effect designed for bass guitar. This features This is a multi-effect designed for bass guitar. an amp sound that uses a preamp and speaker simulator. In addition to a COSM compressor/limiter, it uses a fig.03-230 preamp and speaker simulator for a characteristic amp... -
Page 99: 11. Cosm Comp Vcl
Insert Effect Parameter Functions 11. COSM COMP VCL This is a multi-effect designed for vocals. The COSM compressor/limiter is perfect for creating a basic sound. fig.03-270 –[ COMP/LIM ]–[ DES ]–[ ENH ] [ EQ ]–[ NS ]–[ FV ]–[ DLY ]= COSM Comp/Limiter De-esser Enhancer... -
Page 100: Bank : Simul
Insert Effect Parameter Functions BANK : SIMUL 14. VO+GT AMP 15. VO+AC.SIM This algorithm is for use when simultaneously recording a This algorithm is for use when simultaneously recording a vocal and electric guitar. vocal and electric guitar. For the guitar, you can make the electric guitar sound like For the guitar, you can produce an amp sound using a an acoustic guitar. -
Page 101: Parameter List
The trademarks listed in this document are trademarks of their respective owners, which are separate companies from BOSS. Those companies are not affiliated with BOSS and have not licensed or authorized BOSS’s BR-600. Their marks are used solely to identify the equipment whose sound is simulated by BOSS’s BR-600. -
Page 102: Chorus
Rate 0 – 100 Adjusts the rate of the Chorus effect. The BR-600 uses COSM technology to model four types of compressor/limiter in which the compressor and limiter Depth 0 – 100 functions are combined. -
Page 103: Creating Original Patterns
Creating Original Patterns If you mistakenly input the wrong drum sound, delete that sound. You can use the following procedure to delete drum sounds. Move the cursor to the position of the drum sound you want to delete, then carry out the following. •... -
Page 104: Naming Patterns
Naming Patterns Song patterns can be given a name (pattern name) that consists of up to eight characters. Press [EXIT] repeatedly to return to the Play screen. “Keep power on!” appears in the display, and the changed pattern name is saved. Confirm that [PAD] is not lit, then press [PATTERN]. -
Page 105: Copying Patterns
Copying Patterns When you want to change a preset pattern slightly to create a desired pattern, you can copy the preset pattern to a song Press [ENTER] again. pattern, after which you have complete freedom to change “Keep power on!” appears in the display, and the copy the performance data. -
Page 106: Erasing Patterns
Erasing Patterns Confirm that [PAD] is not lit, then press [PATTERN]. [PATTERN] and [RHYTHM ON/OFF] light. You cannot erase the preset patterns. Press [RHYTHM EDIT]. The Pattern Edit screen appears in the display. Press CURSOR [ ] to move the cursor to “ERASE,”... -
Page 107: Creating Original Arrangements
In other words, since even lengthy songs are sequences preceding step, or press [FF] to move to the next step. of these compositional units, or steps, these songs can be finished with less steps. With the BR-600, you can arrange sequences of up to 50 steps. - Page 108 Creating Original Arrangements Press CURSOR [ ] to move the cursor to the parameter you want to change, then turn the TIME/ • The starting measure for step 1 is always set to VALUE dial to change the setting’s value. “001.”...
-
Page 109: Inserting Steps
Creating Original Arrangements Inserting Steps Erasing Steps Perform the procedure below to insert a new step at the This erases the content of the currently selected step. The current step. content of the following steps are brought forward to fill the erased step. -
Page 110: Naming Arrangements
Confirm that [PAD] is not lit, then press [ARRANGE]. [ARRANGE] and [RHYTHM ON/OFF] light. The Preset Arrangement names are permanently assigned when the BR-600 is shipped; these names Press [RHYTHM EDIT]. cannot be changed. The Arrangement Edit screen appears in the display. -
Page 111: Copying Arrangements
Copying Arrangements When you want to change a preset arrangement slightly to create a desired arrangement or create a variation of a Press [ENTER] again. source arrangement, you can copy the preset arrangement “Keep power on!” appears in the display, and the copy as a song arrangement, after which you can change it freely. -
Page 112: Erasing Arrangements
Erasing Arrangements This erases Step 2 and all subsequent steps in the currently selected song arrangement. Press [EXIT] to return to the Play screen. Step 1 cannot be erased, but instead remains with the step set to “Metro” (Metronome). You cannot erase the preset arrangements. Confirm that [PAD] is not lit, then press [ARRANGE]. - Page 113 MEMO...
-
Page 114: Section5 Using Usb
Section 5 Using USB Section5 Using USB... -
Page 115: Before Using Usb (Overview)
(you may need to make settings when connecting USB Folder WAV/AIFF File certain devices). ROLAND Folder The structure of the files and folders on the BR-600 is as follows. Realtime audio signals and MIDI messages cannot be handled via the BR-600’s USB connector. BR0 Folder... -
Page 116: Connecting A Computer
WAV and AIFF files loaded to the BR-600’s tracks, and WAV and AIFF files saved on computers (track data Use the USB cable to connect the BR-600 to your computer. converted to WAV and AIFF format) will be saved here * Purchase USB cables at computer stores or other retailers. -
Page 117: With Windows
“Parameter List” (p. 210).) Quit the connection to the computer. With Windows XP Connect your computer and the BR-600 with a USB cable. In My Computer, right-click on the “BOSS_BR-600” icon (or “Removable disk (*:)” icon) to “Eject” the disk. -
Page 118: Reading Backup Data Back Into The Br-600 From Pc (Recover)
“Stop USB Disk–drive (*:)” message displayed there. When the BR-600 performs Recover, the data on fig.05-080 memory cards will be overwrited. Connect your computer and the BR-600 with a USB Task Bar Task Tray cable. 3) Click [OK] in the “Safe To Remove Hardware”... - Page 119 * If you press [EXIT] without quitting the connection to the may prevent the BR-600 from operating correctly. computer, the following screens appear. • When the BR-600 performs Recover, the data on In this case, pressing [ENTER] returns the USB screen to memory cards will be overwrited.
-
Page 120: Saving Br-600 Track Data In Wav/Aiff Format (Wav/Aiff Export)
(WAV/AIFF Export) When saving in mono fig.05-120 You can convert the BR-600’s track data into WAV or AIFF files and save these on your computer. After converting your mastered tracks to WAV or AIFF files, you can easily use your computer to create audio CDs... - Page 121 When you have finished exporting the data, the Idling screen returns to the display. At this point, you can safely disconnect the USB cable from the BR-600 and the computer. Quit the connection to the computer. With Windows XP Repeat Steps 5–9 as needed.
-
Page 122: Resolving Insufficient Memory Issues When Exporting Wav/Aiff
Recover the data (see p. 165). 2.Using a high-capacity memory card For more on supported memory cards (CompactFlash) for the BR-600, refer to the separate sheet “About Memory Cards.” Back up the data on the card (see p. 164). Insert the high-capacity memory card in the BR-600, then initialize the card (see p.199). -
Page 123: Loading Wav/Aiff Files In Br-600 Tracks (Wav/Aiff Import)
Pattern mode. Use [CURSOR] and the TIME/VALUE dial to specify the measure or position in the track from which Connect your computer and the BR-600 with a USB loading is to start, then press [ENTER]. cable. - Page 124 At this point, you can safely disconnect the USB cable Task Bar Task Tray from the BR-600 and the computer. 2) Click [OK] in the “Safe To Remove Hardware” dialog box that appears. Repeat Steps 4–9 as needed.
-
Page 125: Importing Smfs And Creating Patterns
With Windows XP In My Computer, right-click on the “BOSS_BR-600” Connect your computer and the BR-600 with a USB cable. icon (or “Removable disk (*:)” icon) to “Eject” the disk. * If this procedure fails to eject the disk, use the procedure below. - Page 126 GM/GS/XG-compatible SMF files generally have rhythm performance data assigned to MIDI Channel Press [CURSOR] to move the cursor to “SMF,” and 10. For this reason, the BR-600 imports only the data press [ENTER]. extracted from MIDI Channel 10. Note that data The names of the SMFs on the memory card are assigned to other channels is disregarded.
-
Page 127: Loading Drum Sounds From Wav/Aiff Files (Tone Load)
With Windows Loading Drum Sounds from Connect your computer and the BR-600 with a USB WAV/AIFF Files (Tone Load) cable. You can import WAV and AIFF files on your computer and load these as drum sounds (TONE LOAD). Confirm that [PAD] is not lit, and with the recorder stopped, press [UTILITY]. - Page 128 “Stop USB Disk–drive (*:)” message displayed there. At this point, you can safely disconnect the USB cable fig.05-080 from the BR-600 and the computer. Press [UTILITY]. Task Bar Task Tray 2) Click [OK] in the “Safe To Remove Hardware”...
-
Page 129: Using The Br-900Cd/Br-864/ Br-532'S Data
Use the TIME/VALUE dial to select the WAV or AIFF file BR-532’s Data you want to load as the drum sound, then press [ENTER]. You can use the BR-600 to play BR-900CD, BR-864, or BR- 532 data. You can preview the sound of the WAV or AIFF file to * First be sure to back up the BR-900CD / BR-864 / BR-532’s... - Page 130 When backup of the data is complete, press [EXIT] to return to the Play screen. At this point, you can safely disconnect the USB cable Task Bar Task Tray from the BR-600 and the computer. 2) Click [OK] in the “Safe To Remove Hardware” dialog box that appears.
-
Page 131: With Macintosh
“Parameter List” (p. 210).) Quit the connection to the computer. 1) Drag the “BOSS_BR-600” icon into the trash. Connect your computer and the BR-600 with a USB cable. Press [EXIT]. Confirm that [PAD] is not lit, and with the recorder The USB screen returns to the display. -
Page 132: Reading Backup Data Back Into The Br-600 From Pc (Recover)
When you have finished recovering the data, the Idling screen returns to the display. Connect your computer and the BR-600 with a USB cable. • During the recovery operation you may encounter messages asking whether it is all right to overwrite certain files–you should select “YES”... -
Page 133: Saving Br-600 Track Data In Wav/Aiff Format (Wav/Aiff Export)
(WAV/AIFF Export) When saving in mono fig.05-580 You can convert the BR-600’s track data into WAV or AIFF files and save these on your computer. After converting your mastered tracks to WAV or AIFF files, you can easily use your computer to create audio CDs... -
Page 134: Resolving Insufficient Memory Issues When Exporting Wav/Aiff
At this point, you can safely disconnect the USB cable from the BR-600 and the computer. For more on supported memory cards (CompactFlash) for the BR-600, refer to the separate sheet “About Memory Cards.” Repeat Steps 5–9 as needed. Back up the data on the card (see p. 178). -
Page 135: Loading Wav/Aiff Files In Br-600 Tracks (Wav/Aiff Import)
With Macintosh Loading WAV/AIFF Files in Connect your computer and the BR-600 with a USB BR-600 Tracks cable. (WAV/AIFF Import) You can take WAV or AIFF files on your computer, such as Confirm that [PAD] is not lit, and with the recorder files created with audio software applications, and load stopped, press [UTILITY]. - Page 136 BOSS_BR-600 At this point, you can safely disconnect the USB cable from the BR-600 and the computer. Copy the WAV or AIFF files you want to import. Repeat Steps 4–9 as needed. 1) Double-click the “BOSS_BR-600” icon.
-
Page 137: Importing Smfs And Creating Patterns
Quit the connection to the computer. 1) Drag the “BOSS_BR-600” icon into the trash. Connect your computer and the BR-600 with a USB cable. Press [EXIT] repeatedly to return to the Play screen. * If you press [EXIT] without quitting the connection to the Confirm that [PAD] is not lit, and with the recorder computer, the following screens appear. - Page 138 GM/GS/XG-compatible SMF files generally have rhythm performance data assigned to MIDI Channel 10. For this reason, the BR-600 imports only the data extracted from MIDI Channel 10. Note that data assigned to other channels is disregarded.
-
Page 139: Loading Drum Sounds From Wav/Aiff Files (Tone Load)
With Macintosh Loading Drum Sounds from Connect your computer and the BR-600 with a USB cable. WAV/AIFF Files (Tone Load) You can import WAV and AIFF files on your computer and Confirm that [PAD] is not lit, and with the recorder stopped, press [UTILITY]. - Page 140 * WAV files are indicated by the symbol “.W”; “.A” indicates If these files are no longer needed, connect the BR-600 AIFF files. to your computer via USB and use the computer to fig.05-820 delete the files.
-
Page 141: Using The Br-900Cd
BR-864 / BR-532’s Data 1) Double-click the “BOSS_BR-600” icon, and delete the “ROLAND” folder. You can use the BR-600 to play BR-900CD / BR-864 / BR- 532 data. * First be sure to back up the BR-900CD / BR-864 / BR-532’s Drag the previously backed up BR-900CD / BR-864 / “ROLAND”... -
Page 142: Other Convenient Functions
Section 6 Other Convenient Functions Section6 Other Convenient Functions... -
Page 143: Adjusting The Display Contrast
Adjusting the Display Contrast Depending on where the BR-600 is situated, the display contents may be difficult to read. If this is the case, perform After completing the adjustment, press [UTILITY] (or the procedure given below to adjust the contrast (1 to 17). -
Page 144: Using A Foot Switch Or Expression Pedal
You can connect a sold separately foot switch (such as the When Using a Foot Switch BOSS FS-5U or Roland DP-2) or expression pedal (such as the Roland EV-5 or BOSS FV-500L/FV-500H) to the FOOT Use the following procedure to set the foot switch function. -
Page 145: Tuning An Instrument (Tuner)
The built-in tuner supports both guitar and bass guitar. As an example here, we will explain how to use the tuner to When the built-in tuner of the BR-600 is used, the reference tune your guitar. pitch is shown in the upper left of the display, and the note * It is not possible to play back or record while using the tuner. -
Page 146: Setting The Reference Pitch Of The Tuner
(e.g., piano). Your instrument is tuned above the displayed note On the BR-600, you can set the reference pitch of the tuner fig.06-090 to any value between 435 and 445 Hz. -
Page 147: Mixing The Output From An External Audio Device With The Output From Your Br-600 (Audio Sub Mix)
Mixing the Output from an External Audio Device with the Output from Your BR-600 (Audio Sub Mix) The Audio Sub Mix function allows you to mix the signal Enable use of Audio Sub Mix with the following procedure. input from LINE IN with the signal output to LINE OUT. -
Page 148: Practicing Difficult Phrases (Phrase Trainer)
Practicing Difficult Phrases (Phrase Trainer) Your BR-600 features a built-in “Phrase Trainer.” You can also slow down (Time Stretch) the playback to aid in practicing difficult phrases or remove the guitar solo sound (Center Cancel) to play along with only the backing instruments as a practice aid. -
Page 149: Canceling The Center Sound (Center Cancel)
Practicing Difficult Phrases (Phrase Trainer) Canceling the Center Sound Press CURSOR [ ] to select “C.Adjust,” and turn (Center Cancel) the TIME/VALUE dial and adjust the value of the sound that you want to remove to decrease its The Center Cancel function allows you to remove the volume. -
Page 150: Initializing The Br-600'S Settings
ALL,” by holding down INPUT SELECT [GUITAR], [MIC], and [LINE] while turning the POWER switch ON, then pressing [ENTER]. However, the initialization cannot be carried out unless a memory card is inserted in the BR-600 and the song protect function is switched off. -
Page 151: Initializing The Effect Settings
Initializing the BR-600’s Settings Initializing the Effect Settings Initializing the Rhythm Arrangements/Patterns/Drum Kits Follow the procedure below to initialize the user effect patches or song effect patches. This initializes the Rhythm Arrangements, Patterns, and * The same content as that in the Preset patches is copied. -
Page 152: Initializing The Memory Card
• If you initialize the memory card supplied with the BR-600, the demo songs on the card will be lost. • Before you insert or remove a memory card, always turn off the BR-600 first. -
Page 153: Conserving Battery Power (Power Save)
Power Save function is activated. TIME/VALUE dial on the BR-600 is used for a certain Valid Settings : OFF, 1min, 3min, 5min, 10min amount of time, the BR-600 will enter the standby state and fig.06-330 turn off the display backlight and button indicators. -
Page 154: Utility Parameter List
Utilities include the following : • “System parameters” for setting functions affecting the Valid Settings : PLAY, PUNCH, FX entire BR-600 (Initial value : PLAY) • “Sync parameters” for setting synchronized This sets the function for the foot switch (FS-5U or DP-2;... -
Page 155: About The Sync Parameters
Utility Parameter List About the Sync Parameters About the Scrub Parameters Confirm that [PAD] is not lit, then press [UTILITY]. Confirm that [PAD] is not lit, then press [UTILITY]. Press CURSOR [ ] to move the cursor to Press CURSOR [ ] to move the cursor to “SYNC,”... -
Page 156: Section7 Appendices
Section 7 Appendices Section7 Appendices... -
Page 157: Effect Patch List
Effect Patch List ■ GTR (GUITAR/BASS) Patch Name Algorithm Patch Name Algorithm JC Clean COSM GTR AMP Hard Drv COSM GTR AMP HiGainLd COSM GTR AMP HyperMtl COSM GTR AMP Over Drv COSM GTR AMP Metal Ld COSM GTR AMP Phased COSM GTR AMP ResoLead... - Page 158 Effect Patch List ■ ■ LIN (LINE) Patch Name Algorithm Patch Name Algorithm Vo Comp1 COSM COMP VCL CM+FatEQ STEREO MULTI CM+ThnEQ STEREO MULTI Vo Comp2 COSM COMP VCL Tight EQ STEREO MULTI Kick Cmp COSM COMP VCL CM+BigEQ STEREO MULTI SnareCmp COSM COMP VCL SMALL EQ...
- Page 159 Effect Patch List ■ SML (SIMUL) Patch Name Algorithm EQ + JC VO+GT AMP DELAY+JC VO+GT AMP CMP+TWIN VO+GT AMP EQ+twin VO+GT AMP CMP+SMAL VO+GT AMP EQ+CRNCH VO+GT AMP EQ+MATCH VO+GT AMP DL+match VO+GT AMP EQ+VO VO+GT AMP COMP+vo VO+GT AMP CMP+BLUS VO+GT AMP CMP+BG...
-
Page 160: Mastering Tool Kit Patch List
Mastering Tool Kit Patch List ■ MTK (MASTERING TOOL KIT) Patch Name Mix Down PreMastr Live Mix Pop Mix DanceMix JinglMix HardComp SoftComp CleanCmp DanceCmp OrchComp VocalCmp Acoustic RockBand Orchestr LowBoost Brighten DJsVoice PhoneVox Pitch Correction Patch List ■ PCR (PITCH CORRECTION) Patch Name Alto Soprano... -
Page 161: Arrangement / Pattern List
Arrangement / Pattern List Preset Arrangement List Each of the preset Arrangement (except Metro4/4) is set so that a three-measure BREAK, followed by V1 (verse) comes after the E (ending). Arrangement Initial Starting measure Drum Beat BREAK Name Tempo ROCK1 ROOM ROCK2 ROOM... -
Page 162: Preset Pattern List
Arrangement / Pattern List Preset Pattern List Pattern Name Measure Initial (Abbreviation shown Beat Tempo in display) ROCK1 ROCK2 ROCK3 ROCK4 ROCK5 ROCK6 Hard Rock 1(HdRc1) Hard Rock 1(HdRc2) Hard Rock 1(HdRc3) Hard Rock 1(HdRc4) Hard Rock 1(HdRc5) HEAVY1 (HEVY1) HEAVY2 (HEVY2) HEAVY3 (HEVY3) HEAVY4 (HEVY4) -
Page 163: Parameter List
Parameter List (*1) If you want to save the settings as the currently selected song data, hold down [STOP] and press [REC]. (*2) Stored in the BR-600. (*3) Not Stored. ■ Mixer Parameter (*1) Parameter Name Display Initial Value Valid Settings... -
Page 164: Pitch Correction
Parameter List Pitch Correction Parameter Name Display Initial Value Valid Settings Location Location TRACK 1 TRACK 1–8, TRACK 1 2–7 8 Track EQ Parameter Name Display Initial Value Valid Settings Equalizer On/Off Tr1–Tr4,Tr5/6, Tr7/8: OFF OFF, ON Equalizer Low Gain Lo G Tr1–Tr4,Tr5/6, Tr7/8: 0 dB -12–0–+12 dB... -
Page 165: Rhythm Parameter
Parameter List Sync Parameter ■ (*1) Parameter Name Display Initial Value Valid Settings Sync Offset Offset 00:00:00-00.0 00:00:00-00.0–23:59:59-29.9 Scrub Parameter ■ (*3) Parameter Name Display Initial Value Valid Settings Scrub From/To Mode From/To FROM FROM, TO Preview Switch Preview SW OFF, ON ■... -
Page 166: Troubleshooting
Troubleshooting The input source cannot be heard If the BR-600 does not function as you expect, please check the following points before assuming that a malfunction has ❍ Did you adjust GUITAR/BASS/MIC2, MIC1, occurred. and REC LEVEL? If this does not resolve the problem, contact a nearby ❍... -
Page 167: Problems With The Memory Card
Idling screen not displayed ❍ Do you have a compatible (CompactFlash) ❍ Is the USB cable properly connected? memory card inserted in the BR-600? ❍ Is your computer's operating system ❍ Is the memory card fully and securely inserted? compatible with the BR-600 ? -
Page 168: Error Messages
Cause : Memory card data cannot be loaded correctly. Cannot Edit! Quantize is Low! Solution 1 : Turn off the BR-600, properly insert the Cause : During Step Recording of a pattern, the memory card, then turn the BR-600 back... - Page 169 (CompactFlash) is not What is an event? inserted, or is not inserted properly. The smallest unit of memory used by the BR-600 to Cause : The memory card has been removed store recorded results on a memory card is the event. A...
- Page 170 Cause : Internal power source voltage is below DOS. than guaranteed workable range. Solution 1 : Turn off the BR-600, properly insert the Solution : In case of using PSA adaptor : memory card, then turn the BR-600BR- Cable might be broken or adaptor itself 600 back on.
-
Page 171: Specifications
Internal Processing :24 bit (digital mixer section) 32–100 Ω Headphone jack : * AF method (Adaptive Focus method) Adaptive Focus is a unique Roland/BOSS technology ● Residual Noise Level that allows the signal noise (S/N) ratios of AD and LINE OUT jack : -85 dBu or less DA converters to be vastly improved. -
Page 172: Power Supply
700 g / 1 lb 9 oz (excluding batteries) ● Accessories Soft Case Size AA alkaline dry cell batteries (6) TRS-XLR converter cable Demo Card (Already inserted when the BR-600 is shipped) Owner’s Manual Separate sheet (“About Memory Cards” ) Roland Service (information sheet) ● Options... -
Page 173: Index
BG LEAD ................107 Bit .................... 105 BLUES ..................107 D:E ................... 105–106 Body ..................101 Data Type ................54, 69 BOSS-Cmp ................102 DBLN ..................120 BOUNCE ..............45, 52, 65 D-Comp .................. 102 Bounce ..................65 De-esser ............... 98–99, 103 Bounce Mode .............. -
Page 174: Doubling
Index Delay ................. 96–100, 103 Frequency ............... 108, 110 DELETE/MUTE ..............47 FROM ................74, 202 Demo Song ................32 From/To ................. 202 Depth ............102–104, 106, 109, 120 FX ..................... 191 DIGITAL ................105 Fx Level ................105, 108 Dir Level ............ - Page 175 Index Rhythm ................198 Low Mid Freq ................ 115 System ................197 Low Mid Gain ................ 115 INPUT ..............37, 45, 57, 95 Low Mid Q ................115 Input ................102, 116 Low Q ..................115 Input Gain ................115 Low Type ................
- Page 176 Index Pitch ..................106 PITCH CORRECTION ............124 NAM ..................88 Pitch Correction ............. 123–124 NAME ............. 114, 127, 151, 157 Name ................127 NEW ..................35 Save .................. 127 Noise ..................105 Pitch Shifter ..............96–99, 106 Noise Suppressor ............ 96–100, 106 PLAY ..................
- Page 177 Index Repeating Playback ..............58 Song Pattern ..............42, 133 Resonance ............... 104–106 SongKit ................... 137 REV ................51, 118–119 Speaker Simulator ..........96–98, 100, 108 Rev Send ................. 120 SplitH ..................116 Rev Time ................120 SplitL ..................116 REVERB ..................
- Page 178 Index USB ..................162 USB Folder ................163 User Patch ..............39, 92, 111 V ....................133 VO DRV .................. 107 VO+AC.SIM ................100 VO+ACOUSTIC ..............100 VO+GT AMP ................. 100 VOCAL MULTI ............... 98 VOICE TRANS ................ 98 Voice Transformer ............98, 109 Volume ...................
- Page 179 TRACK SHEET...
- Page 180 Cet appareil numérique de la classe B respecte toutes les exigences du Règlement sur le matériel brouilleur du Canada. For the USA DECLARATION OF CONFORMITY Compliance Information Statement Model Name : BR-600 Type of Equipment : Digital Recorder Roland Corporation U.S. Responsible Party : 5100 S.Eastern Avenue, Los Angeles, CA 90040-2938...
- Page 181 17041748...