Sony BRC-H700 System Manual
Brc series
Hide thumbs
Also See for BRC-H700:
- Operating instructions manual (83 pages) ,
- Manual (55 pages) ,
- Command list (26 pages)
Table of Contents
Advertisement
Advertisement
Table of Contents

Related Manuals for Sony BRC-H700


Summary of Contents for Sony BRC-H700
- Page 1 BRC Series System Guide...
- Page 2 Using the BRC-H700/BRC-Z700 as a Second Camera for the PCS-HG90 Video Conferencing System...
-
Page 3: Table Of Contents
Installing the Camera in a High Position ..Remote Operation ............7.1 IR Remote Commander Unit ......... 7.2 RM-BR300 Remote Control Unit ......7.2.1 Features ..............7.2.2 Operation ............... Using the BRC-H700/BRC-Z700 as a Second Camera for the PCS-HG90 Video Conferencing System... -
Page 4: What Is The Brc Series
Switcher, Recorder, Monitor, Projector, etc. Control P/T/Z Color Video Cameras RM-BR300 Remote Control Unit Added Functionality with Optional Accessories Optical Multiplex Units* Optional Video Cards Optical Fiber Cables *Optical Multiplex Units can be used with the BRC-H700/BRC-Z700/BRC-300/300P . What is the BRC Series? - Page 5 *1 Long-distance control using an optical fiber Additionally, each camera’s compact size and connection is available for the BRC-H700, quiet movement avoid distracting audiences from BRC-Z700, and BRC-300/300P . the performance.
- Page 6 House of Worship The BRC Series is also ideal for use in the By using a large screen in combination with highly broadcast industry. The BRC-H700, BRC-Z700 sensitive BRC Series cameras, an organizer can and BRC-Z330*2 can output HD-SDI signals – a...
-
Page 7: Product Lineup
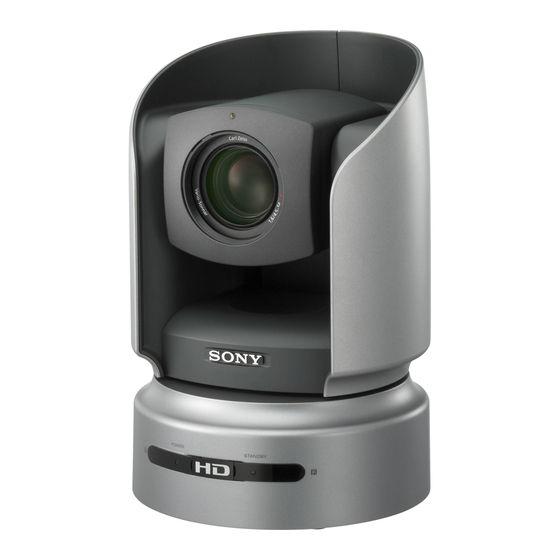
Product Lineup BRC-H700 Equipped with three 1/3-type HD CCDs, the BRC-H700 offers excellent picture quality with high sensitivity and a high resolution of 1,070,000 effective pixels. This camera has the best sensitivity of the BRC Series; it therefore delivers superior performance in dimly lit environments, such as concert or wedding halls. -
Page 8: Key Features
– can between the optical multiplex unit and the be transmitted over a long distance using an camera is 1000 m for the BRC-H700 and BRC-Z700, optical multiplex unit, an optical multiplex card, and 500 m for the BRC-300/300P. - Page 9 HD Component (Y/Pb/Pr), RGB HD-SDI, i.LINK (HDV), WXGA, XGA, VGA, Down Converted SD HFBK Series BRU-H700 The BRC-H700 HD Component (Y/Pb/Pr), RGB, Composite, Y/C HD-SDI, i. LINK (HDV), WXGA, XGA, VGA, Down Converted SD HFBK Series BRU-H700...
-
Page 10: Other Features
= 0.18 – 0.27 inches Multiple presets The BRC-H700, BRC-Z700, and, the BRC-Z330 each have sixteen presets and the BRC-300/300P has six presets to which pre-defined pan/tilt/zoom positions and other parameters can be allocated. These presets can be recalled at the touch of a button of the BRS-200, the RM-BR300, or the IR remote commander unit to easily capture video from pre-specified areas. -
Page 11: System Configuration
System Configuration You can configure a variety of systems to meet your application needs by choosing HD and/or SD components. Users can choose either HD or SD system components. BRC Simple System BRC-H700 BRC-Z700 BRC-Z330 BRC-300/300P Wide Conversion VCL-HG0862* VCL-0737W —... -
Page 12: Daisy-Chain System
BRC and BRU System BRC-H700 BRC-Z700 BRC-300/300P Wide Conversion — VCL-HG0862* VCL-0737W Lens Optical Multiplex Card (inserted to BRBK-H700 BRBK-MF1 BRBK-303 the BRC Series) Optical Fiber CCFC-M100HG CCFC--M100 Cable Optical Multiplex BRU-H700 BRU-300/300P Unit HFBK-HD1 BRBK-301 HD-SDI, HD Component (Y/Pb/Pr), RGB... -
Page 13: Location And Function Of Parts
Location and Function of Parts 5.1 BRC Series of Cameras The following is a summary of the location and function of BRC-H700, BRC-Z700, BRC-Z330, and BRC-300/300P parts. 5.1.1 BRC-H700 RGB/COMPONENT connector Pin No. Signal Pin No. Signal Rear Pr/R With the cable cover attached... -
Page 14: Brc-Z700
5.1.2 BRC-Z700 Setting of the BOTTOM switches Rear 1 2 3 4 5 6 7 8 9 IR SELECT DATA MIX 1 2 3 VISCA RS-422 RGB/COMPONENT DC IN 12V IN VISCA RS-232C OUT EXT SYNC IN VIDEO S VIDEO Switch 1 (59.94i/50i signal format selector) Set to ON for output of 50i signal format, or OFF... - Page 15 VISCA RS-232C OUT connector Camera address selectors When you join multiple cameras, connect it to Set the address of the camera. Normally set to the VISCA RS-232C IN connector of the next 0. With this setting, addresses are assigned to camera in the daisy chain.
-
Page 16: Brc-Z330
5.1.3 BRC-Z330 Pin No. Signal Pin No. Signal Pr/R Rear 2 3 4 5 6 7 Pb/B HD-OUT Tri-level Sync/Bi-level VD 9 10 11 12 13 Bottom DC IN 12V connector VISCA RS-422 connector IR SELECT switch Select the camera number when you operate multiple cameras with the same Remote Commander Unit. -
Page 17: Brc-300/300P
5.1.4 BRC-300/300P Switches 5-7 (Camera address selector) Set the address of the camera. Normally set to Rear “0”. With this setting, addresses are assigned to the cameras automatically in the connected order by pressing the POWER button while holding down the RESET button on the RM-BR300 Remote Control Unit. -
Page 18: Optical Multiplex Units
With these optical multiplex units, you can transmit uncompressed digital data including video, external sync, and camera control signals. 5.2.1 BRU-H700 HD Optical Multiplex Card slot Unit for use with the BRC-H700 AUDIO OUT L/R jacks and BRC-Z700 Loop through output of the audio line signal... -
Page 19: Bru-300/300P Sd Optical Multiplex Unit For Use With The Brc-300/300P
5.2.2 BRU-300/300P SD Optical Pin No. Signal Pin No. Signal Multiplex Unit for use with the Pr/R BRC-300/300P Pb/B Rear HD-OUT Tri-level Sync/Bi-level VD VISCA RS-232C IN connector AC IN FUNCTION VISCA RS-422 Connect to the RM-BR300 Remote Control Unit. IN EXT SYNC OUT S VIDEO VISCA RS-232C... -
Page 20: Optical Multiplex Cards And Optional Video Cards
VISCA RS-232C OUT connector CAMERA connector When you join multiple cameras, connect it to the VISCA RS-232C IN connector of the next camera in the daisy chain. 5.3 Optical Multiplex Cards and Optional Video Cards The following provides information on the location and function of optical multiplex card parts and optional video cards and optional video cards. -
Page 21: Hfbk-Xg1 Xga Interface Board
5.3.4 HFBK-XG1 XGA Interface Board 5.3.6 BRBK-MF1 HD Optical Multiplex Card MONITOR connector (D-sub 15-pin) Pin No. Signal Pin No. Signal AUDIO IN L/R jacks (phono-type) R (X) Input an audio signal (stereo), which is output G (X) from the AUDIO OUT jacks on the BRU-H700 HD B (X) Optical Multiplex Unit via an optical fiber cable. -
Page 22: Brbk-Hd2 Hd-Sdi Output Card
5.3.8 BRBK-HD2 HD-SDI Output 5.3.12 BRBK-304 DV Card Card i.LINK (DV) OUT connector (i.LINK 6-pin) SDI OUTPUT connectors (BNC-type) The Card allows output of an HD-SDI signal conforming to SMPTE292M serial digital interface standards. No audio signal is output from the card. -
Page 23: Basic Set-Up And Operation
6.2 Monitor Set-up The BRC-H700, the BRC-Z700, and the BRC-Z330 come equipped with a Color Bar Output mode, allowing you to precisely adjust the monitor. For the BRC-300/300P , it is suggested that you use the Auto Set-up function of the monitor. -
Page 24: Remote Operation
Note press the same number button. For the the same camera number, they are operated BRC-H700 and BRC-Z700, preset positions from 7 simultaneously with the same IR Remote Com- mander Unit. If you are installing cameras close to 16 are not available. -
Page 25: Rm-Br300 Remote Control Unit
PAN/TILT RESET button at the same Various camera settings can be adjusted within time for a few seconds, and the CAMERA switch the menu. The BRC-H700/BRC-Z700/BRC-Z330 lamp on the RM-BR300 starts to flash. Select have sixteen presets each and the BRC- between 1 and 7: 1 for the lowest speed and 7 300/300P has six presets to which pre-defined... -
Page 26: Operation
2. Set the Tally/Contact switch to Tally Improved functionality with the 3. Press the On/Off switch to turn on the unit, RM-BR300/5 while simultaneously holding down the Mode button, Camera button 4, and Model Name Destination Serial No. Position button 4 RM-BR300/5 Remote Control Unit 120001- When On-Air Tally Mode is selected, the tally... -
Page 27: Operating Multiple Cameras
Be sure to turn on the power of the camera before Note Camera the power of the RM-BR300 Remote Control Unit. address Otherwise, the RM-BR300 cannot recognize the Switch 1 OFF connected camera. Switch 2 OFF Switch 3 OFF To turn on/off the camera using the Switch 4 is not used. -
Page 28: Adjusting The Camera
Adjusting the camera Movement of the Joystick Setting camera MODE While holding down SHIFT Incline to the right. ONE PUSH AWB VALUE/R BACK LIGHT Press. While holding down FOCUS AUTO/MANUAL Incline to the right. BRIGHT/B ONE PUSH AF Focusing on a subject To focus the camera on a subjec Press. -
Page 29: Adjusting The Brightness
Adjust the red gain with the R control and the the EXPOSURE menu, as follows: blue gain with the B control. BRC-H700 Function of Function of Turn toward – for Turn toward + for MODE setting weakening red. - Page 30 BRC-Z700 BRC-Z330 Function of Function of Function of Function of MODE setting MODE setting VALUE control BRIGHT control VALUE control BRIGHT control Exposure compensation Exposure compensation FULL AUTO Not used FULL AUTO Not used level control* level control* SHUTTER SHUTTER Shutter speed Exposure compensation Shutter speed...
-
Page 31: Storing Camera Settings
Storing the Camera Setting in While holding down (for POSITION 1 to 8) Memory Press a POSITION button. Storing camera settings: Memory Preset feature While holding down (for POSITION 9 to 16) To store the camera settings The pressed button flashes while settings are being cancelled. -
Page 32: Factory Settings
Otherwise, the camera start operating with the factory settings. Preset Memory 1 Preset Memory 1 Category Mode/ Category Mode/ BRC-300 BRC-300 Position Position BRC-H700 BRC-Z700 BRC-Z330 BRC-H700 BRC-Z700 BRC-Z330 BRC-300P BRC-300P Pan/Tilt position Effect Mode — — — Pan limit position Wide —... - Page 33 *3: This function is available when BRBK-301 is inserted to the BRC-300/300P . *4: This function is available when HGBK-SD1 is inserted to the BRC-H700 or the BRC-H700. *5: This function is available when HFBK-HD1 is inserted to the BRC-H700 or the BRU-H700.
-
Page 34: Operation With The Brs-200 Remote Camera Operating Switcher
Operation with the BRS-200 Remote Camera Operating Switcher The BRC Series can be remotely controlled by the BRS-200 Remote Camera Operating Switcher. 8.1 System Configuration BRC-series cameras with the HD-SDI Monitor for the multi-viewer output card attached display (LMD-series monitor, etc.) –... -
Page 35: Connecting The Brc Series With The Brs-200 (Rs-422)
8.3 Connecting the BRC Series with the BRS-200 (RS-422) Up to seven cameras of the BRC Series can be connected to the BRS-200. This connection is one example using the RS-422 connection. BRSA-20HSD1 HD/SD-SDI input board (not supplied) AC IN DVI-I OUT SDI IN RS-232C... -
Page 36: Operation With The Aws-G500 Series Anycast Station
You can set and select a maximum of six camera presets, such as the Pan, Tilt, Zoom, and Focus settings, and more. For the BRC-H700, the BRC-Z700, and the BRC-Z330, preset positions from 7 to 16 are not available. Move the positioner for pan (which moves the camera shooting direction horizontally) control and tilt (which moves the camera shooting direction vertically) control. -
Page 37: Controlling The Camera With Visca Support
VISCA cable When connecting a BRC-300/300P camera, connect to the DV, RGB, and SDI input connectors in accordance with the Note camera’s option board. When an HD Video Interface module is Connected (BRC-H700, BRC-Z700/BRC-Z330) VISCA OUT VISCA IN VIDEO OUT... -
Page 38: Operating The Pgm And Next Selection Buttons From The Rm-Br300
Refer to the following diagram to prepare the cables. Sample Circuit diagram TALLY/CONTACT connector FACTORY USE connector Open-collector output TTL output For details, consult your dealer or your Sony service representative. Caution Connect the RM-BR300 before configuring this Connect the RM-BR300 to the FACTORY USE Caution setting. -
Page 39: Using The Brc-H700/Brc-Z700 As A Second Camera For The Pcs-Xg80 Video Conferencing System
VISCA OUT to VISCA IN VISCA OUT TERMINAL to Video output (YPbPr) OPEN VIDEO IN AUDIO 2 IN MAINTENANCE to VIDEO IN YPbPr PIN (RCA) connector Using the BRC-H700/BRC-Z700/BRC-Z330 as a Second Camera for the PCS-XG80 Video Conferencing System... -
Page 40: Specifications
Specifications BRC-H700 BRC-Z700 BRC-Z330 BRC-300 BRC-300P Camera Signal systems 1080/59.94i or 1080/50i 1080/59.94i, NTSC or 1080/50i, 60 Hz: 1080/59.94i, 720/59.94P, NTSC NTSC (switchable) PAL (switchable) 50 Hz: 1080/50i, 720/50P, PAL Sync systems Internal/External Image device 1/3-type IT CCD x 3... -
Page 41: Dimensions
Dimensions BRC-H700 FRONT SIDE 103.5 (4 1/8) ø 207 (8 1/4) ø 207 (8 1/4) 1/4 - 20 UNC BOTTOM 110 (4 3/8) Units: mm (inches) BRC-Z700 FRONT SIDE 99 (4) (7 7/8) 238 (9 3/8) (4 1/8) BOTTOM 1/4 - 20 UNC... - Page 42 BRC-Z330 FRONT SIDE 113 (4 160.8 193.4 (7 BOTTOM Tripod Screw 1/4-20 UNC 88 (3 1/2) Units: mm (inches) 152.8 (6 1/8) BRC-300/300P FRONT SIDE 90 (3 5/8) (13/32) (7 1/8) 205 (8 1/8) BOTTOM 1/4 - 20 UNC 106 (4 1/4) 147.6 (5 7/8) Units: mm (inches) Dimensions...
- Page 43 BRS-200 Control panel 424 (16 Processor 310 (12 320 (12 462 (18 480 (19) Rear RM-BR300 391.3 (15 1/2) Front Side 45.9 (1 13/16) Bottom DIP switches Units: mm (inches) Rear Dimensions...
- Page 44 BRU-H700 Side 86 (3 1/2) 210 (8 3/8) Front Units: mm (inches) BRU-300/300P Side 212 (8 3/8) Front Units: mm (inches) Dimensions...
- Page 45 Ceiling Bracket (B) for BRC-H700 23.1 2-R3 101.6±0.2 Ceiling Bracket (B) for BRC-Z700 21.5 2-R3 Dimensions...
- Page 46 Ceiling Bracket (B) for BRC-Z330 10-XXX 3XXXX 4-ø4.5 XXX Ceiling Bracket (B) for BRC-300/300P 20-R2.25 2-R3 88.2 ±0.2 46 ±0.2 Dimensions...
-
Page 47: Technical Appendix
The BRC-Z700 and BRC-Z330 can enhance or reduce a specific color region without changing the white balance. Both of these cameras adjust the saturation of six colors inde- pendently, and the BRC-H700 is able to modulate six colors simultaneously. Color gain & hue... -
Page 48: Estimated Viewing Angle Of Brc Sereis
13.4 Estimated Viewing Angle of BRC Sereis Estimated Viewing Angle (width) BRC-H700 Wide-end (feet) (m) 216.7 65.0 200 60.0 183.3 55.0 166.7 50.0 150 45.0 133.3 40.0 116.7 35.0 100 30.0 83.3 25.0 66.7 20.0 50 15.0 33.3 10.0 16.7 5.0 (feet) 6.66... - Page 49 Estimated Viewing Angle (width) BRC-Z700 Wide-end (feet) (m) 233.3 70.0 216.7 65.0 200 60.0 183.3 55.0 166.7 50.0 150 45.0 133.3 40.0 116.7 35.0 100 30.0 83.3 25.0 66.7 20.0 50 15.0 33.3 10.0 16.7 5.0 (feet) 6.66 13.3 26.7 33.3 46.7 53.3...
- Page 50 Estimated Viewing Angle (width) BRC-Z330 Wide-end (feet) (m) 233.3 70.0 216.7 65.0 200 60.0 183.3 55.0 166.7 50.0 150 45.0 133.3 40.0 116.7 35.0 100 30.0 83.3 25.0 66.7 20.0 50 15.0 33.3 10.0 16.7 5.0 (feet) 6.66 13.3 26.7 33.3 46.7 53.3...
- Page 51 Estimated Viewing Angle (width) BRC-300/300P Wide-end (16:9 mode) (feet) (m) 216.7 65.0 200 60.0 183.3 55.0 166.7 50.0 150 45.0 133.3 40.0 116.7 35.0 100 30.0 83.3 25.0 66.7 20.0 50 15.0 33.3 10.0 16.7 5.0 (feet) 6.66 13.3 26.7 33.3 46.7 53.3...
- Page 52 Estimated Viewing Angle (width) BRC-300/300P Wide-end (4:3 mode) (feet) (m) 216.7 65.0 200 60.0 183.3 55.0 166.7 50.0 150 45.0 133.3 40.0 116.7 35.0 100 30.0 83.3 25.0 66.7 20.0 50 15.0 33.3 10.0 16.7 5.0 (feet) 6.66 13.3 26.7 33.3 46.7 53.3...
-
Page 53: Recommended Lighting Conditions
[STD [SD]] 13.7 Audio Configuration The BRC-H700 and BRC-Z700 have three and two audio configurations, respectively. In the first configuration with the HFBK-TS1 (illustrated below), you can mix audio signals and video signals and output them as HDV. In the second configuration, you can input the audio signal to the BRBK-H700 or the BRBK-MF1 and transmit it via an optical fiber cable. -
Page 54: Function Priority
BRU-H700 takes priority over that of the BRC cameras. For example, if the switch of the BRU- H700 is ON and the switch of the camera is OFF, the menu will be displayed on the video images. DATA MIX switch on the BRC-H700 (rear) DATA MIX switch on the BRC-Z330 (rear) -
Page 55: Using The Visca Rs-422 Connector Plug
13.10 Using the VISCA RS-422 Connector Plug To remove the connector plug Insert a wire (AWG Nos. 28 to 18) into the desired Grasp both ends of the VISCA RS-422 connector wire opening on the VISCA RS-422 connector plug and pull it out as shown in the illustration. plug, and tighten the screw for that wire using a flathead screwdriver. -
Page 56: Wiring Diagram
13. 11 Wiring Diagram 13.11.1 Wiring Diagram of VISCA RS-422 Connection for the RM-BR300 Third to Seventh BRC or BRU VISCA RS-422 connector RXD OUT – RXD OUT + TXD OUT – TXD OUT + RXD IN – RXD IN + TXD IN –... -
Page 57: Wiring Diagram Of Visca Rs-422 Connection For The Brs-200
13.11.2 Wiring Diagram of VISCA RS-422 Connection for the BRS-200 Third to seventh VISCA cameras VISCA RS-422 Connector RXD OUT – RXD OUT + TXD OUT – TXD OUT + RXD IN – RXD IN + TXD IN – TXD IN + Second VISCA cameras VISCA RS-422 Connector RXD OUT –... -
Page 58: Ccfc Cable Information
Flame-retardant Multi-Mode Optical Fiber Cable and camera control signals. The maximum Transmission Loss: Less than 3.0 dB at wave distance is 1,000 m between the BRC-H700 and length =0.85μm BRU-H700, and also between the BRC-Z700 and Transmission Band Width: More than 1,500 MHz·km BRU-H700, using CCFC-M100HG cables. -
Page 59: Installing The Camera In A High Position
Installing the Camera in a High Position Installation on a ceiling (example) Using the supplied ceiling brackets, wire rope and screws, and the attachment materials (not supplied), Set IMG-FLIP to ON in the SYSTEM menu. you can attach the camera to a ceiling or on a Remove the four screws on the bottom of the shelf, etc. - Page 60 For attaching the wire rope to the bracket, use only Attach the attachment materials (not supplied) Caution the supplied screw. Using another screw may to the ceiling bracket (B), and install the bracket disable the function of the wire rope. on the ceiling.
- Page 61 Take the proper steps to ensure that the load of the Note cables connected does not cause problems. The SONY and/or HD nameplates can be turned upside down, if necessary. To remove the camera For attaching the camera to the ceiling bracket, use...
- Page 62 Attach the ceiling bracket (B) to a shelf, etc. on Insert the protrusions on the ceiling bracket (A) which the camera is to be installed. Use four into the spaces prepared in the ceiling bracket screws (not supplied) appropriate for the (B) with the a hole in the front of the ceiling materials of the shelf, etc.
- Page 63 Connect the cables to the connectors on the rear of the camera. Take the proper steps to ensure that the load of the Note cables connected does not cause problems. To remove the camera Remove the three screws used to attach the camera in step 7 of “Installation on a shelf, etc.
- Page 64 Installing the Camera in a High Position...
- Page 66 Advanced HAD, VISCA, Remote Commander, ClearVid CMOS, i.LINK, and the i.LINK logo are trademarks of Sony Corporation HDV and the HDV logo are trademarks of Sony Corporation and Victor Company of Japan, Limited. Vario-Sonnar T* is a trademark of Carl Zeiss AG.