
Related Manuals for JVC UX-T150


Summary of Contents for JVC UX-T150
-
Page 1: Micro Component System
MICRO COMPONENT SYSTEM SISTEMA DE MICROCOMPONENTES SISTEMA A MICROCOMPONENTI UX-T151/T150 INSTRUCTIONS INSTRUCCIONES MANUALE DI ISTRUZIONI LVT0056-002A... -
Page 2: Table Of Contents
ITALIANO Grazie per avere acquistato questo prodotto JVC. Si prega di leggere queste istruzioni con attenzione prima dell’uso per essere certi di ottenere prestazioni ottimali ed una lunga durata dell’unità. INDICE Caratteristiche ... -
Page 3: Features
REPRODUCTION OF LABELS AND THEIR LOCATION DANGER: Invisible laser ADVARSEL: Usynlig laser - VARNING: Osynlig laser- radiation when open and stråling ved åbning, når strålning när denna del interlock failed or defeated. sikkerhedsafbrydere er ude är öppnad och spärren är AVOID DIRECT EXPOSURE af funktion. - Page 4 3. When unplugging from the wall outlet, always grasp and pull the plug, not the power cord. 4. Consult your nearest dealer when damage, disconnection, or contact failure affects the cord. 5. Do not bend the cord severely, or pull or twist 6.
-
Page 5: Handling Precautions
HANDLING PRECAUTIONS Do not use this unit in direct sunlight where it would be exposed to high temperatures above 40°C (104°F). 1. Avoid installing in the following places ● Where it could be subject to vibrations. ● Where it is excessively humid, such as in a bathroom. -
Page 6: Connections
CONNECTIONS ● Do not switch the power on until all connections are completed. Antenna connection and adjustment ● AM (MW/LW) loop antenna adjustment RIGHT LEFT ` AC IN — DC IN ● Keep the loop antenna away from the unit and install it so that the best reception is obtained. (Do not leave the antenna wire in a bundle.) ●... - Page 7 Speaker cord connection RIGHT LEFT ` AC IN — DC IN ● The speaker grilles can be removed. ● When removing. 1. Insert your fingers at the top and pull towards you. 2. Also pull the bottom towards you. ● Attaching the speaker grille Notes: ●...
- Page 8 ● When connecting the speaker cord make sure that the wire core, not the insulating cover, is connected to the speaker terminal. Otherwise, sound cannot be heard. Connection of external audio units ● Connection with a turntable (or MD player) RIGHT LEFT ` AC IN...
-
Page 9: Power Supply
B. Funcionamiento con batería de automóvil (12 V de CC) Optional exclusive car adapter (JVC model CA-R120E) Adaptador exclusivo para automóvil opcional (JVC modelo CA-R120E) DC IN Adattatore esclusivo per automobile opzionale (modello JVC CA-R120E) ● Primero conecte el adaptador al jack DC IN... -
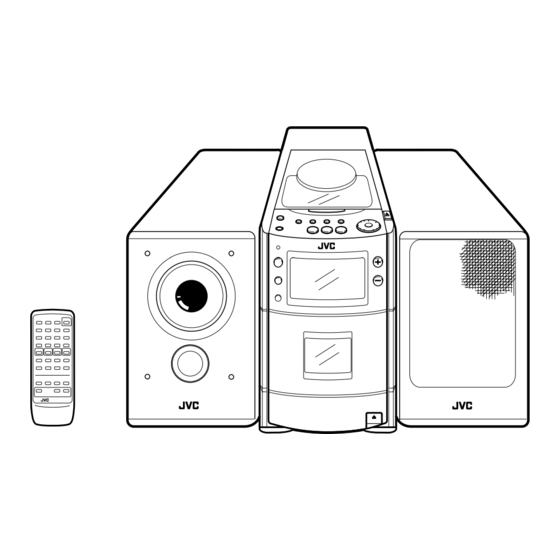
Page 10: Names Of Parts And Their Functions
NAMES OF PARTS AND THEIR FUNCTIONS CD player /General section Front Parta Lato STANDBY MICRO COMPONENT SYSTEM AUTO REVERSE button and power STANDBY indicator AUX button Remote sensor section Display window Function/Track number display Play time display Music calendar display Program mode indicator (PROGRAM) RANDOM play indicator Repeat play indicator (∂ALL) - Page 11 Tuner/Deck section STANDBY MICRO COMPONENT SYSTEM AUTO REVERSE Display window Band indicator Radio frequency display MONO indicator STEREO indicator Recording indicator (REC) Tape direction indicator (1, 4) Reverse mode indicator ( Tape (TAPE) mode display Cassette holder Cassette holder eject (8) button ONE TOUCH REC button TUNER/BAND button Press to select tuner mode.
-
Page 12: Remote Control Unit
REMOTE CONTROL UNIT Preparation before use ● Installing batteries in the remote control unit 1. Remove the battery cover from the back of the remote control unit. 2. Insert two “R6/AA (15F)” size batteries. ● Insert the batteries with the Œ... - Page 13 The following operations can be performed using the remote control unit. ● Check the operation button functions carefully and operate them correctly. Track number buttons (No. 1 to No. 10. +10) Press station buttons (No. 1 to No. 10. +10) REVERSE MODE button : For single-side recording or playback.
-
Page 14: Switching The Power On/Off
SWITCHING THE POWER ON/OFF STANDBY button Botón Tasto AUX button MICRO COMPONENT SYSTEM Botón AUX Tasto AUX AUTO REVERSE Switching the power on/off ● Switching on: STANDBY The STANDBY indicator goes out. El indicador STANDBY se apaga. L’indicatore STANDBY si spegne. ●... -
Page 15: Volume, Tone And Other Controls
One touch operation (COMPU PLAY) Even when the power is set to STANDBY, pressing the button shown below switches on the power and selects the source. Function mode Modo de función Modo di funzionamento TAPE TAPE BAND TUNER TUNER Notes: ●... -
Page 16: Handling Cds
HANDLING CDs Since dirty, damaged and warped CDs may damage the unit, take care regarding the following: 1. Usable CDs Use CDs with the mark shown. 2. Notes on handling CDs ● Do not touch the reflective recorded surface. ● Do not stick or write anything on the label side. -
Page 17: Playing Cds
PLAYING CDs Playing an entire CD The following example of playing an entire CD assumes a CD with 12 tracks and a total playing time of 48 minutes 57 seconds. Operate in the order shown COMPACT DIGITAL AUDIO ACTIVE HYPER TIMER/SNOOZE BASS PRO CLOCK... - Page 18 ● Do not use the unit at excessively high or low temperatures. The recommended temperature range is from 5°C (41°F) to 35°C (95°F). ● After play, unload the CD. ● If mistracking occurs during play, lower the volume. Skip play ●...
- Page 19 ● To designate track number 11 or higher, press the +10 button the required number of times, then a track number button. (Example: To designate the 20th track, press the +10 button once, then press track number button 10.) * +10 button: Each time this button is pressed, the number increases by 10.
- Page 20 To confirm the details of a program... Press the PROGRAM button; the tracks making up the program will be displayed in programmed order. To clear the programmed tracks... Press the 5 button before playing a CD. During programmed play, press this button twice. When the CD holder is opened, programmed tracks are cleared automatically.
-
Page 21: Handling Cassette Tapes
HANDLING CASSETTE TAPES Cassette tapes 1. Loose tape may cause trouble. Using a pencil or like object, gently tighten the tape as shown. 2. To prevent recordings from being erased accidentally, remove the tab(s) with a screwdriver, etc. Reseal the slots with adhesive tape to erase and re-record after the tabs have been removed. -
Page 22: Cassette Playback
CASSETTE PLAYBACK Operate in the order shown STANDBY MICRO COMPONENT SYSTEM AUTO REVERSE Load a cassette tape. Press to start playback. (The power is switched on and the TAPE mode is engaged to start tape playback.) Select the reverse mode ( Adjust. -
Page 23: Radio Reception
RADIO RECEPTION Operate in the order shown ACTIVE HYPER TIMER/SNOOZE BASS PRO CLOCK ONE TOUCH BAND TAPE TUNER Press the TUNER/BAND button. ● The power is switched on and a band and radio frequency will be shown in the display. Select the band. - Page 24 Auto preset tuning (using the remote control unit) This function scans the current band, detecting frequencies used to broadcast signals, and stores the first 30 FM frequencies and 15 AM (MW/LW) frequencies in memory automatically. ● Press the AUTO PRESET button for more than 2 seconds.
-
Page 25: Recording
● All preset stations will be erased when the power cord is disconnected or a power failure occurs for more than 24 hours. In such cases, store the stations again. Preset tuning ● The stations must be preset before this operation can be performed. - Page 26 Operate in the order shown STANDBY MICRO COMPONENT SYSTEM AUTO REVERSE Load a cassette with side A facing out. (Wind past the tape leader before starting recording.) Load a CD and close the CD holder. Set to the CD mode. Press the 5 button to set stop mode.
- Page 27 ● CD complete recording function (Synchro recording mode only) If the tape is reversed while a CD is being played, recording will be done on the reverse side of the tape as follows: * When less than 12 seconds of the last tune on the forward side of the tape have been recorded, recording on the other side of the tape will start from the beginning of the...
-
Page 28: Clock Adjustment
BEAT CUT button (using the remote control unit) When recording an AM broadcast, beats may be produced which are not heard when listening to the broadcast. In such case, set this button after setting the deck to the record mode so that the beats are eliminated. -
Page 29: Timer Operations
Setting the current time (when this unit is used for the first time) (Example: To set the clock to 13:15.) CLOCK Back Advance Atrás Adelantar Indietro Avanzare CLOCK One hour is advanced/moved back every 2 clicks. Cada 2 “clic” adelanta/atrasa una hora. Si avanza/indietreggia di 1 ora ogni 2 scatti. - Page 30 Set the stop time. (Example: To set the timer stop timer to 13: 15.) Select the TIMER mode ● The selected TIMER mode is shown in the display. TUNER When the MULTI JOG dial is turned to select the timer mode, the mode changes from TUNER (timer reception of a broadcast), to TUNER/REC (timer recording of a broadcast), to CD (timer play of a CD), to TAPE (timer...
- Page 31 Timer recording of broadcast ● The current time must be set before the timer can be used. ● Make sure that the safety tabs of the cassette have not been broken off. Operations STANDBY MICRO COMPONENT SYSTEM AUTO REVERSE Set the button to ON.
- Page 32 Timer playback ● Timer playback of tapes, broadcasts and CDs is possible. Operations STANDBY MICRO COMPONENT SYSTEM Set the button to ON. Set the timer. (Refer to “Setting the timer” on page 29.) Source sound Fuente de sonido Fonte CD play Reproducción de CD Riproduzione CD Tape playback...
- Page 33 ● To get an extra 5 minutes of sleep... When timer playback starts, press the TIMER/ SNOOZE button. The power is switched off and timer playback restarts after 5 minutes (snooze function). TIMER/SNOOZE Sleep timer operations (using the remote control unit) A.
-
Page 34: Maintenance
MAINTENANCE Cleaning is important! When the tape is running, magnetic powder and dust naturally accumulate on the heads, capstan and pinch roller. When they become too dirty... ● Sound quality deteriorates. ● The output sound level drops. ● Previously recorded tape is not completely erased. -
Page 35: Troubleshooting
TROUBLESHOOTING What appears to be trouble is not always serious. First make sure... ● Power cannot be turned on. * Is the power cord unplugged? ● No sound from the speakers. * Are headphones connected? CD Player Section ● The CD player does not play. * Is the CD upside down? * Is the CD dirty? ●... - Page 36 Tape deck section Track system : 4-track 2-channel stereo Motor : Electronic governor DC motor for capstan Heads : Hard permalloy head for recording/playback, 2 gap ferrite head for erasure (Combination head) Frequency response : 60-15,000 Hz (with CrO tape) Wow &...