
Related Manuals for True Z5.4 & Z5.0


Summary of Contents for True Z5.4 & Z5.0
- Page 1 Z5.4 & Z5.0 Treadmill Owner’s Manual truefitness.com / 800.426.6570 / 1.636.272.7100...
- Page 2 Our goal is not to sell the most cardio products in the world, but to deliver the world’s best premium equipment for our customers’ health and fitness solutions. To own a TRUE machine is to be part of an exclusive fitness community that delivers results – your results.
-
Page 3: Table Of Contents
Chapter 5: Care & Maintenance........27-30 Chapter 6: Troubleshooting..........31-32 Chapter 7: Additional Information........33-39 IMPORTANT: Product specifications, features & software are subject to change without notice. For the latest news and information from TRUE Fitness please visit www.truefitness.com. truefitness.com / 800.426.6570 / 1.636.272.7100... -
Page 4: Chapter 1: Safety Instructions
Chapter 1: Safety Instructions Chapter 1: Safety Instructions Chapter 2: Treadmill Overview Chapter 3: Display Console Chapter 4: Programming & Operation Chapter 5: Care & Maintenance Chapter 6: Troubleshooting Chapter 7: Additional Information truefitness.com / 800.426.6570 / 1.636.272.7100... -
Page 5: Important Safety Instructions
45, smokes, has high cholesterol, is obese or has not exercised regularly in the past year. TRUE also recommends consulting a fitness professional on the correct use of this product. - Page 6 • To disconnect, turn power OFF at the ON/OFF switch, then remove plug from electrical outlet. • Never operate a TRUE product if it has a damaged power cord or electrical plug, of if it has been dropped, damaged, or even partially immersed in water. Contact TRUE Customer Service.
-
Page 7: Grounding Instructions
Chapter 1: Safety Instructions CAUTION (continued): • Use the side handrails whenever additional stability is required. In case of emergency, such as tripping, the side handrails should be grabbed and the user should place his/her feet on the side platforms. The front handlebars should be used to grasp the heart rate sensors or to rest the hand on while operating the activity zone keys, but not for stability, emergency, or continuous use. -
Page 8: Starting And Stopping The Treadmill Safely
Chapter 1: Safety Instructions GROUNDING INSTRUCTIONS (continued) • The 120-V model is for use on a nominal 120-V circuit and has a grounding plug that looks like the plug illustrated in figure A. Make sure the product is connected to an outlet having the same configuration as the plug. No adaptor should be used with this product. - Page 9 POWER REQUIREMENTS FOR PRODUCTS Information Sheet 2010 For example, in the United States some TRUE treadmills NOTE: Read and understand all instructions on this sheet and in the Owner’s manual before plugging require a circuit rated 115 VAC, 60 Hz and 20 amps. See any TRUE power cord into an electrical outlet.
- Page 10 à la prise murale, faites installer une prise adéquate par un électricien qualifié. Votre appareil d’ e ntraînement TRUE doit être correctement mis à la terre de façon à réduire le risque d’ é lectrocution en cas de fonctionnement défectueux.
- Page 11 • Pour procéder au débranchement, placez l’interrupteur en position d’arrêt, puis enlever la fiche de la prise. • N’utilisez jamais un produit TRUE dont le cordon d’alimentation ou la fiche est endommagé, ou qui a fait l’ o bjet d’une chute, a été endommagé ou a été partiellement immergé. Contactez le service client de TRUE.
- Page 12 Chapter 1: Safety Instructions ATTENTION (continu) : • Tenez-vous aux barres latérales si vous avez besoin de plus de stabilité. En cas d’urgence, par exemple si vous trébuchez, accrochez-vous aux barres latérales et placez les pieds sur les repose-pieds latéraux. Les poignées avant permettent de saisir les capteurs de fréquence cardiaque ou de poser les mains lors de la manipulation des touches de la zone d’activité...
- Page 13 à la terre ou installé sur une ligne dédiée. Faites appel à un électricien qualifié si le cordon ou la fiche doit faire l’objet de modifications. TRUE n’est pas responsable des blessures ou des dégâts résultant d’une modification des cordons ou des fiches.
- Page 14 Lignes dédiées mises à la terre Les équipements TRUE doivent être mis à la terre. En cas de défaillance ou de panne, la mise à la terre permet de faire passer le courant dans la terre de façon à éviter l’ é lectrocution.
- Page 15 Chapter 1: Safety Instructions LANCEMENT ET ARRÊT SANS DANGER DU TAPIS : Placez les pieds de chaque côté du tapis. Attachez la clé de sécurité à votre taille. Placez l’ e xtrémité magnétique de la clé sur le porte-clé. IMPORTANT : Pour éviter toute utilisation non autorisée, rangez la clé et la pince dans un endroit sûr après chaque entraînement.
-
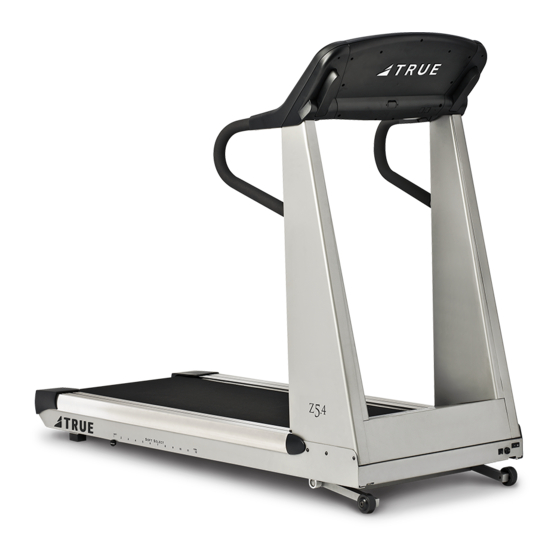
Page 16: Chapter 2: Treadmill Overview
Chapter 2: Treadmill Overview Z5.4 Console Safety Key Contact Heart Rate Pads Hand Rails Straddle Covers Belt Belt Adjustment Soft Select truefitness.com / 800.426.6570 / 1.636.272.7100... - Page 17 Chapter 2: Treadmill Overview Z5.0 Console Safety Key Contact Heart Rate Pads Hand Rails Straddle Covers Belt Belt Adjustment truefitness.com / 800.426.6570 / 1.636.272.7100...
-
Page 18: Chapter 3: Display Console
Chapter 3: Display Console Chapter 1: Safety Instructions Chapter 2: Treadmill Overview Chapter 3: Display Console Chapter 4: Programming & Operation Chapter 5: Care & Maintenance Chapter 6: Troubleshooting Chapter 7: Additional Information truefitness.com / 800.426.6570 / 1.636.272.7100... - Page 19 Chapter 3: Display Console WORKOUTS QUICKSPEED + WORKOUTS NUMERICAL Keys INCLINE + SPEED Keys CLEAR Key CHANGE DISPLAY STOP/PAUSE Key START Key ENTER Key Contact Heart Rate Safety Key Pads truefitness.com / 800.426.6570 / 1.636.272.7100...
-
Page 20: Chapter 4: Programming & Operation
Chapter 4: Programming & Operation Chapter 1: Safety Instructions Chapter 2: Treadmill Overview Chapter 3: Display Console Chapter 4: Programming & Operation Chapter 5: Care & Maintenance Chapter 6: Troubleshooting Chapter 7: Additional Information truefitness.com / 800.426.6570 / 1.636.272.7100... -
Page 21: Heart Rate Monitoring
By training at a specific target heart rate, you can exercise at a more efficient cardiovascular level. The TRUE HRC system is unique because you must enter the key parameters of your workout; target heart rate, maximum speed, maximum grade, and time, prior to beginning your HRC workout. As you approach you target heart rate, the treadmill’s computer automatically takes over and changes the speed and/or grade automatically to... - Page 22 Chapter 4: Programming & Operation Contact Heart Rate (chr): The CHR system lets you monitor your heart rate without wearing a strap. Gently grasp the CHR pads. During this time, the system is analyzing and locking in your heart rate. Within about 15 seconds, your digital heart rate in beats per minute (bpm) should be displayed.
-
Page 23: Safety Key
Chapter 4: Programming & Operation Safety Key: This magnetized cord must be in place on the treadmill console, and should be attached to your clothing. The treadmill will not operate if the safety key is not attached. Target Heart Rate: (hrc) Instructions: Put on a compatible transmitter chest strap. - Page 24 Chapter 4: Programming & Operation Target Heart Rate: Continued Cool-down: At the end of your workout time or distance, the treadmill reduces workload by half and goes back into Manual Control mode, where you directly control your cool-down. Your treadmill can remember more than one workout setup for a heart rate control workout. You can select these in later workouts so you don’t have to re-enter your workout parameters, which tend to stay the same from workout to workout.
- Page 25 Chapter 4: Programming & Operation PRE-SET Programs Quick Start Workout: Quick Start into a manual workout by pressing START Pressing START begins your workout. Adjust speed or incline at any time by using the dedicated SPEED and INCLINE keys Change data readouts by pressing the CHANGE DISPLAY key. Pause your workout by pressing the STOP key.
- Page 26 Chapter 4: Programming & Operation PRE-SET Programs: Continued Leg Shaper: Press ENTER Use + or – to adjust program level of (1-9) and press ENTER Maximum grade and speed will be displayed. Adjust time using numeric keys or + and – keys and press ENTER Adjust weight using numeric keys or + and –...
-
Page 27: Chapter 5: Care & Maintenance
Chapter 5: Care & Maintenance Chapter 1: Safety Instructions Chapter 2: Treadmill Overview Chapter 3: Display Console Chapter 4: Programming & Operation Chapter 5: Care & Maintenance Chapter 6: Troubleshooting Chapter 7: Additional Information truefitness.com / 800.426.6570 / 1.636.272.7100... -
Page 28: Cleaning The Equipment
CAUTION: Do not use any acidic cleaners. Doing so will weaken the paint or powder coatings and may void the TRUE Fitness Warranty. Never pour water or spray liquids on any part of the treadmill. Allow the treadmill to dry completely before using. Frequently vacuum the floor underneath the unit to prevent the accumulation of dust and dirt, which can affect the smooth operation of the unit. -
Page 29: Running Belt Alignment
Proper belt alignment allows the belt to remain centered and ensures smooth operation. Realigning the belt takes a few simple adjustments. If you are unsure about this procedure, call the TRUE Service Department. CAUTION: Special care must be taken when aligning the running belt. Turn off the treadmill while adjusting or working near the rear roller. -
Page 30: Long Term Storage
Treadmill Lubrication For average use of your treadmill, TRUE recommends you lubricate under the treadbelt once per year. For heavy use, which is more than 10 hours per week, TRUE recommends lubricating every three months. The TRUE treadmill you have purchased may be designed with a premium orthopedic belt. This belt provides additional comfort and cushioning. -
Page 31: Chapter 6: Troubleshooting
Chapter 6: Troubleshooting Chapter 1: Safety Instructions Chapter 2: Treadmill Overview Chapter 3: Display Console Chapter 4: Programming & Operation Chapter 5: Care & Maintenance Chapter 6: Troubleshooting Chapter 7: Additional Information truefitness.com / 800.426.6570 / 1.636.272.7100... -
Page 32: Troubleshooting
Q. The upper display shows an error code or has odd characters. A. If your display has any error messages on it TRUE Fitness recommends that you contact your local dealer or service provider to arrange a service call. The error codes are there for your protection and we do not recommend that you continue using the unit without consulting a professional. -
Page 33: Additional Information
Chapter 7: Additional Information Chapter 1: Safety Instructions Chapter 2: Treadmill Overview Chapter 3: Display Console Chapter 4: Programming & Operation Chapter 5: Care & Maintenance Chapter 6: Troubleshooting Chapter 7: Additional Information truefitness.com / 800.426.6570 / 1.636.272.7100... -
Page 34: Chapter 7: Additional Information
Chapter 7: Additional Information Z5.4 Treadmill Specifications truefitness.com / 800.426.6570 / 1.636.272.7100... - Page 35 Chapter 7: Additional Information Z5.0 Treadmill Specifications truefitness.com / 800.426.6570 / 1.636.272.7100...
- Page 36 Chapter 7: Additional Information CONTACT INFORMATION TRUE FITNESS SERVICE DEPARTMENT 865 HOFF ROAD ST. LOUIS, MO 63366 1.800.883.8783 HOURS OF OPERATION: 8:30 A.M. - 5:00 P.M. CST TRUE FITNESS HOME OFFICE 865 HOFF ROAD ST. LOUIS, MO 63366 1.800.426.6570 1.636.272.7100...