Table of Contents
Advertisement
Quick Links
COMPACT COMPONENT SYSTEM
MX-GT700
MX-G500
STANDBY/ON
1
2
3
SUBWOOFER
LEVEL
SLEEP
4
5
6
AUX
SOUND
MODE
7
8
9
FM MODE
10
+10
FM/AM
TAPE
FADE
TAPE A/B
MUTING
DISC
CD
SKIP
+
VOLUME
VOLUME
–
RM–SMXG500A REMOTE CONTROL
STANDBY/ON
1
2
3
SUBWOOFER
SLEEP
LEVEL
4
5
6
SOUND
AUX
MODE
7
8
9
FM MODE
10
+10
FADE
FM/AM
TAPE
TAPE A/B
MUTING
DISC
CD
SKIP
+
VOLUME
VOLUME
–
RM–SMXG500A REMOTE CONTROL
— Consists of CA-MXGT700 and SP-MXGT700.
— Consists of CA-MXG500 and SP-MXG500.
STANDBY
STANDBY/ON
EXTENDED SUPER BASS
FM
AUX
CD
/AM
REPEAT
PROGRAM
RANDOM
PHONES
REC START
CD REC
/STOP
START
DUBBING
FULL - LOGIC CONTROL
CA-MXGT700
SP-MXGT700
STANDBY
STANDBY/ON
EXTENDED SUPER BASS
FM
CD
AUX
/AM
PHONES
REPEAT
PROGRAM
RANDOM
REC START
CD REC
/STOP
START
FULL - LOGIC CONTROL
SP-MXG500
CA-MXG500
INSTRUCTIONS
DISC CHANGE
3
CD
CD-R/RW PLAYBACK
MX-GT700
SOUND
MODE
CLOCK
/TIMER
DISPLAY
TAPE
TUNING
TAPE A
TAPE B
SUBWOOFER
LEVEL
C O M P U
P L A Y
C O N T R O L
CD SYNCHRO RECORDING
SP-MXGT700
DISC CHANGE
3
CD
CD-R/RW PLAYBACK
MX-G500
SOUND
MODE
CLOCK
/TIMER
DISPLAY
TAPE
TAPE A
TAPE B
SUBWOOFER
LEVEL
DUBBING
C O M P U
P L A Y
C O N T R O L
CD SYNCHRO RECORDING
SP-MXG500
For Customer Use:
Enter below the Model No. and Serial
No. which are located either on the rear,
bottom or side of the cabinet. Retain this
information for future reference.
Model No.
Serial No.
LVT0901-001A
[J]
Advertisement
Chapters
Table of Contents
Troubleshooting

Related Manuals for JVC MX-GT700


Summary of Contents for JVC MX-GT700
- Page 1 COMPACT COMPONENT SYSTEM MX-GT700 — Consists of CA-MXGT700 and SP-MXGT700. MX-G500 — Consists of CA-MXG500 and SP-MXG500. DISC CHANGE STANDBY STANDBY/ON CD-R/RW PLAYBACK STANDBY/ON MX-GT700 SOUND SUBWOOFER MODE LEVEL SLEEP SOUND MODE CLOCK /TIMER FM MODE DISPLAY EXTENDED SUPER BASS...
- Page 2 Warnings, Cautions and Others Mises en garde, précautions et indications diverses CAUTION To reduce the risk of electrical shocks, fire, etc.: CAUTION 1. Do not remove screws, covers or cabinet. RISK OF ELECTRIC SHOCK DO NOT OPEN 2. Do not expose this appliance to rain or moisture. CAUTION: TO REDUCE THE RISK OF ELECTRIC SHOCK.
- Page 3 For Canada/pour le Canada For Canada/pour le Canada THIS DIGITAL APPARATUS DOES NOT EXCEED THE CLASS CAUTION: TO PREVENT ELECTRIC SHOCK, MATCH WIDE B LIMITS FOR RADIO NOISE EMISSIONS FROM DIGITAL BLADE OF PLUG TO WIDE SLOT, FULLY INSERT. APPARATUS AS SET OUT IN THE INTERFERENCE-CAUSING ATTENTION: POUR EVITER LES CHOCS ELECTRIQUES, EQUIPMENT STANDARD ENTITLED “DIGITAL APPARATUS,”...
- Page 4 Introduction We would like to thank you for purchasing one of our JVC products. Before operating this unit, read this manual carefully and thoroughly to obtain the best possible performance from your unit, and retain this manual for future reference.
-
Page 5: Table Of Contents
Contents Location of the Buttons and Controls ....... 3 Front Panel ..............3 Remote Control ............5 Getting Started ............6 Unpacking ..............6 Putting the Batteries into the Remote Control ... 6 Connecting Antennas ..........6 Connecting Speakers ..........7 Connecting Other Equipment ........ -
Page 6: Location Of The Buttons And Controls
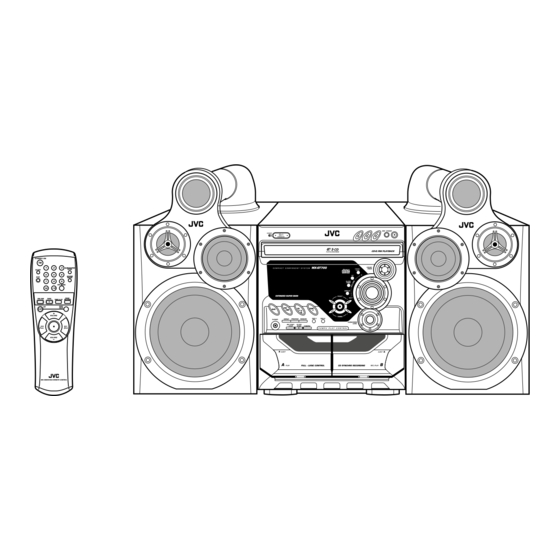
Location of the Buttons and Controls Become familiar with the buttons and controls on your unit. Front Panel DISC CHANGE STANDBY STANDBY/ON CD-R/RW PLAYBACK SOUND MODE CLOCK /TIMER DISPLAY EXTENDED SUPER BASS TAPE TAPE A TAPE B REPEAT PROGRAM RANDOM PHONES SUBWOOFER LEVEL... - Page 7 Continued Display Window a Disc number buttons and lamps (CD1, CD2, and CD3) See pages in the parentheses for details. (13 – 15, 18) Front Panel Pressing one of these buttons also turns on the unit. s SET button (9, 11, 14, 19 – 21) STANDBY/ON button and STANDBY lamp (9) d CANCEL/DEMO button (8, 9, 14, 20, 21) 2 CLOCK/TIMER button (9, 19 –...
-
Page 8: Remote Control
Remote Control Remote Control STANDBY/ON button (9) 2 SLEEP button (21) 3 AUX button (9) Pressing this button also turns on the unit. STANDBY/ON 4 Number buttons (11, 13) 5 TAPE 3 button (9, 16) SUBWOOFER SLEEP LEVEL Pressing this button also turns on the unit. SOUND 6 FM/AM button (9, 11) MODE... -
Page 9: Getting Started
Getting Started Continued Unpacking Connecting Antennas FM antenna After unpacking, check to be sure that you have all the following items. The number in the parentheses indicates the quantity of the pieces supplied. FM antenna (supplied) • AM loop antenna (1) •... -
Page 10: Connecting Speakers
AM antenna Connecting Speakers For MX-GT700: DO NOT carry the speaker by holding the duct 2, 3 tube (on the top of the speaker). 2, 3 Vinyl-covered wire ANTENNA (not supplied) FM 75 Speaker cord Black Speaker (blue/black) cord (red/black) -
Page 11: Connecting Other Equipment
Connecting Other Equipment NOW, you can plug in the unit and other connected equipment FINALLY! You can connect both analog and digital equipment. • DO NOT connect any equipment while the power is on. Cancelling the Display Demonstration • DO NOT plug in any equipment until all connections are complete. -
Page 12: Common Operations
Common Operations Turning On or Off the Power Press 4 or ¢ to adjust the minute, then press SET. To turn on the unit, press STANDBY/ STANDBY STANDBY/ON ON so that the STANDBY lamp goes off. To turn off the unit (on standby), press STANDBY STANDBY/ON again so that the STANDBY/ON... -
Page 13: Adjusting The Volume
Adjusting the Volume Selecting the Sound Modes You can adjust the volume level only while the unit is turned This function only affects the playback sound, not your recording. Turn the VOLUME control You can select one of the 6 preset sound modes (3 surround clockwise to increase the volume or modes and 3 SEA—Sound Effect Amplifier—modes). -
Page 14: Listening To The Radio
Listening to the Radio Tuning in a Station On the unit ONLY: Tune in the station you want to preset (in this Press FM/AM. example, of FM 87.50). The unit automatically turns on and tunes • See “Tuning in a Station.” in the previously tuned station (either FM or AM). -
Page 15: Playing Back Cds
Playing Back CDs Continued This unit has been designed to playback the following CDs: DISC CHANGE If you wish to load a third disc, press Audio CD, CD-R, and CD-RW. DISC CHANGE on the unit or DISC SKIP on the remote control. When playing a CD-R or CD-RW DISC The disc tray rotates by 120˚. -
Page 16: Basic Cd Operations
Basic CD Operations Press one of the disc number buttons (CD1, CD2 or CD3) While playing a CD, you can do the following operations. for the disc you want to start to play from. To exchange CDs during playback of another CD play starts from the first track of the Press DISC CHANGE to change the CD and the DISC CHANGE... -
Page 17: Programming The Playing Order Of The Tracks
Continued Programing the Playing Order of the Tracks Program other tracks you want. —–Program Play • To program tracks from the same disc, repeat step 4 . • To program tracks from a different disc, repeat steps 3 You can arrange the order in which the tracks play before you and 4 . -
Page 18: Playing At Random-Random Play
Playing at Random—–Random Play Repeating Tracks or CDs—–Repeat Play The tracks of the selected CD will play at random. You can have all the CDs, the program or the individual track • To use Random play mode, you have to cancel the Program currently playing repeat as many times as you like. -
Page 19: Playing Back Tapes
Playing Back Tapes To stop during play, press 7. Playing Back a Tape To operate the other deck, press TAPE A or TAPE B (or TAPE A/B on the remote control), then TAPE 3. Press EJECT (0) for the deck you want to To fast-forward the tape, press ¡... -
Page 20: Recording
Recording IMPORTANT: Recording a Tape on Deck B • It should be noted that it may be unlawful to re- record pre-recorded tapes, records, or discs without On the unit ONLY: the consent of the owner of copyright in the sound or video recording, broadcast or cable program and in Press EJECT 0 for deck B. -
Page 21: Dubbing Tapes
Dubbing Tapes CD Synchronized Recording You can easily record a CD onto a tape. On the unit ONLY: • You can also record the tracks in order you have made the program. Press TAPE 3, then 7. On the unit ONLY: Put a recordable cassette into deck B. -
Page 22: Using The Timers
Using the Timers There are three timers available—Daily Timer, Recording Press CLOCK/TIMER again. CLOCK / TIMER Timer, and Sleep Timer. “ON TIME” appears for 2 seconds, then the Before using the timers, you need to set the clock built in the unit enters on-time setting mode. -
Page 23: Using Recording Timer
Continued Using Recording Timer Select the preset station number. With Recording Timer, you can make a tape of a radio Press 4 or ¢ to select the preset broadcast automatically. You can set the timer whether the station number, then press SET. unit is on or off. -
Page 24: Using Sleep Timer
Using Sleep Timer Set the on-time you want the unit to turn on. With Sleep Timer, you can fall asleep to music. 1) Press 4 or ¢ to set the hour, then You can set Sleep Timer when the unit is turned on. press SET. -
Page 25: Maintenance
Maintenance To get the best performance of the unit, keep your discs, tapes, and mechanism clean. Handling cassette tapes Cleaning the unit • If the tape is loose in its cassette, take up • Stains on the unit the slack by inserting a pencil in one of Should be wiped off with a soft cloth. -
Page 26: Troubleshooting
Troubleshooting If you are having a problem with your unit, check this list for a possible solution before calling for service. If you cannot solve the problem from the hints given here, or the unit has been physically damaged, call a qualified person, such as your dealer, for service. -
Page 27: Specifications
Specifications Design and specifications are subject to change without notice. Amplifier section—CA-MXGT700 Amplifier section—CA-MXG500 Output Power Output Power SUBWOOFERS : 110 W per channel, min. RMS, driven into SUBWOOFERS : 80 W per channel, min. RMS, driven into 6 Ω at 63 Hz with no more than 10% total 6 Ω... - Page 28 To prevent electrical shock,do not open the cabinet.There are no user serviceable parts inside.Please refer to qualified service personnel for repairs. Accessories To purchase accessories for your JVC product,please call toll free:1 (800)882-2345 or on the web at www.JVC.com BT-51002-5...
- Page 29 If service is not available locally, box the product carefully, preferably in the original carton, and ship, insured, with a copy of your bill of sale plus a letter of explanation of the problem to the nearest JVC Factory Service Center, the name and location of which will be given to you by the toll-free number.
- Page 30 MEMO...
- Page 31 MEMO...
- Page 32 VICTOR COMPANY OF JAPAN, LIMITED 0102KSMMDWSAM...
- Page 33 COMPACT COMPONENT SYSTEM SYSTEME DE COMPOSANTS COMPACT MX-GT700 Consists of CA-MXGT700 and SP-MXGT700. — Composé du CA-MXGT700 et SP-MXGT700. — MX-G500 Consists of CA-MXG500 and SP-MXG500. — Composé du CA-MXG500 et SP-MXG500. — DISC CHANGE STANDBY STANDBY/ON CD-R/RW PLAYBACK STANDBY/ON...
- Page 34 Warnings, Cautions and Others Mises en garde, précautions et indications diverses CAUTION To reduce the risk of electrical shocks, fire, etc.: CAUTION 1. Do not remove screws, covers or cabinet. RISK OF ELECTRIC SHOCK DO NOT OPEN 2. Do not expose this appliance to rain or moisture. CAUTION: TO REDUCE THE RISK OF ELECTRIC SHOCK.
- Page 35 For Canada/pour le Canada CAUTION: TO PREVENT ELECTRIC SHOCK, MATCH WIDE BLADE OF PLUG TO WIDE SLOT, FULLY INSERT. ATTENTION: POUR EVITER LES CHOCS ELECTRIQUES, INTRODUIRE LA LAME LA PLUS LARGE DE LA FICHE DANS LA BORNE CORRESPONDANTE DE LA PRISE ET POUSSER JUSQUAU FOND.
- Page 36 Introduction We would like to thank you for purchasing one of our JVC products. Before operating this unit, read this manual carefully and thoroughly to obtain the best possible performance from your unit, and retain this manual for future reference.
- Page 37 Contents Location of the Buttons and Controls ....... 3 Front Panel ..............3 Remote Control ............5 Getting Started ............6 Unpacking ..............6 Putting the Batteries into the Remote Control ... 6 Connecting Antennas ..........6 Connecting Speakers ..........7 Connecting Other Equipment ........
-
Page 38: Location Of The Buttons And Controls
Location of the Buttons and Controls Become familiar with the buttons and controls on your unit. Front Panel DISC CHANGE STANDBY STANDBY/ON CD-R/RW PLAYBACK SOUND MODE CLOCK /TIMER DISPLAY EXTENDED SUPER BASS TAPE TAPE A TAPE B PROGRAM RANDOM REPEAT PHONES SUBWOOFER LEVEL... - Page 39 Continued Display Window See pages in the parentheses for details. a Disc number buttons and lamps (CD1, CD2, and CD3) (13 – 15, 18) Front Panel Pressing one of these buttons also turns on the unit. s SET button (9, 11, 14, 19 – 21) STANDBY/ON button and STANDBY lamp (9) d CANCEL/DEMO button (8, 9, 14, 20, 21) 2 CLOCK/TIMER button (9, 19 –...
-
Page 40: Remote Control
Remote Control Remote Control STANDBY/ON button (9) 2 SLEEP button (21) 3 AUX button (9) Pressing this button also turns on the unit. STANDBY/ON 4 Number buttons (11, 13) 5 TAPE 3 button (9, 16) SUBWOOFER SLEEP LEVEL Pressing this button also turns on the unit. SOUND 6 FM/AM button (9, 11) MODE... -
Page 41: Getting Started
Getting Started Continued Unpacking Connecting Antennas FM antenna After unpacking, check to be sure that you have all the following items. The number in the parentheses indicates the quantity of the pieces supplied. FM antenna (supplied) • AM loop antenna (1) •... -
Page 42: Connecting Speakers
AM antenna Connecting Speakers For MX-GT700: DO NOT carry the speaker by holding the duct 2, 3 tube (on the top of the speaker). 2, 3 Vinyl-covered wire ANTENNA (not supplied) FM 75 Speaker cord Black Speaker (blue/black) cord (red/black) -
Page 43: Connecting Other Equipment
For MX-GT700: To connect audio equipment with an optical digital To remove the speaker grilles input terminal You can record CD sound onto the connected digital The speaker grilles are removable as the illustration below. equipment. DIGITAL OUT (OPTICAL) Projections... -
Page 44: Common Operations
Common Operations Turning On or Off the Power Press 4 or ¢ to adjust the minute, then press SET. To turn on the unit, press STANDBY/ STANDBY STANDBY/ON ON so that the STANDBY lamp goes off. To turn off the unit (on standby), press STANDBY STANDBY/ON again so that the STANDBY/ON... -
Page 45: Adjusting The Volume
Adjusting the Volume Selecting the Sound Modes You can adjust the volume level only while the unit is turned This function only affects the playback sound, not your recording. Turn the VOLUME control You can select one of the 6 preset sound modes (3 surround clockwise to increase the volume or modes and 3 SEA—Sound Effect Amplifier—modes). -
Page 46: Listening To The Radio
Listening to the Radio Tuning in a Station On the unit ONLY: Tune in the station you want to preset (in this Press FM/AM. example, of FM 87.50). The unit automatically turns on and tunes • See “Tuning in a Station.” in the previously tuned station (either FM or AM). -
Page 47: Playing Back Cds
Playing Back CDs Continued This unit has been designed to playback the following CDs: DISC CHANGE If you wish to load a third disc, press Audio CD, CD-R, and CD-RW. DISC CHANGE on the unit or DISC SKIP on the remote control. When playing a CD-R or CD-RW DISC The disc tray rotates by 120˚. -
Page 48: Basic Cd Operations
Basic CD Operations Press one of the disc number buttons (CD1, CD2 or CD3) While playing a CD, you can do the following operations. for the disc you want to start to play from. To exchange CDs during playback of another CD play starts from the first track of the Press DISC CHANGE to change the CD and the DISC CHANGE... -
Page 49: Programing The Playing Order Of The Tracks -Program Play
Continued Programing the Playing Order of the Tracks Program other tracks you want. —–Program Play • To program tracks from the same disc, repeat step 4 . • To program tracks from a different disc, repeat steps 3 You can arrange the order in which the tracks play before you and 4 . -
Page 50: Playing At Random-Random Play
Playing at Random—–Random Play Repeating Tracks or CDs—–Repeat Play The tracks of the selected CD will play at random. You can have all the CDs, the program or the individual track • To use Random play mode, you have to cancel the Program currently playing repeat as many times as you like. -
Page 51: Playing Back Tapes
Playing Back Tapes To stop during play, press 7. Playing Back a Tape To operate the other deck, press TAPE A or TAPE B (or TAPE A/B on the remote control), then TAPE 3. Press EJECT (0) for the deck you want to To fast-forward the tape, press ¡... -
Page 52: Recording
Recording IMPORTANT: Recording a Tape on Deck B • It should be noted that it may be unlawful to re-record pre-recorded tapes, records, or discs without the On the unit ONLY: consent of the owner of copyright in the sound or video recording, broadcast or cable program and in any Press EJECT 0 for deck B. -
Page 53: Dubbing Tapes
Dubbing Tapes CD Synchronized Recording You can easily record a CD onto a tape. On the unit ONLY: • You can also record the tracks in order you have made the program. Press TAPE 3, then 7. On the unit ONLY: Put a recordable cassette into deck B. -
Page 54: Using The Timers
Using the Timers There are three timers available—Daily Timer, Recording Press CLOCK/TIMER again. CLOCK / TIMER Timer, and Sleep Timer. “ON TIME” appears for 2 seconds, then the Before using the timers, you need to set the clock built in the unit enters on-time setting mode. -
Page 55: Using Recording Timer
Continued Using Recording Timer Select the preset station number. With Recording Timer, you can make a tape of a radio Press 4 or ¢ to select the preset broadcast automatically. You can set the timer whether the station number, then press SET. unit is on or off. -
Page 56: Using Sleep Timer
Using Sleep Timer Set the on-time you want the unit to turn on. With Sleep Timer, you can fall asleep to music. 1) Press 4 or ¢ to set the hour, then You can set Sleep Timer when the unit is turned on. press SET. -
Page 57: Maintenance
Maintenance To get the best performance of the unit, keep your discs, tapes, and mechanism clean. Handling cassette tapes Cleaning the unit • If the tape is loose in its cassette, take up • Stains on the unit the slack by inserting a pencil in one of Should be wiped off with a soft cloth. -
Page 58: Troubleshooting
Troubleshooting If you are having a problem with your unit, check this list for a possible solution before calling for service. If you cannot solve the problem from the hints given here, or the unit has been physically damaged, call a qualified person, such as your dealer, for service. -
Page 59: Specifications
Specifications Design and specifications are subject to change without notice. Amplifier section—CA-MXGT700 Amplifier section—CA-MXG500 Output Power Output Power SUBWOOFERS : 110 W per channel, min. RMS, driven into SUBWOOFERS : 80 W per channel, min. RMS, driven into 6 Ω at 63 Hz with no more than 10% total 6 Ω... - Page 60 VICTOR COMPANY OF JAPAN, LIMITED 0202KSMMDWSAM EN, FR...