JVC AX-UXG6 Instructions Manual
Consists of ax-uxg6, xt-uxg6r, td-uxg6, and sp-uxg6
Hide thumbs
Also See for AX-UXG6:
- Instructions manual (40 pages) ,
- Service manual (108 pages) ,
- Service manual (51 pages)
Table of Contents
Advertisement
Quick Links
MICRO COMPONENT SYSTEM
UX-G6R
STEREO AMPLIFIER
AX-UXG6
COMPACT DISC/TUNER
XT-UXG6R
CASSETTE DECK
TD-UXG6
SPEAKER SYSTEM
SP-UXG6
REMOTE CONTROL RM-SUXG6E
PANEL
OPEN/CLOSE
DIMMER
ACTIVE
BASS EX.
CLOCK/TIMER
SLEEP
BASS
TREBLE
FM MODE
PLAY MODE
REPEAT
AUTO PRESET
PTY/EON
TITTLE/EDIT
ENTER
DISPLAY
/CHARA.
CANCEL
UP
<
>
SET
DOWN
MD
AUX
TAPE
CD
FM/AM
4
7
¢
+
VOLUME
–
Consists of AX-UXG6, XT-UXG6R, TD-UXG6,
and SP-UXG6.
STANDBY/ON
M I C R O
C O M P O N E N T
FM/AM
MULTI
JOG
MOS - FET
1 B I T
P • E • M
D • D • C O N V E R T E R
PHONES
COMPACT
DIGITAL AUDIO
DOLBY B NR
REC PAUSE
AUTO
REVERSE
REC
INSTRUCTIONS
OPEN/CLOSE
S Y S T E M
U X - G 6 R
AUX
VOLUME
For Customer Use:
Enter below the Model No. and Serial
No. which are located either on the rear,
bottom or side of the cabinet. Retain this
information for future reference.
Model No.
Serial No.
LVT0376-001B
[B]
Advertisement
Table of Contents

Related Manuals for JVC AX-UXG6


Summary of Contents for JVC AX-UXG6
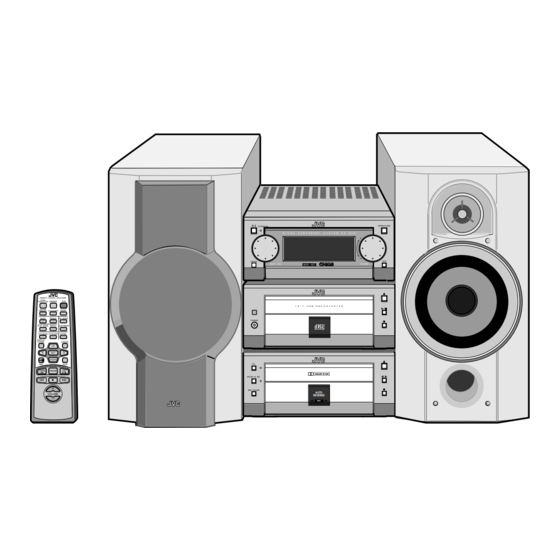
- Page 1 MICRO COMPONENT SYSTEM UX-G6R Consists of AX-UXG6, XT-UXG6R, TD-UXG6, and SP-UXG6. STEREO AMPLIFIER AX-UXG6 COMPACT DISC/TUNER XT-UXG6R CASSETTE DECK TD-UXG6 SPEAKER SYSTEM SP-UXG6 REMOTE CONTROL RM-SUXG6E PANEL OPEN/CLOSE DIMMER ACTIVE BASS EX. CLOCK/TIMER SLEEP BASS TREBLE FM MODE PLAY MODE...
- Page 2 1. Do not remove screws, covers or cabinet. 2. Do not expose this appliance to rain or moisture. OPEN/CLOSE U X - G 6 R VOLUME 15 cm 1 cm 15 cm AX-UXG6 XT-UXG6R TD-UXG6 XM-G6 – G-1 – Side view 15 cm 15 cm...
- Page 3 REPRODUCTION OF LABELS 1 CLASSIFICATION LABEL, PLACED ON EXTERIOR SURFACE CLASS LASER PRODUCT 1. CLASS 1 LASER PRODUCT 2. DANGER: Invisible laser radiation when open and interlock failed or defeated. Avoid direct exposure to beam. 3. CAUTION: Do not open the top cover. There are no user serviceable parts inside the Unit;...
-
Page 4: Introduction
Introduction We would like to thank you for purchasing one of our JVC products. Before operating this micro component system, read this manual carefully and thoroughly to obtain the best possible performance from your system, and retain this manual for future reference. -
Page 5: Table Of Contents
Contents Introduction ... 1 About This Manual ... 1 Precautions ... 1 Contents ... 2 Location of the Buttons and Controls ... 3 Front Panels ... 4 Remote Control ... 5 Getting Started ... 6 Unpacking ... 6 Putting the Batteries into the Remote Control ... 6 Connecting the System Control Cables and the External Wire ... -
Page 6: Location Of The Buttons And Controls
Location of the Buttons and Controls Become familiar with the buttons and controls on the units. Front Panels AX-UXG6 Stereo Amplifier XT-UXG6R Compact Disc /Tuner TD-UXG6 Cassette Deck Display window STANDBY/ON M I C R O C O M P O N E N T... -
Page 7: Front Panels
Front Panels AX-UXG6 Stereo Amplifier button and STANDBY/ON lamp (11)* 2 MULTI JOG dial 3 FM/AM button (14)* 4 OPEN/CLOSE button (13)* 5 Display window 6 VOLUME dial (11) 7 AUX button (13, 28)* XT-UXG6R Compact Disc/Tuner 8 CD tray... -
Page 8: Remote Control
Continued Become familiar with the buttons on the remote control. Remote Control REMOTE CONTROL RM-SUXG6R PANEL OPEN/CLOSE DIMMER ACTIVE BASS EX. CLOCK/TIMER BASS TREBLE FM MODE PLAY MODE REPEAT AUTO PRESET PTY/EON TITTLE/EDIT DISPLAY /CHARA. < DOWN TAPE FM/AM VOLUME STANDBY/ON M I C R O C O M P O N E N T... -
Page 9: Getting Started
Connecting the System Control Cables and the External Wire UX-G6R micro component system consists of three units, AX-UXG6 Stereo Amplifier, XT-UXG6R Compact Disc/ Tuner, TD-UXG6 Cassette Deck, and SP-UXG6 Speaker System. You can easily connect these units using the system control cables equipped on the rear panel of the units. -
Page 10: Connecting Md Recorder Xm-G6
• DO NOT change the vertical stacking order of XM- G6 as illustrated to avoid heat buildup. Connecting Sub Woofer System When using JVC external sub woofer system, connect audio cable between AX-UXG6’s SUB WOOFER OUT jack and the input of your sub woofer system. -
Page 11: Connecting Speakers
AM antenna ANTENNA LOOP FM 75 COAXIAL AM loop antenna (supplied) Connect the AM loop antenna to the AM LOOP terminals as illustrated. Turn the AM loop antenna until you have the best reception. To connect an external AM antenna When reception is poor, connect a single vinyl-covered wire to the AM EXT terminal and extend it horizontally. -
Page 12: Connecting Other Equipments
Continued Connecting Other Equipments You can connect the following equipments to the system: • Audio equipment — used only as an analog playback device. • Audio equipment with an optical digital input terminal — used as a digital recording device. When you connect and use these equipments, refer also to the manuals supplied with them. -
Page 13: Basic Settings
Basic Settings REMOTE CONTROL RM-SUXG6R PANEL OPEN/CLOSE DIMMER ACTIVE SLEEP BASS EX. CLOCK/TIMER BASS TREBLE FM MODE PLAY MODE REPEAT AUTO PRESET PTY/EON TITTLE/EDIT ENTER DISPLAY /CHARA. CANCEL < > DOWN TAPE Before operating the system any further, set the clock built in this system first, then some other basic settings. -
Page 14: Common Operations
Common Operations REMOTE CONTROL RM-SUXG6R PANEL OPEN/CLOSE DIMMER ACTIVE SLEEP BASS EX. CLOCK/TIMER BASS TREBLE FM MODE PLAY MODE REPEAT AUTO PRESET PTY/EON TITTLE/EDIT ENTER DISPLAY /CHARA. CANCEL < > DOWN TAPE FM/AM VOLUME Here are basic and common things that apply to all the operations of UX-G6R system. -
Page 15: Reinforcing The Bass Sound
• When using the remote control, press VOLUME + button to increase the volume level or press VOLUME – button to decrease it. The volume level (from 0 to 50) appears in the display window as follows: For private listening Connect a pair of headphones to the PHONES jack. -
Page 16: Operating The Sliding Panel
Continued Operating the Sliding Panel You can use the sliding panel to enable advanced operations features provided for UX-G6R micro component system. Inner Buttons • Press OPEN/CLOSE button on the front panel (or PANEL OPEN/CLOSE button on the remote control). The sliding panel opens to uncover the inner buttons behind the panel for further operations. -
Page 17: Listening To Fm And Am Broadcasts
Listening to FM and AM Broadcasts REMOTE CONTROL RM-SUXG6R PANEL OPEN/CLOSE DIMMER ACTIVE SLEEP BASS EX. CLOCK/TIMER BASS TREBLE FM MODE PLAY MODE REPEAT AUTO PRESET PTY/EON TITTLE/EDIT ENTER DISPLAY /CHARA. CANCEL < > DOWN TAPE FM/AM VOLUME You can tune in FM and AM (MW/LW) stations manually, automatically, and use the preset station feature. -
Page 18: Presetting Stations
Continued Presetting Stations You can preset up to 30 FM and 15 AM (MW/LW) stations into memory by following two methods: manual/automatic presettings. • There is a time limit in doing the following steps. If the setting is canceled before you finish, start from step 1 again. -
Page 19: Receiving Fm Stations With Rds
Receiving FM Stations with RDS BASS TREBLE FM MODE PLAY MODE AUTO PRESET REPEAT PTY/EON TITTLE/EDIT ENTER DISPLAY /CHARA. CANCEL < > DOWN TAPE FM/AM VOLUME RDS allows FM stations to send an additional signal along with their regular program signals. For example, the stations send their station names, as well as information about what type of program they broadcast such as sports and music. -
Page 20: Searching For Programs By Pty Codes (Pty Search)
Continued Searching for Programs by PTY Codes (PTY Search) One of the RDS advantages is that you can locate a particular kind of program by specifying the PTY codes. • The PTY Search is applicable only to preset stations. • There is a time limit in doing the following steps. If the setting is canceled before you finish, start from step 1 again. - Page 21 How the EON function actually works: CASE 1 If there is no station broadcasting the program you have selected The unit continues tuning in the current station. « When a station starts broadcasting the program you have selected, the unit automatically switches to the station.
- Page 22 Continued Description of the PTY codes: News: News. Affairs: Topical program expanding or enlarging upon the news — debate or analysis. Info: Program the purpose of which is to impart advice in the widest sense. Sport: Program concerned with any aspect of sports.
-
Page 23: Playing Back A Cd
You can use Normal, Program, Random, or Repeat Play. • When using the buttons behind the sliding panel, press OPEN/CLOSE button on the AX-UXG6 to open the sliding panel first. • When using the remote control, press CD 6 (play/ pause) button first and 7 (stop) button successively. -
Page 24: Searching And Skipping Tracks
Continued Press 6 (play/pause) button on the CD unit. Each track of the CD starts playing one after another, and stops when the final track has finished playing. • To stop playing back for a moment, press 6 (play/pause) button on the CD unit. The playback time starts blinking in the display window. - Page 25 Press SET button to program the track number. Track number Program number Here the track number 2 on the CD is stored into a program number 1, and shortly after that the total playback time of programed tracks appears in the display window as follows: Total playback time Repeat steps 3 to 4 to program other tracks you...
-
Page 26: Playing At Random - Random Play
Continued Playing at Random — Random Play The tracks of the loaded CD will play in no special order (at random) when you select this mode. Place a CD. If the current playing source is not the CD, press 6 (play/pause) button on the CD unit, then 7 (stop) button before going to the next step. -
Page 27: Playing Back A Tape
Metal (Type IV) type tapes without further settings. • When using the inner buttons, press OPEN/CLOSE button on AX-UXG6 unit to open the sliding panel first. • When using the remote control, press TAPE 23 (playback) button first and 7 (stop) button successively. -
Page 28: Fast-Winding A Tape
Continued Press 7 (stop) button to stop playback the tape. Press 0 (open/close) button directly to stop and remove the tape. While the system is turned off (standby mode) Pressing ` (playback) or TAPE ` (playback) button automatically switches the system turned on and starts playback if a tape is already loaded. -
Page 29: Recording Onto A Tape
Recording onto a Tape PTY/EON TITTLE/EDIT ENTER DISPLAY /CHARA. CANCEL < > DOWN TAPE FM/AM VOLUME Two types of cassette tapes can be recorded onto, including normal (Type I), and High position (Type II) tapes. These types are identified automatically by the cassette deck unit and the recording level is also corrected automatically. -
Page 30: Recording In Auto Reverse
Continued REC indicator lights red to show the recording pause mode, and “TAPE REC” appears in the display window as follows, To change the recording source You cannot change the selected source during the recording pause mode. To exit from the recording pause mode, press 7 (stop) button on the cassette deck unit. -
Page 31: Synchronized Recording From A Cd
Synchronized Recording from a CD CD application on UX-G6R system can be recorded with a simple, one-touch operation. Place a recordable tape and a source CD into each tray. • To record using Dolby B NR, press the DOLBY B NR button before recording so that its lamp near the button lights orange. -
Page 32: Using The Timers
Using the Timers REMOTE CONTROL RM-SUXG6R PANEL OPEN/CLOSE DIMMER ACTIVE SLEEP BASS EX. CLOCK/TIMER BASS TREBLE FM MODE PLAY MODE REPEAT AUTO PRESET PTY/EON TITTLE/EDIT ENTER DISPLAY /CHARA. CANCEL < > DOWN TAPE FM/AM On UX-G6R system, three timer features are available — Recording Timer, Daily Timer, and Sleep Timer. -
Page 33: Using Daily Timer
Rotate MULTI JOG dial ( < / > button on the remote control also available) to select the minute of the timer-off time, then press SET button. Rotate MULTI JOG dial ( < / > button on the remote control also available) to select either “TUNER FM” or “TUNER AM,”... - Page 34 Continued Rotate MULTI JOG dial ( < / > button on the remote control also available) to select the minute of the timer-off time, then press SET button. Rotate MULTI JOG dial ( < / > button on the remote control also available) to select the source, then press SET button.
-
Page 35: Using Sleep Timer
Using Sleep Timer With Sleep Timer, you can fall asleep to your favorite music or radio program. How Sleep Timer actually works The system automatically turns off after the selected time length passes while playing any source. On the remote control only: Press SLEEP button on the remote control repeatedly to select the sleep timer. -
Page 36: Maintenance And Additional Information
Maintenance and Additional Information General Notes In general, you will have the best performance by keeping your CDs, cassette tapes and the mechanism clean. • Store CDs and cassette tapes in their cases, and keep them in cabinets or on shelves. •... -
Page 37: Handling Cassette Tapes
Handling Cassette Tapes Cautions regarding handling • Do not touch the surface of the tape or pull the tape out of the cassette. • Tape spooled loosely around the hubs is likely to jam in the pinch rollers and capstans. Before loading the tape into the cassette tray, take up the slack in the tape as shown below. -
Page 38: Troubleshooting
Troubleshooting If you are having a problem with your system, check this list for a possible solution before calling for service. If you cannot solve the problem from the hints given here, or the units has been physically damaged, call a qualified person, such as your dealer, for service. -
Page 39: Specifications
Specifications Stereo Amplifier AX-UXG6 Output power: 48 W (24 W + 24 W) at 6 (Max.) 42 W (21 W + 21 W) at 6 (10% THD) Load impedance: Audio output level/Impedance (at 1 kHz): Sub Woofer 800 mV/440 Power requirement:... - Page 40 VICTOR COMPANY OF JAPAN, LIMITED 1299JTMMDWJSC...