Table of Contents
Advertisement
1210-7201-01(i12010S)_V3.qxd:_
Ionization
Smoke Alarm
• 120V AC
• Sealed 3V Lithium Battery
Backup
• 2-LED Display
• Test/Hush
®
For questions concerning your Smoke Alarm, please call our
Product Support Line at 1-800-880-6788.
For your convenience, write down the following information. If you call
our Product Support Line, these are the first questions you will be asked:
Alarm Model Number
(located on back of the alarm):
Date of Manufacture
(located on back of the alarm):
Date of Purchase:
Where Purchased:
READ AND SAVE THIS USER GUIDE
P/N 1210-7201-01 REV.A EN
User Guide for Model i12010S
button
10 YEAR SMOKE ALARM
2014.2.20
GREEN-
STANDBY
3:19 PM
Page
Advertisement
Table of Contents

Related Manuals for Kidde i12010S


Summary of Contents for Kidde i12010S
-
Page 1: Smoke Alarm
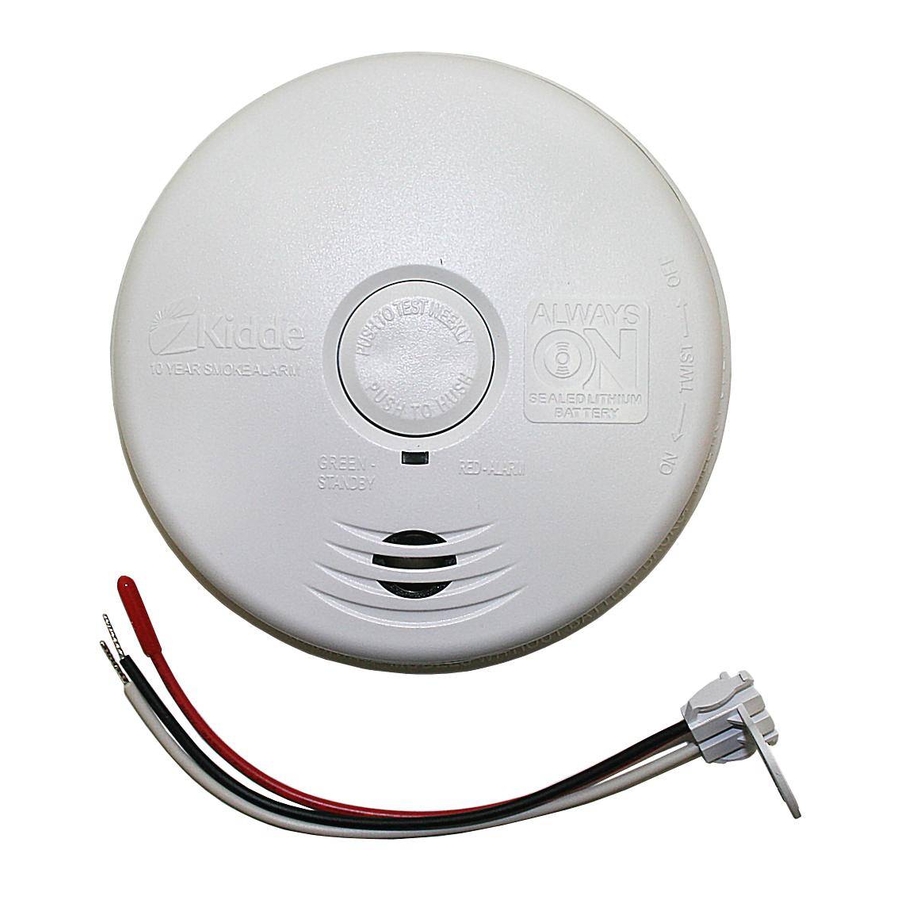
1210-7201-01(i12010S)_V3.qxd:_ 2014.2.20 3:19 PM Page User Guide for Model i12010S Ionization Smoke Alarm • 120V AC • Sealed 3V Lithium Battery Backup • 2-LED Display • Test/Hush button ® 10 YEAR SMOKE ALARM GREEN- STANDBY For questions concerning your Smoke Alarm, please call our Product Support Line at 1-800-880-6788. -
Page 2: Table Of Contents
1210-7201-01(i12010S)_V3.qxd:_ 2014.2.20 3:19 PM Page Table of Contents Introduction ......Page 1 Product View ......Pages 2-3 Features . -
Page 3: Introduction
Introduction Thank you for purchasing the Kidde Smoke Alarm model # i12010S. This alarm is suitable as a Single Station and/or Multiple Station (24 devices) alarm. This alarm has a ten-year limited warranty. Please take a few minutes to thoroughly read this user guide, and save for future reference. -
Page 4: Product View
1210-7201-01(i12010S)_V3.qxd:_ 2014.2.20 3:19 PM Page Product View FRONT RED AND GREEN LED 10 YEAR SMOKE ALARM GREEN- STANDBY ALARM SOUNDER... - Page 5 1210-7201-01(i12010S)_V3.qxd:_ 2014.2.20 3:19 PM Page Product View BACK...
-
Page 6: Features
• Ionization smoke sensor. • Powered by 120V AC (60 Hz, 45mA max) wire-in connector . • Interconnectable to other Kidde/Nighthawk brand smoke and CO alarms (see page 15 for details). SMOKE ALARM: The alarm pattern is three long alarm beeps, which will repeat until the smoke is eliminated. - Page 7 Home fires develop in different ways and are often unpredictable. For maximum protection, Kidde recommends that both Ionization and Photoelectric alarms be installed. • A battery powered alarm must have a battery of the specified type, in good condition and installed properly.
-
Page 8: Installation Instructions
TABLETOP DEVICE! INSTALL ONLY AS DETAILED! A. Recommended Installation Locations: Kidde Safety recommends the installation of a Smoke Alarm in the following locations. For maximum protection we suggest an alarm be installed on each level of a multilevel home, including every bedroom, hallways, finished attics and basements. -
Page 9: Recommended Installation Locations
1210-7201-01(i12010S)_V3.qxd:_ 2014.2.20 3:19 PM Page Installation Instructions Sloped Ceiling Installation: The following information is from the National Fire Protection Association and is listed in Fire Code 72. Install Smoke Alarms on sloped, peaked or cathedral ceilings at, or within 3 ft (0.9m) of the highest point (measured horizontally). -
Page 10: Where Not To Install
1210-7201-01(i12010S)_V3.qxd:_ 2014.2.20 3:19 PM Page Installation Instructions through poorly insulated walls and roof. This may cause a thermal barrier, which can prevent smoke from reaching an alarm mounted on the ceiling. In such mobile homes install your Smoke Alarm on an inside wall with the top edge of the alarm at a minimum of 4 inches (10cm) and a maximum of 12 inches (30.5cm) below the ceiling (see figure 2). -
Page 11: Step 2: Wiring Instructions
1210-7201-01(i12010S)_V3.qxd:_ 2014.2.20 3:19 PM Page Installation Instructions electronic noise may cause nuisance alarms. Do not place in direct sunlight and keep out of insect infested areas. Extreme temperatures will effect the sensitivity of the Smoke Alarm. Do not install in areas where the temperature is colder than 40 degrees Fahrenheit (4.4˚... - Page 12 • When alarms are interconnected, all interconnected units must be powered from a single circuit. • A maximum of 24 Kidde Safety devices may be interconnected in a multiple station arrangement. The interconnect system should not exceed the NFPA interconnect limit of 12 smoke alarms and/or 18 alarms total (smoke, CO, Smoke/ CO Combination, heat, etc.).
-
Page 13: Step 3: Mounting Instructions
1210-7201-01(i12010S)_V3.qxd:_ 2014.2.20 3:19 PM Page Installation Instructions Step 3 Mounting Instructions: CAUTION: YOUR SMOKE ALARM IS SEALED AND THE COVER IS NOT REMOVABLE! 1. To help identify the date to replace the unit, write the "Replace by" date (10 years from initial power up) in permanent marker in the space provided on the side of the alarm. -
Page 14: Step 4: Testing The Alarm
AC power failure. • This unit is only approved to interconnect with other Kidde/Nighthawk products. It is NOT approved to interconnect with any other brand of detection product. • This alarm is interconnect compatible with the following alarms and accessories: –Smoke alarms: 1235, 1275, 1276, 1285, i12020, i12020A,... -
Page 15: Smoke Hush Control Feature
1210-7201-01(i12010S)_V3.qxd:_ 2014.2.20 3:19 PM Page Operating Instructions • For more information about compatible interconnect units and their functionality in an interconnect system, visit our web site at www.kidde.com. Smoke HUSH Control Feature The HUSH feature has the capability of temporarily desensitizing the smoke alarm circuit for approximately 9 minutes. - Page 16 1210-7201-01(i12010S)_V3.qxd:_ 2014.2.20 3:19 PM Page Operating Instructions -Green LED The green LED will flash as described below under the following conditions: – Standby Condition (powered by AC and battery backup): The LED will be constantly on. – Standby Condition (powered by only battery backup): The LED will flash every 60 seconds.
-
Page 17: Tamper Resist Feature
1210-7201-01(i12010S)_V3.qxd:_ 2014.2.20 3:19 PM Page Operating Instructions Tamper Resist Feature To make your smoke alarm tamper resistant, a tamper resist feature has been provided. Activate the tamper resist feature by breaking off the four posts in the square holes in the trim ring (see figure 5A). -
Page 18: What To Do If The Alarm Sounds
It’s advisable to inquire about any applicable fees prior to having the service performed. Kidde Safety will not pay for, or reimburse, the owner or user of this product, for any repair or... -
Page 19: Alarm Removal/Battery Information
1210-7201-01(i12010S)_V3.qxd:_ 2014.2.20 3:19 PM Page Battery Information Alarm Removal IF TAMPER RESIST FEATURE HAS BEEN ACTIVATED, REFER TO TAMPER RESIST FEATURE DESCRIPTION ON PAGE 17 FOR REMOVAL INSTRUCTIONS. Remove the alarm from the mounting bracket by rotating the alarm in the direction of the “OFF” arrow on the cover. -
Page 20: Deactivation Of Alarm
1210-7201-01(i12010S)_V3.qxd:_ 2014.2.20 3:19 PM Page DEACTIVATION OF ALARM ! WARNING: a. When disposing of the alarm, the alarm must be deactivated which discharges the battery to a safe level for disposal. b. Deactivation of the alarm is permanent. Once the alarm has been deactivated, it cannot be reactivated! c. -
Page 21: General Alarm Maintenance
1210-7201-01(i12010S)_V3.qxd:_ 2014.2.20 3:19 PM Page General Maintenance To keep your Smoke Alarm in good working order, please follow these simple steps: • Verify the unit's alarm and LED lights operation by pushing the test/reset button once a week. • Remove the unit from mounting bracket and vacuum the alarm cover and vents with a soft brush attachment once a month to remove dust and dirt. -
Page 22: Fire Safety Information
1210-7201-01(i12010S)_V3.qxd:_ 2014.2.20 3:19 PM Page Fire Safety Information Escape Plan Familiarize everyone with the sound of the smoke alarm and train them to leave the home when they hear it. Practice a fire drill at least every six months, including fire drills at night. Ensure that small children hear the alarm and wake when it sounds. -
Page 23: Industry Safety Standards
1210-7201-01(i12010S)_V3.qxd:_ 2014.2.20 3:19 PM Page Industry Safety Standards NFPA (National Fire Protection Association) your information, National Fire Protection Association’s Standard 72, reads as follows: Smoke Detection. Where required by applicable laws, codes, or standards for the specified occupancy, approved single-... -
Page 24: Nrc
1210-7201-01(i12010S)_V3.qxd:_ 2014.2.20 3:19 PM Page Industry Safety Standards Ionization type smoke alarms use a very small amount of a radioactive element in the sensing chamber to enable detection of visible and invisible combustion products. The radioactive element is safely contained in the chamber and requires no adjustments or maintenance. -
Page 25: Limited Warranty And Service Information
Limited Warranty TEN YEAR LIMITED WARRANTY KIDDE warrants that the enclosed alarm will be free from defects in material and workmanship or design under normal use and service for a period of ten years from the date of purchase. The... - Page 26 2014.2.20 3:19 PM Page Limited Warranty and Service Information Your Kidde Smoke Alarm is not a substitute for property, fire, disability, life or other insurance of any kind. Appropriate insurance coverage is your responsibility. Consult your insurance agent. Removal of the front cover will void the warranty.
- Page 27 3:19 PM Page tion QUESTIONS OR FOR MORE INFORMATION Call our Product Support Line at 1-800-880-6788 or contact us at our website at www.kidde.com Kidde 1016 Corporate Park Drive, Mebane, NC 27302 Custom Assembled in China with U.S. and Foreign Components...