Table of Contents

Related Manuals for Grundig DRS 100 CL


Summary of Contents for Grundig DRS 100 CL
- Page 1 Grundig SAT Syst ms Digital Satellite Receiver DRS 100 CI Phone: +49 (0) 911 / 703 8877 Grundig SAT Systems GmbH Fax: +49 (0) 911 / 703 9210 Beuthener Strasse 43 E-mail: info@gss.tv D-90471 Nuremberg, Germany Internet: http://www.gss.tv...
-
Page 2: Table Of Contents
Contents Index ..........................4 1 General information ....................5 Package contents ..................5 Accessories for satellite receivers..............5 Digital satellite reception ................5 Special features of your digital receiver ............5 The common interface .................6 2 Set-up and safety ......................6 3 Your device at a glance .....................7 The digital receiver ..................7 3.2 The SAT mouse ...................8 3.3 The remote control ..................8... - Page 3 7 Basic functions ......................22 Adjusting the volume .................22 Muting ....................22 Selecting channels – numerical preset channel selection........22 Preset AV channel ..................23 Selecting channels from the TV/radio channel lists ........23 Selecting channels from the list ..............23 Alphanumerical program selection – entering letters ........23 Selecting locked channels .................24 Zapping function ..................24 7.10 Selecting the audio channel ...............24...
-
Page 4: Index
Index Application of data .... 29 GMT .........14 Satellite antenna ....11 Satellite antennas....17 Satellites ......18 SAT mouse ..... 8, 11 Backward ......31 Information on reception..35 Scart cable ......5 Batteries low ....... 9 Screen format .....15 Blocking channels ....21 Sleep timer ...... -
Page 5: General Information
You can find out more about the extensive GSS range of accessories for satellite receiv- ing devices at your specialist dealer or at the website of Grundig SAT Systems GmbH: http://www.gss.tv. Digital satellite reception To use this device you need a satellite receiving device that must be prepared for receiv- ing digital signals. -
Page 6: Set-Up And Safety
Set-up and safety • This digital receiver set is designed to receive and display video and audio signals. Any other use is expressly prohibited. • When setting up the device, make sure the mains socket is easily accessible. • If the digital receiver is subject to a sudden change in temperature, for example when brought in from the cold to a warm room, let it stand for at least two hours before you connect it to the mains supply. -
Page 7: Your Device At A Glance
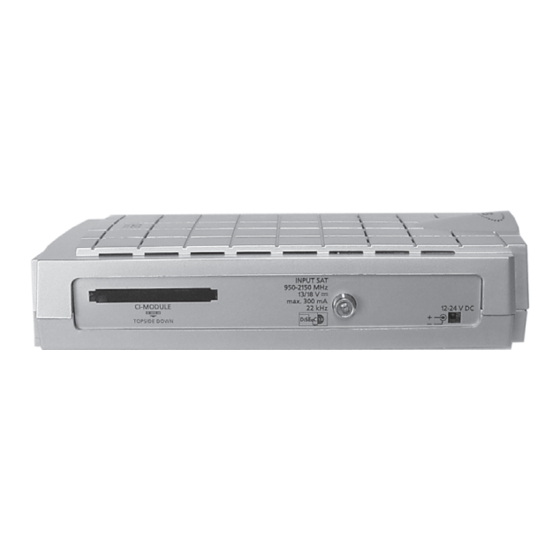
Your device at a glance The digital receiver CI MODULE Common interface slot. INPUT SAT Antenna socket for the satellite antenna. 12-24 V DC Socket for the supplied mains adapter. RECORDER Euro AV socket (input and output) for the video or DVD recorder Euro AV (output) socket for the television. -
Page 8: The Sat Mouse
The SAT mouse The SAT mouse receives the infrared signals for the remote con- trol and forwards the commands via cable to the receiver. • Position the SAT mouse visibly so that it can receive the com- mands by the remote control. Note: –... -
Page 9: Remote Control Level
Inserting batteries in the remote control • Open the battery compartment and remove the lid. • Insert the batteries (Mignon, e.g. UM-3 or AA, 2 x 1.5 V). Observe the polarity marked in the battery compartment base. • Close the battery compartment. Notes: –... -
Page 10: Connecting The Device
Switching the remote control to SAT 2 level You can switch the remote control permanently to the SAT 2 remote control level. • Press the button SAT and hold. • At the same time press the buttons 4, 5, 6. To return to SAT 1 remote control level •... -
Page 11: Connecting The Satellite Antenna
Connecting the satellite antenna • Connect the antenna cable to the INPUT SAT socket on the digital receiver (screw connector, F-connector). Connecting the television • Plug the Euro-AV cable into the TV socket on the digital receiver and into the corresponding Euro-AV socket on the television. -
Page 12: Connecting The Hifi System
Connecting the hifi system • Plug a commercial cinch cable into the AUDIO OUT R L (right/left) sockets on the digital receiver and the cor- responding input sockets on the hifi system. Connecting the digital multi-channel amplifier (SPDIF) • Remove the socket cover. •... -
Page 13: Preparations
Preparations Note: Your digital receiver was set at the factory so that it is ready for operation once you have connected it and to receive Astra channels. If required, you only need to cor- rect the local time difference, adjust the LNB settings for receiving more satellites and select the menu language (default is “German”, “Single LNB”). -
Page 14: Setting The Menu Language
– On closing the menu function, your settings are automati- cally saved. – You return to the previous menu via Z. – To close the menu function press MENU. Note: In menu mode, you cannot press to switch the digital receiver to standby. -
Page 15: Adjusting The Digital Receiver To The Television Set
Adjusting the digital receiver to the television set Setting the video signal for the Euro-AV output You can choose between the settings “ CVBS” (normal pic- ture quality, factory setting), “ RGB” (high picture quality) and “ YUV” (e.g. for a connected beamer or LCD TV set). ▼... -
Page 16: Automatic Picture Format Identification
Automatic picture format identification If problems with the automatic picture format switchover (e.g. 4:3, 16:9, Letterbox) arise with the connected device, you can switch off Wide-Screen-Signaling (WSS) in this menu. ▼ ▲ • Use in the main menu to select “System Setup” and TV Setup press OK to confirm. -
Page 17: Adjusting The Digital Receiver To The Satellite Antenna
Adjusting the digital receiver to the satellite antenna This digital receiver was factory set so that it is ready for operation with most satellite an- tennas and LNB configurations. Changes in this menu have a direct effect on the reception characteristics of the digital receiver and should therefore only be made by an expert. - Page 18 ◀ ▶ • Use to place the cursor under the number to be changed. —> Enter value with 1 … 0. • Press OK to confirm. • To return to the previous menu: press the Z button. • To finish your setting: press MENU. Receiving signals from two or more satellites ▼...
-
Page 19: Reception Of Signals From Encoded Satellite Channels
Reception of signals from encoded satellite channels This digital receiver has a common interface (CI) slot. It allows you to connect a CI module for various encryption systems and broadcasting stations. Encoded channels can only be viewed with a CI module suitable for the encoding system and the corre- sponding smart card. -
Page 20: Editing Channel Lists
Editing channel lists This menu is for changing the order of the preset TV and RA (Radio) channels as desired, deleting channels you do not need and locking channels. You can select your favourite channels and save them in four separate lists of favourites. •... -
Page 21: Deleting Channels
Deleting channels Note: If a channel is deleted from a TV or radio channel (RA) list, it is also deleted from the list of favourites. If a channel is deleted from one of the lists of favourites, the channels still remain in the TV / radio channel list. •... -
Page 22: Undoing The Channel Lock
Undoing the channel lock • Select the locked channel in the channel list with TV/R and ▼ ▲ • Press the (blue) button – “Input Password” appears. • Enter the password with 1 … 0. • Confirm the “undo” channel lock action with MENU. Basic functions Adjusting the volume Notes:... -
Page 23: Preset Av Channel
Preset AV channel As soon as the set connected to the socket “RECORDER” is activated and provides a switching voltage the Digital Re- ceiver switches to AV operation. • To select a preset AV channel manually: press the 0 button. –... -
Page 24: Selecting Locked Channels
Selecting locked channels If you select a locked channel, you will only see the chan- nel name with a key symbol. By entering the password, you can activate locked channels until the next time the device is switched off (see also page 22, chapter “Undoing the chan- nel lock”). -
Page 25: Teletext
Note: If a stereo transmission is faulty, the left stereo channel might transmit a different language than the right one. • Use A/B to change stereo channels. 7.11 Teletext Teletext is a service offered by some broadcasters that is provided along with the video and audio signals. These signals are converted by the digital receiver and can be displayed on the TV screen as teletext. -
Page 26: Updating The Channel List
Updating the channel list Preset channel lists This digital receiver was programmed at the factory with most digital TV and RADIO channels on the Astra 19.2° East, EutelSat/Hotbird 13° East and Turksat 1C satellites. You can open the corresponding lists in the “Channel List” ◀... - Page 27 Manual Channel search If the channel search does not automatically find a particu- Main Menu lar channel, you can set it using the manual search. To do 1 Channel List 2 System Setup so, enter all the parameters of the channel you are looking 3 Channel Search for.
-
Page 28: Electronic Programme Guide (Epg)
Electronic programme guide (EPG) The electronic programme guide provides information on the current programme such as the title and a short descrip- tion. You can also list the following programmes and call up the corresponding descriptions. Displaying programme information • To display information on the current programme: Press the EPG button. -
Page 29: Timer Functions
10 Timer functions Your digital receiver has a sleep timer for switching off your device at a defined time. Furthermore your digital receiver has 6 timer positions that you can set manually or automatically by applying the data selected in the EPG. 10.1 Entering the switch-off time for the sleep timer ▼... - Page 30 ▼ ▲ • Use or 0 … 9 to set the day of switching on. Move the TIMER Date Prog Start Stop ▼ ▲ or 0 … 9 to set the month. cursor on (month) and use Timer 1 22/07 TV 0001 22:00 –...
-
Page 31: Setting (Lead Time / Follow-Up Time) Options
Note: – If you want to record channels via your video or DVD re- corder, these devices must be programmed accordingly. – If you use the electronic programme guide (EPG), the data is transferred automatically. 10.4 Setting ( lead time / follow-up time) options This menu enables the individual shifting of the actual switch-on and switch-off times in both directions (lead time and follow-up time), regardless of the preset switch-on and... -
Page 32: Special Functions
11 Special functions 11.1 Hotel mode – The “Hotel Mode” menu is for locking all access to the menus and limiting the volume to a maximum level. – The default password is “0 0 0 0”. 11.1.1 Locking the menu ▼... -
Page 33: Removing The Menu Lock
11.1.3 Removing the menu lock • Press the Menu button for approx. 5 seconds. • Enter the 4-digit password. ▼ ▲ • In the main menu that appears use to select “System Setup” and press OK to confirm. ▼ ▲ •... -
Page 34: Updating Software
11.4 Updating software The software for the digital receiver is provided by the Astra 19.2° East satellite. The digital receiver is designed so that you can update its operating software and certain channel information directly using this satellite. ▼ ▲ •... -
Page 35: Deleting Channel Lists
11.5 Deleting channel lists You can completely delete channels from the channel lists and lists of favourites. ▼ ▲ • Use in the main menu to select “System Setup” and System Setup press OK to confirm. 1 LNB System 2 TV Setup ▼... -
Page 36: Technical Data
If a malfunction should nevertheless occur, please consult your specialist dealer or con- tact the point of sale where you purchased the device. Therefore always keep your sales receipt. Warranty claims cannot be made directly to GSS - Grundig SAT Systems GmbH! - 36 - - 36 -... -
Page 37: Troubleshooting
12.5 Troubleshooting Please observe the following information first in the event of an error. If you are unable to rectify the fault using the information given here, please contact your local dealer or service specialist. Never under any circumstances attempt to repair the digital receiver yourself. - Page 38 Subject to change. Technical data subject to change. Alterations reserved. Technical data E. & O.E. © by GSS GmbH 13012006...