GE Profile PVM1790SRSS Installation And Owner's Manual
Profile series 1.7 cu. ft. convection over-the-range microwave oven
Hide thumbs
Also See for Profile PVM1790SRSS:
- Installation manual (257 pages) ,
- Owner's manual (76 pages) ,
- Installation instructions manual (48 pages)
Table of Contents
Advertisement
Advertisement
Chapters
Table of Contents

Related Manuals for GE Profile PVM1790SRSS


Summary of Contents for GE Profile PVM1790SRSS
-
Page 2: Microwave Oven
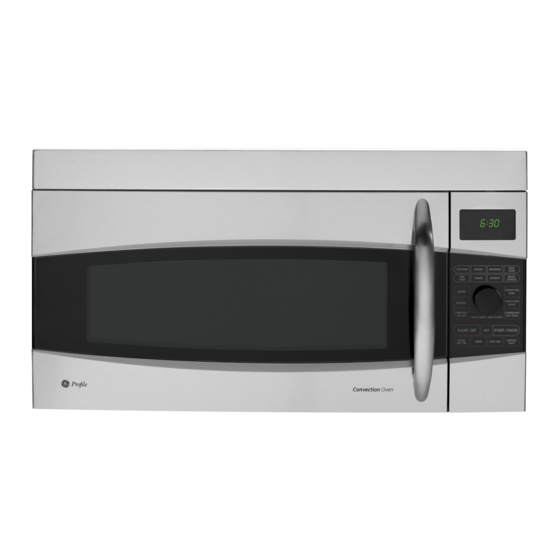
GE Profile™ Series 1.7 Cu. Ft. Convection Over-the-Range Microwave Oven Model# PVM1790SRSS FEATURES Control Type Touchpads Dial Display On/Off Electronic Digital Display with Clock Scrolling Variable Scroll Speed 5 speeds (sub-pad w/ AM/PM) Cooking Modes Microwave Convection Bake Warm FastBake... - Page 3 Microwave Oven Interior Stainless Steel Microwave Watts (IEC-705) 1000.0 Have more questions? Please contact 1-800-626-2005...
- Page 4 GE Profile™ Series 1.7 Cu. Ft. Convection Over-the-Range Microwave Oven Model# PVM1790SRSS APPROXIMATE DIMENSIONS (HxDxW) • 16 7/16 in x 15 3/8 in x 29 15/16 in CAPACITY • Total Capacity (cubic feet) 1.7 cu ft WARRANTY • Parts Warranty - Limited 1-year entire appliance Limited 5-year magnetron tube •...
- Page 5 1/2-inch. For answers to your Monogram, GE Profile ® ™ ® appliance questions, visit our website at ge.com or call GE Answer Center service, ® 800.626.2000. Listed by Underwriters Laboratories Specification Revised 12/11...
- Page 6 PVM1790DR/SR GE Profile 1.7 Cu. Ft. Capacity Over-the-Range Microwave Oven ™ Optional Accessories (Available at additional cost) Filter Kits Filler Panel Kits JX40/41 JX81D–Recirculating Hood Exhaust Duct: Outside ventilation requires a HOOD EXHAUST DUCT. Read the Charcoal Filter Kit following carefully. To be used when the Spacemaker Exhaust Connection: The hood exhaust has been designed to mate with a standard microwave oven When replacing a 36"...
- Page 7 Conversion - Just set the controls according to the recipe ™ and the oven automatically converts standard recipe temperatures to PVM1790SR proper convection settings • S tainless steel interior - Stainless steel interior is both stylish and easy to clean • Model PVM1790DRWW – White • Model PVM1790DRCC – Bisque • Model PVM1790DRBB – Black • Model PVM1790SRSS – Stainless steel Specification Revised 12/11 240273...
- Page 10 Ensure proper ground exists before use...
- Page 11 EQUIVALENT NUMBER EQUIVALENT DUCT PIECES LENGTH USED LENGTH Roof Cap 24 Ft. 24 Ft. 12 Ft. Straight Duct 12 Ft. 12 Ft. (6 Round) Rectangular-to-Round 5 Ft. 5 Ft. Transition Adaptor* Equivalent lengths of duct pieces are based on actual tests and reflect requirements for good venting performance with any vent hood.
- Page 12 EQUIVALENT NUMBER EQUIVALENT DUCT PIECES LENGTH USED LENGTH Rectangular-to-Round 5 Ft. Transition Adaptor* Wall Cap 40 Ft. 90° Elbow 10 Ft. 45° Elbow 5 Ft. 90° Elbow 25 Ft. 45° Elbow 5 Ft. Roof Cap 24 Ft. Straight Duct 6 Round or 1 Ft.
- Page 13 PART QUANTITY Top Cabinet Template Rear Wall ≤ ≤ Template ≤ Installation Instructions PART QUANTITY Wood Screws ⁄ x 2 ) Toggle Bolts (and Separately wing nuts) ( ⁄ x 3 ) Packed Grease Filters Self-aligning Machine Screw ( ⁄ -28 x 2 ⁄...
- Page 14 Ruler or tape measure and straight edge Pencil Carpenter square # 1 and #2 Phillips screwdriver (optional) Tin snips (for cutting damper, if required) Scissors Electric drill with ⁄ ⁄ (to cut template, if necessary) ⁄ ⁄ drill bits Filler blocks or scrap wood pieces, if needed for top cabinet spacing (used on recessed bottom...
- Page 15 Wall Studs Center Carton Styrofoam...
- Page 16 Mounting Plate Tabs Mounting Plate Tabs Touching the Back Touching the Cabinet Bottom Frame 30 to Cooktop Mounting Plate with Tabs Below Cabinet Bottom the Same Distance as the Front Overhang Depth 30 to Cooktop...
- Page 17 Hole B Draw a Vertical Hole A Line on Wall from Center of Top Cabinet Hole D Hole C Area E...
- Page 18 Adaptor in Place for Outside Top Exhaust...
- Page 19 Spacing for Toggles More Than Wall Thickness Toggle Wings Mounting Toggle Plate Bolt Wall Bolt End...
- Page 20 Damper Exhaust Adaptor Blower Plate Back of Oven...
- Page 21 Damper Back of Oven House Duct Cabinet Front Cabinet Bottom Shelf Filler Block This distance can NOT Equivalent exceed 2” to to Depth of ensure proper Cabinet Recess installation Self-Aligning Screw Oven Top...
- Page 23 Spacing for Toggles More Than Wall Thickness Toggle Wings Mounting Toggle Plate Bolt Retaining Flange Wall Blower Plate Bolt End Blower Motor Screw End B End A Before Rotation After Rotation Back of Back of Oven Oven Before Rerouting After Rerouting Wires Routed Through Left Side Wires Routed Through Right Side...
- Page 24 Blower Plate Screws Before Rolling After Rolling Blower Plate Back of Oven Back of Back of Oven Oven Exhaust Adaptor Snip all 4 webs Exhaust Adaptor Damper on each knockout (hinge side up) panel and remove the metal knockouts for rear airflow. Slide exhaust adaptor into guides on...
- Page 25 Cabinet Front Cabinet Bottom Shelf Filler Block This distance can NOT Equivalent exceed 2” to to Depth of ensure proper Cabinet Recess installation Self-Aligning Screw Oven Top...
- Page 26 Spacing for Toggles More Than Wall Thickness Toggle Wings Mounting Toggle Plate Bolt Wall Bolt End...
- Page 27 Blower Plate Screws Back of Oven Retaining Flange Roll Blower Plate Blower Motor Screw...
- Page 28 Blower Plate Screws Back of Oven Blower Motor Screw...
- Page 29 Cabinet Front Screws Cabinet Bottom Shelf Filler Block Grille This distance can NOT Equivalent exceed 2” to to Depth of ensure proper Cabinet Recess installation Self-Aligning Screw Oven Top Front lower tabs Charcoal filter Charcoal filter installed...
- Page 30 Ensure proper ground exists before use.
- Page 37 ≤ ≤ ≤...
- Page 56 1/2-inch. For answers to your Monogram, GE Profile ® ™ ® appliance questions, visit our website at ge.com or call GE Answer Center service, ® 800.626.2000. Listed by Underwriters Laboratories Specification Revised 12/11...
- Page 57 PVM1790DR/SR GE Profile 1.7 Cu. Ft. Capacity Over-the-Range Microwave Oven ™ Optional Accessories (Available at additional cost) Filter Kits Filler Panel Kits JX40/41 JX81D–Recirculating Hood Exhaust Duct: Outside ventilation requires a HOOD EXHAUST DUCT. Read the Charcoal Filter Kit following carefully. To be used when the Spacemaker Exhaust Connection: The hood exhaust has been designed to mate with a standard microwave oven When replacing a 36"...
- Page 58 Conversion - Just set the controls according to the recipe ™ and the oven automatically converts standard recipe temperatures to PVM1790SR proper convection settings • S tainless steel interior - Stainless steel interior is both stylish and easy to clean • Model PVM1790DRWW – White • Model PVM1790DRCC – Bisque • Model PVM1790DRBB – Black • Model PVM1790SRSS – Stainless steel Specification Revised 12/11 240273...
- Page 67 EVERAGE OPCORN EHEAT ICRO OWER EFROST XPRESS ONVECTION ONVECTION OAST OMBI TART LEAR AUSE URNTABLE PTIONS ON/OFF URFACE LOCK IMER IGHT AM/PM...
- Page 71 BEVERAGE...
- Page 75 REHEAT...
- Page 81 START / PAUSE CLEAR / OFF CLEAR / OFF...
- Page 103 EVERAGE OPCORN EHEAT ICRO OWER EFROST XPRESS ONVECTION ONVECTION OAST OMBI TART LEAR AUSE URNTABLE PTIONS ON/OFF URFACE LOCK IMER IGHT AM/PM...
- Page 108 BEVERAGE...
- Page 114 REHEAT...
- Page 120 START / PAUSE...
- Page 121 CLEAR / OFF CLEAR / OFF...
- Page 136 CR424BL 3.0" x 24.0" x 20.5" (H x W x D) 24" wide 4-burner electric cooktop in smooth black ceramic glass finish Highlights: 24" width is ideally sized for many hard-to-fill cutouts Smooth black finish in Schott Ceran glass offers easy cleanup Four 1200W burners made by E.G.O.
- Page 137 Specifications: Cutout Width 22.13" Cutout Height 2.5" Cutout Depth 18.63" Height 3.0" Width 24.0" Depth 20.5" Countertop Cutout Width 22.13" Countertop Cutout Depth 18.63" US Electrical Safety Amps 21.0 Voltage/Frequency 220 V AC/60 Hz Canadian Electrical Safety Burner Type Glasstop Number of Burners Heating Type Radiant...
-
Page 138: Instruction Manual
INSTRUCTION MANUAL for 4-Burner Electric Cooktop Model CR424 Felix Storch, Inc. Summit Appliance Division 770 Garrison Avenue Bronx, NY 10474 www.summitappliance .com... -
Page 139: Table Of Contents
Page 1 Please read these instructions in their entirety before installation and use of your cooktop. SAVE THIS MANUAL FOR FUTURE REFERENCE. Table of Contents Technical Information ..................1 Safety Instructions..................2 - 3 Installation Instructions ................4 - 9 Unpacking the Cooktop ................4 Checking the Electrical Supply Requirements ........... -
Page 140: Safety Instructions
Page 2 SAFETY INSTRUCTIONS Read this section BEFORE operating the cooktop. This cooktop, like all appliances, has the potential to create safety problems through careless and improper use. Please observe all of the following safety precautions. Proper Installation Be sure your appliance is properly installed and grounded by a qualified technician. -
Page 141: Save These Instructions
Page 3 potholder touch the heating elements on the appliance. Do not use a towel or other bulky cloth in place of a potholder. Do not cook on a broken cooktop. If your cooktop should break, cleaning solutions and spillovers may penetrate the broken cooktop and create a risk of electric shock. -
Page 142: Installation Instructions
Page 4 Installation Instructions IMPORTANT! Save this manual for review by local inspector. This appliance must be properly installed and grounded by a qualified technician. 1. Unpacking the Cooktop Carefully unpack the cooktop from its shipping container. If possible, keep the original shipping carton and protective packaging in the event the unit has to be returned for service. -
Page 143: Preparing The Countertop
Page 5 3. Preparing the countertop Please read this section prior to making a cutout in your counter for the cooktop. It is important to plan ahead for installation of the cooktop, keeping the following dimensions in mind. (Please refer to Fig. A.) A. - Page 144 Page 6 Before making the countertop cutout, check for clearance. See if the cooktop will clear the front and side walls of the base cabinet. It is also important to provide enough ventilation. Adequate ventilation of the space below the countertop must be provided to ensure proper operation of the cooktop.
-
Page 145: Installing The Cooktop
Page 7 4. Installing the Cooktop The cooktop should be bedded to the countertop using a soft bedding compound that will prevent damage if later removal for service is necessary. A very small bead of silicone sealant should be laid around the edges of the cutout. Installation of the cooktop into the countertop... - Page 146 Page 8 5. Electrical Connection Before proceeding further, verify that the power supply is disconnected. Verify that the appropriate electrical supply requirements have been met. Please refer to the table on page 4 for appropriate electrical requirements. The cooktop is supplied with a 48-inch long conduit for a connection to an accessible junction box.
-
Page 147: Final Preparations Prior To Use
Page 9 6. Final Preparations Prior to Use Remove the plastic film from the cooktop. Clean the cooktop before you use it for the first time. A thorough cleaning with a recommended cooktop cleaner will provide a clean, shiny coating on the cooktop surface. The next sections of the manual cover cooktop use, maintenance and service information. -
Page 148: Controls & Indicators
Page 10 temperature limiter will cycle the radiant element on and off to prevent exceeding the maximum safe surface temperature. Controls & Indicators Each of the cooking area controls has an infinite selection of heat settings. The control settings begin at low and increase heat output by cycling the heating elements between OFF and full power as you turn the knob clockwise. -
Page 149: Warranty
Page 11 ONE-YEAR LIMITED WARRANTY Within the 48 contiguous United States, for one year from the date of purchase, when this appliance is operated and maintained according to instructions attached to or furnished with the product, warrantor will pay for factory-specified parts and repair labor to correct defects in materials or workmanship. -
Page 150: Helpful Tips
www.summitappliance.com How To Clean Your Glass Cooktop To maximize the lifespan and maintain the great look of your smoothtop electric cooktop or range, follow these quick and simple steps to keep the cooktop surface clean: Make sure the cooktop surface has completely cooled down before cleaning ... - Page 154 12/1/13 SANYO :: LCD Televisions :: 42" Diagonal LCD FULL HDTV 1080p SANYO Manufacturing C orporation 42" Diagonal LCD FULL HDTV 1080p DP42840 Overview Features Downloads SANYO 42" Diagonal Full HD 1080p LCD Model DP42840 with integrated ATSC Digital and NTSC Analog Tuner is the latest technology for the digital age.The digital tuner is Digital Clear QAM capable of receiving unscrambled digital cable.
- Page 155 12/1/13 SANYO :: LCD Televisions :: 42" Diagonal LCD FULL HDTV 1080p Native Panel Resolution: 1920 x 1080 pixels Wide Viewing Angles:178 H x 178 V Degrees Integrated Digital Clear QAM ATSC + Analog NTSC Tuner 191 Total channels Receives ATSC signal formats (including 480i/p, 720p and 1080i/p) converted to 1080p display 3D Y/C Digital Comb Filter MTS/SAP Stereo &...
- Page 156 12/1/13 SANYO :: LCD Televisions :: 42" Diagonal LCD FULL HDTV 1080p HDMI, the HDMI logo and High-Definition Multimedia Interface are trademarks or registered trademarks of HDMI Licensing LLC in the United States and other countries. Design and specifications subject to change without notice, errors, and omissions. C opyright ©...
- Page 157 12/1/13 SANYO :: LCD Televisions :: 42" Diagonal LCD FULL HDTV 1080p SANYO Manufacturing C orporation 42" Diagonal LCD FULL HDTV 1080p DP42840 Overview Features Downloads Native Panel Resolution: 1920 x 1080p pixels(WXGA) Picture Brightness: 500 cd/m2 Contrast Ratio: 4000:1 Response Time: 6.5 ms Viewing Angle: H:178 x V:178 Digital Scanning Display: Receives ATSC signal formats (including 480i/p, 720p and...
- Page 158 12/1/13 SANYO :: LCD Televisions :: 42" Diagonal LCD FULL HDTV 1080p 7-Picture Menu:(5 Preset, Manual, Advanced Manual) Comb Filter: 3D Y/C Digital Noise Reduction Signal Balancer Dynamic Contrast (adjustment in Menu) Expanded DNR V Sharpness Edge Enhancer White Balance 3:2 Pull down XDS Extended Data Service Clock On Timer...
- Page 159 12/1/13 SANYO :: LCD Televisions :: 42" Diagonal LCD FULL HDTV 1080p 1 Coaxial Digital Audio Output 1 Fixed Analog Audio Out (R/L) Detachable Stand / Vesa 400 x 400 Wall Mountable (with optional kit not supplied) Power: 120v AC, 60hz Power Rating: 178 Watts UL Rated Dimensions w/stand: 39.8"W x 27.7"H x 12.1"D, 39.0 lbs.
-
Page 161: Important Safety Instructions
CAUTION THIS SYMBOL INDICATES THAT DANGEROUS VOLTAGE CONSTITUTING A RISK OF ELECTRIC SHOCK IS PRESENT WITHIN THIS UNIT. RISK OF ELECTRIC SHOCK DO NOT OPEN! THIS SYMBOL INDICATES THAT THERE ARE IMPORTANT OPERATING AND CAUTION: TO REDUCE THE RISK OF ELECTRIC SHOCK, DO NOT REMOVE COVER (OR BACK). -
Page 162: Fcc Information
FCC INFORMATION This equipment has been tested and found to comply with the limits for a Class B digital device, pursuant to Part 15 of the FCC Rules. These limits are designed to provide reasonable protection against harmful interference in a residential installation. -
Page 163: Contents
SPECIFICATIONS CONTENTS Power Requirement: Source: AC 120V, 60Hz IMPORTANT SAFETY INSTRUCTIONS ....2 FCC INFORMATION ....... .3 AC Power Consumption: Weight: TRADEMARKS . -
Page 164: Positioning The Lcd Hdtv
POSITIONING THE LCD GETTING STARTED HDTV BATTERY INSTALLATION • Install two (2) “AAA” batteries in the remote Always use a firm and flat surface when control. (Not included) positioning your HDTV. • Do not position the unit in a confined area. To ensure safe operation, please observe the following precautions: •... -
Page 165: Back Panel Jacks
GETTING STARTED HDTV INPUT/OUTPUT REFERENCE Digital Audio Output (Coaxial) Component AV Input (VIDEO2 or VIDEO3) Green (Y), blue (Pb), and red (Pr) Video inputs plus the white and red Audio inputs. NOTE: A composite connection is possible via VIDEO INPUT2 using the Y (VIDEO) jack and the L/R audio jacks. -
Page 166: A/V Connections
GETTING STARTED AUDIO / VIDEO CONNECTIONS Digital Audio Output is used to hookup a COMPOSITE connections are used to hookup multichannel receiver with the use of a phono- your analog equipment such as a VCR or an type digital audio cable. older DVD player. -
Page 167: Power Connection / Initial Channel Search
GETTING STARTED INITIAL CHANNEL SEARCH Before proceeding, please make sure to hook up your antenna or cable connection and all AV equipment correctly to your HDTV. PLUG IN AC POWER CORD 120V AC, 60Hz INITIAL ENERGY SAVING TURN ON TV (PRESS POWER BUTTON) MODE SCREEN Wait for on-screen instructions to set an Initial Energy Saving Mode, and perform an... -
Page 168: Remote Control Operation
REMOTE CONTROL OPERATION • USB Key—Selects the USB input directly. • POWER Key—Turns your HDTV On or Off. • PIX SHAPE Key—Cycles through the available • ECO Key—Modifies the Energy Saver level (see page 11.) aspect ratios. The different settings either stretch, zoom, or fill the image on your screen. -
Page 169: On-Screen Menu Operation
ON-SCREEN MENU OPERATION CHANNEL SETTING ___________ Display the On Screen menu and use the CURSOR LM keys to select Channel Setting. Press ENTER. Channel Search Auto – Searches the detected mode, Cable or Air. Cable – Searches for analog and unscrambled (ClearQAM) digital cable channels. -
Page 170: Video2 Setting
ON-SCREEN MENU OPERATION Video2 Setting Use this feature to establish either a Component or Composite connection to the VIDEO INPUT 2 jacks on your HDTV. Use the CURSOR LM keys to select the type of connec- tion you’ll use in VIDEO INPUT 2. Press ENTER, a blue mark will appear next to the selected option. -
Page 171: Clock Timer
ON-SCREEN MENU OPERATION SETUP _________________________ Clock timer This feature allows you to set a Current Time for your HDTV and enable a Switch On Time for the HDTV to turn on at a specific time of day. When On Timer Function is set to ON, the TV will automatically turn on at the previously set Switch on Time. -
Page 172: V-Chip
ON-SCREEN MENU OPERATION SETUP _________________________ V – Chip (Parental control) Use this feature to automatically block programs with content you deem as inappropriate for viewing by your children. NOTE: This feature is designed to comply with the United States of America’s FCC V-Chip regulations. Therefore, it may not function with broadcasts that originate in other countries. -
Page 173: Picture
ON-SCREEN MENU OPERATION PICTURE ____________________ Display the On Screen menu and use the CURSOR LM keys to select Picture. Press ENTER. You may choose between Vivid, Mild, , and Standard, which have predetermined fixed picture parameter values, or choose the Manual option for customized personal settings. -
Page 174: Sound
ON-SCREEN MENU OPERATION SOUND _____________________ Display the On Screen menu and use the CURSOR LM keys to select Sound. Press ENTER. Choose an option for your sound settings: Auto – Sound settings are linked to the current Picture option and parameters are adjusted accordingly. Dynamic, Mild, Standard –... -
Page 175: Pc Connections
PC INPUT Use your HDTV as a computer monitor by hooking PC Setting up your PC or Laptop to the TV with the use of an Auto Adjustment – Automatically adjusts display appropriate monitor cable (not included.) position, dot clock and phase. Before connecting any cables, disconnect the Dot Clock –... -
Page 176: Photo Viewer
USB INPUT PHOTO VIEWER _____________ View pictures on your HDTV with the use of a USB mass storage device (not included.) USB FLASH DRIVE THUMBNAIL VIEW SCREEN NOTE: The HDTV switches to NOTE: A thumbnail hide icon will appear if a USB Input when a USB picture cannot be decoded or if no flash drive is detected. -
Page 177: Warranty
ONE-YEAR LIMITED PARTS AND LABOR WARRANTY THIS LIMITED PARTS AND LABOR WARRANTY IS VALID ONLY ON SANYO TELEVISIONS PURCHASED AND USED IN THE UNITED STATES OF AMERICA, CANADA, AND PUERTO RICO, EXCLUDING ALL OTHER U.S. TERRITORIES AND PROTECTORATES. THIS LIMITED WARRANTY APPLIES ONLY TO THE ORIGINAL RETAIL PURCHASER, AND DOES NOT APPLY TO PRODUCTS USED FOR INDUSTRIAL OR COMMERCIAL PURPOSES. -
Page 178: Importantes Medidas De Seguridad
PRECAUCIÓN ESTE SÍMBOLO INDICA QUÉ VOLTAJES PELIGROSOS QUE CONSTI- TUYEN UN RIESGO DE CHOQUE ELÉCTRICO ESTÁN PRESENTES DEN- TRO DE ESTA UNIDAD. RIESGO DE CHOQUE ELÉCTRICO ¡NO ABRIR! ESTE SÍMBOLO INDICA QUE HAY INSTRUCCIONES IMPORTANTES DE PRECAUCIÓN: PARA REDUCIR EL RIESGO DE CHOQUE ELÉCTRICO, NO QUITE LA CUBIERTA OPERACIÓN Y MANTENIMIENTO EN LA LITERATURA QUE SE ANEXA A (O LA TAPA TRASERA). -
Page 179: Información Fcc
INFORMACIÓN FCC Este equipo ha sido probado y se encontró en acuerdo a los límites para un aparato digital Clase B, en acorde a la Parte 15 de las Reglas FCC. Estos límites están diseñados para proveer una protección razonable contra interferencia nociva en una instalación residencial. -
Page 180: Contenido
ESPECIFICACIONES CONTENIDO Requerimiento de Potencia: AC 120V, 60Hz IMPORTANTES MEDIDAS DE SEGURIDAD ..19 INFORMACIÓN FCC .......20 Consumo de Potencia: Peso: MARCAS REGISTRADAS . -
Page 181: Colocación De La Hdtv
COLOCANDO LA HDTV DE PARA COMENZAR INSTALACIÓN DE BATERÍAS • Siempre utilice una superficie firme y plana al Instale las baterías al control remoto. colocar su HDTV. ( 2 “AAA”, no incluídas) • No se coloque la HDTV en áreas confinadas. Para una operación segura, favor de observar •... -
Page 182: Operación Del Control Remoto
OPERACIÓN DEL CONTROL REMOTO • Tecla MUTE—Cancelar o restaurar el audio. • Tecla POWER—Prende o apaga su HDTV. • Tecla RECALL—Cambiar entre el canal actual y • Tecla ECO—Modifica el nivel del Ahorrador de el último accesado. Energía. (Ver pág. 28). •... -
Page 183: Conectores Del Panel Trasero
PARA COMENZAR REFERENCIA DE ENTRADAS Y SALIDAS Salida de Audio Digital (Coaxial) Entrada de video Componente (VIDEO2 ó VIDEO3) Entradas verde (Y), azul (Pb) y roja (Pr) de video; además de las entradas de audio roja y blanca. NOTA: Una conexión Compuesta es posible por medio de VIDEO INPUT2 usando la entrada Y (VIDEO) y las de Audio L/R. -
Page 184: Conexiones De Audio/Video
PARA COMENZAR CONEXIONES DE AUDIO Y VIDEO La conexión COMPUESTA es utilizada para La salida de Audio Digital es utilizada para conectar equipo análogo tal como una video- conectar un receptor multicanal con el uso de casetera o un reproductor DVD que no cuente un cable de audio digital. -
Page 185: Conexión A Corriente
PARA COMENZAR BÚSQUEDA DE CANALES INICIAL Antes de continuar, asegúrese de conectar correctamente su antena o conexión de TV por cable y todos los dispositivos a su HDTV. CONECTE EL CABLE DE CORRIENTE 120V AC, 60Hz PANTALLA INICIAL DE MODO DE AHORRO DE ENERGÍA ENCIENDA LA TV Siga instrucciones en pantalla para configurar... -
Page 186: Operación Del Menú En Pantalla Establecer Canales
OPERACIÓN DEL MENÚ EN PANTALLA ________ ESTABLECER CANALES Despliegue el menú en pantalla. Utilice las teclas CURSOR para seleccionar Establecer canales. Presione ENTER. Búsqueda de canales Auto – Busca en el modo detectado, Cable o Aire. Cable – Busca canales análogos y canales digitales de PANTALLA DE MENÚ... -
Page 187: Configuración De Video2
OPERACIÓN DEL MENÚ EN PANTALLA Configuración de Video 2 Utilice esta función para establecer una conexión ya sea Componente o Compuesta a la entrada de VIDEO INPUT 2 en su HDTV. Use el CURSOR LM para seleccionar el tipo de conexión que será... -
Page 188: V-Chip
OPERACIÓN DEL MENÚ EN PANTALLA CONFIGURACIÓN ___________ V – Chip (Control paternal) Utilice esta función para bloquear automáticamente programación con contenido que crea inapropiado para ser visto por sus hijos. NOTA: Esta función está diseñada para cumplir con regula- ciones de la FCC para V-Chip en los Estados Unidos de América. -
Page 189: Reloj Temporizador
OPERACIÓN DEL MENÚ EN PANTALLA CONFIGURACIÓN _____________ Reloj Temporizador Esta función permite establecer la Hora Actual en su HDTV y habilitar una Hora de Encendido para que el televisor se prenda a determinada hora. Cuando la Función de encendido se habilita, la TV automáticamente se encenderá... -
Page 190: Imagen
OPERACIÓN DEL MENÚ EN PANTALLA IMAGEN ____________________ Despliegue el menú en pantalla. Utilice las teclas CURSOR LM para seleccionar Imagen. Presione ENTER. Puede elegir entre Intenso, Moderado y Normal, los cuales tienen valores fijos y predeterminados para los diferentes parámetros. O puede elegir la opción de Manual para ingresar PANTALLA DE MENÚ... -
Page 191: Sonido
OPERACIÓN DEL MENÚ EN PANTALLA SONIDO ____________________ Despliegue el menú en pantalla. Utilice las teclas CURSOR LM para seleccionar Sonido. Presione ENTER. Elija una opción para su configuración de sonido: Auto – Utiliza valores predeterminados de acuerdo al modo actual de Imagen. Dinámico, Tenue, Estándar –... -
Page 192: Reproductor De Imágenes
ENTRADA USB REPRODUCTOR DE IMÁGENES Despliegue fotos en su HDTV con el uso de un dispositivo de memoria USB. MEMORIA PANTALLA DE VISTAS EN MINIATURA NOTA: Aparecerá un ícono “tapando” la vista en NOTA: La HDTV se cambia a la miniatura si una foto no puede ser decodi- entrada USB cuando se ficada o no contiene datos de vista previa. -
Page 193: Conexiones De Pc
CONEXIONES Y CONFIGURACION DE PC Utilice su HDTV como monitor de computadora, Configuración de PC conectando su televisor a su PC o Laptop por Auto Ajuste – Ajuste automático de posición de la medio de un cable de monitor apropiado. imagen, dot clock y fase. -
Page 194: Garantía
GARANTÍA LIMITADA DE UN AÑO EN PARTES Y MANO DE OBRA ESTA GARANTÍA LIMITADA DE PARTES Y MANO DE OBRA ES VÁLIDA SÓLO EN TELEVISORES SANYO COMPRADOS Y USADOS EN LOS ESTADOS UNIDOS DE AMÉRICA, CANADÁ Y PUERTO RICO, EXCLUYENDO CUALQUIER OTRO TERRITORIO Y PROTECTORADO DE E.E.U.U. -
Page 195: Mesures De Sécurité
MESURES DE SÉCURITÉ Utilisez uniquement un chariot, AVERTISSEMENT Afin d’éviter les risques une table ou un support d’incendie ou de choc électrique, n’exposez pas recommandé par le fabricant l’appareil à la pluie ni à l’humidité. ou vendu avec l’appareil. Lors Afin d’éviter les risques de choc électrique, de son installation, suivez les n’enlevez pas le panneau arrière. -
Page 196: Marques De Commerce
MARQUES DE COMMERCE RÉSOLUTIONS DE PC Fabriqué sous licence Dolby Laboratories. « Dolby » est une marque de commerce de Dolby Laboratories. HDMI, le logo HDMI et “High-Definition Multimedia Interface” sont des mar- ques déposées de HDMI Licensing, LLC aux États-Unis et dans d’autres pays. En tant que partenaire d’E NERGY Sanyo Manufacturing Corporation a... -
Page 197: Précautions De Maniement
TABLE DES MATIÈRES Veuillez lire avant d’u- MESURES DE SÉCURITÉ ......36 tiliser votre HDTV! INFORMATION FCC . -
Page 198: Placer La Tvhd Acl
PLACER LA TVHD ACL POUR COMMENCER • PLACEZ LES PILES Utilisez toujours une surface plane et ferme pour installer votre TVN. Placez les piles dans la télécommande • Ne placez pas le téléviseur dans un endroit trop ( 2 “AAA”, non comprises) exigu. -
Page 199: Connecteurs Du Panneau Arrière
POUR COMMENCER CONNECTEURS DU PANNEAU ARRIÈRE Sortie audio numérique (Coaxial) Entrée composant vidéo (VIDEO2 ou VIDEO3) Entrées vidéo verte (Y), bleue (Pb) et rouge (Pr) ainsi que les fiches blanche et rouge de l’audio. REMARQUE: Vous pouvez utiliser l’entrée VIDEO INPUT2 pour obtenir une conexion de vidéo Composite, en utilisant l’entré... -
Page 200: Branchements De Audio / Video
POUR COMMENCER BRANCHEMENTS DE AUDIO / VIDEO L’entrée de vidéo Composite est utilisée pour La Sortie d’Audio Numérique est utilisée pour brancher des équipements analogiques comme se brancher à un récepteur audionumérique en VCR ou des vieux reproducteurs de DVD. utilisant un câble d’audio. -
Page 201: Branchement Électrique
POUR COMMENCER RECH. DE CHAÎNES INITIALE Avant de continuer, assurez-vous de brancher correctement votre antenne ou connexion de TV par câble, et tous les dispositifs à votre HDTV. BRANCHEZ LE CORDON D’ALIMENTA- TION CA 120V CA, 60Hz ÉCRAN INITIAL D'ÉCONOMISEUR ALLUMER TV D'ÉNERGIE Suivez les instructions dans l'écran pour con-... -
Page 202: Utilisation De La Télécommande
UTILISATION DE LA TÉLÉCOMMANDE • Touche MUTE—Sourdine ou retourner le son. • Touche POWER—Allumer ou éteindre la TV. • Touche RECALL—Changer entre les deux • Touche ECO—Il modifie le niveau de l'É- dernières chaînes choisies. conomiseur d'Énergie. (Voir p. 45) •... -
Page 203: Fonctionnement Du Menu À L'écran
FONCTIONNEMENT DU MENU À L'ÉCRAN ÉTABLIR CHAÎNES Montre le Menu dans l’écran et utilise les touches CURSEUR LM pour choisir Établir chaînes. Appuyez sur ENTER. Recherche de chaînes Auto – Recherche la manière détectée, le câble ou l'air. Câble – Recherche les chaînes analogiques et numériques de câble déchiffrées (ClearQAM). -
Page 204: Configuration Vidéo2
FONCTIONNEMENT DU MENU À L'ÉCRAN Configuration Vidéo 2 Utilisez cette fonction pour établir une connexion de vidéo Composite ou Composant dans l’entrée VIDEO INPUT2 de votre HDTV. Utilisez les CURSEUR LM pour choisir le type de con- nexion qui sera utilisé dans l'entrée Video2. Appuyer sur ENTER, il apparaîtra une marque bleue à... -
Page 205: Temporisateur D'horloge
FONCTIONNEMENT DU MENU À L'ÉCRAN CONFIGURATION _____________ Temporisateur d'horloge Configurez l'Heure actuelle de votre TVHD. Établissez le Heure d’allumer à utiliser avec la Fonction d’allumer. Quand la Fonction d'allumer soit habilitée, la TV s’al- lumera automatiquement à l'heure fixée préalablement. ÉCRAN DE TEMPORISATEUR D’HORLOGE Capteur de lumiére Cette fonction détecte l'intensité... -
Page 206: Image
FONCTIONNEMENT DU MENU À L'ÉCRAN IMAGE Montre le Menu dans l’écran et utilise les touches CURSEUR LM pour choisir Image. Appuyer sur ENTER. Vous pouvez choisir entre Vivant, Doux, et Normal, lesquels ont des valeurs prédéterminées pour l'image. Ou, on peut choisir l’option manuel avec des valeurs personnalisées. -
Page 207: Son
FONCTIONNEMENT DU MENU À L'ÉCRAN Montre le Menu dans l’écran et utilise les touches CURSEUR LM pour choisir Son. Appuyer sur ENTER. Choisit une des deux options disponibles pour l'ajuste- ment du son. Auto – Les valeurs de son sont ajustées et associées avec le mode actuel d'Image. -
Page 208: Lecteur Des Photos
ENTRÉE USB LECTEUR DES PHOTOS Voir des photos sur la TVHD en utilisant un dispositif de mémoire de masse USB. DISPOSITIF ÉCRAN VU MINIATURE REMARQUE: La télé changera à REMARQUE: Une icône de vu miniature apparaî- l'entrée USB, quand tra si la photo ne peut pas être elle détecte un dis- décodée ou si n'existent pas des positif USB relié. -
Page 209: Branchements Et Configuration Du Pc
BRANCHEMENTS ET CONFIGURATION DU PC Configuration du PC On peut utiliser votre TV HD comme un moniteur d’ordinateur. Branchez l’ordinateur et le téléviseur Auto-ajustement – Ajuste automatiquement la en utilisant un câble de moniteur approprié. position d'image, le dot clock et la phase. Avant brancher moindre... -
Page 210: Garantie
GARANTIE LIMITÉE D'UN AN POUR PIÈCE ET MAIN-D' ŒUVRE CETTE GARANTIE LIMITÉE POUR PIÈCE ET MAIN-D'UVRE N'EST VALABLE QUE SUR LES TÉLÉVISEURS SANYO ACHETÉS ET UTILISÉS AUX ÉTATS-UNIS D'AMÉRIQUE, AU CANADA, ET À PORTO RICO, À L'EXCLUSION DE TOUT AUTRE TERRITOIRE ET PROTECTORAT DES ÉTATS-UNIS D'AMÉRIQUE. - Page 213 Frost-Free User Manual Guide de l’Utilisateur Refrigerator/Freezer Manual del Usuario Modelo Frost-Free HA10TG20S Réfrigérateur/ Congélateur Frost-Free Refrigerador/ Congelador...
- Page 215 English GENERAL SAFETY RULES WARNING: Read all of the instructions before using this appli- ance. When using this appliance, always exercise basic safety precautions, including the following: NOTE: If the refrigerator has been placed in a horizontal or tilted position for any period of time wait 24 hours before plugging the unit in.
- Page 216 English 9) Do not use any electrical device or any sharp instrument in defrosting your refrigerator. 10) Unplug your refrigerator before cleaning or before making any repairs. Note: If for any reason this product requires service, we strongly recom mend that a certified technician perform service. 11) Do not operate your refrigerator in the presence of explosive fumes.
-
Page 217: Parts And Features
English Parts And Features (Features may vary per model) 1. Ice Cube Trays 9. Interior Light 2. Full-Width Freezer Door Shelves 10. Freezer Shelf 3. Full-Width Door Shelf 11. Gallon Storage Compartment 4. Adjustable Front Leveling Legs 12. Can Storage (not shown) 13. -
Page 218: Proper Air Circulation
English Installing Your Refrigerator Unpacking Your Refrigerator 1. Remove all packaging material. This includes the foam base and all adhesive tape holding the refrigerator accessories inside and outside. 2. Inspect and remove any remains of packing, tape or printed materials before powering on the refrigerator. -
Page 219: Electrical Requirement
English WARNING: ELECTRICAL REQUIREMENT - SHOCK HAZARD Electrical Requirement • Make sure there is a suitable power outlet (120 volts, 15 amps outlet) with proper grounding to power the refrigerator. • Avoid the use of three prong adapters or cutting off the third grounding prong in order to accommodate a two prong outlet. - Page 220 English Door Alignment Freezer Door: (see fig. # 1) 1. Remove hinge cover screw. 2. Remove the top hinge cover. 3. Loosen the top hinge screws using a Phillips head screwdriver. 4. Adjust the door or put a spacer in between and then tighten the screws. 5.
- Page 221 English screw holes doorstopper (right side) fig. # 2 middle pivot pin central hinge Reinstallation: (see fig. # 3 and fig. # 4) 1. Remove the lower pivot pin from the lower hinge by turning counter clockwise. Move the pin to the opposite hole and tighten. (see below) fig.
- Page 222 English 3. Remove both left and right front feet from bottom. 4. Loosen the screws holding the bottom hinge and remove it. 5. Align the holes in the bottom hinge to the corresponding holes on the opposite side of the cabinet. Insert and tighten the screws. Reinstall both front feet.
- Page 223 English Refrigerator Features And Use General Features Freezer Section Your freezer compartment is equipped Adjustable temperature dial: with adjustable airflow control. For Your refrigerator will automatically your convenience, airflow is preset by maintain the temperature level you the factory to the colder setting. There select.
- Page 224 English Refrigerator Interior Shelves (Shelves May vary by Model) The refrigerator shelves of your refrigerator were designed with you in mind. Their varied adjustability allows you to satisfy your personal storage needs. To remove or adjust a full-width slide-out shelf: (see fig. # 5) 1.
- Page 225 English Food Storage Information Fresh Food: • When storing fresh food, which is not prepackaged, be sure to wrap or store food in airtight and moisture proof material unless otherwise noted. This will ensure proper shelf life and prevent the transfer of odors and tastes.
- Page 226 English Frozen Food • Wipe containers before storing to avoid needless spills. • Hot food should be allowed to cool before storing in the freezer. This will prevent unnecessary energy use. • When storing meats, keep in the original packaging or rewrap as nec- essary.
-
Page 227: Cleaning And Maintenance
English Proper Refrigerator Care and Cleaning Cleaning and Maintenance Warning: To avoid electric shock always unplug your refrigerator before cleaning. Ignoring this warning may result in death or injury. Caution: Before using cleaning products, always read and follow manufacturer’s instructions and warnings to avoid personal injury or product damage. -
Page 228: Light Bulb Replacement
English Light Bulb Replacement 1. Switch off power to refrigerator. 2. Remove the highest shelf. 3. Allow light bulb to cool before removing. 4. Pinch the plastic cover between fingers and thumb and gently pull to the left. 5. Remove the bulb by screwing it counter-clockwise. 6. -
Page 229: Troubleshooting
English Troubleshooting Unit Does Not Operate • Check if thermostat control is not in the “OFF” position. • Check if refrigerator is plugged in. • Check if there is power at the AC outlet, by checking the circuit breaker. Food temperature appears too warm •... -
Page 230: Limited Warranty
English Limited Warranty What is covered and for how parts are covered in the remaining long? warranty. Labor is not provided and must be paid by the customer. This warranty covers all defects in workmanship or materials for a 3. Contact your nearest authorized period of: service center. - Page 231 Français CONSIGNES GÉNÉRALES DE SECURITÉ ATTENTION: Lire l’ensemble des instructions avant d’utiliser l’appareil. Lors de l’utilisation de cet appareil, prendre toutes les mesures de sécurité de base, y compris les suivantes: REMARQUE: Si le réfrigérateur a été placé en position horizontale ou en position inclinée, que ce soit pour longtemps ou non, attendez 24 heures avant de brancher l’appareil.
- Page 232 Français « …La décongélation ou la recongélation, même partielle réduit la quali é gustative des aliments, en particulier des fruits, légumes et plats pré- parés. La qualité gustative des viandes rouge est beaucoup moins affec- tée que celle de nombreux autres aliments. Utiliser les aliments recongelés dès que possible, afin de conserver un maximum de leur qualité...
- Page 233 Français Piéces et Caractéristiques 1. Bacs a glace 10. Etagere du congelateur 2. Etageres integrales de la porte du 11. Compartiment d’emmagasinage congelateur. des gallons 3. Etagere integrale du congelateur 12. Emmagasinage des cannettes 4. Pieds de mise a niveau reglables 13.
- Page 234 Français Installation du Réfrigérateur Désemballage du Réfrigérateur 1. Retirer l’ensemble du matériel d’emballage. Ceci comprend la base en mousse ainsi que l’ensemble du matériel adhésif qui maintient les accessoires du réfrigérateur à l’intérieur tout comme à l’extérieur. 2. Inspecter et enlever tout restant d’emballage, de scotch ou de matériaux imprimés avant de brancher le réfrigérateur.
- Page 235 Français ATTENTION: EXIGENCES ÉLECTRIQUES – RISQUE DE CHOC ÉLECTRIQUE Caractéristiques Electriques • Pour l’alimentation du réfrigérateur, veiller à utiliser une prise de courant convenable (prise de 120 volts,15 amp) raccordée à la terre. • Eviter d’utiliser des adaptateurs à trois fiches ou de sectionner la troisième fiche reliée à...
- Page 236 Français Alignement de la porte La Porte du Congélateur: (voir fig. # 1) 1. Retirer la vis de protection de la charnière. 2. Retirer ensuite la protection de la charnière supérieure. 3. Desserrer les vis de la charnière supérieure à l’aide d’un tournevis cruciforme.
- Page 237 Français trous de vis taquet de la porte de congélateur fig. # 2 axe de pivotement moyen fixing moyen Réinstallation: (voir fig. # 3 et # 4) 1. Retirez le trou inférieur de la broche de point d'appui de la porte en tournant dans le sens contraire à...
- Page 238 Français 3. Retirez les deux pieds avant gauches et droits du bas. 4. Desserrez les vis tenant la charnière inférieure et retirez-les. 5. Alignez les trous du support de la charnière inférieure sur les trous correspondant l'autre côté. Introduisez les vis et serrez-les. 6.
- Page 239 Français Caractéristiques du Réfrigératuer et Utilisati Caracteristiques Lumiere interieure de la generales section refrigerante: Votre refrigerateur est equipe d’une Commande de temperature lumiere interieure automatique situee reglable: dans le section des aliments frais pour Votre refrigerateur maintient reperer facilement votre nourriture. automatiquement le niveau de temperature Le compartiment de votre congelateur programme.
- Page 240 Français Pour retirer ou régler une étagère de‘largeur intégrale’ coulissante: (Voir fig. # 5) 1. Incliner légèrement l’étagère vers le haut puis la faire glisser vers l’avant jusqu’à ce que l’étagère soit complètement retirée. 2. Pour replacer l’étagère, sélectionner la position souhaitée puis la faire glisser avec précaution jusqu’à...
- Page 241 Français Informations sur le Rangement des Aliments Aliments Frais: • Sauf avis contraire, lorsque vous stockez des aliments frais n’ayant pas été préemballés, assurez-vous de bien emballer ou stocker ces aliments dans des matières hermétiques et à l'épreuve de l'humidité. Vous en préserverez ainsi la durée de conservation et empêcherez le transfert d'odeurs et de goûts.
- Page 242 Français Aliments Surgelés • Essuyez les contenants avant de les ranger pour éviter tout déversement inutile. • Les aliments chauds devraient être laissés à refroidir avant d’être stockés au congélateur. Ceci évitera toute dépense superflue d’électricité. • Lorsque vous stockez des viandes, gardez-les dans leur emballage d’origine ou réemballez-les au besoin.
-
Page 243: Nettoyage Et Entretien
Français Entretien e Nettoyage Adéquats du Réfrigérateur Nettoyage et Entretien Nettoyage et Entretien Attention: Pour éviter les risques d’électrocution; toujours débrancher le réfrigérateur avant de le nettoyer. Le non respect de cette mesure peut entraîner des blessures graves ou mortelles. Avant d’avoir recours à... - Page 244 Français Changement d’Ampoule 1. Débrancher l’alimentation du réfrigérateur. 2. Retirer l’étagère la plus haute. 3. Laisser l’ampoule refroidir avant de la retirer. 4. Pince l'en matière plastique couvre entre doigts et pouce et doucement tire à gauche. 5. Retirer l’ampoule en la dévissant dans le sens inverse des aiguilles d’une montre.
- Page 245 Français Dépannage Le Réfrigérateur ne fonctionne pas: • Vérifier que le programmateur du thermostat ne se trouve pas sur la position ‘OFF’ (arrêt). • Veiller à ce que le réfrigérateur soit bien branché. • Veiller à ce que la prise de courant CA fonctionne bien en vérifiant le disjoncteur.
- Page 246 Français Garantie Limitée Eléments sous garantie et durée de la garantie: 3. Contacter le centre de réparations Cette garantie couvre tous les défauts de agréé le plus proche. Pour obtenir main-d’œuvre et de matériaux pour une les nom et adresse du centre le plus période de: proche, appeler le 1-877-337-3639.
- Page 247 Español REGLAS GENERALES DE SEGURIDAD ADVERTENCIA: Lea todas las instrucciones antes de utilizar este aparato. Cuando utilice este aparato, siempre ejerza las precauciones de seguridad básicas, incluyendo las siguientes: NOTA: Si el refrigerador se ha ubicado en una posición horizontal o inclinada durante cualquier lapso de tiempo, espere 24 horas antes de enchufar la unidad.
- Page 248 Español "…Incluso el descongelar parcialmente y volver a congelar los ali mentos disminuye su calidad de consumo, especialmente si se trata de frutas, verduras y alimentos preparados. La calidad de consumo de las carnes rojas es menormente afectada en comparación a la de muchos otros alimentos.
- Page 249 Español Piezas y Características 1. Bandejas para cubos de hielo 10. Estante del congelador 2. Estantes de la puerta del ancho 11. Compartimiento de almacenamiento completo del congelador de un galón 3. Estante de la puerta del ancho 12. Sistema de almacenamiento de latas completo 4.
- Page 250 Español Instalación de Su Refrigerador Desempaque del Refrigerador 1. Retire todo el material de embalaje. Esto incluye la base de espuma y toda la cinta adhesiva que sostiene los accesorios del refrigerador en el interior y exterior. 2. Inspeccione y retire cualesquier restos del embalaje, la cinta adhesiva o los materiales impresos antes de encender el refrigerador.
- Page 251 Español Limitaciones de Instalación • No instale su refrigerador en ningún lugar que no tenga el aislamiento o la calefacción apropiada, por ejemplo una cochera, etc. Su refrigerador no fue diseñado para funcionar en temperaturas abajo de los 12° Centígrados (55°F). •...
- Page 252 Español Alineación de la Puerta Puerta del congelador: (vea fig. # 1) 1. Quite la cubierta de los tornillos. 2. Quite la cubierta de la bisagra superior. 3. Afloje los tornillos de la bisagra superior usando un destornillador de punta de cruz. 4.
- Page 253 Español agujeros del tornillo tapón para la puerta del congelador pasador- pivote en el centro fijación en el centro Reinstallation: (see fig. # 3 and fig. # 4) 1. Remueva el inferior para el pasador- pivote del soporte del gozne inferior, girándolo en la dirección opuesta a las manecillas del reloj.
- Page 254 Español 3. Remueva los tornillos que sostienen el soporte del gozne inferior y quite el soporte. 4. Afloje los tornillos que sostienen la bisagra inferior y quítelos. 5. Alinee los agujeros del soporte del gozne inferior con los agujeros correspondientes en el costado opuesto del gabinete, para luego insertar y apretar sus tornillos.
- Page 255 Español Uso y Funciones Refrigerador Características Luz interior de la sección del generales refrigerador Su refrigerador está equipado con una Dial para el ajuste de la luz interior automática en la sección de temperatura: alimentos frescos para que ubique los El refrigerador mantendrá...
- Page 256 Español Para sacar o ajustar un entrepaño deslizable no voladizo de ancho completo: (vea la figura # 5) 1. Levante ligeramente el entrepaño y deslícelo hacia el frente hasta sacarlo completamente. 2. Para volver a colocar el entrepaño, seleccione la ubicación deseada y deslice cuidadosamente el entrepaño hasta que quede enganchado.
- Page 257 Español Información Sobre el Almacenamiento de Alimentos Alimentos Frescos: • Cuando almacene alimentos frescos que no vengan empacados, asegúrese de envolverlos o almacenarlos con material a prueba de humedad o hermético, a menos que se indique otra cosa. De esta forma no caducarán antes de lo previsto y evitará...
- Page 258 Español Alimentos Congelados • Limpie los recipientes antes de guardarlos para evitar derrames innec- esarios. • Los alimentos calientes deben dejarse enfriar antes de meterlos al con- gelador. Esto evitará el uso innecesario de energía. • Cuando almacene carnes, manténgalas en el empaque original o vuelva a envolverlas si es necesario.
-
Page 259: Cuidados Y Limpieza
Español Cuidados y Limpieza Asecuada Limpieza y Mantenimiento Advertencia: Para evitar una descarga eléctrica siempre desenchufe su refrigerador antes de limpiarlo. El ignorar esta advertencia puede causar esiones o la muerte. Antes de usar productos de limpieza, siempre lea y Precaución: siga las instrucciones y advertencias del fabricante para evitar lesiones personales o daños al producto. - Page 260 Español Reemplazo del Foco 1. Apague el interruptor del refrigerador. 2. Saque el entrepaño más alto. 3. Permita que el foco se enfríe antes de quitarlo. 4. Pellizque la cubierta plástica entre dedos y pulgar y estire suavemente a la izquierda. 5.
- Page 261 Español Verificación de Problemas El Refrigerador no Funciona: • Revise que el control del termostato no esté en la posición de "OFF" (apagado). • Revise que el refrigerador esté conectado. • Revise que haya corriente eléctrica en el tomacorriente de corriente alterna, revisando el interruptor de circuito.
- Page 262 Español Garantía Limitado ¿Qué está cubierto y por 3. Localice su centro de servicio cuánto tiempo? autorizado más cercano. Para Esta garantía cubre cualquier defecto en conocer el nombre del centro de la manufactura o empleo de materiales servicio más próximo a su domicilio, por un plazo de: por favor llame al 1-877-337-3639 12 meses de mano de obra...
- Page 264 IMPORTANT Do Not Return This Product To The Store If you have a problem with this product, please contact the “Haier Customer Satisfaction Center” at 1-877-337-3639. DATED PROOF OF PURCHASE, MODEL # AND SERIAL # REQUIRED FOR WARRANTY SERVICE IMPORTANT Ne pas renvoyer cet appareil au magasin.
- Page 265 12/1/13 Shop Haier 10.3-cu ft Top-Freezer Refrigerator (Stainless Steel) at Lowes.com Your Store: Iwilei - Honolulu, HI Your Store: Honolulu, HI FREE Store Pickup Your order can be available for pickup in Low e's Of Iw ilei - Honolulu, HI Haier 10.3-cu ft T op-Freezer today.
- Page 266 12/1/13 Shop Haier 10.3-cu ft Top-Freezer Refrigerator (Stainless Steel) at Lowes.com shelves Manufacturer's Warranty (Parts) 1-year Snack/Deli Drawer Lowe's Exclusive Temperature Controlled Drawer Steel- Color/Finish Family Pantry Drawer Stainless Door Shelves CSA Safety Listing Gallon Door Storage ETL Safety Listing Humidity-Controlled Crispers UL Safety Listing Freezer Door Bins...