JVC KD-G720 Instructions Manual
Jvc cd receiver instructions
Hide thumbs
Also See for KD-G720:
- Instructions manual (92 pages) ,
- Instruction manual (256 pages) ,
- Installation & connection manual (4 pages)
Table of Contents
Advertisement
CD RECEIVER
RECEPTOR CON CD
RECEPTEUR CD
For canceling the display demonstration, see page 8.
Para cancelar la demostración en pantalla, consulte la página 8.
Pour annuler la démonstration des affichages, référez-vous à la page 8.
For installation and connections, refer to the separate manual.
Para la instalación y las conexiones, refiérase al manual separado.
Pour l'installation et les raccordements, se référer au manuel séparé.
INSTRUCTIONS
MANUAL DE INSTRUCCIONES
MANUEL D'INSTRUCTIONS
KD-AR770/KD-G720
KD-AR770/KD-G720
KD-AR770/KD-G720
For customer Use:
Enter below the Model
No. and Serial No. which
are located on the top or
bottom of the cabinet.
Retain this information
for future reference.
Model No.
Serial No.
GET0354-001A
[J]
Advertisement
Table of Contents

Related Manuals for JVC KD-G720


Summary of Contents for JVC KD-G720
- Page 1 Para la instalación y las conexiones, refiérase al manual separado. Pour l’installation et les raccordements, se référer au manuel séparé. INSTRUCTIONS MANUAL DE INSTRUCCIONES MANUEL D’INSTRUCTIONS KD-AR770/KD-G720 KD-AR770/KD-G720 KD-AR770/KD-G720 For customer Use: Enter below the Model No. and Serial No. which are located on the top or bottom of the cabinet.
- Page 2 CD RECEIVER For canceling the display demonstration, see page 6. For installation and connections, refer to the separate manual. INSTRUCTIONS KD-G725 KD-G725 GET0355-005A [UT]...
- Page 3 IMPORTANT FOR LASER PRODUCTS CAUTION: CAUTION: How to reset your unit Your preset adjustments will also be erased. How to forcibly eject a disc • If this does not work, reset your unit. • Be careful not to drop the disc when it ejects. Warning: How to use the MODE button Time countdown indicator...
- Page 4 • Button operations are mainly explained with the illustrations in the table below. • Some related tips and notes are explained in “More about this unit” (see pages 18 – 21). Press briefly. Press repeatedly. Press and hold until your desired response begins.
-
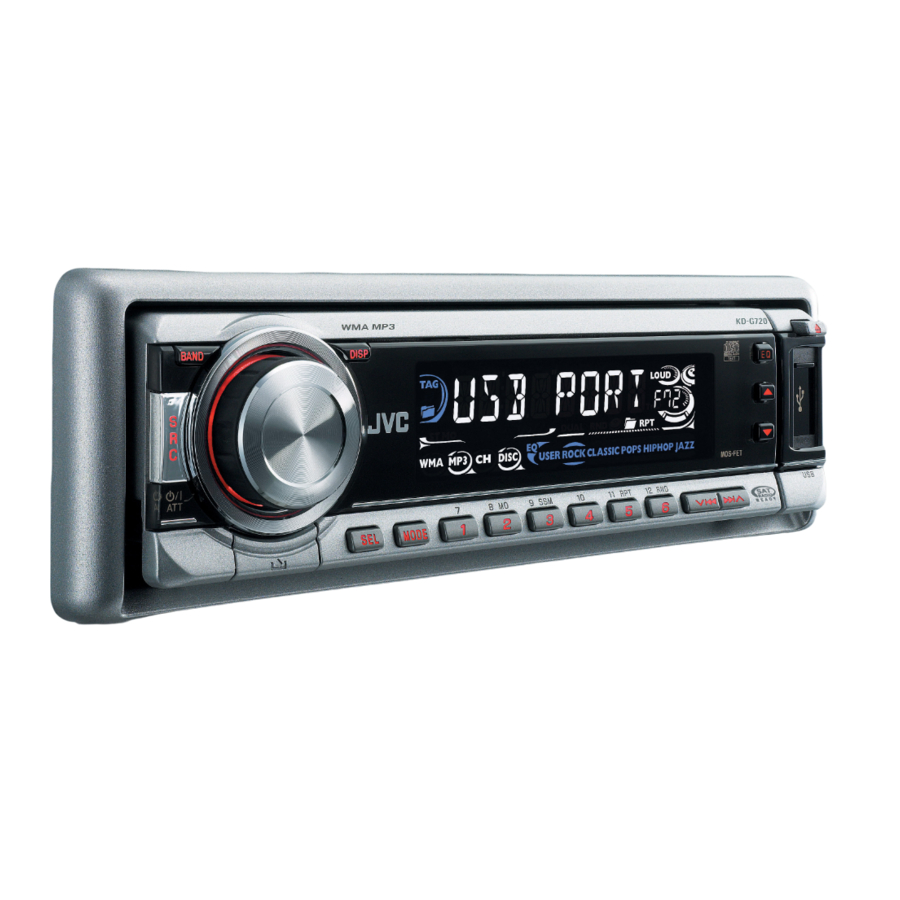
Page 5: Control Panel
Control panel Display window • DO NOT expose the remote sensor to strong light (direct sunlight or artificial lighting). ∞ 4 ¢ Parts identification Display window Lights up only when CD-CH is selected as the playback source. Lights up for the built-in CD player. •... - Page 6 Remote controller — Aim the remote controller directly at the remote sensor on the unit. Make sure there is no obstacle in between. RM-RK50 ∞ : Returns to the previous menu. ∞ : Confirms the selection. ∞ ∞ ∞ 2 Continued on the next page...
-
Page 7: Getting Started
∞ Getting started Basic operations Turn on the power. Ÿ * You cannot select these sources if they are not ready or not connected. For FM/AM tuner ⁄ Adjust the volume. Volume level appears. Adjust the sound as you want. (See page 12.) Caution on volume setting: To drop the volume in... -
Page 8: Radio Operations
Finish the procedure. To check the current clock time while the power is turned off To check other information while listening to the radio Clock = Station name* =Frequency =(back to the beginning) * FM/AM: If no name is assigned to a station, “NO NAME”... - Page 9 Preset number flashes for a while. Disc/USB memory operations Ÿ...
- Page 10 Ÿ USB input terminal USB memory...
- Page 11 To go to the next or previous folders (only for MP3/WMA/USB) To locate a particular track (for CD) or folder (for MP3/WMA/USB) directly Other main functions Skipping tracks quickly during play Only possible on JVC MP3-compatible CD changer Prohibiting disc ejection To cancel the prohibition,...
- Page 12 Changing the display information While playing an audio CD or a CD Text While playing an MP3/WMA USB memory • When “TAG DISP” is set to “TAG ON” (see page 14) • When “TAG DISP” is set to “TAG OFF” : Clock with the current track number : Elapsed playing time with the current track number...
-
Page 13: Sound Adjustments
Sound adjustments USER ROCK CLASSIC POPS HIP HOP JAZZ Indication pattern changes as you adjust the level. Ex.: When “TRE” is selected BAS* TRE* FAD* BAL* (bass) (treble) (loudness) LOUD* SUB.W*... - Page 14 General settings — PSM Select a PSM item. Ex.: When “DIMMER” is selected Indications Selectable settings, [reference page] DEMO DEMO ON : [Initial]; DEMO OFF : CLOCK H 1 12 [Initial: 1 (1:00)] 00 59 CLOCK M [Initial: 00 (1:00)] LEVEL DIMMER AUTO...
- Page 15 Indications WOOFER EXT IN* TAG DISP AMP GAIN IF BAND * Some characters or symbols will not be shown correctly (or will be blanked) on the display. * Displayed only when one of the following sources is selected—FM, AM, CD or USB. Selectable settings, [reference page] [Initial];...
-
Page 16: Title Assignment
Title assignment Select the sources. Enter the title assignment mode. Ex.: When you select “CD“ as the source Assign a title. 1 Select a character. 2 Move to the next (or previous) character position. 3 Repeat steps 1 and 2 until you finish entering the title. - Page 17 iPod®/D. player operations Interface adapter for iPod® D. player interface adapter Caution: Preparations: Ÿ Adjust the volume. ⁄ Adjust the sound as you want. (See page 12.) To pause stop playback To fast-forward or reverse the track To go to the next or previous tracks * For iPod * For D.
- Page 18 Confirm the selection. To move back to the previous menu, press 5. • If a track is selected, playback starts automatically. • If the selected item has another layer, you will enter the layer. Repeat steps 2 and 3 until the desired track is played. 4 /¢...
-
Page 19: More About This Unit
Other external component operations Ÿ Turn on the connected component and start playing the source. Adjust the volume. ⁄ Adjust the sound as you want. (See page 12.) To check other information while listening to an external component More about this unit Basic operations Turning on the power Turning off the power... - Page 20 Playing a disc Playing a CD-R or CD-RW Playing an MP3/WMA disc * The parenthetic figure is the maximum number of characters for file/folder names in case the total number of files and folders is 313 or more. Continued on the next page...
- Page 21 Changing the source Playing MP3/WMA tracks from a USB memory Ejecting a disc General settings—PSM Title assignment iPod® or D. player operations...
- Page 22 Maintenance How to clean the connectors Connector Moisture condensation How to handle discs When removing a disc from its case, Notice: For iPod users: For D. player users: When storing a disc into its case, To keep discs clean To play new discs Do not use the following discs: Warped disc Center holder...
-
Page 23: Troubleshooting
Troubleshooting Symptoms Remedies/Causes... - Page 24 Continued on the next page...
-
Page 26: Specifications
Specifications AUDIO AMPLIFIER SECTION Ω Ω Ω Ω Ω TUNER SECTION [FM Tuner] [AM Tuner] CD PLAYER/USB MEMORY SECTION Ω Ω Ω GENERAL Ω Ω Design and specifications are subject to change without notice. - Page 27 Having TROUBLE with operation? Please reset your unit Refer to page of How to reset your unit EN, CT © 2005 Victor Company of Japan, Limited 1205DTSMDTJEIN...
- Page 28 • Be sure to ground this unit to the car’s chassis again after installation. Notes: • Replace the fuse with one of the specified rating. If the fuse blows frequently, consult your JVC car audio dealers. • It is recommended to connect to the speakers with maximum power of more than 50 W (both at the rear and at the front, with an impedance of 4 Ω...
-
Page 29: Removing The Unit
The following illustration shows a typical installation. If you have any questions or require information regarding installation kits, consult your JVC car audio dealers or a company supplying kits. • If you are not sure how to install this unit correctly, have it installed by a qualified technician. -
Page 30: Electrical Connections
ENGLISH ELECTRICAL CONNECTIONS Typical connections / Before connecting: Check the wiring in the vehicle carefully. Incorrect connection may cause serious damage to this unit. The leads of the power cord and those of the connector from the car body may be different in color. Connect the colored leads of the power cord in the order specified in the illustration below. - Page 31 Connecting the external components / ® CD changer, Apple iPod , or JVC D. player / CD • Set “CHANGER” for the external input setting (See page 14 of the INSTRUCTIONS.) / You can connect these components as illustrated below.
- Page 32 INFORMATION (For U.S.A.) Caution: IMPORTANT FOR LASER PRODUCTS CAUTION: CAUTION: How to reset your unit • Your preset adjustments will also be erased. How to forcibly eject a disc • If this does not work, reset your unit. • Be careful not to drop the disc when it ejects. How to use the MODE button Time countdown indicator To use these buttons for their original...
- Page 33 CONTENTS Basic operations ... 7 Playing a disc in the unit ... 10 Playing discs in the CD changer ... 10 Playing from a USB memory ... 10...
- Page 34 Control panel — • DO NOT expose the remote sensor to strong light (direct sunlight or artificial lighting). ∞ How to detach/attach the control panel Lever KD-AR770 and KD-G720 Parts identification 4 ¢ Detaching... CAUTION: Attaching...
- Page 35 Remote controller — Aim the remote controller directly at the remote sensor on the unit. Make sure there is no obstacle in between. • also works as the time countdown indicator and level meter during play (see page 15). lights up for the selected item. RM-RK50 Continued on the next page...
- Page 36 ∞ ∞ ∞ Returns to the previous menu. ∞ Confirms the selection. ∞ ∞ 2...
- Page 37 Getting started Basic operations Turn on the power. Ÿ You cannot select these sources if they are not ready or not connected. Only for KD-AR770. For FM/AM tuner For SIRIUS radio For XM radio ⁄ Adjust the volume. Volume level appears. Volume level indicator Adjust the sound as you want.
- Page 38 Radio operations Ÿ Lights up when receiving an FM stereo broadcast with sufficient signal strength. Selected band appears.
- Page 39 When an FM stereo broadcast is hard to receive Lights up when monaural mode is activated. Reception improves, but stereo effect will be lost. To restore the stereo effect, repeat the same procedure. “MONO OFF” appears and the MO indicator goes off. Storing stations in memory You can preset six stations for each band.
- Page 40 Disc/USB memory operations Playing a disc in the unit To stop play and eject the disc Playing discs in the CD changer * If you have changed the external input setting to “EXT IN” (see page 16), you cannot select the CD changer. Ÿ...
-
Page 42: Changing The Display Information
Each time you press the button, you can skip 10 tracks. • After the last track, the first track will be selected and vice versa. Prohibiting disc ejection You can lock a disc in the loading slot. To cancel the prohibition, repeat the same procedure. - Page 43 Selecting the playback modes Select your desired playback mode. 7 Repeat play Mode Plays repeatedly TRK RPT FLDR RPT* : DISC RPT* : RPT OFF 7 Random play Mode Plays at random FLDR RND* : DISC RND MAG RND* : RND OFF * Only while playing a media (MP3/WMA/ USB).
- Page 44 BAS* TRE* FAD* BAL* LOUD* SUB. W* General settings — PSM Ex.: When you select “DIMMER”...
- Page 45 Indications Selectable settings, [reference page] DEMO DEMO ON : DEMO OFF : CLOCK H 1 12 CLOCK M 00 59 CLK ADJ* AUTO T-ZONE* * EASTERN PACIFIC “ MOUNTAIN “ CENTRAL “ DST* * SID* LEVEL DIMMER AUTO TEL* MUTING 1/MUTING 2 : SCROLL* ONCE AUTO...
- Page 46 Indications WOOFER LINE ADJ* EXT IN* TAG DISP AMP GAIN IF BAND AREA * Only for KD-AR770. * Displayed only when one of the following sources is selected—FM, AM, CD, USB, or LINE IN (only for KD-AR770). Selectable settings, [reference page] : [Initial];...
- Page 47 Title assignment Sources Maximum number of characters Select the sources. Enter the title assignment mode. Ex.: When “CD“ is selected as the source Assign a title. Select a character. Move to the next (or previous) character position. Repeat steps finish entering the title. Finish the procedure.
-
Page 48: Satellite Radio Operations
Satellite radio operations • “SIRIUS” and the SIRIUS dog logo are registered trademarks of SIRIUS Satellite Radio Inc. • XM and its corresponding logos are registered trademarks of XM Satellite Radio Inc. • “SAT Radio,” the SAT Radio logo and all related marks are trademarks of SIRIUS Satellite Radio Inc., and XM Satellite Radio, Inc. - Page 50 Select a channel for listening. Ex.: When you select “COUNTRY” for Category Search Checking the XM Satellite radio ID While selecting “XM1,” “XM2,” or “XM3,” select “Channel 0.” To cancel the ID number display, Current channel number Tune in to a channel you want. Select either SIRIUS Satellite radio or XM Satellite radio.
- Page 51 iPod®/D. player operations Interface adapter for iPod D. player interface adapter Caution: Preparations: Ÿ Adjust the volume. ⁄ Adjust the sound as you want. (See pages 13 and 14.) To pause playback To fast-forward or reverse the track To go to the next or previous tracks * For iPod * For D.
- Page 52 Selecting a track from the menu Enter the main menu. Now the 5/∞/ 4/¢ work as the menu selecting buttons* The menu selecting mode will be canceled: – If no operations are done for about 5 seconds. – When you confirm the selection of a track.
- Page 53 Other external component operations Ÿ ⁄ More about this unit Ô...
- Page 54 ")
- Page 55 Changing the source Ejecting a disc Playing MP3/WMA tracks from a USB memory General settings—PSM Title assignment Satellite radio operations Continued on the next page...
- Page 56 iPod® or D. player operations Notice: For iPod users: For D. player users: Maintenance How to clean the connectors Moisture condensation How to handle discs When removing a disc from its case, When storing a disc into its case, To keep discs clean To play new discs Connector Center holder...
- Page 57 Do not use the following discs: Sticker Sticker residue Stick-on label Warped disc Troubleshooting Continued on the next page...
- Page 58 Symptoms Remedies/Causes...
- Page 59 Continued on the next page...
- Page 60 Symptoms Remedies/Causes...
- Page 61 Specifications AUDIO AMPLIFIER SECTION Ω ≤ Ω Ω Ω Ω Ω Ω TUNER SECTION [FM Tuner] Ω [AM Tuner] CD PLAYER/USB MEMORY SECTION Ω Ω GENERAL Ω Design and specifications are subject to change without notice. " " " " "...
- Page 62 Having TROUBLE with operation? Please reset your unit Refer to page of How to reset your unit Still having trouble?? USA ONLY Call 1-800-252-5722 http://www.jvc.com We can help you! EN, SP, FR © 2005 Victor Company of Japan, Limited 1205DTSMDTJEIN...
- Page 63 KD-AR770/KD-G720 Installation/Connection Manual Manual de instalación/conexión Manuel d’installation/raccordement GET0354-002A ENGLISH WARNINGS • • • Ω Ω • • • • ESPAÑOL ADVERTENCIAS • • • Ω Ω • • • • 1205DTSMDTJEIN EN, SP, FR © 2005 Victor Company of Japan, Limited FRANÇAIS...
-
Page 64: Localizacion De Averias
INSTALLATION (IN-DASH MOUNTING) • Removing the unit When using the optional stay / Cuando emplea un soporte opcional / Lors de l’utilisation du hauban en option TROUBLESHOOTING • The fuse blows. • Power cannot be turned on. • No sound from the speakers. •... - Page 65 • Disconnect the speakers from this unit, connect them to the amplifier. Leave the speaker leads of this unit unused. JVC Amplifier Amplificador de JVC JVC Amplificateur JVC Amplifier Amplificador de JVC JVC Amplificateur ESPAÑOL...
- Page 66 Connecting the external components / Conexión de los componentes externos / Connexion des appareils extérieurs JVC CD changer, SIRIUS Satellite radio, XM Satellite radio, Apple iPod®, or JVC D. player / Cambiador de CD de JVC, radio satelital SIRIUS, radio satelital XM, iPod®...
- Page 67 CD RECEIVER For canceling the display demonstration, see page 6. For installation and connections, refer to the separate manual. INSTRUCTIONS KD-G725 KD-G725 GET0355-001A [U/UH]...
- Page 68 IMPORTANT FOR LASER PRODUCTS CAUTION: CAUTION: How to reset your unit Your preset adjustments will also be erased. How to forcibly eject a disc • If this does not work, reset your unit. • Be careful not to drop the disc when it ejects. Warning: How to use the MODE button Time countdown indicator...
- Page 69 • Button operations are mainly explained with the illustrations in the table below. • Some related tips and notes are explained in “More about this unit” (see pages 18 – 21). Press briefly. Press repeatedly. Press and hold until your desired response begins.
- Page 70 Control panel Display window • DO NOT expose the remote sensor to strong light (direct sunlight or artificial lighting). ∞ 4 ¢ Parts identification Display window Lights up only when CD-CH is selected as the playback source. Lights up for the built-in CD player. •...
- Page 71 Remote controller — Aim the remote controller directly at the remote sensor on the unit. Make sure there is no obstacle in between. RM-RK50 ∞ : Returns to the previous menu. ∞ : Confirms the selection. ∞ ∞ ∞ 2 Continued on the next page...
- Page 72 ∞ Getting started Basic operations Turn on the power. Ÿ * You cannot select these sources if they are not ready or not connected. For FM/AM tuner ⁄ Adjust the volume. Volume level appears. Adjust the sound as you want. (See page 12.) Caution on volume setting: To drop the volume in...
- Page 73 Finish the procedure. To check the current clock time while the power is turned off To check other information while listening to the radio Clock = Station name* =Frequency =(back to the beginning) * FM/AM: If no name is assigned to a station, “NO NAME”...
- Page 74 Preset number flashes for a while. Disc/USB memory operations Ÿ...
- Page 75 Ÿ USB input terminal USB memory...
- Page 76 To go to the next or previous folders (only for MP3/WMA/USB) To locate a particular track (for CD) or folder (for MP3/WMA/USB) directly Other main functions Skipping tracks quickly during play Only possible on JVC MP3-compatible CD changer Prohibiting disc ejection To cancel the prohibition,...
- Page 77 Changing the display information While playing an audio CD or a CD Text While playing an MP3/WMA USB memory • When “TAG DISP” is set to “TAG ON” (see page 14) • When “TAG DISP” is set to “TAG OFF” : Clock with the current track number : Elapsed playing time with the current track number...
- Page 78 Sound adjustments USER ROCK CLASSIC POPS HIP HOP JAZZ Indication pattern changes as you adjust the level. Ex.: When “TRE” is selected BAS* TRE* FAD* BAL* (bass) (treble) (loudness) LOUD* SUB.W*...
- Page 79 General settings — PSM Select a PSM item. Ex.: When “DIMMER” is selected Indications Selectable settings, [reference page] DEMO DEMO ON : [Initial]; DEMO OFF : CLOCK H 1 12 [Initial: 1 (1:00)] 00 59 CLOCK M [Initial: 00 (1:00)] LEVEL DIMMER AUTO...
- Page 80 Indications WOOFER EXT IN* TAG DISP AMP GAIN IF BAND * Some characters or symbols will not be shown correctly (or will be blanked) on the display. * Displayed only when one of the following sources is selected—FM, AM, CD or USB. Selectable settings, [reference page] [Initial];...
- Page 81 Title assignment Select the sources. Enter the title assignment mode. Ex.: When you select “CD“ as the source Assign a title. 1 Select a character. 2 Move to the next (or previous) character position. 3 Repeat steps 1 and 2 until you finish entering the title.
- Page 82 iPod®/D. player operations Interface adapter for iPod® D. player interface adapter Caution: Preparations: Ÿ Adjust the volume. ⁄ Adjust the sound as you want. (See page 12.) To pause stop playback To fast-forward or reverse the track To go to the next or previous tracks * For iPod * For D.
- Page 83 Confirm the selection. To move back to the previous menu, press 5. • If a track is selected, playback starts automatically. • If the selected item has another layer, you will enter the layer. Repeat steps 2 and 3 until the desired track is played. 4 /¢...
- Page 84 Other external component operations Ÿ Turn on the connected component and start playing the source. Adjust the volume. ⁄ Adjust the sound as you want. (See page 12.) To check other information while listening to an external component More about this unit Basic operations Turning on the power Turning off the power...
- Page 85 Playing a disc Playing a CD-R or CD-RW Playing an MP3/WMA disc * The parenthetic figure is the maximum number of characters for file/folder names in case the total number of files and folders is 313 or more. Continued on the next page...
- Page 86 Changing the source Playing MP3/WMA tracks from a USB memory Ejecting a disc General settings—PSM Title assignment iPod® or D. player operations...
- Page 87 Maintenance How to clean the connectors Connector Moisture condensation How to handle discs When removing a disc from its case, Notice: For iPod users: For D. player users: When storing a disc into its case, To keep discs clean To play new discs Do not use the following discs: Warped disc Center holder...
- Page 88 Troubleshooting Symptoms Remedies/Causes...
- Page 89 Continued on the next page...
- Page 91 Specifications AUDIO AMPLIFIER SECTION Ω Ω Ω Ω Ω TUNER SECTION [FM Tuner] [AM Tuner] CD PLAYER/USB MEMORY SECTION Ω Ω Ω GENERAL Ω Ω Design and specifications are subject to change without notice.
- Page 92 Having TROUBLE with operation? Please reset your unit Refer to page of How to reset your unit EN, TH © 2005 Victor Company of Japan, Limited 1205DTSMDTJEIN...
- Page 93 • Be sure to ground this unit to the car’s chassis again after installation. Notes: • Replace the fuse with one of the specified rating. If the fuse blows frequently, consult your JVC car audio dealers. • It is recommended to connect to the speakers with maximum power of more than 50 W (both at the rear and at the front, with an impedance of 4 Ω...
- Page 94 The following illustration shows a typical installation. If you have any questions or require information regarding installation kits, consult your JVC car audio dealers or a company supplying kits. • If you are not sure how to install this unit correctly, have it installed by a qualified technician.
- Page 95 ENGLISH ELECTRICAL CONNECTIONS Typical connections / °“√‡™◊ Ë Õ ¡µË Õ ·∫∫ª°µ Before connecting: Check the wiring in the vehicle carefully. Incorrect connection may cause serious damage to this unit. The leads of the power cord and those of the connector from the car body may be different in color. Connect the colored leads of the power cord in the order specified in the illustration below.
- Page 96 Connecting the external components / CD changer, Apple iPod ® , or JVC D. player / CD • Set “CHANGER” for the external input setting (See page 14 of the INSTRUCTIONS.) / You can connect these components as illustrated below.
- Page 97 CD RECEIVER ALAT PENERIMA CD For canceling the display demonstration, see page 6. Untuk membatalkan tampilan demonstrasi, lihat halaman 6. For installation and connections, refer to the separate manual. Untuk instalasi dan penyambungan, lihat buku pedoman terpisah. INSTRUCTIONS BUKU PETUNJUK KD-G725 KD-G725 GET0355-004A...
- Page 98 IMPORTANT FOR LASER PRODUCTS CAUTION: CAUTION: How to reset your unit Your preset adjustments will also be erased. How to forcibly eject a disc • If this does not work, reset your unit. • Be careful not to drop the disc when it ejects. Warning: How to use the MODE button Time countdown indicator...
- Page 99 • Button operations are mainly explained with the illustrations in the table below. • Some related tips and notes are explained in “More about this unit” (see pages 18 – 21). Press briefly. Press repeatedly. Press and hold until your desired response begins.
- Page 100 Control panel Display window • DO NOT expose the remote sensor to strong light (direct sunlight or artificial lighting). ∞ 4 ¢ Parts identification Display window Lights up only when CD-CH is selected as the playback source. Lights up for the built-in CD player. •...
- Page 101 Remote controller — Aim the remote controller directly at the remote sensor on the unit. Make sure there is no obstacle in between. RM-RK50 ∞ : Returns to the previous menu. ∞ : Confirms the selection. ∞ ∞ ∞ 2 Continued on the next page...
- Page 102 ∞ Getting started Basic operations Turn on the power. Ÿ * You cannot select these sources if they are not ready or not connected. For FM/AM tuner ⁄ Adjust the volume. Volume level appears. Adjust the sound as you want. (See page 12.) Caution on volume setting: To drop the volume in...
- Page 103 Finish the procedure. To check the current clock time while the power is turned off To check other information while listening to the radio Clock = Station name* =Frequency =(back to the beginning) * FM/AM: If no name is assigned to a station, “NO NAME”...
- Page 104 Preset number flashes for a while. Disc/USB memory operations Ÿ...
- Page 105 Ÿ USB input terminal USB memory...
- Page 106 To go to the next or previous folders (only for MP3/WMA/USB) To locate a particular track (for CD) or folder (for MP3/WMA/USB) directly Other main functions Skipping tracks quickly during play Only possible on JVC MP3-compatible CD changer Prohibiting disc ejection To cancel the prohibition,...
- Page 107 Changing the display information While playing an audio CD or a CD Text While playing an MP3/WMA USB memory • When “TAG DISP” is set to “TAG ON” (see page 14) • When “TAG DISP” is set to “TAG OFF” : Clock with the current track number : Elapsed playing time with the current track number...
- Page 108 Sound adjustments USER ROCK CLASSIC POPS HIP HOP JAZZ Indication pattern changes as you adjust the level. Ex.: When “TRE” is selected BAS* TRE* FAD* BAL* (bass) (treble) (loudness) LOUD* SUB.W*...
- Page 109 General settings — PSM Select a PSM item. Ex.: When “DIMMER” is selected Indications Selectable settings, [reference page] DEMO DEMO ON : [Initial]; DEMO OFF : 1 12 CLOCK H [Initial: 1 (1:00)] CLOCK M 00 59 [Initial: 00 (1:00)] LEVEL DIMMER AUTO...
- Page 110 Indications WOOFER EXT IN* TAG DISP AMP GAIN IF BAND * Some characters or symbols will not be shown correctly (or will be blanked) on the display. * Displayed only when one of the following sources is selected—FM, AM, CD or USB. Selectable settings, [reference page] [Initial];...
- Page 111 Title assignment Select the sources. Enter the title assignment mode. Ex.: When you select “CD“ as the source Assign a title. 1 Select a character. 2 Move to the next (or previous) character position. 3 Repeat steps 1 and 2 until you finish entering the title.
- Page 112 iPod®/D. player operations Interface adapter for iPod® D. player interface adapter Caution: Preparations: Ÿ Adjust the volume. ⁄ Adjust the sound as you want. (See page 12.) To pause stop playback To fast-forward or reverse the track To go to the next or previous tracks * For iPod * For D.
- Page 113 Confirm the selection. To move back to the previous menu, press 5. • If a track is selected, playback starts automatically. • If the selected item has another layer, you will enter the layer. Repeat steps 2 and 3 until the desired track is played. 4 /¢...
- Page 114 Other external component operations Ÿ Turn on the connected component and start playing the source. Adjust the volume. ⁄ Adjust the sound as you want. (See page 12.) To check other information while listening to an external component More about this unit Basic operations Turning on the power Turning off the power...
- Page 115 Playing a disc Playing a CD-R or CD-RW Playing an MP3/WMA disc * The parenthetic figure is the maximum number of characters for file/folder names in case the total number of files and folders is 313 or more. Continued on the next page...
- Page 116 Changing the source Playing MP3/WMA tracks from a USB memory Ejecting a disc General settings—PSM Title assignment iPod® or D. player operations...
- Page 117 Maintenance How to clean the connectors Connector Moisture condensation How to handle discs When removing a disc from its case, Notice: For iPod users: For D. player users: When storing a disc into its case, To keep discs clean To play new discs Do not use the following discs: Warped disc Center holder...
- Page 118 Troubleshooting Symptoms Remedies/Causes...
- Page 119 Continued on the next page...
- Page 121 Specifications AUDIO AMPLIFIER SECTION Ω Ω Ω Ω Ω TUNER SECTION [FM Tuner] [AM Tuner] CD PLAYER/USB MEMORY SECTION Ω Ω Ω GENERAL Ω Ω Design and specifications are subject to change without notice.
- Page 122 Having TROUBLE with operation? Please reset your unit Refer to page of How to reset your unit Ada MASALAH dengan cara pengoperasian? Setel kembali unit Anda Lihat halaman mengenai Bagaimana mereset unit anda EN, IN © 2005 Victor Company of Japan, Limited 1205DTSMDTJEIN...
- Page 123 KD-G725 Installation/Connection Manual Manual Pemasangan/Penyambungan GET0355-009A [UN] ENGLISH WARNINGS Ω Ω INDONESIA PERINGATAN 1205DTSMDTJEIN EN, IN © 2005 Victor Company of Japan, Limited Ω sampai Ω × ×...
- Page 124 INSTALLATION (IN-DASH MOUNTING) TROUBLESHOOTING PEMASANGAN (BINGKAI-DALAM DASH) × × PEMECAHAN MASALAH × ×...
- Page 125 ENGLISH Typical connections / Ciri khas sambungan-sambungan Before connecting: INDONESIA Sebelum penyambungan:...
- Page 126 Connecting the external components / Menyambung komponen eksternal ® CD changer, Apple iPod , or JVC D. player / CD changer, Apple iPod Other external component / Komponen eksternal lainnya Penyambungan penguat eksternal dan/atau subwoofer Putuskan sambungan speaker-speaker dari alat penerima ini, sambungkan ini ke penguat.
- Page 127 CD RECEIVER KD-G724 For canceling the display demonstration, see page 6. For installation and connections, refer to the separate manual. INSTRUCTIONS GET0356-001A [UI]...
- Page 128 CAUTION: CAUTION: Your preset adjustments will also be erased. • If this does not work, reset your unit. • Be careful not to drop the disc when it ejects. Time countdown indicator To use these buttons for their original functions again after pressing MODE, 5 ∞...
- Page 129 • Button operations are mainly explained with the illustrations in the table below. • Some related tips and notes are explained in “More about this unit” (see pages 18 – 21). Press briefly. Press repeatedly. Press and hold until your desired response begins.
- Page 130 Control panel • DO NOT expose the remote sensor to strong light (direct sunlight or artificial lighting). ∞ 4 ¢ Lights up only when CD-CH is selected as the playback source. Lights up for the built-in CD player. • also works as the time countdown indicator and level meter during play (see page 13).
- Page 131 Remote controller — Aim the remote controller directly at the remote sensor on the unit. Make sure there is no obstacle in between. RM-RK50 ∞ : Returns to the previous menu. ∞ : Confirms the selection. ∞ ∞ ∞ 2 Continued on the next page...
- Page 132 ∞ Getting started Ÿ ⁄ Volume level appears. Volume level indicator...
- Page 133 Radio operations Ÿ Lights up when receiving an FM stereo broadcast with sufficient signal strength. Selected band appears. Lights up when monaural mode is activated.
- Page 134 Preset number flashes for a while. Disc/USB memory operations Ÿ...
- Page 135 Ÿ USB input terminal USB memory...
- Page 137 TRK RPT FLDR RPT* DISC RPT* RPT OFF FLDR RND* DISC RND MAG RND* RND OFF...
- Page 138 Sound adjustments Preset values Indication (For) USER ROCK CLASSIC POPS HIP HOP JAZZ Adjusting the sound Indication pattern changes as you adjust the level. Ex.: When “TRE” is selected Indication [Range] BAS* TRE* FAD* LOUD (bass) (treble) (loudness) LOUD* SUB.W* * When you adjust the bass, treble, or loudness, the adjustment you have made is stored for the currently selected sound mode (C-EQ)
- Page 139 General settings — PSM Select a PSM item. Ex.: When “DIMMER” is selected DEMO DEMO ON : DEMO OFF : CLOCK H 1 12 CLOCK M 00 59 LEVEL DIMMER AUTO MUTING 1/MUTING 2 : SCROLL* ONCE AUTO Adjust the PSM item selected. Repeat steps 2 and 3 to adjust the other PSM items if necessary.
- Page 140 Indications WOOFER EXT IN* TAG DISP AMP GAIN IF BAND * Some characters or symbols will not be shown correctly (or will be blanked) on the display. * Displayed only when one of the following sources is selected—FM, AM, CD or USB. Selectable settings, [reference page] [Initial];...
- Page 141 Title assignment Select the sources. Enter the title assignment mode. Ex.: When you select “CD“ as the source Assign a title. 1 Select a character. 2 Move to the next (or previous) character position. 3 Repeat steps 1 and 2 until you finish entering the title.
- Page 142 iPod®/D. player operations Interface adapter for iPod D. player interface adapter Preparations: Ÿ Adjust the volume. ⁄ Adjust the sound as you want. (See page 12.) Enter the main menu. Select the desired menu. For iPod: Ô For D. player: Ô...
- Page 143 Confirm the selection. To move back to the previous menu, press 5. • If a track is selected, playback starts automatically. • If the selected item has another layer, you will enter the layer. Repeat steps 2 and 3 until the desired track is played. 4 /¢...
- Page 144 Other external component operations Ÿ Turn on the connected component and start playing the source. Adjust the volume. ⁄ Adjust the sound as you want. (See page 12.) To check other information while listening to an external component More about this unit Basic operations Turning on the power Turning off the power...
- Page 146 Changing the source Playing MP3/WMA tracks from a USB memory Ejecting a disc General settings—PSM Title assignment iPod® or D. player operations...
- Page 147 Maintenance Connector When removing a disc from its case, For iPod users: For D. player users: When storing a disc into its case, Do not use the following discs: Warped disc Center holder Sticker Sticker residue Stick-on label...
- Page 148 Troubleshooting Symptoms Remedies/Causes...
- Page 149 Continued on the next page...
- Page 151 Specifications Ω Ω Ω Ω Ω Ω Ω Ω Ω Ω Design and specifications are subject to change without notice.
- Page 152 Having TROUBLE with operation? Please reset your unit Refer to page of How to reset your unit © 2005 Victor Company of Japan, Limited 1205DTSMDTJEIN...
- Page 153 KD-G724 Installation/Connection Manual GET0356-002A [UI] WARNINGS Ω Ω TROUBLESHOOTING INSTALLATION (IN-DASH MOUNTING) × 1205DTSMDTJEIN © 2005 Victor Company of Japan, Limited × ×...
- Page 154 ELECTRICAL CONNECTIONS JVC Amplifier JVC Amplifier • Set “CHANGER” for the external input setting (See page 14 of the INSTRUCTIONS.) JVC CD changer • Set “EXT IN” for the external input setting (See page 14 of the INSTRUCTIONS.) External component...
- Page 155 CD RECEIVER RECEPTEUR CD KD-G722/KD-G721 For canceling the display demonstration, see page 7. Pour annuler la démonstration des affichages, référez-vous à la page 7. For installation and connections, refer to the separate manual. Pour l’installation et les raccordements, se référer au manuel séparé. INSTRUCTIONS MANUEL D’INSTRUCTIONS GET0357-003A...
- Page 156 IMPORTANT FOR LASER PRODUCTS CAUTION: CAUTION: How to reset your unit • Your preset adjustments will also be erased. How to forcibly eject a disc • If this does not work, reset your unit. • Be careful not to drop the disc when it ejects. How to use the MODE button Time countdown indicator To use these buttons for their original...
- Page 157 CONTENTS Basic operations ... 7 Searching for your favorite FM RDS programme ... 9 Playing a disc in the unit ... 11 Playing discs in the CD changer ... 11 Playing from a USB memory ... 12...
- Page 158 Control panel — • DO NOT expose the remote sensor to strong light (direct sunlight or artificial lighting). ∞ How to detach/attach the control panel Lever KD-G722 and KD-G721 Parts identification 4 ¢ Detaching... CAUTION: Attaching...
- Page 159 Remote controller — Aim the remote controller directly at the remote sensor on the unit. Make sure there is no obstacle in between. • also works as the time countdown indicator and level meter during play (see page 17). lights up for the selected item. RM-RK50 Continued on the next page...
- Page 160 ∞ ∞ ∞ ∞ 2 ∞ Returns to the previous menu. ∞ Confirms the selection.
- Page 161 Getting started Turn on the power. Ÿ * You cannot select these sources if they are not ready or not connected. For FM/AM tuner For DAB tuner ⁄ Adjust the volume. Volume level appears. Volume level indicator Adjust the sound as you want. (See page 15.) 1 Canceling the display demonstrations...
- Page 162 Radio operations Ÿ Lights up when receiving an FM stereo broadcast with sufficient signal strength. Start searching for a station. When a station is received, searching stops. To stop searching, press the same button again. To tune in to a station manually In step ! above...
- Page 163 FM RDS operations Ÿ Ô...
-
Page 165: Playing A Disc In The Unit
To deactivate the PTY Standby Reception, Tracing the same programme— Network-Tracking Reception To change the Network-Tracking Reception setting, Programme A broadcasting on different frequency areas (01 – 05) To check the current clock time while listening to an FM RDS station Station name (PS) = Station Frequency = Programme type (PTY) = Clock = Disc/USB memory... -
Page 166: Playing From A Usb Memory
Playing from a USB memory Ÿ If a USB memory has been attached... To eject the USB memory, Cautions: About MP3 and WMA tracks About the CD changer USB input terminal To fast-forward or reverse the track USB memory To go to the next or previous tracks To go to the next or previous folders (only for MP3/WMA/USB) - Page 168 Changing the display information While playing an audio CD or a CD Text While playing an MP3/WMA USB memory • When “TAG DISP” is set to “TAG ON” (see page 18) • When “TAG DISP” is set to “TAG OFF” : Elapsed playing time with the current track number : Clock with the current track number...
- Page 169 Sound adjustments Preset values (bass) Indication (For) USER ROCK CLASSIC POPS HIP HOP JAZZ Adjusting the sound Indication pattern changes as you adjust the level. Ex.: When “TRE” is selected Indication, [Range] BAS* TRE* FAD* LOUD* LOUD (treble) (loudness) SUB.W* * When you adjust the bass, treble, or loudness, the adjustment you have made is stored for the currently selected sound mode (C-EQ)
- Page 170 General settings — PSM Select a PSM item. Indications DEMO CLOCK H CLOCK M 24H/12H CLK ADJ AF-REG PTY-STBY Adjust the PSM item selected. Repeat steps 2 and 3 to adjust the other PSM items if necessary. Finish the procedure. Selectable settings, [reference page] DEMO ON : [Initial];...
- Page 171 Indications Selectable settings, [reference page] TA VOL P-SEARCH DAB AF* AF ON AF OFF DAB VOL* LEVEL DIMMER AUTO MUTING 1/MUTING 2 : SCROLL* ONCE AUTO WOOFER HIGH EXT IN* CHANGER : EXT IN...
- Page 172 TAG DISP AMP GAIN IF BAND Title assignment Ex.: When “CD“ is selected as the source TAG ON : [Initial]; TAG OFF LOW PWR : HIGH PWR : [Initial]; AUTO : [Initial]; WIDE...
- Page 173 iPod®/D. player operations Interface adapter for iPod D. player interface adapter Caution: Preparations: Ÿ Adjust the volume. ⁄ Adjust the sound as you want. (See page 15.) To pause or stop playback To fast-forward or reverse the track To go to the next or previous tracks * For iPod * For D.
- Page 174 Select the desired menu. For iPod: PLAYLIST Ô ARTISTS Ô ALBUMS Ô SONGS Ô GENRES Ô COMPOSER Ô For D. player: PLAYLIST Ô ARTIST Ô ALBUM Ô GENRE Ô TRACK Ô Confirm the selection. 4 ¢ Selecting the playback modes Select your desired playback mode.
-
Page 175: Dab Tuner Operations
EXT IN Ô Clock DAB tuner operations What is DAB system? It is recommended to use DAB tuner KT-DB1000 with your unit. If you have another DAB tuner, consult your JVC IN-CAR ENTERTAINMENT dealer. Ÿ Start searching for an ensemble. To stop searching, ⁄... - Page 176 Preset number flashes for a while. More about this unit...
- Page 177 Continued on the next page...
- Page 178 * The parenthetic figure is the maximum number of characters for file/folder names in case the total number of files and folders is 313 or more. Playing MP3/WMA tracks from a USB memory Changing the source Ejecting a disc...
- Page 179 General settings—PSM Title assignment iPod® or D. player operations Notice: For iPod users: For D. player users: DAB tuner operations Maintenance How to clean the connectors Connector Moisture condensation How to handle discs When removing a disc from its case, When storing a disc into its case, Continued on the next page Center holder...
- Page 180 Do not use the following discs: Sticker Stick-on label Sticker residue Warped disc Troubleshooting...
- Page 181 Symptoms Remedies/Causes Continued on the next page...
- Page 182 Symptoms Remedies/Causes...
- Page 183 Specifications AUDIO AMPLIFIER SECTION Ω Ω Ω Ω Ω TUNER SECTION [FM Tuner] [MW Tuner] [LW Tuner] CD PLAYER/USB MEMORY SECTION Ω Ω Ω GENERAL Ω Ω Design and specifications are subject to change without notice.
- Page 184 Having TROUBLE with operation? Please reset your unit Refer to page of How to reset your unit Vous avez des PROBLÈMES de fonctionnement? Réinitialisez votre appareil Référez-vous à la page intitulée Comment réinitialiser votre appareil EN, FR 1205DTSMDTJEIN © 2005 Victor Company of Japan, Limited...
- Page 185 KD-G722/KD-G721 Installation/Connection Manual Manuel d’installation/raccordement GET0357-010A [EX/EU] ENGLISH WARNINGS Ω Ω FRANÇAIS AVERTISSEMENTS 1205DTSMDTJEIN EN, FR © 2005 Victor Company of Japan, Limited Ω Ω × ×...
- Page 186 INSTALLATION (IN-DASH MOUNTING) Removing the unit When using the optional stay / Lors de l’utilisation du hauban en option TROUBLESHOOTING • The fuse blows. • Power cannot be turned on. • No sound from the speakers. • Sound is distorted. •...
- Page 187 ENGLISH ELECTRICAL CONNECTIONS If your car is equipped with the ISO connector / Si votre voiture est équippée d’un connecteur ISO • Connections without using the ISO connectors / Connexions sans l’utilisation des connecteurs ISO Before connecting: FRANÇAIS RACCORDEMENTS ELECTRIQUES For some VW/Audi or Opel (Vauxhall) automobile / Pour certaine voiture VW/Audi ou Opel (Vauxhall) •...
- Page 188 JVC Amplifier JVC Amplificateur Connecting the external components / Connexion des appareils extérieurs CD changer, DAB tuner, Apple iPod®, or JVC D. player / Changeur de CD, tuner DAB, iPod‚ Apple® ou lecteur D. JVC JVC DAB tuner Tuner DAB JVC...
- Page 189 CD RECEIVER CD-RECEIVER РЕСИВЕР С ПРОИГРЫВАТЕЛЕМ КОМПАКТ-ДИСКОВ KD-G722/KD-G721 INSTRUCTIONS BEDIENUNGSANLEITUNG ИНСТРУКЦИИ ПО ЭКСПЛУАТАЦИИ GET0357-006A [EY]...
- Page 190 CAUTION: CAUTION: • Your preset adjustments will also be erased. • If this does not work, reset your unit. • Be careful not to drop the disc when it ejects. Time countdown indicator To use these buttons for their original functions again after pressing MODE, 5 ∞...
- Page 191 CONTENTS Basic operations ... 7 Searching for your favorite FM RDS programme ... 9 Playing a disc in the unit ... 11 Playing discs in the CD changer ... 11 Playing from a USB memory ... 12...
- Page 192 Control panel — • DO NOT expose the remote sensor to strong light (direct sunlight or artificial lighting). ∞ Lever KD-G722 and KD-G721 4 ¢ Detaching... CAUTION: Attaching...
- Page 193 Remote controller — Aim the remote controller directly at the remote sensor on the unit. Make sure there is no obstacle in between. • also works as the time countdown indicator and level meter during play (see page 17). lights up for the selected item. RM-RK50 Continued on the next page...
- Page 194 ∞ ∞ ∞ ∞ 2 ∞ Returns to the previous menu. ∞ Confirms the selection.
- Page 195 Getting started Turn on the power. Ÿ * You cannot select these sources if they are not ready or not connected. For FM/AM tuner For DAB tuner ⁄ Adjust the volume. Volume level appears. Volume level indicator Adjust the sound as you want. (See page 15.) 1 Canceling the display demonstrations...
- Page 196 Radio operations Ÿ...
- Page 197 FM RDS operations Ÿ Ô...
- Page 199 Disc/USB memory operations Ÿ...
- Page 200 Ÿ...
- Page 202 TRK RPT FLDR RPT* : DISC RPT* : RPT OFF FLDR RND* : DISC RND MAG RND* : RND OFF...
- Page 203 Sound adjustments Preset values (bass) Indication (For) USER ROCK CLASSIC POPS HIP HOP JAZZ Adjusting the sound Indication pattern changes as you adjust the level. Ex.: When “TRE” is selected Indication, [Range] BAS* TRE* FAD* LOUD* LOUD (treble) (loudness) SUB.W* * When you adjust the bass, treble, or loudness, the adjustment you have made is stored for the currently selected sound mode (C-EQ)
- Page 204 General settings — PSM DEMO CLOCK H CLOCK M 24H/12H CLK ADJ AF-REG PTY-STBY DEMO ON : DEMO OFF : 0 23 1 12 00 59 12H O 24H AUTO AF REG...
- Page 205 TA VOL P-SEARCH DAB AF* AF ON AF OFF DAB VOL* LEVEL DIMMER AUTO MUTING 1/MUTING 2 : SCROLL* ONCE AUTO WOOFER HIGH EXT IN* CHANGER : EXT IN...
- Page 206 TAG DISP AMP GAIN IF BAND Title assignment Ex.: When “CD“ is selected as the source TAG ON : [Initial]; TAG OFF LOW PWR : HIGH PWR : [Initial]; AUTO : [Initial]; WIDE...
- Page 207 iPod®/D. player operations Preparations: Ÿ ⁄ * For iPod * For D. player * The menu selecting mode will be canceled: – If no operations are done for about 5 seconds. – When you confirm the selection of a track. 5 ∞...
- Page 208 For iPod: Ô Ô Ô For D. player: Ô Ô Ô Ô 4 ¢ ONE RPT ALL RPT RPT OFF ALBM RND* Ô Ô Ô SONG RND RND ON Ô RND OFF * For iPod: Only if you select “ALL” in Other external component operations “ALBUMS”...
- Page 209 Ÿ ⁄ DAB tuner operations Ÿ ⁄ Ô Continued on the next page...
- Page 210 Preset number flashes for a while. More about this unit...
- Page 211 Continued on the next page...
- Page 212 * The parenthetic figure is the maximum number of characters for file/folder names in case the total number of files and folders is 313 or more. Playing MP3/WMA tracks from a USB memory Changing the source Ejecting a disc...
- Page 213 For iPod users: For D. player users: Maintenance Connector When removing a disc from its case, When storing a disc into its case, Continued on the next page Center holder...
- Page 214 Do not use the following discs: Sticker Stick-on label Sticker residue Warped disc Troubleshooting...
- Page 215 Continued on the next page...
- Page 217 Specifications Ω Ω Ω Ω Ω Ω Ω Ω Ω Ω Design and specifications are subject to change without notice.
- Page 218 Having TROUBLE with operation? Please reset your unit Refer to page of How to reset your unit Haben Sie PROBLEME mit dem Betrieb? Bitte setzen Sie Ihr Gerät zurück Siehe Seite Zurücksetzen des Geräts Затруднения при эксплуатации? Пожалуйста, перезагрузите Ваше устройство Для...
- Page 219 KD-G722/KD-G721 Installation/Connection Manual Einbau/Anschlußanleitung Руководство по установке/подключению GET0357-013A [EY] WARNINGS WARNUNGEN 1205DTSMDTJEIN EN, GE, RU © 2005 Victor Company of Japan, Limited ПРЕДУПРЕЖДЕНИЯ × × ×...
- Page 220 INSTALLATION (IN-DASH MOUNTING) TROUBLESHOOTING EINBAU (IM ARMATURENBRETT) × × × FEHLERSUCHE УСТАНОВКА (УСТАНОВКА В ПРИБОРНУЮ ПАНЕЛЬ) × × ×...
- Page 221 ELECTRICAL CONNECTIONS ELEKTRISCHE ANSCHLÜSSE...
- Page 222 JVC Amplifier JVC Verstärker JVC Amplifier JVC Verstärker JVC DAB tuner DAB-Tuner von JVC JVC DAB tuner DAB-Tuner von JVC JVC Amplifier JVC Verstärker JVC CD changer CD-Wechsler von JVC JVC CD changer CD-Wechsler von JVC External component Externe Komponente...
- Page 223 CD RECEIVER РЕСИВЕР С ПРОИГРЫВАТЕЛЕМ КОМПАКТ-ДИСКОВ KD-G727 INSTRUCTIONS ИНСТРУКЦИИ ПО ЭКСПЛУАТАЦИИ GET0358-001A [EE]...
- Page 224 IMPORTANT FOR LASER PRODUCTS CAUTION: CAUTION: How to reset your unit • Your preset adjustments will also be erased. How to forcibly eject a disc • If this does not work, reset your unit. • Be careful not to drop the disc when it ejects. How to use the MODE button Time countdown indicator To use these buttons for their original...
- Page 225 CONTENTS Basic operations ... 7 Searching for your favorite FM RDS programme ... 9 Playing a disc in the unit ... 11 Playing discs in the CD changer ... 11 Playing from a USB memory ... 12...
- Page 226 Control panel • DO NOT expose the remote sensor to strong light (direct sunlight or artificial lighting). ∞ How to detach/attach the control panel Lever Parts identification 4 ¢ Detaching... CAUTION: Attaching...
- Page 227 Display window Remote controller — Installing the lithium coin battery (CR2025) Aim the remote controller directly at the remote sensor on the unit. Make sure there is no obstacle in between. • also works as the time countdown indicator and level meter during play (see page 17).
- Page 228 ∞ ∞ ∞ ∞ 2 ∞ Returns to the previous menu. ∞ Confirms the selection.
- Page 229 Getting started Turn on the power. Ÿ * You cannot select these sources if they are not ready or not connected. For FM/AM tuner For DAB tuner ⁄ Adjust the volume. Volume level appears. Volume level indicator Adjust the sound as you want. (See page 15.) 1 Canceling the display demonstrations...
- Page 230 Radio operations Ÿ Lights up when receiving an FM stereo broadcast with sufficient signal strength. Start searching for a station. When a station is received, searching stops. To stop searching, press the same button again. Note: FM1 and FM2: 87.5 MHz – 108.0 MHz FM3: 65.00 MHz –...
- Page 231 FM RDS operations Ÿ Ô...
- Page 232 Start searching for your favorite programme. If there is a station broadcasting a programme of the same PTY code as you have selected, that station is tuned in. PTY codes NEWS, AFFAIRS, INFO, SPORT, EDUCATE, DRAMA, CULTURE, SCIENCE, VARIED, POP M (music), ROCK M (music), EASY M (music), LIGHT M (music), CLASSICS, OTHER M (music), WEATHER, FINANCE, CHILDREN, SOCIAL, RELIGION, PHONE IN, TRAVEL, LEISURE, JAZZ, COUNTRY, NATION M (music),...
- Page 233 To deactivate the PTY Standby Reception, Tracing the same programme— Network-Tracking Reception To change the Network-Tracking Reception setting, Programme A broadcasting on different frequency areas (01 – 05) To check the current clock time while listening to an FM RDS station Station name (PS) = Station Frequency = Programme type (PTY) = Clock = Disc/USB memory...
- Page 234 Ÿ...
- Page 236 Changing the display information While playing an audio CD or a CD Text While playing an MP3/WMA USB memory • When “TAG DISP” is set to “TAG ON” (see page 18) • When “TAG DISP” is set to “TAG OFF” : Elapsed playing time with the current track number : Clock with the current track number...
- Page 237 Sound adjustments Preset values (bass) Indication (For) USER ROCK CLASSIC POPS HIP HOP JAZZ Adjusting the sound Indication pattern changes as you adjust the level. Ex.: When “TRE” is selected Indication, [Range] BAS* TRE* FAD* LOUD* LOUD (treble) (loudness) SUB.W* * When you adjust the bass, treble, or loudness, the adjustment you have made is stored for the currently selected sound mode (C-EQ)
- Page 238 General settings — PSM DEMO CLOCK H CLOCK M 24H/12H CLK ADJ AF-REG PTY-STBY DEMO ON : DEMO OFF : 0 23 1 12 00 59 12H O 24H AUTO AF REG...
- Page 239 Indications Selectable settings, [reference page] TA VOL P-SEARCH DAB AF* AF ON AF OFF DAB VOL* LEVEL DIMMER AUTO MUTING 1/MUTING 2 : SCROLL* ONCE AUTO WOOFER HIGH EXT IN* CHANGER : EXT IN...
- Page 240 Indications TAG DISP AMP GAIN IF BAND Title assignment Select the sources. Enter the title assignment mode. Ex.: When “CD“ is selected as the source Selectable settings, [reference page] TAG ON : [Initial]; TAG OFF LOW PWR : HIGH PWR : [Initial]; AUTO : [Initial];...
- Page 241 Move to the next (or previous) character position. Repeat steps finish entering the title. Finish the procedure. To erase the entire title iPod®/D. player operations Interface adapter for iPod D. player interface adapter Caution: Preparations: until you Ÿ Adjust the volume. ⁄...
- Page 242 Selecting a track from the menu Enter the main menu. 5 ∞ 4 ¢ * The menu selecting mode will be canceled: – If no operations are done for about 5 seconds. – When you confirm the selection of a track.
- Page 243 EXT IN Ô Clock DAB tuner operations What is DAB system? It is recommended to use DAB tuner KT-DB1000 with your unit. If you have another DAB tuner, consult your JVC IN-CAR ENTERTAINMENT dealer. Ÿ Start searching for an ensemble. To stop searching, ⁄...
- Page 244 Storing DAB services in memory You can preset six DAB services (primary) for each band. Select a service you want (see page 21). Select the preset number (1 – 6) you want to store into. Preset number flashes for a while. Tuning in to a preset DAB service Select the preset DAB service (primary) number (1 –...
- Page 245 Continued on the next page...
- Page 246 * The parenthetic figure is the maximum number of characters for file/folder names in case the total number of files and folders is 313 or more. Playing MP3/WMA tracks from a USB memory Changing the source Ejecting a disc...
- Page 247 General settings—PSM Title assignment iPod® or D. player operations Notice: For iPod users: For D. player users: DAB tuner operations Maintenance How to clean the connectors Connector Moisture condensation How to handle discs When removing a disc from its case, When storing a disc into its case, Continued on the next page Center holder...
- Page 248 Do not use the following discs: Sticker Stick-on label Sticker residue Warped disc Troubleshooting...
- Page 249 Symptoms Remedies/Causes Continued on the next page...
- Page 250 Symptoms Remedies/Causes...
- Page 251 Specifications AUDIO AMPLIFIER SECTION Ω Ω Ω Ω Ω TUNER SECTION [FM Tuner] [MW Tuner] [LW Tuner] CD PLAYER/USB MEMORY SECTION Ω Ω Ω GENERAL Ω Ω Design and specifications are subject to change without notice.
- Page 252 Having TROUBLE with operation? Please reset your unit Refer to page of How to reset your unit Затруднения при эксплуатации? Пожалуйста, перезагрузите Ваше устройство Для получения информации о перезагрузке Вашего устройства обратитесь на соответствующую страницу EN, RU 1205DTSMDTJEIN © 2005 Victor Company of Japan, Limited...
- Page 253 KD-G727 Installation/Connection Manual Руководство по установке/подключению GET0358-002A [EE] WARNINGS ПРЕДУПРЕЖДЕНИЯ 1205DTSMDTJEIN EN, RU © 2005 Victor Company of Japan, Limited × ×...
- Page 254 INSTALLATION (IN-DASH MOUNTING) × × × × TROUBLESHOOTING...
- Page 255 ELECTRICAL CONNECTIONS К контрольному переключателю освещения автомобиля...
- Page 256 External component External component...